Page is loading ...


ZeroWire User Manual 11
Front of ZeroWire
Key Colour Description
ALARM
Red System is in alarm. Enter
your PIN code then
ENTER to turn off the
alarm. Press STATUS
key for more info.
STAY
Not lit System is disarmed if
Away is also not lit.
Yellow System is armed in the
“STAY” mode.
STATUS
Green System is ready to be
armed.
Yellow System message
present.
Red
(steady) System trouble message
present.
Touch the STATUS key to hear
system messages. If you are unable
to fix the issue, contact your service
provider for help.
AWAY
Not lit System is disarmed if
Stay is also not lit.
Red System is armed in the
“AWAY” mode.
READY
Not lit System cannot be
armed, press STATUS
key for more info
Green
(steady) Your system is ready to
arm in Away or Stay
mode.
Green
(flashing) Zones are currently
unsealed but system is
force-armable. If these
zones are not sealed by
the end of the exit time
the system will go into
alarm.
BYPASS
Touch the BYPASS key to access
the bypass menu where you can
bypass or un-bypass zones.
CHIME
Touch the CHIME key to access the
chime menu where you can select
zones to make a chime sound on
the ZeroWire when they are tripped.
HISTORY
Press the HISTORY key to listen for
alarm and event history.
Microphone Stay Arm Key Status Key Away Arm Key
Ready Light
Bypass Key
Chime Key
History Key
Siren
Enter Key Numeric
Keys
Menu
Key
Speaker
Alarm Light
SOS
Emergency
Keys

12 ZeroWire User Manual
Basic Features
Arm your system in Away Mode
Protect your property using Away Mode when you are leaving the premises.
Normally zones must be secure before you can arm in Away Mode, this will be indicated
by the Ready Light being lit a solid green.
If the Ready Light is flashing green then “forced arming” is enabled. This means some
zones are not secure but you can still arm your security system. Read more about the
Forced Arming Feature on the next page.
If the Status Key is not green press the Status Key to hear what zones are not secured.
You may arm your system using your user PIN code:
READY STATUS
Check ready key is green.
Check status key is green.
1.
AWAY
Select the Away Mode.
2.
3. Leave the premises.
To silence the Exit Delay beeping, press the Away Key again and the beeping will stop.
This can also be performed from the UltraConnect app.
USER PIN CODE ENTER
EXIT DELAY BEEPS
All partitions
now protected
Druk
Away
Ready Light
is green

ZeroWire User Manual 13
If your service provider has enabled the quick arm feature, you can simply touch the Away
key:
4.
READY STATUS
Check ready key is green.
Check status key is green.
5.
AWAY
Select the Away Mode.
6. Leave the premises.
Forced Arming Feature
Normally all zones must be secure before you can arm your security system.
For example, a home with a door detector on the front door. When forced arming is NOT
enabled, you would have to close the door to secure the sensor before being allowed to
arm the system. When force arming is enabled, you can arm your system with the door
opened, and the door will automatically be protected after it is fully closed as you leave.
If your service provider has enabled the “forced arming” feature, you will be able to arm
your security system even if pre-selected zones are not secure. The Ready Light will flash
green to indicate this feature is available. Press Status key to hear which zones are not
secure.
Check with your installer to confirm how Forced Arming has been set up for your
system:
Option 1: At the end of the exit delay, zones that are not secured will automatically be
bypassed. If they later become secured, the bypass will be automatically removed and
they will become part of the active security system until the system is disarmed.
Option 2: At the end of the exit delay:
• delay sensor types that are not secured will start an entry delay and go into alarm if a
valid PIN code is not entered,
• instant sensor types that are not secured will go into alarm immediately.
Explanation of Stay Modes
Use one of the Stay Modes when you are staying inside the premises and you want the
perimeter protected. You will be able to move around inside the protected area without
setting the alarm off. This gives you peace of mind even when you are at home.
For example, Stay Mode is often used at night. Internal motion sensors will be ignored.
Perimeter detectors will be armed and active to detect intruders. The security of your home
in Stay mode is dependent on the type and number of detectors you have installed and are
active in Stay mode.
There are three similar modes available - Stay Mode, Stay Instant Mode, and Night Mode.
EXIT DELAY BEEPS

14 ZeroWire User Manual
In Stay Mode – Entry/Exit zones will be active, and zones with the Stay or Night Mode
property will be bypassed. Entry via a zone with the Entry/Exit property will start the
partition entry timer as normal.
This will allow you to move around inside your home without causing the system to sound
an alarm. A person entering the house will have the ability and time to disarm the system
as usual.
In Instant Stay Mode – Entry/Exit zones will be active with entry delay time removed, and
zones with the Stay or Night Mode property will be bypassed. Entry via a zone with the
Entry/Exit property will trigger an instant alarm.
This is a higher level of security and requires you to disarm the system (from inside or
remotely) before entering the protected area. No person will be able to enter the house
without triggering an alarm.
In Night Mode – Entry/Exit zones will be active with entry delay time removed, zones with
the Stay property will be bypassed, zones with the Night Mode property will be active.
Entry via a zone with the Entry/Exit property will trigger an instant alarm.
This is a higher level of security and requires you to disarm the system (from inside or
remotely) before entering the protected area. No person will be able to enter the house
without triggering an alarm.
Example
For example, in a two-level home, the upstairs motion sensors are programmed as Stay
and the downstairs motion sensors are programmed as Night Mode. The first press of the
Stay button arms the system in Stay Mode, allowing free access in the downstairs and
upstairs levels and will start the entry delay if someone enters through an Entry/Exit zone
such as the front door.
The second press of the Stay button arms the system in Instant Stay Mode, allowing free
access in the downstairs and upstairs level and will trigger an instant alarm (no entry
delay) if someone enters through an Entry Exit zone such as the front door. This prevents
even authorized users from entering the area unless it is disarmed first (for example, by
someone inside the area).
The third press of the Stay button arms the system in Night Mode, allowing free access in
the upstairs level and will trigger an instant alarm (no entry delay) if someone enters the
protected Night Mode area downstairs. This prevents even authorized users from entering
the area unless it is disarmed first (for example by someone inside the Stay area).
Arm your system in Stay Mode
Use Stay Mode when you are staying in the premises and you want the perimeter
protected whilst allowing you to move around inside without setting the alarm off.
Normally all Stay Mode zones must be secure before you can arm in Stay Mode.
If the Ready Light is flashing green then “forced arming” is enabled. This means some
zones are not secure but you can still arm your security system. Read more about the
Forced Arming Feature on the previous page.

ZeroWire User Manual 15
You may arm your system by entering your user PIN code:
1.
STATUS
Check status key is green. Close all
protected doors and windows. If you
have motion detectors outside your “stay
mode”, have everyone leave those
areas.
2.
STAY
Select the Stay Mode.
3.
4.
Stay within the protected areas.
Or, if your service provider has enabled the quick arm feature, you can simply touch the
Stay key:
5.
STATUS
Check status key is green. Close all
protected doors and windows. If you
have motion detectors outside your
“stay mode”, have everyone leave
those areas.
6.
STAY
Select the Stay Mode.
7.
Stay within the protected Stay or Night
Mode areas.
If an armed zone is alarmed whilst your security system is in the Stay mode, it will sound a
warning tone on your ZeroWire and start a timer. At the end of the Stay Mode Entry Time
your sirens will sound. Your service provider predetermines this warning time at the time of
installation.
Downstairs only
protected
Touch Stay
Ready Light
is green

16 ZeroWire User Manual
To start the Stay Instant Mode touch the Stay key twice:
1.
STATUS
Check status key is green. Close all
protected doors and windows. If you
have motion detectors outside your
“stay mode”, have everyone leave
those areas.
2.
STAY
STAY
Select the Stay Mode twice.
Or press Stay button once when
system is already in Stay Mode. In this
case, you will not be asked second time
for a PIN code.
3.
STAY
(flashing yellow)
Stay button will flash on and off.
Stay within areas protected with Stay
Mode or Night Mode zones.
If an armed zone is alarmed whilst your security system is in the Stay mode there will be
no warning timer and your sirens will sound immediately.
To start the Night Mode touch the Stay key three times:
1.
STATUS
Check status key is green. Close all
protected doors and windows. If you
have motion detectors outside your
“stay mode”, have everyone leave
those areas.
2.
STAY
STAY
STAY
Select the Stay Mode three times.
Or when system is already in Instant
Stay Mode, press Stay once. In this
case you will not be asked second time
for a PIN code.
3.
STAY
(flashing red)
Stay button will flash on and off.
Stay within areas protected with Stay
Mode zones. Do not move into areas
protected with Night Mode zones.
If an armed zone is alarmed whilst your security system is in the Stay mode there will be
no warning timer and your sirens will sound immediately.
To set normal Stay Mode, touch the Stay key one more time:
1.
STAY
Select the Stay Mode when the system
is in Night Mode.
2.
STAY
Stay button will return to a solid yellow.
Stay within the protected areas.

ZeroWire User Manual 17
Note: Subsequent presses of the Stay button loop through the three Stay Mode states:
Stay Mode Stay Instant Mode Night Mode
Sensors which are automatically bypassed for Stay Mode are logged in the event history
(but not reported) as bypassed.
Events Preventing Arming
The following system alarms will prevent a system in EMEA from arming. You must clear
all of these. Contact your service provider for assistance.
Wireless supervision faults
Wireless Low Battery
Tamper
Trouble
Ethernet or WiFi fault
Phone Line Fault
Wireless Jamming
Over-current fault
Power fail
Low Battery
Expander fail
Status Key in EN Grade 2
For EN Grade 2 compliant systems, the Status Key behaviour has been modified for
greater security. It will be off or red, and not announce system status when pressed.
To check system status on EN Grade 2 systems:

18 ZeroWire User Manual
1.
Enter a valid user PIN
2.
STATUS
Select Status Key
3.
Status condition(s) are
announced
Acknowledging Latched System Alarms
When the Status Key is red, there may be latched system alarms present. A master user
(Level 2) is required to acknowledge and clear these. Standard users cannot acknowledge
and clear these.
To acknowledge Latched System Alarms:
1.
STATUS
Select Status Key
2.
Status condition(s) are
announced
3.
Enter a valid master PIN
4.
STATUS
Status Key will change to green if
no other conditions are present
Exit Error / Fail To Close
If during exit delay a zone is tripped which causes an alarm, then the areas affected will
not be armed. Exit Error and Fail To Close are logged in the event history.
Check the zone is secure and try to arm the area(s) again.
Disarming
Make your way to the ZeroWire through one of the designated entry / exit doors.
Once a detector detects your presence, the entry delay will begin counting down and your
ZeroWire will repeat a warning message until a valid PIN code is entered. If a valid PIN
code is not entered by the end of the entry delay time, your sirens and communicator will
activate.
If you require more time to disarm your system, the entry time can be modified in Menu 8
by a master user. Away and Stay modes can be configured with different entry delay
times, ask your service provider for further details.
USER PIN CODE ENTER
STATUS ANNOUNCED
STATUS ANNOUNCED
MASTER PIN ENTER

ZeroWire User Manual 19
Depending on how your system has been set up, entry through a non-designated door
may cause the alarm to sound immediately for greater security.
1. Enter the premises through a
designated entry/exit door
2.
Approach the ZeroWire. When you are
detected, the entry warning timer will begin
and the ZeroWire will beep.
3.
Enter your PIN code before the entry delay
expires.
4.
All zones are now disarmed, any bypassed
zones are restored to normal operation.
Lock Out On 3 Invalid Attempts
If an invalid PIN code is entered three times, the ZeroWire will deny all login attempts for
90 seconds. Attempts are counted from any method (e.g. keypad, app, or web server).
You must wait the full 90 seconds before trying again with the correct PIN. This is to
prevent brute-force attacks on guessing PIN codes.
Bypass a Zone
The zone bypass menu is used to bypass (isolate) selected zones in your security system.
A bypassed zone is ignored by the system and is not capable of activating an alarm. This
option is commonly used to temporarily ignore zones that require service, or zones that
you wish to temporarily add to your “stay mode”.
Whilst still offering security with the remaining zones, bypassing zones lowers your level of
security.
All bypassed zones are reset and cleared from memory when your security system is next
armed / disarmed.
ENTRY DELAY BEEPS
USER PIN CODE ENTER
All partitions
now disarmed
Enter
PIN
One or more partitions
armed

20 ZeroWire User Manual
Your security system must be disarmed (turned off) before being able to bypass zones.
After bypassing your selected zones, your security system must be armed (turned on) in
either the away or stay mode to secure the remaining zones.
The status light will turn to yellow to indicate there are one or more bypassed zones.
Touch the status key to check which zones are bypassed.
5.
BYPASS
Select Bypass Menu
6.
Enter PIN code with authority to bypass
7.
Select a zone to bypass
8.
Toggle between un-bypassed to bypassed
state
9.
Exits from Bypass Menu
Event History
The Event History menu is used to listen to events that occurred in your security system.
These events include arming, disarming, system faults and alarmed zones. Ensure your
clock is set correctly as all events are time stamped.
“Alarm Memory” will announce the last zone(s) that caused your security system to go into
an alarm condition:
1.
HISTORY
Select History Menu.
2.
3.
Listen to the last alarm memory event.
4.
Exits from History Menu.
It is recommended you record user names, zone names, and outputs names in Menu 8 –
Recordings. This will make reviewing any events much clearer as ZeroWire will announce
the recorded name.
You may also review all events recorded by your security system:
USER PIN CODE ENTER
ZONE NUMBER ENTER
0
MENU
YOUR 4 TO 8 DIGIT MASTER CODE
ENTER
1
MENU

ZeroWire User Manual 21
1.
HISTORY
Select History Menu.
2.
3.
Listen to history events.
4.
Touch ENTER for next event.
Touch 0 for previous event.
5.
Exits from History Menu.
Emergency Keys
ZeroWire has three (3) emergency keys: Medical, Police (duress) and Fire.
If these keys are not lit, then the Emergency Keys are not available on your system. Check
with your service provider to clarify what responses will be provided upon activation.
Touch the required key for two seconds to activate that alarm. You should only touch
these keys in an emergency situation that requires a response by a central monitoring
station.
To cancel an emergency activation:
6.
Enter you code after an emergency key has
been activated.
Detector Reset
Check with your installer if this feature is configured.
Detection devices, such as smoke detectors, shock sensors and some glass break
detectors, “latch” their alarm lights to indicate an alarm condition. The alarm will stay on
until it is reset by an authorized user. Use this menu to acknowledge and clear the alarm.
Example: Reset latching detectors that are in alarm:
1.
Select main menu - Option 7, Detector Reset
2.
3.
Exits from Detector Reset Menu
YOUR 4 TO 8 DIGIT MASTER CODE
ENTER
2
MENU
YOUR 4 TO 8 DIGIT MASTER CODE
ENTER
MENU 7
YOUR 4 TO 8 DIGIT MASTER CODE
ENTER
MENU

22 ZeroWire User Manual
Users
In the initial ZeroWire configuration, there are two users of two different user types -
Master and Engineer.
Master
A Master user can change Standard user PIN codes and Master user PIN codes, and can
access all menus except installation programming.
A default Master user name is "User 1", and a default passcode is "1234". Please note that
there is a space between "User" and "1".
In EN Grade 2 terminology, a master user is Level 2.
Engineer
An Engineer user can only access installation programming menus, but no user
programming menus. These users can always arm a system but can only disarm the
partitions they previously armed.
A default Engineer user name is "installer", and a default passcode is "9713".
In EN Grade 2 terminology, a master user is Level 3.
Caution: For security reasons, it is highly recommended to change the passcode for the
Installer and change the login and the passcode for the User 1, at the first opportunity.
Add a User
You need to be a Master user to add new users to the panel.
Example: Add a new user to ZeroWire and assign them a PIN code 2580. We will add this
as user 4.
4. Selects User Configuration menu.
5.
6. Selects configure user PIN.
7. Select user 4.
8.
Sets user 4 PIN code as 2580.
9.
Exits from Advanced system configuration.
Note: If you attempt to create a user with a PIN code that is the same as another user’s
PIN code your ZeroWire will announce "PIN code is occupied, select a new user PIN
code."
MENU 3
YOUR 4 TO 8 DIGIT MASTER CODE
ENTER
1
4 ENTER
2 5 8 0
ENTER
MENU MENU MENU

ZeroWire User Manual 23
Add a Username
The UltraConnect app requires a username and PIN code to function. If you do not have
these details login to ZeroWire Web Server to view or program usernames:
1. On the ZeroWire press Menu – 8 – [PIN] – 6 and note the IP address announced.
2. Open your web browser and enter the IP address. Some browsers may require you to
enter http:// before the IP address. The ZeroWire login screen should appear.
3. Enter your username and password, by default this is User 1 and 1234. Please note
that there is a space between "User" and "1".
4. You should now see a screen similar to the one below.

24 ZeroWire User Manual
5. Click Users.
6. Enter a First Name, this will be the username for the user on the UltraConnect app.
7. Enter a PIN, this will be the PIN for the user on the UltraConnect app.
Remove a User
Example: Remove User 4 from your system.
1. Selects User Configuration menu.
2.
3. Selects configure user PIN.
4. Select user 4.
5.
BYPASS
Disables the user PIN.
6.
Exits from Advanced system configuration.
MENU 3
YOUR 4 TO 8 DIGIT MASTER CODE
ENTER
1
4 ENTER
MENU MENU MENU

ZeroWire User Manual 25
Change a User PIN
Example: Change User 4 PIN code to 5555.
1. Selects User Configuration menu.
2.
3. Selects configure user PIN.
4. Select user 4.
5.
Sets user 4 PIN code as 5555
6.
Exits from Advanced system configuration.
Note: User must have a unique PIN code. If the new PIN code you enter is the same as
another user’s PIN code your ZeroWire will announce "PIN code is occupied, select a new
user PIN code."
Change the User Type
The user type determines what that user can do:
• Master users can arm and disarm partitions. They can create, delete, or modify user
codes. They can also change system settings.
• Standard users can arm and disarm partitions. But they cannot create users or review
event history.
• Arm only users can only turn on the security system, they cannot disarm, or dismiss
any system conditions.
Example: Change user 6 to a master user to allow them to add/remove users.
1. Selects User Configuration menu.
2.
3. Selects configure user type.
4. Select user 6.
5. Sets master user type.
6.
Exits from Advanced system configuration.
Add Keyfobs
Keyfobs require special programming depending on your requirements. Contact your
security provider to purchase additional keyfobs.
MENU 3
YOUR 4 TO 8 DIGIT MASTER CODE
ENTER
1
4 ENTER
5 5 5 5
ENTER
MENU MENU MENU
MENU 3
YOUR 4 TO 8 DIGIT MASTER CODE
ENTER
2
6 ENTER
2
MENU MENU MENU

26 ZeroWire User Manual
More About Users
ZeroWire supports up to 40 users. For simplicity it is recommended you create user
numbers from 1-40. For advanced programming you can create user numbers 1-999.
Each user is assigned a PIN code and a user number. This allows them to interact with the
system.
PIN codes must be four (4) to eight (8) digits in length. Longer length PIN codes provide
greater security as they are harder to guess. Every user must have a unique PIN code.
Keep user PIN information in a safe place, do not disclose your PIN to others.
Users can have a recorded audio name to make it easier to manage users. See Record
User Names on page 29 for instruction to do this.
Users created on the physical ZeroWire unit via the menus will not be assigned a
username. These users will not have remote access to the ZeroWire (e.g. over the internet
or using the smartphone app). If you wish to give remote access to a user then you must
assign a username via ZeroWire Web Server (see User Name and PIN on page 21) or
DLX900 desktop software.
If you have many users to add you may find it is easier to use ZeroWire Web Server or
DLX900 desktop software. These are installer tools, refer to the Installation Manual for
instructions.
Notes:
• IMPORTANT: Change the default PIN codes of the installer and User 1 accounts.
• The system must be disarmed before accessing user configuration from the ZeroWire
unit. You may use the ZeroWire Web Server or UltraConnect app to access user
configuration at any time.
Send User PINs to Z-Wave Door Lock
ZeroWire can send user PIN codes to an existing Z-Wave Door Lock so the PIN codes on
the alarm system can also be used to operate the door lock.
This feature is available to User Types – Engineer, Master, and Custom users with Z-
Wave menu access.
Communication is one way from the ZeroWire to the lock, instructing the lock to add or
remove PIN codes. Each lock is individually controlled.
When “Send PIN(s) to Lock” is selected, ZeroWire queries the lock for the number of
standard users it supports. Some locks support up to 250 PINS, others are limited to 40.
Check your lock documentation.

ZeroWire User Manual 27
Each ZeroWire user number is sent to the same numbered slot in the lock, up to the
maximum slots available in the lock. For example, ZeroWire user number 1 will be sent to
the Z-Wave Door Lock slot 1. Users exceeding the capacity of the lock will not be sent.
Existing PIN codes in the door lock will be overridden. If the lock detects a duplicate PIN
then the send command will fail.
Selecting “Remove PIN(s) from Lock” will clear all PIN codes from the lock, whether or not
they were added by the ZeroWire.
Some door locks have special master/installer PIN codes, these will not be changed.
However, if they are default standard user PIN codes then ZeroWire will have access to
change or remove them. Each lock is different and you should test this feature on your
specific lock to ensure only the appropriate codes are present.
1. Log in to ZeroWire Web Server or UltraConnect app.
2. Click Settings – Lock PIN Share.
3. Select the Z-Wave Door Lock in the drop down list.
4. Wait for the “Building User List- Please Wait” message to be replaced with “Ready”.
5. The default will have “All Users” pre-selected. You may select an individual user
instead.

28 ZeroWire User Manual
6. Optional and recommended, click “Remove PIN(s) from Lock”. This ensures any extra
PIN codes are removed from the lock and only the PIN codes from ZeroWire can
operate the lock. Once completed it will show “Removed All Users”.
7. Click “Send PIN(s) to Lock.
8. PIN codes will be sent to Z-Wave door lock one at a time. Once completed it will show
“Sent All Users”.
9. Test PIN codes on door lock and verify only the codes you want can operate the lock.
10. Refer to door lock manual to remove or change installer / master codes from door lock.
As PIN codes can also be changed on the door lock, over time there may be a mismatch
in PINs on the door lock compared to ZeroWire. To avoid this confusion, only make PIN
code changes via ZeroWire.

ZeroWire User Manual 29
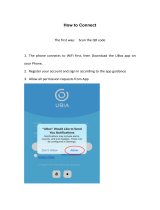
UltraConnect App
Introduction
UltraConnect is a smartphone app that allows you to:
• Check the status of your system
• Arm and Disarm partitions
• Bypass zones
• Manage users
• Operate Z-Wave devices
• Set up system and Z-Wave features (depends on your assigned user type: Standard or
Master)
• Receive push notifications
• Change push notification events
• View live cameras and retrieve recorded clips
Web Access Code
This code should be written on the rear of this manual. It permits remote access from the
UltraConnect app. When it is set to 00000000 the app is prevented from connecting.
Example: Listen to the Web Access Code or change it to a new one.
1. Select Zone Configuration.
2.
3. Select Web Access Code.
4. Web Access Code will be flashed on the key pad.
5.
Enter a new 8 digit Web Access Code, or skip.
6.
Exit from Advanced system configuration.
User Name and PIN
The UltraConnect app requires a valid username and PIN code to function. A default user
should be written on the rear of this manual, or refer to "Add a Username" on page 23. The
menus available are dependent on the permissions for the user entered.
MENU 9
YOUR 4 TO 8 DIGIT MASTER CODE
ENTER
9
WEB ACCESS CODE
8 DIGIT CODE ENTER
MENU MENU MENU
/