Page is loading ...

ENGLISH
2
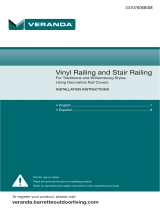
A
B
C
D
F
H
J
K
L
M
N
O
G
E
I
STAIR RAIL
Warning: Always wear safety goggles.
Need a little help installing your railing?
www.rdirail.com/support/installation-videos.html
Transform is designed to exceed the most stringent building codes. For most situations
everything you need is in the box. When installing spans that are greater than 91" under
certain International Building Code conditions, an additional stiffener may be necessary,
please check Transform’s CCR report for the most up to date technical information and
install accordingly.
An evaluation report is available through your Transform Dealer RDI Customer Service or
online at http://www.rdirail.com/support/code-testing-reports.html.
COMPONENT LIST:
Depending on the stair kit and kit length that you’ve purchased, your component list will
vary. Use this as a guide to identify the individual components.
– Safety goggles
– Tape measure
– Pencil
– Level
– Power screwdriver/drill
– Power saw
– Straight edge/ruler/triangle
– Masking tape
– Clamp(s)
– Rubber mallet
TOOLS NEEDED:

ENGLISH
3
NEEDED FOR INSTALLATION 6' STAIR RAIL KIT 8' RAIL SECTION
A.) Top Rail 11
B.) Bottom Rail 11
C.) Bottom Beam 11
D.) Top Beam 11
E.) Balusters needed - quantities are for both square & round* balusters 15 20
F.) Set Screw (#6 x ¾") 44
G.) Screw (#10 x 2.5") 12 12
H.) Screw (#12 x 5") 12
I.) Screw (#10 x 2" - not painted - for stair/level angle application)
66
J.) Screw (#10 x 2" - painted to match rail color)
44
K.) Baluster Plug - varies by baluster type; comes pre-inserted into baluster 30 40
L.) Mounting Bracket 44
M.) Bottom Rail Support 12
N.) Resalite
®
Stiffener (shape varies by top rail pro le)
O.) PVC Glue (included with 6' stair kits and stair baluster boxes) 1 -
*If using round aluminum balusters, ensure that there are enough baluster shoes (sold separately) for the top and bottom of each baluster.
(Fig. 2)
(Fig. 3)(Fig. 1)
1.
Prepare all posts and mounting surfaces
before installation. If using a trim ring, be sure
to install trim ring prior to fastening bottom rail.
NOTE: Check with your local building code
of ce for design load requirements for guard
rails and bottom space requirements. All
supporting structures should be built in
accordance with applicable building codes.
2.
Temporarily secure a plank on the nose of
the stairs along side of the posts onto which
you are installing the stair rail (Fig. 1). The
thickness of the plank will determine the
space between the stairs and the bottom
rail (Fig. 2).
NOTE: Depending on the angle of your
stair, code may require you to mount the
bottom beam to the tread noses (no plank).
Check with your local building of ce for
applicable regulations.
3.
Center the bottom beam (C) on plank
between posts with the at surface of the
bottom beam facing down. Trace the angle
of the posts at the inside edge of the posts
onto the bottom beam (Fig. 3).
C - bottom beam

ENGLISH
4
6.
Install a set screw on inside of rail, ensuring
set screws connect the beam with the
bracket, in the location shown in Figure 10.
This should be as close as possible to the
inside face of the bracket so that the screw
still embeds.
5.
Place the bottom rail (B) with routed slots
facing up, on the plank. Slide the bottom
rail on the plank between the posts until the
distance from the edge of the post to the
baluster rout is the same at both ends (Fig. 7).
Trace the angle of the post onto the bottom
rail at both ends (Fig. 8), and cut the rail at
these marks (Fig. 9).
Tip: Use a miter saw with a carbide tip blade
of at least 60 teeth.
(Fig. 8)
(Fig. 9)
4.
Wrap enough masking tape around the
bracket (Fig. 4) to make it slide snugly into
the end of the beam. Slide the bracket into
the end of the bottom beam. Align brackets
with angle marked on beam (Fig. 5) so that
when the cut is made, the entire face of the
bracket is cut but as little material is removed
as possible. With brackets secured into
bottom beam, cut through the beam and
bracket together on the marked line (Fig. 6)
to establish your installation angle.
(Fig. 5)
(Fig. 7)
(Fig. 4)
(Fig. 6)
STAIR RAIL CONTINUED
(Fig. 10)
Fasten set screw here
Top of stair
Bottom of stair

ENGLISH
5
(Fig. 12)
(Fig. 11)
Set the bottom beam in position between
the two posts, and ensure alignment (Fig 11).
Pre-drill the post for the center bracket screw
using a
1
/
8
" drill bit. Secure the brackets to
the post using 3 mounting screws (G) in each
bracket, beginning with the center screw hole
(Fig. 12). If using with an RDI structural post
and screws come in contact with steel, use
2" unpainted screws (I) where necessary. This
may occur in the screw locations shown in
Figure 10 depending on the angle of the stair.
7.
Place the bottom rail support (M) on the nose
of the tread that is nearest to the center of
the stair rail section. Trace the bottom of the
beam onto the support and cut the support
to match the angle. Place the cut support in
position under the center of the bottom beam.
Drill through the beam perpendicular to
the tread surface using a ¼" drill bit. It is
necessary to drill the beam so the screw
will be positioned at the front edge of the
bottom rail support to prevent the beam from
bowing during installation (Fig. 13). Secure
the bottom rail support using the supplied
screw (H).
(Fig. 14)
(Fig. 13)
If installing a section longer than 6', evenly
space the two rail supports along the span of
the bottom rail.
Snap the bottom rail in place on top of the
bottom beam (Fig. 14).

ENGLISH
6
(Fig. 18)
(Fig. 17)
(Fig. 16)
9.
Insert a baluster onto the rst and last
baluster plug of the bottom rail (B) (Fig. 17).
Set the top beam (D) onto the two balusters
you installed (Fig. 18), allowing the top beam
to extend past the top and bottom post for
aligning your installation angle.
Bottom rail
Top beam
Rounded side
Rounded side
(Fig. 15)
B
A
8.
NOTE: In 6' stair kits and stair baluster packs,
balusters come pre-cut at an angle of 32°. If
stairs are at a different angle, cut balusters at
required angle.
Insert baluster plugs into the bottom rail with
the rounded side of the baluster plug facing
the bottom of the stairs (Fig. 15).
Insert baluster plugs into the top beam with
the rounded side of the baluster plug facing
the top of the stairs (Fig. 15).
STAIR RAIL CONTINUED
Insert the plugs all the way into the slots so
they seat completely (Fig. 16, A), then push
the plugs to the angle required (Fig. 16, B).
Tip: You can use a rubber mallet to help tap
the baluster plugs into the bottom rail.

ENGLISH
7
(Fig. 22) (Fig. 24)
11.
Wrap enough masking tape around the
brackets to make them slide snugly into the
ends of the beam. Slide the brackets into
the ends of the top beam. Align brackets
with angle marked on beam (Fig. 21) so that
when the cut is made, the entire face of the
bracket is cut but as little material is removed
as possible. With brackets secured into top
beam, cut through the beam and bracket
together on the marked line (Fig. 22) to
establish your installation angle.
12.
Install set screws on inside of rail only,
ensuring set screws connect the beam with
the bracket. Fasten in the location shown
in Figure 22; this should be as close as
possible to the inside face of the bracket so
that the screw still embeds, as you did for
the bottom beam.
Once in place, insert the remaining balusters
onto the bottom rail plugs (B) (Fig. 24). Glue
the three balusters in the middle of the rail
section onto the baluster plugs using the
supplied PVC glue. Place the glue inside the
baluster, then place the baluster over the
plug to glue it in place.
(Fig. 21)
(Fig. 23)
Fasten set screw here
(Fig. 19)
(Fig. 20)
10.
Now, adjust top beam until the balusters are
plumb (Fig. 19). Mark both ends of the top
beam (D) on the inside face of the post where
it will be mounted (Fig. 20). Now remove the
top beam.
Top of stair Bottom of stair

ENGLISH
8
(Fig. 28)
(Fig. 30)
(Fig. 29)
14.
Pre-drill downward using a
1
/
8
" drill bit. Be
sure to drill through the beam and bracket
(Fig. 27).
If needed, an additional rail stiffener (N) can
be purchased separately, and installed in
place in top rail (A) as shown below.
Cut the top rail (A) to length at the stair angle
(Fig. 28).
15.
Snap the top rail (A) onto the top beam (D)
by applying downward pressure. Work from
the bottom of the stair to the top end of the
rail until the full length of the cover locks into
place (Fig. 29 & Fig. 30).
(Fig. 25)
(Fig. 26)
13.
Set the top beam (D) in place by inserting the
rst baluster plug (at the bottom post) in the
corresponding baluster, setting it in place, and
working towards the top (Fig. 25).
Position the beam between posts to ensure
proper alignment. Pre-drill the post for the
center bracket screw using a
1
/
8
" drill bit.
Secure the brackets to the post using
3 mounting screws (G) in each bracket,
beginning with the center screw hole (Fig. 26).
(Fig. 27)
STAIR RAIL CONTINUED
If using stiffener,
insert into top of
top rail as shown.
Stiffener shape will
vary based on top
rail pro le.

ENGLISH
9
Formula 409
®
is a registered trademark of The Clorox Company
Glass Plus
®
is a registered trademark used under authority of Reckitt Benckiser, LLC.
Comet
®
, Mr. Clean
®
, and Spic and Span
®
are registered trademarks of the Procter and
Gamble Company
Soft Scrub
®
is a registered trademark of Henkel Consumer Goods, Inc.
In general, the following chemicals may be
safely used with Transform acrylic capped
railing system at ambient temperature
conditions:
• Formula 409
®
Cleaner
• Glass Plus
®
Cleaner
• Liquid Comet
®
Cleaner
• Mineral Oil
• Mr. Clean
®
Cleaner
• Soap and water
• Soft Scrub
®
Cleaner
• Spic and Span
®
Cleaner
16.
Using the painted screws (J) install two of
the screws upward from underneath each
end through the pre-drilled location. This
will secure the bracket, beam, and top rail
together (Fig. 31).
(Fig. 31)
Acrylic capstock resins have good resistance to a variety of common cleaners and
application environments. It is recommended that you test any cleaner in an inconspicuous
area prior to cleaning Transform railing systems. Use proper safety precautions & follow the
manufacturers instructions when working with any chemical agents. Properly dispose of
chemicals according to your local municipality’s regulations for chemical disposal.
Mr. Clean
®
Magic Erasers
®
(original style) are the recommended method of cleaning all
colors of Transform railing products.
Care &
Maintenance

ENGLISH
10
Railing Dynamics, Inc. (“RDI”) warrants to the original consumer/purchaser (the “Purchaser”) of RDI’s rigid vinyl and Resalite™ railing and accessory
products (the “Product”) that they will remain free from material defects in workmanship and materials and will not peel, rot, rust or suffer structural
damage from weather in uences, fungal decay or wood-boring insects, subject to the following limitations, exclusions and conditions for the time periods
de ned below:
1. Warranty periods below are from the date of the original purchase of the Product:
a. Lifetime for individual homeowners for their residence (where product was originally installed)
b. 20 years – for commercial or governmental use
c. All colors other than white – 20 years for individual home owners for their residences and commercial and governmental use
2. This Warranty covers the Product only if it is purchased and used exclusively in North America.
3. This Warranty may be transferred one time, within ve years from the date of original purchase of the Product, to a subsequent buyer of the property
upon which the Product was originally installed. As a condition to the effectiveness of any such transfer, the transferee must send written notice to RDI (at
the address above) of the transfer, together with suf cient information for RDI to determine that the transfer is valid in accordance with the terms of this
Warranty, within 30 days of the purported transfer. No other transfer or assignment of this Warranty will be valid, and any purported transfer or assignment
of rights under this Warranty will void this Warranty.
4. To make a claim under this Warranty, the Purchaser must send to RDI, at its address provided, written during the warranty period, a reasonably
detailed written notice of any defect, damage or other failure of the Product within a reasonable time after discovery of the basis for the claim. RDI may
require proof of purchase, the product serial number, a clear photograph of the defective part(s) and actual part(s) themselves. If RDI determines that
the Purchaser has a valid claim under this Warranty, RDI, at its option, will either: (i) ship to the Purchaser (at his/her address stated in the Warranty
Registration Form) a replacement for the part(s) subject to the warranty claim, free of charge to the Purchaser (but the replacement part may vary in color
or nish as a result of weathering or normal discoloration of the original Product or changes in RDI’s offerings of colors/ nishes); (ii) will repair or restore the
part(s) subject to the warranty claim, free of charge to the Purchaser, provided the Purchaser provides all reasonable cooperation; or (iii) send payment to
the Purchaser of the portion of the purchase price paid by the Purchaser to RDI for the part(s) subject to the warranty claim. This paragraph provides the
Purchaser’s exclusive remedy under this Warranty. Under no circumstances will RDI be liable for any installation, removal or reinstallation of the Product
or any part, or for any labor, loss of time, maintenance or inconvenience.
5. This Warranty does not cover normal weathering effects or normal discoloration of surfaces due to exposure to ultraviolet light (e.g., sunlight) or
extremes of temperature or pressure. This Warranty does not cover defects, damage or other failure resulting from or relating to the impact of any foreign
object, hail, high winds, ood, earthquake, lightning or other weather disturbance, re, act of God, pollutant, chemical, waste, hazardous material or
other cause beyond RDI’s control.
6. THIS WARRANTY DOES NOT APPLY TO, AND UNDER NO CIRCUMSTANCES WILL RDI BE LIABLE FOR, ANY DEFECT, DAMAGE OR FAILURE
RESULTING FROM OR RELATING TO ANY MISUSE, ABUSE, NEGLECT, FAULTY OR IMPROPER INSTALLATION OR FAILURE TO ADHERE TO
ANY INSTRUCTION OR RECOMMENDATION IN RDI’S INSTALLATION INSTRUCTIONS INCLUDED WITH THE PRODUCT (THE “INSTALLATION
INSTRUCTIONS”). THIS WARRANTY WILL BE VOID AS TO ANY SURFACE OF THE PRODUCT COVERED WITH GREASE, OIL, ACID OR ANY
OTHER FOREIGN MATTER, EXCEPT AS RECOMMENDED IN THE INSTALLATION INSTRUCTIONS. THIS WARRANTY WILL BE VOID IF ANY PART
OF THE PRODUCT IS ALTERED OR IF ANY STRUCTURAL PART OR COMPONENT NOT SUPPLIED BY RDI IS USED IN CONJUNCTION WITH THE
PRODUCT, OTHER THAN APPROPRIATE USE OF DECK JOISTS OR OTHER SUPPORT STRUCTURES IN ACCORDANCE WITH THE INSTALLATION
INSTRUCTIONS. THIS WARRANTY WILL NOT COVER ANY CONSEQUENCE OF ANY DEFECT IN, DAMAGE TO OR OTHER FAILURE OF ANY DECK
JOISTS OR OTHER SUPPORT STRUCTURES (OR ANY COMPONENT THEREOF). THIS WARRANTY WILL BE VOID IF THE PRODUCT IS USED IN
VIOLATION OF ANY APPLICABLE BUILDING CODE, ZONING ORDINANCE, FIRE MARSHAL’S ORDER OR ANY OTHER LAW, REGULATION, ORDER,
STANDARD, GUIDELINE OR RECOMMENDATION OF A GOVERNMENTAL OR JUDICIAL BODY.
7. RDI DOES NOT WARRANT SLIP RESISTANCE OF THE PRODUCT. RDI WILL HAVE NO LIABILITY FOR ANY SLIP OR FALL ON OR FROM THE
PRODUCT. UNDER NO CIRCUMSTANCES WILL RDI BE LIABLE FOR ANY PROPERTY DAMAGE, BODILY INJURY OR DEATH.
8. UNDER NO CIRCUMSTANCES WILL RDI BE LIABLE FOR ANY CONSEQUENTIAL, INCIDENTAL, SPECIAL, EXEMPLARY OR PUNITIVE DAMAGES,
AND IN NO EVENT WILL RDI’S LIABILITY RELATING TO ANY PRODUCT OR PART EXCEED THE PURCHASE PRICE PAID BY THE PURCHASER TO
RDI FOR SUCH PRODUCT OR PART. Some states do not allow the exclusion or limitation of consequential or incidental damages, so the preceding
sentence may not apply to the Purchaser in such states.
9. Except as expressly set forth in this Warranty, all purchasers of the Product will be purchasing the Product “AS IS AND WITH ALL FAULTS” and
without any representation, warranty, promise, guaranty or other assurance of any kind, express, implied or statutory. Except as expressly set forth in
this Warranty, RDI HEREBY EXPRESSLY DISCLAIMS ANY REPRESENTATION, WARRANTY, PROMISE, GUARANTY OR OTHER ASSURANCE OF ANY
KIND, EXPRESS OR IMPLIED, ORAL OR WRITTEN, STATUTORY OR OTHERWISE, RELATING TO THE PRODUCT, INCLUDING BUT NOT LIMITED TO
AS TO MERCHANTABILITY, FITNESS FOR ANY PURPOSE (OTHER THAN USES EXPRESSLY DIRECTED OR RECOMMENDED IN THE INSTALLATION
INSTRUCTIONS), QUALITY, RELIABILITY, WORKMANSHIP, MATERIALS, ABSENCE OF DEFECTS (LATENT OR PATENT), ABSENCE OF DANGEROUS
CONDITIONS, CORRESPONDENCE TO ANY DESCRIPTION OR THE LIKE. NO DISTRIBUTOR, DEALER OR OTHER PERSON IS AUTHORIZED BY RDI
TO CHANGE THIS WARRANTY OR TO MAKE ANY ADDITIONAL REPRESENTATION, WARRANTY, PROMISE, GUARANTY OR OTHER ASSURANCE
ON BEHALF OF RDI RELATING TO THE PRODUCT.
To begin your warranty coverage, ll out the form to the right and mail to:
WARRANTY
Railing Dynamics, Inc.
135 Steelmanville Road
Egg Harbor Township, NJ 08234
OR
Register online at: www.rdirail.com/warranty

ENGLISH
11
FILL OUT & MAIL THIS FORM TO REGISTER PRODUCT WARRANTY
Complete only one registration per installation or product. For multiple product purchases, complete one warranty card and list the serial numbers for
remaining products. PLEASE COMPLETE YOUR REGISTRATION WITHIN THIRTY (30) DAYS OF PURCHASE.
Name of Customer:
Address:
City: State: Zip:
E-mail:
Name of Supplier: City:
Date of Purchase: / / Date of Installation: / /
Customer Signature Date
HOMEOWNER’S REGISTRATION
REGISTER ONLINE AT: WWW.RDIRAIL.COM/WARRANTY OR
PLEASE PRINT
Product Line
Titan Pro Endurance Transform RDI Metal Works Excalibur RDI Metal Works Avalon Vinyl Hand Rail Aluminum Hand Rail
Product Color
White or Satin White Earth Sahara Black or Satin Black Bronze Ironstone Wheat Caramel
Did you install this product yourself?
Yes No If no, who was your installer?________________________________________________________________________________
Where is this product installed?
Home Business Front porch Back porch/deck
What type of post was used for this installation?
Vinyl sleeve over wood Vinyl sleeve over structural post Metal post Wooden post
What kind of deck is your railing installed on?
Wood Composite Concrete If wood or composite, what color? ______________________________________________________
How did you hear about RDI?
Store Salesperson Display Trade Show Magazine Web Referral Other _______________
What sources of information did you use to choose our product?
Brochure Sales Person Web Site
Display Other _______________
Please rate the quality of your experience with the:
Instructions Clear and easy to follow Understandable Difficult and Confusing
Installation Simple Somewhat easy, but glad I had instructions Felt like I was trying to build a space shuttle
Please list any other suggestions or ideas for RDI’s products and services:
_________________________________________________________________________________________________________________________
_________________________________________________________________________________________________________________________
Please list all product serial numbers:
Page is loading ...
Page is loading ...
Page is loading ...
Page is loading ...
Page is loading ...
Page is loading ...
Page is loading ...
Page is loading ...
Page is loading ...
Page is loading ...
Page is loading ...
Page is loading ...
Page is loading ...
Page is loading ...
Page is loading ...
Page is loading ...
Page is loading ...
Page is loading ...
Page is loading ...
Page is loading ...

32
RAILING DYNAMICS, INC.
FOR HOME, FOR LIFE
®
135 STEELMANVILLE ROAD
EGG HARBOR TOWNSHIP, NJ 08234
TEL: (877) 420-7245
FAX: (866) 277-5160
E-MAIL: [email protected]
URL: WWW.RDIRAIL.COM
34107251
REV. 1.15
Need a little help installing your railing?
Avez-vous besoin d’un peu d’aide pour installer votre rampe?
¿Necesita un poco de ayuda para instalar el barandal?
www.rdirail.com/support/installation-videos.html
®
/