Page is loading ...

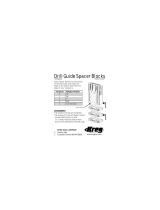
Parts
Safety
• Follow your drill manufacturer’s instructions and safety guidelines.
• The bit cutting edges are sharp. Wear gloves when handling.
• Keep hands away from the rotating bit.
• Always wear eye protection.
• The drill bit gets hot when drilling plugs. Allow the bit to cool
before handling.
• To reduce heat buildup, use the Kreg Jig
®
dust collection
attachment connected to a shop vacuum.
• Use the Plug Cutter guide block only in a Kreg Jig
®
K3, K4, or K5
base secured to your work surface. Do not attempt to hold the jig in
place by hand or clamp it to a workpiece with an ordinary clamp.
Items Included:
(A) Plug Cutter guide block
(B) Plug Cutting Bit (for standard pocket holes)
(C) Stop collar
(D) Hex wrench
WARNING:
!
This product can expose you to chemicals including
Carbon 1333-86-4, which are known to the State of California to cause cancer.
For more information go to www.P65Warnings.ca.gov.
A
B
C
D

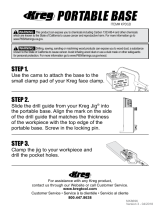
Setup
1 Remove the Drill Guide Block from the drill-guide socket of your
Kreg
®
K3, K4, or K5 pocket-hole jig.
2 Slide the Plug Cutter guide block into the drill-guide socket, seating
it all the way at the bottom. Secure the guide with the locking pin.
3 Slide the stop collar onto the Plug Cutting Bit until it rests on the
bit shoulder. Tighten the stop-collar set screw with the hex wrench.
Chuck the bit into your electric drill.
ATTENTION Electric drills commonly run at speeds from
1300 rpm to 2500 rpm. To obtain good quality plugs from a
lower rpm drill, slow the feed rate. Higher rpm drills produce
good quality plugs at a faster feed rate, but produce more heat.
When using a high rpm drill, pace your production rate to allow
time for the bit to cool.
!
Shoulder
Stop Collar

Drill the plugs
1 Cut plug blanks 3¼" [83mm] long (measured with the grain for
long-grain plugs) or 3¼" [83mm] wide (measured across the grain
for cross-grain plugs). For best results, make the blanks from
leftover scraps of the wood used for your project, or from
wood with a similar color and grain pattern (see Tips).
ATTENTION Due to the grain orientation, cross-grain plugs
are much more likely to chip out than long-grain plugs. It is
possible to make good cross-grain plugs, but the reject rate will
be greater than for long-grain plugs.
2 Clamp a plug blank into the jig with the grain oriented in the desired
direction.Theblankmustsitatagainsttheguideblock,soremove
any debris from a previous drilling operation. When using a Kreg
Jig
®
K5 base, adjust the clamping pressure to three clicks of the
clamping mechanism. When using a K3 or K4 base, advance
the toggle clamp to the full-clamped position. Place your workpiece
against the drill guide, loosen the jam nut on the clamp-pad shaft,
andnger-tightentheclamppadagainsttheworkpiece.Unclamp
the toggle and advance the clamp pad 1½ to 2 turns.
3
1
⁄4" (83mm)
!

Drill the plugs
3 Set your drill to the highest speed. Slide the bit into the cutter guide
until it contacts the plug blank, then withdraw it about ¼" [6mm].
Start the drill and let it come to full speed. Using light pressure and a
slow feed rate, start cutting the plug.
ATTENTION Youwillfeellittleresistanceatrstasthebitcuts
the thin tip section of the plug. At this stage, let the weight of
the drill control the feed rate. As you drill deeper and resistance
increases, apply very slight additional pressure.
!
WARNING The drill bit gets hot when drilling plugs. Allow the
bit to cool before handling.
4 As the bit engages more of the plug blank, increase drilling pressure
and continue drilling until the stop collar contacts the guide block.
5 To make additional plugs, reposition the plug blank and repeat
Steps 2-4.
Small Guide
Large Guide
Use the small guide for the Plug Cutting Bit and optional Plug Cutting
Bit-Micro. Use the large guide for the optional Plug Cutting Bit-HD.
!

Plug the pocket holes
1 Apply glue in the pocket hole and/or to the plug.
2 Insert the plug, letting it protrude 1/16" [2mm] above the workpiece
surface.
3 Allow the glue to dry.
4Sandtheplugush.
Cut the plugs from the blank
1 Mark a cut line
3
⁄16" [5mm] from the bottom edge of the plug blank.
Note: Plugs cut using this dimension will protrude slightly from the
pockethole,providinganextramarginforachievingthebestt.To
makeshorterplugs,cutslightlyfartherfromtheendoftheblank.
2 Apply a strip of masking tape across the plugs to keep them in
position while cutting.
3 Cut along the line at a 15° angle with a band saw, jig saw,
scrollsaw,multi-purposeoscillatingtool,orne-toothhandsaw.
You also can cut the plugs square to the end of the plug blank and
then sand the end to a 15° angle.
15°
cut angle
cut line
3/16" (5mm)
ATTENTION When plugging pocket holes drilled in ½" to
¾" [13mm to 19mm]-thick material, cut the plugs at the 15°
angle indicated. When plugging pocket holes drilled in material
thicker than ¾" [19mm], you can cut the plugs at 90°.
!

Optional accessories
Tips
• For the best color and grain match, use scrap from your project
for plug blanks. If possible, cut blanks from the same board used
to create the project part being plugged
• To align an area on the plug blank that is a good match for the
area surrounding the pocket hole, make a pencil mark on the top
end of the plug blank. Then align the mark with the bit guide.
• To reduce heat buildup in the bit and bit guide, improve cut
quality, and extend bit life, use the Kreg Jig
®
dust collection
port connected to a shop vacuum.
Plug Cutting Bit-Micro Plug Cutting Bit-HD
• To reduce chip-out in your plugs, pay attention to grain geometry.
*Plugs cut from blanks with growth rings more parallel to the blank
faces(viewedfromtheendoftheblank)tendtohavelesschip-out.
**Plugs cut from blanks with growth rings intersecting the blank faces
closer to perpendicular (viewed from the end of the blank) tend to
have morechip-out.
• To improve plug quality, slow your feed rate, especially at the
beginning of the drilling stroke when there is little resistance.
For more tips, visit us online at kregtool.com
Less chipping*
More chipping**

For assistance with any Kreg
®
product, contact us through
our Web site or call Customer Service.
Si vous avez besoin d’aide concernant les articles Kreg
®
,
communiquez avec nous
surnotresiteWebouappeleznotreserviceàlaclientèle.
Si requiere asistencia con cualquier producto Kreg
®
,
póngase en contacto con nosotros
a través del sitio web o llame al Servicio al Cliente.
www.kregtool.com • 800.447.8638
/