Canon HF100 User manual

Category
Camcorders
Type
User manual

This manual is also suitable for

PUB. DIE-300
Instruction Manual
2
Introduction
Important Usage Instructions
WARNING!
TO REDUCE THE RISK OF ELECTRIC SHOCK, DO NOT REMOVE COVER (OR
BACK). NO USER SERVICEABLE PARTS INSIDE. REFER SERVICING TO
QUALIFIED SERVICE PERSONNEL.
WARNING!
TO REDUCE THE RISK OF FIRE OR ELECTRIC SHOCK, DO NOT EXPOSE THIS
PRODUCT TO RAIN OR MOISTURE.
CAUTION:
TO REDUCE THE RISK OF ELECTRIC SHOCK AND TO REDUCE ANNOYING
INTERFERENCE, USE THE RECOMMENDED ACCESSORIES ONLY.
CAUTION:
DISCONNECT THE MAINS PLUG FROM THE SUPPLY SOCKET WHEN NOT IN USE.
The Mains plug is used as the disconnect device. The Mains plug shall remain readily operable to disconnect the
plug in case of an accident.
While using the compact power adapter, do not wrap it or cover it with a piece of cloth, and do not place it in
confined narrow spaces. Heat may build up, the plastic case may deform and it could result in electric shock or fire.
CA-570 identification plate is located on the bottom.
Using any device other than the Compact Power Adapter CA-570 may damage the camcorder.
D128_PAL_E.book Page 2 Thursday, January 24, 2008 3:09 PM
3
European Union (and EEA) only.
This symbol indicates that this product is not to be disposed of with your household waste, according to
the WEEE Directive (2002/96/EC) and your national law. This product should be handed over to a
designated collection point, e.g., on an authorized one-for-one basis when you buy a new similar
product or to an authorized collection site for recycling waste electrical and electronic equipment (EEE).
Improper handling of this type of waste could have a possible negative impact on the environment and
human health due to potentially hazardous substances that are generally associated with EEE. At the same time,
your cooperation in the correct disposal of this product will contribute to the effective usage of natural resources.
For more information about where you can drop off your waste equipment for recycling, please contact your local
city office, waste authority, approved WEEE scheme or your household waste disposal service. For more
information regarding return and recycling of WEEE products, please visit www.canon-europe.com/environment
.
(EEA: Norway, Iceland and Liechtenstein)
D128_PAL_E.book Page 3 Tuesday, January 22, 2008 11:39 AM
4
Enjoying High-Definition Video with Your
Camcorder
Preserve your most treasured memories, be it unforgettable scenery or cherished
moments spent with family and friends, with high-definition video recordings of a
quality second only to actually being there.
What is High-Definition Video?
Your camcorder features a full high-definition image sensor (Full HD CMOS) that captures
video at a resolution of 1,920 x 1,080 pixels
1
. This results in video recordings of
unparalleled high quality, fine detail and lifelike vivid colors.
How does full high definition compare with standard-definition TV broadcasts?
Approximately 5 times the number of pixels.
Almost 90% more scanning lines.
“Full HD 1080” refers to Canon camcorders compliant with high-definition
video composed of 1,080 vertical pixels (scanning lines).
Capture the finest detail,
like the movement or shine
of a single strand of hair
1,080
lines
5
1.9
1
Video is recorded at this resolution only in FXP mode. In other recording modes, the picture is
resized to 1,440 x 1,080 pixels before being recorded. Even in that case, the picture captured is
detailed enough to render richly detailed recordings.
D128_PAL_E.book Page 4 Tuesday, January 22, 2008 11:39 AM
5
What is so special about recording on flash memory?
Your videos and photos are recorded in the built-in memory ( only) or on a memory
card (SD or SDHC card) using AVCHD specifications
2
. Recording on flash memory means
that there are no moving parts in the recorder unit of the camcorder. To you, it means a
camcorder that is smaller, lighter and faster. In fact, using the Quick Start function ( 34)
you can open the LCD panel and start recording within approximately one second.
If your high-definition TV features an SD memory card slot and supports AVCHD
specifications, you can easily play back your recordings directly from the memory card
(36).
What is Cinema Mode?
Give your recordings a cinematic look by using the [ CINE MODE] recording program
( 42). Combine this recording program with the 25 fps progressive frame rate
[PF25] to get the enhanced effect of the 25p Cinema Mode.
2
AVCHD is the new standard for recording high-definition video. With AVCHD specifications the
video signal is recorded using MPEG-4 AVC/H.264 compression and the audio signal is
recorded in Dolby Digital.
D128_PAL_E.book Page 5 Thursday, January 24, 2008 11:01 AM
6
Table of contents
Introduction ______________________________
4 Enjoying High-Definition Video with Your Camcorder
10 About this Manual
11 Getting to Know the Camcorder
11 Supplied Accessories
12 Components Guide
15 Screen Displays
Preparations _____________________________
18 Getting Started
18 Charging the Battery Pack
19 Preparing the Wireless Controller and Accessories
22 Adjusting the Position and Brightness of the LCD Screen
23 Basic Operation of the Camcorder
23 The Button: Mode or Flexible Recording
24 Operating Modes
24 Joystick and Joystick Guide
25 Using the Menus
27 First Time Settings
27 Setting the Date and Time
28 Changing the Language
28 Changing the Time Zone
29 Using a Memory Card
29 Recommended Memory Cards
30 Inserting and Removing a Memory Card
30 Selecting the Memory for the Recordings
31 Initializing the Built-In Memory ( only) or Memory Card
D128_PAL_E.book Page 6 Tuesday, January 22, 2008 11:39 AM
7
Table of contents
Video ____________________________________
32 Basic Recording
32 Shooting Video
33 Selecting the Video Quality
34 Zooming
34 Quick Start Function
35 Reviewing and Deleting the Last Scene Recorded
36 Basic Playback
36 Playing Back the Video
37 Special Playback Modes
38 Selecting Scenes by Recording Date
39 Selecting the Playback Starting Point from the Movie Timeline
40 Deleting Scenes
42 Advanced Functions
42 Cinema Mode: Giving a Cinematic Look to your Recordings
42 Special Scene Recording Programs
44 Changing the Shutter Speed and Aperture
45 Mini Video Light
46 Self Timer
46 Automatic Backlight Correction and Manual Exposure
Adjustment
47 Manual Focus Adjustment
48 White Balance
49 Image Effects
50 Digital Effects
51 On-Screen Displays and Data Code
52 Audio Recording Level
53 Using Headphones or an External Microphone
55 Managing Scenes and the Memory
55 Creating a Playlist
56 Deleting Scenes from the Playlist
56 Moving Scenes in the Playlist
57 Copying Scenes
D128_PAL_E.book Page 7 Tuesday, January 22, 2008 11:39 AM
8
Photos __________________________________
58 Basic Recording
58 Taking Photos
58 Selecting Photo Size and Quality
60 Erasing a Photo Right After Recording It
60 Basic Playback
60 Viewing Photos
62 Magnifying Photos during Playback
62 Erasing Photos
63 Additional Functions
63 Flash
64 Drive Mode: Continuous Shooting and Exposure Bracketing
65 Capturing a Still Image while Recording Movies
(Simultaneous Recording)
66 Light Metering Mode
66 Histogram Display
67 Capturing a Still Image from the Playback Scene
67 Protecting Photos
68 Copying Photos
69 Other Functions You Can Use when Taking Photos
69 Printing Photos
69 Printing Photos (Direct Print)
70 Selecting the Print Settings
73 Trimming Settings
73 Print Orders
External Connections _______________________
75 Terminals on the Camcorder
77 Connection Diagrams
79 Playback on a TV Screen
80 Saving and Backing Up Your Recordings
80 Backing Up Your Recordings on a Computer
D128_PAL_E.book Page 8 Tuesday, January 22, 2008 11:39 AM
9
Table of contents
80 Authoring High-Definition (AVCHD) Discs and Photo DVDs
83 Copying your Recordings to an External Video Recorder
84 Transferring Photos to a Computer (Direct Transfer)
86 Transfer Orders
Additional Information ______________________
88 Appendix: Menu Options Lists
88 FUNC. Menu
90 Setup Menus
90 Camera Setup (Digital Zoom, Image Stabilizer, etc.)
92 Memory Operations (Initialization, etc.)
93 Display Setup (LCD Brightness, Language, etc.)
94 System Setup (Speaker Volume, Beep, etc.)
96 Date/Time Setup
97 Trouble?
97 Troubleshooting
101 List of Messages
109 Do’s and Don’ts
109 Handling Precautions
112 Maintenance/Others
113 Using the Camcorder Abroad
114 General Information
114 System Diagram
115 Optional Accessories
119 Specifications
122 Index
D128_PAL_E.book Page 9 Tuesday, January 22, 2008 11:39 AM
Introduction
10
Thank you for purchasing the Canon HF10/HF100. Please read this manual carefully
before you use the camcorder and retain it for future reference. Should your
camcorder fail to operate correctly, refer to Troubleshooting ( 97).
Conventions Used in this Manual
IMPORTANT: Precautions related to the camcorder’s operation.
NOTES: Additional topics that complement the basic operating procedures.
POINTS TO CHECK: Restrictions or requirements regarding the function
described.
: Reference page number within this manual.
: Text that applies only to the model(s) shown in the icon.
The following terms are used in this manual:
When not specified as “memory card” or “built-in memory”, the term “memory” by
itself refers to both ( only).
“Scene” refers to one movie unit from the point you press the START/STOP button
to start recording until you press again to pause the recording.
“Photo” and “still image” are used interchangeably with the same meaning.
The photos included in this manual are simulated pictures taken with a still camera.
Unless indicated otherwise, illustrations and menu icons refer to the .
About this Manual
To complete some operations you will need to refer also to other instruction
manuals. This will be indicated with the following icons and the name of the relevant
chapter or section.
Refer to the
Digital Video Software” instruction manual, included as a
PDF file in the supplied DIGITAL VIDEO Solution Disk CD-ROM.
Refer to the instruction manual of the optional DW-100 DVD Burner.
DVSD
DW-100
ENU
FUNC.
(32)
[ M ]
[ DISPLAY SETUP]
[LANGUAGE ]
Desired language
FUNC.
FUNC.
Names of buttons and switches other than the
joystick are indicated within a
button frame.
For example .
FUNC.
Buttons and switches to be operated
Brackets [ ] and capital letters are used to refer to
menu options as they are displayed on screen. In
tables in this manual the default value is shown in
boldface.
For example [ON], [OFF].
D128_PAL_E.book Page 10 Tuesday, January 22, 2008 11:39 AM
11
Gettin g to Kn ow the Camcorde r
1
Software for saving, managing , editing and playing back movies on your computer ( 80).
The CD-ROM includes the instruction manual of the software (electronic version on PDF file).
2
Software for saving, managing , retouching and printing photos ( 84). The CD-ROM includes
the instruction manual of the software (electronic version on PDF file).
Supplied Accessories
CA-570 Compact Power
Adapter (incl. power cord)
BP-809 Battery Pack
WL-D88 Wireless Controller
Lithium Button Battery
CR2025 for Wireless
Controller
CTC-100/S
Component Cable
Red • Green • Blue plugs
STV-250N
Stereo Video Cable
Yellow • Red • White plugs
(incl. ferrite core)
IFC-400PCU USB Cable
Software CD-ROM
1
and Installation Guide
PIXELA ImageMixer 3 SE
WS-30 Wrist Strap
Software CD-ROM
2
DIGITAL VIDEO
Solution Disk
D128_PAL_E.book Page 11 Tuesday, January 22, 2008 11:39 AM
Introduction
12
Names of buttons and switches other than the
joystick are indicated within a
button frame
(for example ).
Components Guide
Left side view
Front view
Right side view
button ( 23)/
(print/share) button ( 70, 84)
DISP. (on-screen display) button
( 51, 39)/
BATT. INFO button ( 17)
Speaker ( 38)
CARD OPEN switch (open the memory
card slot cover) ( 30)
Memory card slot ( 30)
COMPONENT OUT terminal ( 77)
Mode dial ( 24)
HDMI OUT mini terminal ( 77, 79)
USB terminal ( 78)
Instant AF sensor ( 90)
Flash ( 63)
Stereo microphone
Mini video light ( 45)
FUNC.
D128_PAL_E.book Page 12 Wednesday, January 23, 2008 2:49 PM
13
Names of buttons and switches other than the
joystick are indicated within a
button frame
(for example ).
Back view
Top view
LCD panel
MIC terminal ( 54)
AV OUT/ terminal ( 77)
ACCESS (memory access) indicator
( 32, 58)/CHG (charge) indicator
( 18)
Serial number
START/STOP button ( 32)
Strap mount ( 20)
DC IN terminal ( 18)
RESET button ( 99)
Remote sensor ( 20)
LCD screen ( 22)
Joystick ( 24)
FUNC. button ( 25, 88)
/ (play/pause) button ( 36)/
START/STOP button ( 32)
(fast reverse) button ( 36)/
Zoom out W (wide-angle) button ( 34)
(fast forward) button ( 36)/
Zoom in T (telephoto) button ( 34)
(stop) button ( 36)/
BLC (backlight correction) button ( 46)
Zoom lever ( 34)
PHOTO button ( 58)
Mini advanced shoe ( 54)
indicator
ON/OFF button
FUNC.
D128_PAL_E.book Page 13 Tuesday, January 22, 2008 11:39 AM
Introduction
14
Wireless Controller WL-D88
B
ottom v
i
ew
Tripod socket ( 109)
BATTERY RELEASE switch ( 19)
Grip belt
START/STOP button ( 32)
FUNC. button ( 25, 88)
MENU button ( 26, 90)
PLAYLIST button ( 36)
Navigation buttons ( / / / )
(frame reverse) button ( 37)
(fast reverse) button ( 37)
(play) button ( 36)
(pause) button ( 36)
(stop) button ( 36)
PHOTO button ( 58)
Zoom buttons ( 34)
SET button
(frame advance) button ( 37)
(fast forward) button ( 37)
DISP. (on-screen display) button
( 39, 51)
D128_PAL_E.book Page 14 Tuesday, January 22, 2008 11:39 AM
15
Recording Movies
Playing Movies
(During Playback)
Screen Displays
Operating mode ( 24)
Recording program ( 42, 43)
White balance ( 48)
Image effect ( 49)
Digital effects ( 50)
Recording mode ( 33)
Still image quality/size
(simultaneous recording) ( 65)
Remote sensor off ( 95)
Instant AF ( 90),
MF Manual focus ( 47)
25F progressive frame rate ( 17)
Memory operation ( 17)
Time code/Playback time
(hours : minutes : seconds)
Remaining recording time
On the memory card
In the built-in memory
Remaining battery time ( 17)
Image stabilizer ( 91)
Wind screen off ( 92)
Headphones output ( 53)
Microphone attenuator ( 52)
Audio level indicator ( 52)
Level marker ( 93)
Mini advanced shoe ( 54)
Backlight correction ( 46)
Scene number
Data code ( 51)
D128_PAL_E.book Page 15 Wednesday, January 23, 2008 2:50 PM
Introduction
16
Recording Still Images
Viewing Still Images
Zoom ( 34), Exposure ( 46)
Recording program ( 42, 43)
Light metering mode ( 66)
White balance ( 48)
Image effect ( 49)
Digital effects ( 50)
Drive mode ( 64)
Still image quality/size ( 58)
Instant AF ( 90),
MF Manual focus ( 47)
Remaining battery time ( 17)
Number of still images available
On the memory card
In the built-in memory
Self timer ( 46)
Image stabilizer ( 91)
AF frame ( 91)
Mini video light ( 45)
Camcorder shake warning ( 91)
Focus and exposure lock ( 58)
Flash ( 63)
Image number ( 95)
Current image / Total number of images
Histogram ( 66)
Image protection mark ( 67)
Date and time of recording
Manual focus ( 47)
Manual exposure ( 46)
Image size ( 58)
File size
Aperture value ( 43)
Shutter speed ( 43)
D128_PAL_E.book Page 16 Wednesday, January 23, 2008 2:50 PM
17
25F progressive frame rate
Select the 25F progressive frame rate ( 42) to
give your recordings a cinematic look. You can
combine this frame rate with the [ CINE
MODE] recording program to enhance the effect.
Memory operation
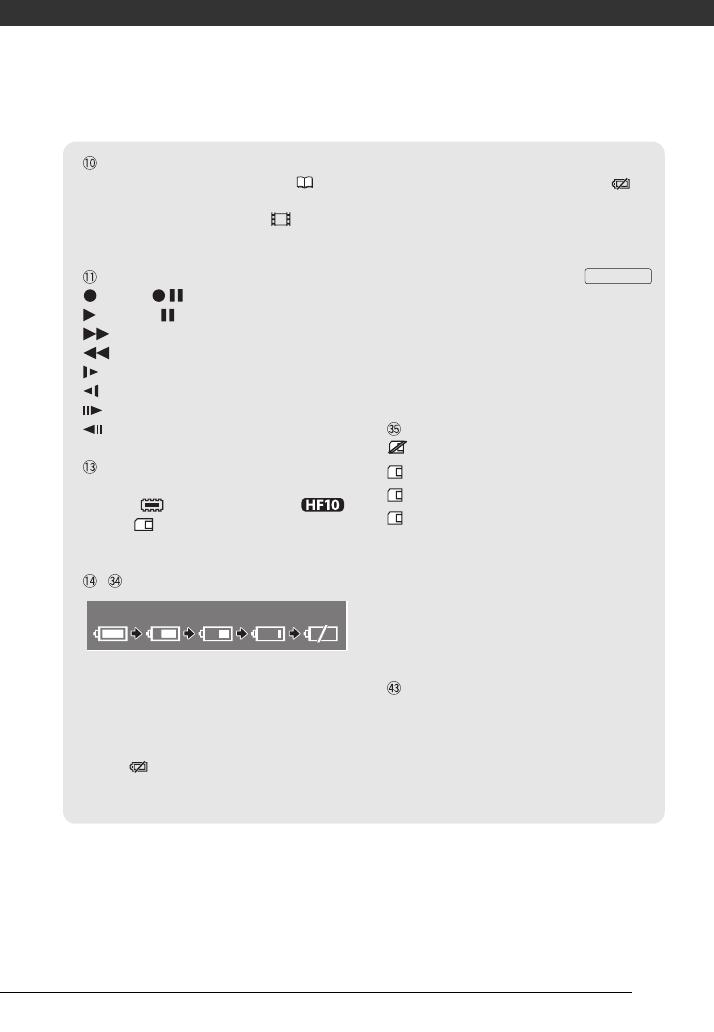
Record, Record pause,
Playback, Playback pause,
Fast playback,
Fast reverse playback,
Slow playback,
Slow reverse playback,
Frame advance,
Frame reverse
Remaining recording time
When there is no more free space on the
memory, “ END” (built-in memory,
only) or “ END” (memory card) will be
displayed and the recording will stop.
, Remaining battery time
• The icon shows a rough estimate of the
remaining charge as a percentage of the full
charge of the battery pack. The remaining
recording/playback time of the battery pack is
displayed, in minutes, next to the icon.
• When is displayed in red, replace the
battery pack with a fully charged one.
• When you attach an empty battery pack, the
power may turn off without displaying .
• Depending on the conditions under which the
camcorder and the battery pack are used, the
actual battery charge may not be indicated
accurately.
• When the camcorder is off, press
to display the charge status of a battery pack.
The Intelligent System will display the charge
status (as a percentage) and the remaining
recording time (in minutes) for 5 seconds. If the
battery pack is exhausted, the battery
information may not be displayed.
Number of still images available
in red: No card
in green: 6 or more images
in yellow: 1 to 5 images
in red: No more images can be recorded
• When viewing the still images, the display will
always be in green.
• Depending on the recording conditions, the
number of available still images displayed may
not decrease even after a recording has been
made, or may decrease by 2 still images at
once.
Image number
The image number indicates the name and
location of the file on the memory card. For
example, the file name of image 101-0107 is
“IMG_0107.JPG”, stored under the folder
“DCIM\101CANON”.
100% 75% 50% 25% 0%
BATT.INFO
D128_PAL_E.book Page 17 Tuesday, January 22, 2008 11:39 AM
18
Preparations
This chapter describes basic operations, such as navigating the
menus, and first time settings to help you learn more about your
camcorder.
Charging the Battery Pack
The camcorder can be powered with a
battery pack or directly using the
compact power adapter. Charge the
battery pack before use.
For approximate charging times and
recording/playback times with a full
battery pack, refer to the tables on
pages 115-116.
1 Turn off the camcorder.
2 Attach the battery pack to the
camcorder.
Press the battery pack softly into the
battery attachment unit and slide it
up until it clicks in place.
3 Connect the power cord to the
compact power adapter.
4 Plug the power cord into a power
outlet.
5 Connect the compact power
adapter to the camcorder’s DC IN
terminal.
The CHG (charge) indicator starts
flashing. The indicator will stay on
when the charging is completed.
If the indicator flashes quickly,
refer to Troubleshooting ( 97).
1 Disconnect the compact power
adapter from the camcorder.
2 Unplug the power cord from the
power outlet and the compact
power adapter.
Getting Started
ONCE THE BATTERY PACK IS FULLY CHARGED
CHG (charge)
indicator
DC IN terminal
D128_PAL_E.book Page 18 Tuesday, January 22, 2008 11:39 AM
19
1 Slide in the
direction of the arrow and hold it
pressed down.
2 Slide the battery pack down and
then pull it out.
IMPORTANT
Turn off the camcorder before
connecting or disconnecting the
compact power adapter. After pressing
to turn off the camcorder,
important data is updated in the
memory. Be sure to wait until the
indicator turns off.
We recommend charging the battery
pack in temperatures between 10 °C
and 30 °C. Outside the temperature
range of 0 °C to 40 °C, the charging will
not start.
Do not connect to the camcorder’s DC
IN terminal or to the compact power
adapter any electrical equipment that is
not expressly recommended for use
with this camcorder.
To prevent equipment breakdowns and
excessive heating, do not connect the
supplied compact power adapter to
voltage converters for overseas travels
or special power sources such as those
on aircraft and ships, DC-AC inverters,
etc.
NOTES
If remaining battery time is an issue, you
can power the camcorder using the
compact power adapter so the battery
pack will not be consumed.
Charged battery packs continue to
discharge naturally. Therefore, charge
them on the day of use, or the day
before, to ensure a full charge.
We recommend that you prepare battery
packs to last 2 to 3 times longer than
you think you might need.
Preparing the Wireless Controller and
Accessories
First, insert the supplied lithium button
battery CR2025 into the wireless
controller.
1 Press the tab in the direction of
the arrow and pull out the battery
holder.
2 Place the lithium button battery
with the + side facing up.
3 Insert the battery holder.
TO REMOVE THE BATTERY PACK
BATTERY RELEASE
switch
BATTERY RELEASE
ON/OFF
Tab
D128_PAL_E.book Page 19 Tuesday, January 22, 2008 11:39 AM
Preparations
20
Point the wireless controller at the
camcorder’s remote sensor when
you press the buttons.
You can rotate the LCD panel 180
degrees to use the wireless controller
from the front of the camcorder.
NOTES
The wireless controller may not work
properly when the remote sensor is
situated under strong light sources or
direct sunlight.
If the wireless controller does not work,
check that [WL.REMOTE] is not set to
[ OFF ] ( 95). Otherwise,
replace the battery.
Accessories
Fasten the grip belt.
Adjust the grip belt so that you can
reach the zoom lever with your
index finger, and the
button with your thumb.
You can remove the grip belt and
replace it with the supplied wrist
strap.
1 Lift the padded handgrip's flap
and detach the strap from the
Velcro pad.
TO USE THE WIRELESS CONTROLLER
TO REMOVE THE GRIP BELT
START/STOP
D128_PAL_E.book Page 20 Tuesday, January 22, 2008 11:39 AM
  • Page 1 1
  • Page 2 2
  • Page 3 3
  • Page 4 4
  • Page 5 5
  • Page 6 6
  • Page 7 7
  • Page 8 8
  • Page 9 9
  • Page 10 10
  • Page 11 11
  • Page 12 12
  • Page 13 13
  • Page 14 14
  • Page 15 15
  • Page 16 16
  • Page 17 17
  • Page 18 18
  • Page 19 19
  • Page 20 20
  • Page 21 21
  • Page 22 22
  • Page 23 23
  • Page 24 24
  • Page 25 25
  • Page 26 26
  • Page 27 27
  • Page 28 28
  • Page 29 29
  • Page 30 30
  • Page 31 31
  • Page 32 32
  • Page 33 33
  • Page 34 34
  • Page 35 35
  • Page 36 36
  • Page 37 37
  • Page 38 38
  • Page 39 39
  • Page 40 40
  • Page 41 41
  • Page 42 42
  • Page 43 43
  • Page 44 44
  • Page 45 45
  • Page 46 46
  • Page 47 47
  • Page 48 48
  • Page 49 49
  • Page 50 50
  • Page 51 51
  • Page 52 52
  • Page 53 53
  • Page 54 54
  • Page 55 55
  • Page 56 56
  • Page 57 57
  • Page 58 58
  • Page 59 59
  • Page 60 60
  • Page 61 61
  • Page 62 62
  • Page 63 63
  • Page 64 64
  • Page 65 65
  • Page 66 66
  • Page 67 67
  • Page 68 68
  • Page 69 69
  • Page 70 70
  • Page 71 71
  • Page 72 72
  • Page 73 73
  • Page 74 74
  • Page 75 75
  • Page 76 76
  • Page 77 77
  • Page 78 78
  • Page 79 79
  • Page 80 80
  • Page 81 81
  • Page 82 82
  • Page 83 83
  • Page 84 84
  • Page 85 85
  • Page 86 86
  • Page 87 87
  • Page 88 88
  • Page 89 89
  • Page 90 90
  • Page 91 91
  • Page 92 92
  • Page 93 93
  • Page 94 94
  • Page 95 95
  • Page 96 96
  • Page 97 97
  • Page 98 98
  • Page 99 99
  • Page 100 100
  • Page 101 101
  • Page 102 102
  • Page 103 103
  • Page 104 104
  • Page 105 105
  • Page 106 106
  • Page 107 107
  • Page 108 108
  • Page 109 109
  • Page 110 110
  • Page 111 111
  • Page 112 112
  • Page 113 113
  • Page 114 114
  • Page 115 115
  • Page 116 116
  • Page 117 117
  • Page 118 118
  • Page 119 119
  • Page 120 120
  • Page 121 121
  • Page 122 122
  • Page 123 123
  • Page 124 124
  • Page 125 125

Canon HF100 User manual

Category
Camcorders
Type
User manual
This manual is also suitable for

Ask a question and I''ll find the answer in the document

Finding information in a document is now easier with AI