Page is loading ...

www.sunfounder.com
Preface
About SunFounder
SunFounder is a technology company focused on Raspberry Pi and Arduino open source
community development. Committed to the promotion of open source culture, we strive to
bring the fun of electronics making to people all around the world and enable everyone to be a
maker. Our products include learning kits, development boards, robots, sensor modules and
development tools. In addition to high quality products, SunFounder also offers video tutorials
to help you build your own project. If you have interest in open source or making something
cool, welcome to join us! Visit www.sunfounder.com for more!
About This Kit
In this book, we will show you how to build the bionic robot via description, illustrations of
physical components, in both hardware and software respects. You may visit our
website www.sunfounder.com to download the related code and view the user manual
on LEARN -> Get Tutorials and watch related videos under VIDEO.
Free Support
If you have any TECHNICAL questions, add a topic under FORUM section on our
website and we’ll reply as soon as possible.
For NON-TECH questions like order and shipment issues, please send an email to
service@sunfounder.com. You’re also welcomed to share your projects on FORUM.

www.sunfounder.com
Contents
Components List ............................................................................................................................................................ 1
Acrylic Plate ............................................................................................................................................................. 1
Mechanical Fasteners .......................................................................................................................................... 2
Electrical Components ........................................................................................................................................ 3
Introduction ..................................................................................................................................................................... 5
Get Started ....................................................................................................................................................................... 6
Arduino ..................................................................................................................................................................... 6
Arduino Board – SunFounder Compatible ......................................................................................... 6
Install Arduino IDE ........................................................................................................................................ 6
Install the Driver ............................................................................................................................................ 7
Add Libraries................................................................................................................................................... 7
Test ...................................................................................................................................................................................... 9
Assembly ....................................................................................................................................................................... 14
Assemble the forefeet ...................................................................................................................................... 14
Assemble the back feet ................................................................................................................................... 16
Lizard body ........................................................................................................................................................... 18
Assemble head and neck ................................................................................................................................ 21
Body+head+limb+tail ..................................................................................................................................... 25
Assemble expansion board ............................................................................................................................ 27
Adjusting ....................................................................................................................................................................... 30
Case 1: The forefeet are inclined .................................................................................................................. 30
Case 2: The back foot is inclined .................................................................................................................. 32
Case 3: The Lizard can’t stand steadily ...................................................................................................... 33

www.sunfounder.com
1
Components List
Acrylic Plate
You need to clean the acrylic plates before using. Here takes one plate as example.
1. Clean the residue by a tool with sharp
point.
2. Remove the stickers on the two faces of
the plate.

www.sunfounder.com
2
Mechanical Fasteners
Name
Components
Qty.
M1.2 x 4mm Self-tapping Screw
8
M2 x 10 Screw
6
M2 x 14 Screw
4
M2.5 x 8 Screw
14
M2.5 x 10 Screw
16
M3 x 6 Screw
4
M3 x 12 Screw
6
M2 Nut
8
M2.5 Nut
16
M3 Self-locking Nut
6
M2.5*13 Copper Standoff
8
M3 x 25 Red Aluminum Standoff
1

www.sunfounder.com
3
Electrical Components
Name
Components
Qty.
9g SF0180 Servo
3
Nano board
1
Expansion board
1
2S battery
1
Cable Spiral Wrap
1
Velcro Tape
(Length 35mm)
1
Mini USB Cable
1

www.sunfounder.com
4
IR Remote Control
1
IR Receiver Module
1
3Pin-Anti-reverse Cable
1
2S Lithium Battery USB
Charger Cable
1
Phillips Screw Driver
1
Cross Socket Wrench
1

www.sunfounder.com
5
Introduction
This is a bionic robot - Lizard. It is control walking by three servos, the walking shape is imitate
Lizard and looks flexible and vivid. Infrared module is equipped, you can control the Lizard walk by
the remote controller.
Before using it, you need to assemble according to the tutorial. After assembling and adjusting,
you can control it walk by the remote controller.
You can also add other sensors on the Lizard, like obstacles avoiding, line following and so on.
There are remaining pins on the sensor shield. You can find the schematic diagram of Sensor Shield
at the file of Circuit.
Besides, in order to control the robot in a more simple way, there is a tutorial wrote for the visual
programming: How to use Lizard robot with Mixly. Visual programming is a kind of modularize
programming software, users do not need to have much basis on programming, but just logic.

www.sunfounder.com
6
Get Started
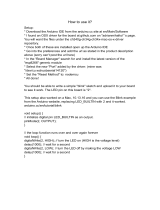
Note: Before starting your own project, you must download the Bionic Robot Kit for Arduino -
Lizard.zip package on our website by visiting LEARN -> Get Tutorials -> Lizard and unzip it.
Arduino Description
Arduino is an open source platform that applies simple software and hardware. You can get it in a
short time even when you know little about it. It provides an integrated development environment
(IDE) for code editing and compiling, compatible with multiple control boards. So you can just
download the Arduino IDE, upload the sketches (i.e. the code files) to the board, and then you can
see experimental phenomena. For more information, you can refer to http://www.arduino.cc.
Arduino Board – SunFounder Compatible
Arduino senses the environment by receiving inputs from many sensors, and affects its
surroundings by controlling lights, motors, and other actuators.
In this kit, the SunFounder Nano board is used.
Install Arduino IDE
The code in this kit is written based on Arduino, so you need to install the IDE at the very beginning.
Skip if you have done this.
Now go to the arduino.cc website and click DOWNLOAD. On the page, check the software list on
the right side under Download the Arduino Software.The picture following is just an example,
please download the latest edition IDE.

www.sunfounder.com
7
Find the one that suits your operation system and click to download. There are two versions of
Arduino for Windows: Installer or ZIP file. You're recommended to download the former. Just
download the package, and run the executable file to start installation. It will download the driver
needed to run Arduino IDE. After downloading, follow the prompts to install. For the details of
installing steps, you can refer to the guide on Learning->Getting Started with Arduino, scroll
down and see Install the Arduino Software.
After installing, you will see Arduino icon on your desk and double click to open it.
Install the Driver
If the driver is not installed, the Nano board will not be recognized by your computer. Therefore,
before using it, please install appropriate driver.
For Windows users, run
PL2303_Prolific_DriverInstaller_v1180B
in the folder Driver.
For Mac users, refer to the folder
PL2303_MacOSX_1_6_1_20170620
in the folder Driver.
Add Libraries
1) Select Sketch -> Include Library -> Management Libraries

www.sunfounder.com
8
2) Input IRremote, then the library will appear, click Install button to install it.
3) You can see the libraries just imported have appeared on the list by going to Sketch->Include
Library->IRremote.

www.sunfounder.com
9
Test
Build Circuit
1) Insert SunFounder Nano board into the Sensor Shield. Note: The USB port should be at the
same side with blue power supply terminal.
2) Insert the battery JST female pin into the red power of the Sensor Shield.
3) Connect 3 servos and Infrared receive module with expansion board. Insert 3 rocker arms into
servos in that observe if they are rotate or not.
Note: The Black wire of IR Receiver module connect to sensor shield pin 5, then yellow wire
connect to GND pin
Servo
Sensor Shield
IR Receiver
Sensor Shield
Orange
2,3,4
Black
5
Red
+
Red
+
Brown
-
Yellow
GND

www.sunfounder.com
10
Pay attention to the colors and the directions of the anti-reverse cable.
Upload the code
4) If everything looks good, connect the Sensor Shield to your PC with a USB cable, then the blue
LED on SunFounder Nano board will light up.
If there display “USB Device not recognized”, it means that you haven’t installed the driver, thus you
need to install the driver below:
For Windows users, run
PL2303_Prolific_DriverInstaller_v1180B
in the folder Driver.
For Mac users, refer to the folder
PL2303_MacOSX_1_6_1_20170620
in the folder Driver.
5) Open the Arduino Software (IDE), Select File->Open. On the pop-up window, go to the Bionic
Robot Kit for Arduino – Lizard -> Code -> Test directory and find
Test.ino
. Click it to open.

www.sunfounder.com
11
6) Select a board. Here we select Arduino Nano. The Processor is ATmega328.
7) Go to Tools -> Port to select the port. Your serial port may be different from what's shown here
(right-click My Computer on desktop, click Properties>Device Manager>Ports).
8) Click the following button to upload.

www.sunfounder.com
12
9) Wait for a moment until the following information appears at the bottom of the window, which
indicates it is uploaded successfully.
Servo Test
10) Switch on the power, you will find the 3 servos rotate from 0 degree to 180 degree and then
stop at 90 degree. If you haven’t seen clear of the process, you can press the Reset button on the
Nano board, the servo will rotate again.
Test IR Receiver
11) Click File -> Preference to enable display line numbers, then select OK.

www.sunfounder.com
13
12) Comment line 31 by “//”, uncomment line 32 and then upload the code again.
13) Open the Serial Monitor on the top-right of Arduino IDE, held and press the button of
the IR Remote Controller toward IR receive module.
14) You will see it display the value of button on the Serial Monitor.
Note: Press the button on the remote controller gently. If you press the button forcefully, it will be
default as long press and display FFFFFFF.
After testing, extract the servo and the Infrared Module.
Note: The axis of the servos is not moved accidentally in the subsequent installation. If the axes are
moved, adjust them again before the installation.
Now let’s begin to assemble the Lizard robot.

www.sunfounder.com
14
Assembly
Note:In order to conveniently recognize, here number every acrylic plate as shown below. In the
following description, the number will be used. There is an independent picture of the following
one, you can refer to Acrylic Plate.png.
Assemble the forefeet
1) Assemble the acrylic plate 11 to 12. Note:
The direction of the plate 11 can’t be put on
reverse side.
2) Insert the plate 11 into the 12.

www.sunfounder.com
15
3) Connect these two components with an
M2.5x10 screw and an M2.5 nut.
4) It looks as the picture shown below
after assembling.
5) Assemble the other forefoot at the same way.
6) Assemble the rocker arm (packaged with the
servo) to the acrylic plate 15, then connect them
by M1.2 x 4mm self-tapping screw.
7) Fasten the self-tapping screw.
Do not over tighten it! Or the screw may be
broken!

www.sunfounder.com
16
8) Fix plate 11 and 15 by M2.5 x 10 screw and
M2.5 nut.
9) Fasten the screw and nut. Note:Plate
15 with white rocker arm side should be
Downward.
10) Assemble the other foot at the same way.
11) Top view.
Assemble the back feet
1) Assemble the acrylic plate 11 to the 13. Note:
The direction of the 11 plate can’t be put on
reverse side. The square hole of 13 plate in on the
right side.
2) Fasten the acrylic plate 11 and 13.

www.sunfounder.com
17
3) Fix them by M2.5x10 screw and M2.5 nut.
4) After assembling, it looks as shown
below.
5) Assemble the other two back feet at the same way, you will find the two back feet are in
opposite direction.
6) Assemble the rocker arm (packaged with the
servo) to the acrylic plate 14, then connect them
by M1.2 x 4mm self-tapping screw.
7) Fasten the screw.

www.sunfounder.com
18
8) Fix the plate 11 and 14 by M2.5x10 screw and
M2.5 nut.
9) Fasten the screw and nut
Note:Plate 14 with white rocker arm side
should be Downward.
10) Assemble the other foot at the same way.
11) Top view
Lizard body
1) Assemble the servo onto the acrylic plate 4 by the
M2 x 10 screw and M2 nut.
/