For information about other American International automotive
accessories visit our website at:
http://www.americaninternational.net
CUSTOMER HELP LINE
USA 800-323-4329 • Canada 800-245-8777
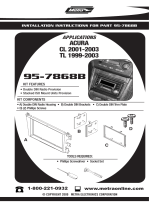
ACUK866 Mounting Kit
Acura
1999-2003 TL
2000-2003 CL
VEHICLE APPLICATIONS
IACUK866
Optional: ISO trim ring
may be used in place of
after-market radio’s trim ring.
NOTE: Refer to dash disassembly instructions for factory pocket retention
1. Insert DIN sleeve from your new radio into the opening of the installation kit.
2. Depress the tabs from inside the sleeves opening upward, outward, and
downward to secure sleeve to the installation kit.
3. Insert DIN sleeve from your new radio into the upper section of the installation kit.
4. Depress the tabs from inside the sleeves opening upward, outward, and downward
to secure sleeve to the installation kit.
5. Install radio into sleeve and lock into place.
6. Attach a rear support bracket to the rear of the new radio and adjust as necessary to
attach to the rear support stud located on the back of the pocket using the small
phillips screw supplied with kit.
IS
O T
rim
Rin
g
(Us
e
Op
tio
n
a
l)
DIN MOUNT INSTRUCTIONS
Insert Clips
Both Sides
©2015 AMERICAN INTERNATIONAL INDUSTRIES, INC.
TECH Ver. 10/12 PRINT Ver. 01/15
WWW.AIUS.NET
2500 East Francis Street Ontario, CA 91761, U.S.A.
USA Sales (800) 336-6500
Canada Sales (888) 922-3006

NOTE: See back page for DIN mount instructions.
1. Attach ISO brackets inside the radio opening from the rear of the main mounting kit
(see illustration below).
2. Slide radio into kit from rear & attach to ISO mounting brackets using screws supplied
with radio (do not tighten screws at this time).
3. Slide radio forward or backward for your desired look and then tighten the mounting
screws. Use ISO trim ring when possible.
4. Attach rear support strap (supplied with radio) to rear of pocket and to rear of radio.
ISO MOUNT INSTRUCTIONS
1. Starting from the back edges, lift upward and remove both left and right wood trim
side console trim panels. (Opening the Armrest compartment makes this step easier)
2. With the armrest open, remove the (2) Phillips screws from under the bottom of
carpeted padding and remove the (2) Phillips screws from the front edge of the rear
console, then pull console section back a few inches.
3. From the left side of the dash, unclip and remove the fuse box panel cover and
remove the single Phillips screw at the lower edge securing the front lower dash trim.
4. Carefully unclip the driver's side lower dash panel, disconnect the harness and set
panel out of the way.
5. Remove the (4) Phillips screws securing the drivers side center console side panel
and remove panel.
6. Remove the (3) Phillips screws securing the passenger side center console side
panel and remove panel.
7. Disconnect the harnesses from each seat heater switch located at the front edge of
the center console.
8. Carefully unclip the seat heater switch trim and remove the switched from the trim
then remove the seat heater switch trim.
9. Remove the (2) Phillips screws exposed after the heater switch panel has been
removed.
10. Remove the (2) Phillips screws from the upper back edge securing the forward
section of the center console.
11. Pull the forward section of the center console back.
12. Remove the (3) Phillips screws from each side of the radio assembly.
13. Carefully unclip and pull forward the lower edge of the climate control trim panel to
allow the upper edge of the radio assembly to be pulled forward.
14. Carefully pull radio assembly forward, disconnect all harnesses and antenna lead
and remove radio.
15. Remove the individual plastic clip attached to each side of the factory radio and re-
insert into the ACUK866 kit in the same slot locations provided.
16. Remove the (2) Phillips screws securing the factory pocket above the radio and set
aside to attach to the upper section of the ACUK866 kit.
Not e: Attach one of the (2) metal retaining clip (included in kit) to each of the upper
storage pocket mounting tabs located on the kit (see illustration on next page).
Position the factory storage pocket removed in step 15 of dash disassembly instructions
onto the top edge of the ACUK866 kit and secure using the screws supplied with kit.
DASH DISASSEMBLY INSTRUCTIONS
ITR-866
ISO
Tri
m
Ri
ng
(U
se Opti
onal)
Fig. A
Optional: ISO trim ring
may be used in place of
after-market radio’s trim ring.
ACUK866
Insert Clip
Insert Clip
Clip Close-Up
866L
866R
/