Page is loading ...

In-Wall 7 Day Digital Timer Instruction Sheet
MADE IN CHINA
04/06/2017 MAPATIM-01
Timer # PATIM-01
1-800-350-4562
info@anconahoods.com
Rating:
General: 125 V ac, 60 Hz; 15 A, 1875W
Resistive: 125 V ac, 60 Hz; 15 A, 1875W
Tungsten (incandescent): 8 Amp, 125 VAC 1000 Watts
Ballast (fluorescent): 8 Amp, 125 VAC
Motor: 1/4 H.P., 125 VAC
SETTING THE CLOCK
1. Press and hold the CLOCK button to set time.
2. Press the DAY button until the display shows the current day.
3. Press the HOUR button until the display shows the current hour.
4. Press the MIN (Minute) button until the display shows the current minute.
SETTING PROGRAMS
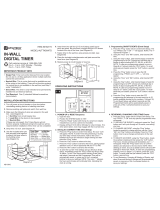
SET START TIME
1. a. Press the PROG (Program) button once. The display will look as
shown at the right.
b. You will now set up the time in which you want your device turned ON.
c. The number 1 in the lower left hand corner indicates that you are now
programming EVENT 1.
2. Press the DAY button repeatedly until the display shows the day(s) when you
want the timer to turn on. The options are:
- All days of the week (MO, TU, WE, TH, FR, SA, SU)
- Individual days of the week (MO, TU, WE, TH, FR, SA, or SU)
- Weekdays only (MO, TU, WE, TH, FR)
- Weekends only (SA, SU)
3. Press the HOUR and MIN (Minute) buttons to set the time when you want the
timer to turn on.
SET STOP TIME
4. Press the PROG (Program) button again. The display reads as
shown at the right.
5. Repeat Steps 2 - 4 to set the OFF time for Event 1.
6. When programming is complete, press the CLK button to display the current time.
Things you should know about programming events
- You can repeat the ON and OFF programming procedures for up to 7 events.
- In order to use programmed times, MODE must be set to AUTO or RDM
- ON / OFF button overrides the current programmed events.
OPERATING THE TIME SWITCH
Press the MODE button repeatedly to set the timer to Automatic, Random or Manual
mode.
NOTE: For the time switch to run programmed events, it must be set to “AUTO” mode.
AUTO: runs all events automatically, according to the schedule you have set. The
word “AUTO” appears in the display.
RDM (Random): runs all events in a RANDOM mode. This is a security feature in
which ON and OFF times randomly differ ± 15 minutes of the programmed times,
creating a more “lived-in” look. The word “RDM” appears in the display.
NOTE: DO NOT set the ON / OFF events within 30 minutes or less from one
another if you are going to use this timer in the RANDOM MODE. The RANDOM
MODE is ± 15 minutes of programmed times and may overlap one another, causing
the timer to possibly not work as desired.
OVERRIDING TIMER SETTINGS
The ON / OFF button overrides the current programmed events.
To override the current program (either ON or OFF), press the ON/OFF button.
NOTE: If the timer is not in “Manual” mode, it will obey the next programmed event.
This allows the user to manually turn a light on and allow the program to shut the
light back off at a preset time.
RESETTING THE TIMER
In case of an operational failure of the timer, insert a thin non-conducting object (like
a wood toothpick) into the RESET orifice to clear all settings and restart.
*Works with CFL bulbs.
*This timer has been tested to work with standard compact fluorescent (CFL) bulbs.
However, it will not control a CFL bulb that specifically states
- Do not set up events out of order. Be sure to set up events in progressive order of
time (for example, 8:00pm ON, 9:00 pm ON, 10:00 pm ON — NOT 8:00 pm ON,
10:00 pm ON, 9:00 pm ON).
- Do not overlap event times (for example, 8:00 pm ON /12:00pm OFF, and 9:00 pm
ON / 11:00 pm OFF).
- Do not set ON / OFF events within 30 minutes or less from one another if you are
going to use the timer in the Random Mode.
The Random Mode interval is ± 15 minutes from the programmed times, and
programs set too close together may overlap one another.
REVIEWING EVENTS PROGRAMMED
1. In the current time display, press the PROG (Program) button repeatedly to check
your settings.
2. When finished, press the CLK button to return the display to the time of day.
CLEARING (DELETING) AN EVENT
1. Press the PROG (Program) button as many times as necessary to locate the
setting you want to clear.
2. Press and hold the MODE button.
3. Press the PROG button to clear the setting.
4. When finished, press the CLK button to return the display to the time of day.
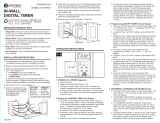
Black
White (Neutral)
Red
Ground / Green
A
B
D
C
B
1
2
3
4
A
B
C
D
C
D
B
8 : 00
1
PM
ON
MO TU WE TH FR
AUTO
12 : 00
1
AM
MO TU WE TH FR
OFF AUTO
WARNING
While setting events, the timer may prematurely turn on the load, if you press the
MODE button. Three kinds of settings can cause the timer to work in an unexpected
way:
MANUAL: turns ON and OFF only when the user presses the ON or OFF button.
The display is blank, showing neither RDM or AUTO.
Remove wall plate and disconnect existing light switch, install junction box with a
qualified electrician.
Make sure both “hot”(black or red) and neutral (white) wires are present in the
junction box. If both wires are not present, additional wiring will be necessary
before installation can be completed.
Connect red timer wire to wire from towel warmer fixture, using wire connector.
( )
Connect black timer wire to the “hot” (usually black or red) wire in junction box
using wire connector. ( )
Expose white wire in junction box (or open splice) and strip 1/2 in. of insulation
to both wires.
Connect all three white wires together (timer wire, junction box wires) using wire
connector.
If the wall switch you are replacing had separate grounding conductors
connected to the GREEN screw on the switch, make sure to connect these to
the green wire from the timer with a wire connector. ( )
Check that all wire connections are secure.
Place all wires inside junction box.
Fit timer into junction box and install using two mounting screws (included).
Reconnect the electrical power
1.
2.
3.
4.
5.
6.
7.
8.
9.
10.
11.
1
2
( )
3
4
NOTE: Timer installation is optional to towel warmer installation. Towel warmer
fixtures DO NOT EXCEED RATED CAPACITY stated in this manual.

HECHO EN CHINA
Clasificacíon:
General: 125 V ac, 60 Hz; 15 A, 1875W
Resistivo (electrodoméstico): 125 V ac, 60 Hz; 15 A, 1875W
Tungsteno (Incandescente): 8 Amp, 125 VAC 1000 Watts
Reactancia (fluorescente): 8 Amp, 125 VAC
Motor: 1/4 H.P., 125 VAC
NOTA: Si el temporizador no está en modo “Manual”, obedecerá al siguiente
evento programado. Esto permite al usuario encender una luz manualmente y dejar
que el programa apague de nuevo la luz en tiempo presente.
REAJUSTANDO EL TEMPORIZADOR
En caso de un fallo operacional del temporizador, inserte un objeto no conductor
angosto (como un mondadientes de madera) en el orificio RESET para
borrar todos los ajustes y reiniciar.
*Funciona con bombillas CFL.
*Este temporizador se sido probado para funcionar con bombillas fluorescentes
compactas (CFL) estándar. Sin embargo, no controlará una bombilla CFL que
especifica claramente que "no se debe usar con controles de temporizador". En
caso de duda, consulte al fabricante de la bombilla.
04/06/2017 MAPATIM-01
NOTA: La instalación del temporizador es opcional al momento de instalar el
calentador de toallas. Los calentadores de toallas NO EXCEDERÁN LA
CAPACIDAD NOMINAL indicada en este manual.
IMPORTANT - Federal Communications
Commission Interference Statement
This equipment has been tested and found to comply with the limits for Class B
digital device, pursuant to part 15 of the FCC Rules. These limits are designed to
provide reasonable protection against harmful interference in a residential
installation. This equipment generates, uses and can radiate radio frequency
energy and, if not installed and used in accordance with the instructions, may cause
harmful interference to radio or television reception, which can be determined by
turning the equipment off and on, the user is encouraged to try to correct the
interference by one or more of the following measures:
• Reorient or relocate the receiving antenna.
• Increase the separation between the equipment and the receiver.
• Connect the equipment into an outlet on a circuit different from that to which the
receiver is connected.
• Consult the dealer or an experienced radio/TV technician for help.
This device complies with Part 15 of the FCC Rules.
Operation is subject to the following two conditions:
(1) This device may not cause harmful interference, and
(2) this device must accept any interference received, including interference that
may cause undesired operation of the device.
FCC Caution: Any changes or modifications not expressly approved by the party
responsible for compliance could void the user's authority to operate this
equipment.
IMPORTANT - Declaration De La FCC
Concernant Le Brouillage
Cet appareil a été testé et déclaré conforme aux limites imposées aux appareils
numériques de classe B, conformément à l’alinéa 15 du règlement de la FCC. Ces
limites sont destinées à assurer une protection raisonnable contre les interférences
nuisibles dans un environnement résidentiel. Cet appareil génère, utilise et peut
émettre de l’énergie radiofréquence et, s’il n’est pas installé et utilisé conformément
aux instructions, risque de provoquer des interférences nuisibles aux
communications radio. Cependant, tout risque d’interférence ne peut être
totalement exclu. Si l’utilisateur constate des interférences lors de la réception
d’émissions de radio ou de télévision (il suffit pour le vérifier d’allumer et d’éteindre
successivement l’appareil), il devra prendre les mesures nécessaires suivantes
pour les éliminer :
• Réorienter ou déplacer l’antenne réceptrice.
• Accroître la distance entre l’appareil et le récepteur.
• Brancher l’appareil sur une prise de courant connectée à un circuit autre que celui
du récepteur.
• Chercher de l’aide auprès du détaillant ou d’un technicien en radio ou en
télévision expérimenté.
Cet appareil est conforme à l’alinéa 15 du règlement de la FCC.
Son utilisation est soumise aux deux conditions suivantes :
(1) Cet appareil ne doit provoquer aucune interférence nuisible; et
(2) cet appareil doit accepter toute interférence reçue, y compris les interférences
pouvant entraîner un fonctionnement indésirable.
ATTENTION: Toute modification non autorisée expressément par la partie
responsable de la conformité peut annuler le droit de l’utilisateur de se servir de cet
appareil.
IMPORTANTE - Declaración de la
Comisión Federal de Comunicaciones
Este equipo ha sido probado y se ha encontrado en cumplimiento con los límites
correspondientes para un dispositivo digital de la Clase B, conforme a la Parte 15
de las Reglas de la FCC. Estos límites están diseñados para brindar una
protección razonable contra la interferencia en una instalación residencial. Este
equipo genera, usa y puede irradiar energía de radio frecuencia y, si no se instala y
usa de acuerdo con las instrucciones, puede causar interferencia dañina a la
recepción de radio o televisión, lo cual puede determinarse apagando y
encendiendo el equipo, se recomienda al usuario que trate de corregir la
interferencia realizando uno o varios de los siguientes pasos:
• Cambiar de dirección o de lugar la antena receptora.
• Aumentar la separación entre el equipo y el receptor.
• Conectar el equipo en un tomacorriente en un circuito diferente de donde esté
conectado el receptor.
• Consulte al concesionario o a un técnico de radio/TV con experiencia para que le
ayude.
Este dispositivo cumple con la parte 15 de las reglas de la FCC.
El funcionamiento está sujeto a las siguientes dos condiciones:
(1) este dispositivo no puede causar interferencia dañina y
(2) este dispositivo debe aceptar toda interferencia recibida, incluso la que puede
causar un funcionamiento indeseado del dispositivo.
Precaución de la FCC: Cualquier cambios o modificación a esta unidad que no
sean aprobados en forma expresa por la parte responsable del cumplimiento,
pueden invalidar el permiso del usuario para operar el equipo.
Back
/