Page is loading ...

Electronic
7-Day
In-Wall
Time Switch
MODEL EI500 Series
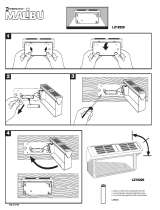
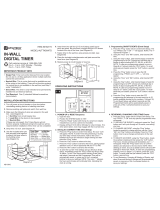
1. Remove wall plate and disconnect
existing light switch.
2. Make sure both “hot” and
“neutral” wires are present in the
junction box. If both wires are not
present, additional wiring will be
necessary before installation can be
completed.
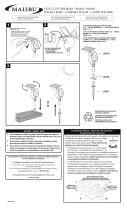
3. Connect red timer wire to wire from
fixture using wire connector.
4. Connect black timer
wire to the “hot” (usually
black or red) wire in
junction box using wire
connector.
5. Cut white
wire in
junction
box (or
open splice) and strip
½” of insulation on both
wires.
Installation Instructions
• All Ratings 125 VAC, 60 Hz
• 15 A / 1875 W Resistive / Heater
• 15 A, General Purpose
• 8 A / 1000 W Tungsten
• 8 A / 1000 VA Inductive / STD Ballast
• 500 VA Electronic Ballast
• 1/4 HP Motor
Installation and User Instructions
• 7-Day Control Schedule
• Up to 7 ON and 7 OFF Events per day
• Works with multiple load types including: incandescent,
compact fluorescent, HID, motors, and heaters
• Available in White, Ivory, and Light Almond
Ratings
Features
• Black = Line
• White = Neutral
• Red = Load
• Green = Ground
Leads
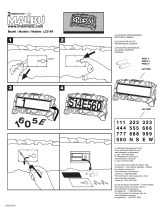
6. Connect white timer wire to white wires in junction box
using wire connector.
7. If the wall switch you are replacing had separate grounding
conductors connected to the GREEN screw on the switch,
make sure to connect these to the green wire from the timer
with a wire connector.
8. Check that all wire connections are secure.
9. Place all wires inside junction box.
10. Fit timer into junction box and install using two (2) mounting
screws (furnished).
11. Reconnect the electrical power.
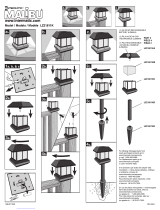
Setting the Clock
1. Press and HOLD the CLK (Clock) button.
2. Press the DAY button until the display shows the current day.
3. Press the HOUR button until the display shows the current
hour.
4. Press the MIN (Minute) button until the display shows the
current minute.
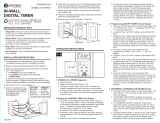
Setting Programs
1. Press the PROG (Program) button once. The
display will look as shown at the right.
You will now set up the time in which you
want your device turned ON.
The number 1 in the lower left hand corner
indicates that you are now programming
EVENT 1.
2. Press the DAY button repeatedly until the display shows the
day(s) when you want the timer to turn on. The options are:
- All days of the week (MO TU WE TH FR SA SU)
- Individual days of the week (MO etc.)
- Weekdays only (MO TU WE TH FR)
- Weekends only (SA SU)
3. Press the HOUR and MIN (Minute) buttons
to set the time when you want the timer to
turn on.
4. Press the PROG (Program) button again. The
display reads as shown at the right.
• Disconnect power at the circuit breaker(s) or disconnect
switch(es) before installing or servicing.
• Installation and/or wiring must be in accordance with national and
local electrical code requirements.
• Use COPPER conductors ONLY.
WARNING
Risk of Fire or Electric Shock
• No user-serviceable parts.
• The internal battery requires up to 30 minutes to charge. If the
battery is not charged and power is lost, schedule information
may have to be re-configured.
NOTICE

Reviewing Events Programmed
1. In the current time display, press the PROG (Program) button
repeatedly to check your settings.
2. When finished, press the CLK (Clock) button to return the
display to the time of day.
LIMITED ONE-YEAR WARRANTY
If within the warranty period specied, this product fails due to a defect in material or workmanship, Intermatic Incorporated will repair or replace it, at its
sole option, free of charge. This warranty is extended to the original household purchaser only and is not transferable. This warranty does not apply to: (a)
damage to units caused by accident, dropping or abuse in handling, acts of God or any negligent use; (b) units which have been subject to unauthorized
repair, opened, taken apart or otherwise modied; (c) units not used in accordance with instructions; (d) damages exceeding the cost of the product; (e)
sealed lamps and/or lamp bulbs, LED’s and batteries; (f) the nish on any portion of the product,such as surface and/or weathering, as this is considered
normal wear and tear; (g) transit damage, initial installation costs, removal costs, or reinstallation costs.
INTERMATIC INCORPORATED WILL NOT BE LIABLE FOR INCIDENTAL OR CONSEQUENTIAL DAMAGES. SOME STATES DO NOT ALLOW THE EXCLUSION OR LIMITATION OF
INCIDENTAL OR CONSEQUENTIAL DAMAGES, SO THE ABOVE LIMITATION OR EXCLUSION MAY NOT APPLY TO YOU. THIS WARRANTY IS IN LIEU OF ALL OTHER EXPRESS OR
IMPLIED WARRANTIES. ALL IMPLIED WARRANTIES, INCLUDING THE WARRANTY OF MERCHANTABILITY AND THE WARRANTY OF FITNESS FOR A PARTICULAR PURPOSE, ARE
HEREBY MODIFIED TO EXIST ONLY AS CONTAINED IN THIS LIMITED WARRANTY, AND SHALL BE OF THE SAME DURATION AS THE WARRANTY PERIOD STATED ABOVE. SOME
STATES DO NOT ALLOW LIMITATIONS ON THE DURATION OF AN IMPLIED WARRANTY, SO THE ABOVE LIMITATION MAY NOT APPLY TO YOU.
This warranty service is available by either (a) returning the product to the dealer from whom the unit was purchased or (b) completing a warranty claim
online at www.intermatic.com.
This warranty is made by: Intermatic Incorporated, Customer Service 7777 Winn Rd., Spring Grove, Illinois 60081-9698. For warranty service go to:
http://www.Intermatic.com or call 815-675-7000.
INTERMATIC INCORPORATED, SPRING GROVE, ILLINOIS 60081-9698
5. Repeat Steps 2-3 to set the OFF time for Event 1.
• You can repeat the ON and OFF programming procedures
outlined above for up to 7 events, as needed.
• Do not set ON / OFF events within 30 minutes or less from
one another if you are going to use the timer in the Random
Mode. The Random Mode interval is ± 30 minutes from the
programmed times, and programs set too close together
may overlap one another.
6. When programming is complete, press the CLK (Clock)
button to display the current time.
Clearing (Deleting) an Event
1. Press the PROG (Program) button as many times as necessary
to locate the setting you want to clear.
2. Press and hold the MODE button.
3. Press the PROG button to clear the setting.
4. When finished, press the CLK (Clock) button to return the
display to the time of day.
Operating the Time Switch
Press the MODE button repeatedly to set the timer to Automatic,
Random or Manual mode.
NOTE: For the time switch to run programmed events, it
must be set to “AUTO” or “RDM” (Random) mode.
NOTE: After setting events, the timer may turn on the load if
you press the MODE button.
• AUTO — runs all events automatically, according to the
schedule you have set. The word “AUTO” appears in the
display.
• RDM (Random) — runs all events in a RANDOM mode. This
is a security feature in which ON and OFF times randomly
differ ± 30 minutes from the programmed times, creating a
more “lived-in” look. The word “RDM” appears in the display.
• MANUAL — turns ON and OFF only when the user presses
the ON or OFF button. The display is blank, showing neither
RDM or AUTO.
Overriding Timer Settings
The ON or OFF buttons override the current programmed events.
To override the current program (either ON or OFF), press the
ON or OFF button.
NOTE: If the timer is not in “Manual” mode, it will obey the
next programmed event. This allows the user to manually
turn a light on and allow the program to shut the light back
off at a preset time.
Resetting the Timer
In case of an operational failure of the timer, press the RESET
button to clear all settings and restart.
Printed in China

Revisión de eventos programados
1. En la pantalla de hora actual, presione el botón PROG
(PROGRAMA) varias veces para revisar los ajustes.
2. Cuando termine, presione el botón CLK (RELOJ) para volver
a la pantalla de hora del día.
GARANTÍA LIMITADA DE UN AÑO
Si dentro del período de garantía especicado, este producto presenta fallas a causa de defectos en los materiales o en la mano de obra, Intermatic
Incorporated lo reparará o lo reemplazará, a su exclusivo criterio, sin cargo. Esta garantía se extiende solo al comprador doméstico original y no es
transferible. Esta garantía no se aplica a: (a) daño a las unidades causado por accidente, caída o uso indebido en su manipulación, casos fortuitos o
cualquier uso negligente; (b) unidades que hayan sido reparadas, abiertas, desmontadas o modicadas de otra forma sin autorización; (c) unidades que
no se hayan usado de acuerdo con las instrucciones; (d) daños que excedan el costo del producto; (e) focos o bombillas sellados, LED y baterías; (f)
el acabado de cualquier parte del producto, como la supercie o la alteración por exposición a la intemperie, puesto que se considera como desgaste
natural; (g) daño en el transporte, costos de instalación inicial, costos de retiro o costos de reinstalación.
INTERMATIC INCORPORATED NO SERÁ RESPONSABLE POR DAÑOS INDIRECTOS O EMERGENTES. ALGUNOS ESTADOS NO PERMITEN LA EXCLUSIÓN O LIMITACIÓN DE DAÑOS
INDIRECTOS O EMERGENTES, DE MODO QUE LA LIMITACIÓN O EXCLUSIÓN ANTERIOR PODRÍA NO APLICARSE A SU CASO. ESTA GARANTÍA REEMPLAZA TODAS LAS DEMÁS
GARANTÍAS EXPRESAS O IMPLÍCITAS. TODAS LAS GARANTÍAS IMPLÍCITAS, INCLUIDA LA GARANTÍA DE COMERCIABILIDAD E IDONEIDAD DEL PRODUCTO PARA UN PROPÓSITO
EN PARTICULAR, POR MEDIO DEL PRESENTE QUEDAN MODIFICADAS PARA TENER VALIDEZ SOLO COMO SE INDICA EN ESTA GARANTÍA LIMITADA Y TENDRÁN LA MISMA
DURACIÓN QUE EL PERÍODO DE GARANTÍA ESTIPULADO ANTERIORMENTE. ALGUNOS ESTADOS NO PERMITEN LIMITACIONES A LA DURACIÓN DE UNA GARANTÍA IMPLÍCITA, DE
MODO QUE LA LIMITACIÓN ANTERIOR PODRÍA NO APLICARSE A SU CASO.
Este servicio de garantía está disponible ya sea (a) si se devuelve el producto al proveedor donde se compró la unidad o (b) si se completa una
reclamación de garantía en línea en www.intermatic.com.
Este producto tiene garantía de: Intermatic Incorporated, Customer Service 7777 Winn Rd., Spring Grove, Illinois 60081-9698. Para obtener servicios de
garantía, ingrese a: http://www.Intermatic.com o llame al 815-675-7000.
INTERMATIC INCORPORATED, SPRING GROVE, ILLINOIS 60081-9698
5. Repita los pasos 2 a 3 para ajustar la hora de OFF (APAGADO)
para el Evento 1.
• Puede repetir los procedimientos de programación de
ENCENDIDO y APAGADO que se indican anteriormente para
hasta 7 eventos, según sea necesario.
• No ajuste los eventos ON / OFF (ENCENDIDO y APAGADO)
dentro de 30 minutos o menos uno del otro si va a usar
el temporizador en modo RDM (Aleatorio). El intervalo
del modo Aleatorio es de ± 30 minutos desde las horas
programadas, y los programas ajustados demasiado cerca
se pueden superponer entre sí.
6. Cuando complete la programación, presione el botón CLK
para mostrar la hora actual.
Borrado (eliminación) de un evento
1. Presione el botón PROG (PROGRAMA) cuantas veces sea
necesario para ubicar el ajusto que desea borrar.
2. Mantenga presionado el botón MODE (MODO).
3. Presione el botón PROG button to clear the setting.
4. Cuando termine, presione el botón CLK (RELOJ) para volver
a la pantalla de hora del día.
Operación del interruptor temporizador
Presione el botón MODE (MODO) varias veces para ajustar el
temporizador a modo Automático, Aleatorio o Manual.
NOTA: Para que el interruptor temporizador ejecute los
eventos programados, se debe ajustar en modo “AUTO”
(AUTOMÁTICO) o “RDM” (ALEATORIO).
NOTA: Después de ajustar los eventos, es posible que el
temporizador encienda la carga si presiona el botón MODE.
• AUTO: ejecuta todos los eventos automáticamente, según
el programa que haya ajustado. La palabra “AUTO” aparece
en la pantalla.
• RDM: ejecuta todos los eventos de modo ALEATORIO. Esta
es una característica de seguridad en la cual las horas de ON
y OFF varían de manera aleatoria ± 30 minutos desde las hora
programadas, lo cual crea una apariencia más “habitada”. La
palabra “RDM” aparece en la pantalla.
• MANUAL: ENCIENDE y APAGA solo cuando el usuario
presione el botón ON u OFF. La pantalla está en blanco, no
muestra RDM ni AUTO.
Transferencia de los ajustes del temporizador
Los botones ON u OFF transfieren los eventos programados
actuales.
Para transferir el programa actual (ya sea ON u OFF), presione
el botón ON u OFF.
NOTA: Si el temporizador no está en modo “Manual”,
obedecerá al siguiente evento programado. Esto permite
al usuario encender una luz manualmente y permite al
programa apagar la luz a una hora predeterminada.
Restablecimiento del temporizador
En caso de una falla operacional del temporizador, presione el
botón RESET (REINICIALIZAR) para borrar todos los ajustes y
reiniciar.
Impreso en China
158--01825
/