Page is loading ...

CAM540 Conference Camera
Quick Installation Guide
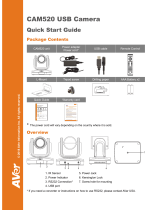
Package Contents
Camera
Remote controller
AAA Batteries
Power Adapter
Power plug*
USB Cable
/
L-Mount Bracket Screws for mount Quick Guide Warranty card
USB type-A to
type-C adapter
*The power plug will vary depending on the standard power outlet of the country where it is sold.
Overview
(1) (2) (4)(3) (5)
(6)
(7)
(1) IR sensor (3) RS232 port (5) Reset button (7) Screw hole for mounting
(2) Power port (4) USB port (6) Kensington Lock
P/N: 300AU300-???

Installation
1. Connect the camera to power outlet.
Power cord
2. Connect the camera to the computer.
[Note] If you like to use the type-C connector on
newer PC, connect provided adapter to type-A
end of the cable, then connect type-C side of the
adapter to PC.
3. Install the cable first and secure the
cable.
[Note] Make sure the cable is well connect to
the connector on the camera before secure the
cable
USB cable
Wall Mount Installation
1 2
58mm(2.28”)
97.5mm(3.84”)
4 - Ø5.5mm(Ø0.22”)
3 4

Wall Mount Installation Continue
5
6
1
2
Celling Mount/ Switch Box Installation
1
2
3
4
1
2
5
Switch Box

Remote Controller
Camera select
Camera Directional
control
Line In**
SmartFraming
Zoom In/Out
Preset
Call/Answer*
Brightness -
Enter**
M
u
t
e
/
U
n
-
m
u
t
e
*
*
V
o
l
u
m
e
U
p
/
D
o
w
n
*
*
P
r
e
s
e
t
H
o
t
k
e
y
P
r
e
s
e
t
P
o
s
i
t
i
o
n
H
a
n
d
u
p
*
B
r
i
g
h
t
n
e
s
s
+
1
Making a Video Call
A computer is required to use this device.
Step 1: Open your video collaboration application such as Skype
TM
, Skype for Business, Google
Hangouts
TM
, ZOOM
TM
, WebEx
TM
, Adobe Connect
TM
, WebRTC, TrueConf, V-Cube, U-meeting,
Ringcentral, BlueJeans, Fuze.
Step 2: Set the CAM540 as your primary camera device in your application (Please consult your
application setup guide for details).
Step 3: Ready to make a video call.
[Note] CAM540 is a Plug-n-Play Conference Camera. The system requires no special drivers. For
advanced setting and firmware update, please download AVer PTZApp.
AAA Batteries (required)
*Function requires AVer PTZApp
**Not support for CAM540
1: If you only have one camera
and don’t need to do any setting,
the default is camera 1.
If you press camera 2 or 3 on
the remote control, you will find
your remote can’t control your
camera. In this case, please
press camera 1 on your remoter
again.

Install AVer PTZApp
Please go to http://www.aver.com/download-center to download the AVer PTZApp. After downloading,
double-click on the file and follow the on-screen instructions to complete the installation.
After installing the AVer PTZApp, double-click on the AVer PTZApp icon to run the application.
Use AVer PTZApp
1. Run your video application.
2. During your video call, you can use the AVer PTZApp to pan, tilt and zoom the camera in/out and
enable/disable the backlight feature, set up camera Home or Sleep mode preset points. For more
details, please refer to the user manual.
3.
Smart Framing:
The Smart Framing function can auto detects face of people to find the best view
for all meeting participants. Press
on the remote for 1 second can switch the Smart framing
function between auto and manual; a message (as figure shown) will display on the screen to
indicate in auto or manual status.
Also, user can change Smart Framing function status
in AVer PTZApp. In AVer PTZApp, select “Settings” >
“Smart Framing” > “Auto/Manual”.
[Note] While in conferencing meeting, participants
must face the camera for face detection (smart
framing). When Smart Framing is detecting, the
screen will display word “Framing” on the left upper
corner.
4. Flip: If the CAM540is installed in the upside down
position, please enable the "Flip" function in the AVer
PTZApp , and the screen will display normally.

5. Hotkey Control: Enable hotkey control to use keyboard control camera’s movement and backlight.
The default is off.
When hotkey control is enabled, a hotkey tip will display when mouse is moved to the PTZ control
button in PTZ mode.
If the hotkey function is enabled after installed PTZApp, PTZApp auto launch next time PC reboot.
Therefore, the customer can use all the hotkey commands since PTZApp is auto running in
system tray.

More Help
For FAQs, technical support, software and user manual download, please visit:
http://www.averusa.com
Contact Information
AVer Information Inc.
668 Mission Ct
Fremont, CA 94539
www.averusa.com
Toll-free: 1(877)528-7824
Local: 1(408)263-3828
support.usa@aver.com
Federal Communication Commission Interference Statement
NOTE: This equipment has been tested and found to comply with the limits for a Class A digital device, pursuant to
part 15 of the FCC Rules. These limits are designed to provide reasonable protection against harmful interference
when the equipment is operated in a commercial environment. This equipment generates, uses, and can radiate radio
frequency energy and, if not installed and used in accordance with the instruction manual, may cause harmful
interference to radio communications. Operation of this equipment in a residential area is likely to cause harmful
interference in which case the user will be required to correct the interference at his own expense.
FCC Caution: Any changes or modifications not expressly approved by the party responsible for compliance could
void the user's authority to operate this equipment.
This device complies with part 15 of the FCC Rules.
Operation is subject to the following two conditions:
(1) This device may not cause harmful interference, and
(2) this device must accept any interference received, including interference that may cause undesired operation.
Warning: This is a class A product. In a domestic environment this product may cause radio interference in which case
the user may be required to take adequate measures.
©2019 AVer Information Inc. All rights reserved.
/