Page is loading ...

Data creazione 10/09/03 DS03I009GB--00 Pagina 1 di 59
CONTROLLER MANUAL
SPINCHILLER C.D.A

Data creazione 10/09/03 DS03I009GB--00 Pagina 2 di 59
SUMMARY
CLIVET TALK LOCAL INTERFACE................................................................................................................. 3
DESCRIPTION OF THE BUTTONS ................................................................................................................................4
DESCRIPTION OF THE MAIN SCREEN.........................................................................................................................5
SYSTEM COMPOSITION.................................................................................................................................. 6
CENTRAL MODULE CLIVETTALK.LOCAL.M1...............................................................................................................6
DESCRIPTION OF THE JUMPERS.............................................................................................................................7
I/O CLIVETTALK.LOCAL.M1 .......................................................................................................................................7
EVAPORATOR MODULE CLIVETTALK.LOCAL.EX1.....................................................................................................9
DESCRIPTION OF THE JUMPERS.............................................................................................................................9
I/O CLIVETTALK.LOCAL.EX1....................................................................................................................................10
TANDEM COMPRESSOR MODULE CLIVETTALK.LOCAL.C2....................................................................................11
TRIO COMPRESSOR MODULE CLIVETTALK.LOCAL.C3...........................................................................................11
DESCRIPTION OF THE JUMPERS...........................................................................................................................11
CLIVETTALK.LOCAL.C2 AND CLIVETTALK.LOCAL.C3 ..........................................................................................12
INITIALISING THE MODULES ....................................................................................................................... 13
BASIC RULES FOR CONFIGURATION........................................................................................................................13
SETTING THE HARDWARE ADDRESS....................................................................................................................13
SETTING THE SOFTWARE ADDRESS....................................................................................................................14
SETTING THE HARDWARE ADDRESS OF THE CENTRAL MODULE....................................................................15
SETTING THE HARDWARE ADDRESS OF THE EVAPORATOR MODULE ...........................................................15
SETTING THE HARDWARE ADDRESS OF THE TRIO AND TANDEM MODULES.................................................15
TABLE FOR SETTING THE HARDWARE ADDRESS...............................................................................................16
LOCAL INTERFACE ADDRESS .................................................................................................................... 17
REMOTE INTERFACE ADDRESS................................................................................................................................17
CONFIGURATION EXAMPLE ........................................................................................................................ 18
SETTING THE HARDWARE ADDRESS.......................................................................................................................18
SETTING THE SOFTWARE ADDRESS........................................................................................................................19
PARAMETER MENU TREE............................................................................................................................ 20
OPERATING STATUS MENU TREE.............................................................................................................................39
GENERAL UNIT STATUS MENU..................................................................................................................................40
LIST OF ALARMS........................................................................................................................................... 42
CENTRAL MODULE ALARMS......................................................................................................................................42
COMPRESSOR MODULE ALARMS.............................................................................................................................43
EVAPORATOR MODULE ALARMS..............................................................................................................................44
OPERATION OF THE TEMPERATURE CONTROLLER............................................................................... 45
COOLING ......................................................................................................................................................................45
DETERMINING THE TEMPERATURE DIFFERENCE FOR EACH COMPRESSOR................................................45
FREECOOLING .........................................................................................................................................................46
HEATING.......................................................................................................................................................................51
DETERMINING THE TEMPERATURE DIFFERENCE FOR EACH COMPRESSOR................................................51
STEP ACTIVATION – SCAN TIMES .............................................................................................................. 52
STEP DEACTIVATION..................................................................................................................................................52
COMPENSATION............................................................................................................................................ 52
SET POINT CORRECTION IN COOLING ...................................................................................................... 53
SET POINT CORRECTION IN HEATING....................................................................................................... 54
SECOND SET POINT FROM DIGITAL INPUT............................................................................................... 55
DEMAND LIMIT............................................................................................................................................... 56
MAINTENANCE SET POINT .......................................................................................................................... 58
RESOURCE MANAGEMENT ALGORITHM ..................................................................................................59
BALANCING OF THE CAPACITY DELIVERED............................................................................................................59

Data creazione 10/09/03 DS03I009GB--00 Pagina 3 di 59
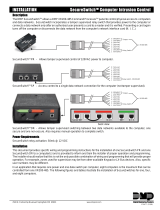
CLIVET TALK LOCAL INTERFACE
Figure 1
Clivet code C5110612
Figure 1 represents the layout of the control keypad corresponding to the ClivetTalk modular control system.
The functions of the buttons and the meaning of the configuration screens are described below.

Data creazione 10/09/03 DS03I009GB--00 Pagina 4 di 59
DESCRIPTION OF THE BUTTONS
F1 F4F3F2
?
ESC
I
HOME
ALARM
MODE SETUP STATE
ON
C O O L
STEP:
03 / 12
15 / 02 / 03 08:03:51
7.
0
°C
SET
9.
3
°C
OUT
12.
2
°C
IN
2 731 4 6 85 9
NUMBER SYMBOL MEANING
1 LED = on when unit ON
LED = off when unit OFF
2
I
“ON-OFF” button: holding this for at least 3 seconds turns the unit on or off
3
F1
F1 = Button that runs the associated function indicated in bold, “MODE”
4
?
“HELP” button: depending on the menu selected, pressing this button provides
brief descriptions to help the user interpret the parameters, status variables and
alarms
5
F2
F2 = Button that runs the associated function indicated in bold, “ALARM”
6
ESC
“ESC” key: when navigating the menus, this key can be used to go back to the
previous screen
7
F3
F3 = Button that runs the associated function indicated in bold, “SETUP”
8
HOME
“HOME” button: during navigation, returns to the main menu from any screen
9
F4
F4 = Button that runs the associated function indicated in bold, “STATE”

Data creazione 10/09/03 DS03I009GB--00 Pagina 5 di 59
DESCRIPTION OF THE MAIN SCREEN
ALARMMODE SETUP STATE
ON
C O O L
STEP:
03 / 12
15 / 02 / 03 08:03:51
7.
0
°C
SET
9.
3
°C
OUT
12.
2
°C
IN
7
9
8
6
4
23
5
1
14 1112 10
13
NUMBER SYMBOL MEANING
1 00/00 No. of steps activated in reference to the no. of steps available
2 STEP Capacity-control steps
3 No alarm active Indication of active alarms
4
COOL
HEAT
Unit operating in Cool mode Unit operating in Heat mode
5 ON OFF
Unit on Unit off
6 15/02/03
08:03:51 Display the actual date and hour
7 00.0 °C Inlet temperature
8 00.0 °C Outlet temperature
9 00.0 °C Actual set-point
10
STATE
STATUS button: accesses the unit status menu
11
SETUP
SETUP button: used to access to the menu for setting the unit parameters, the
clock and the time bands
12
ALARM
ALARM: allows access to the alarms menu
13 Time bands disabled Time bands enabled
14
MODE
MODE: if selection of the operating mode from the keypad is enabled, the unit can
be switched between operating modes (heat, cool). The mode can be changed
only when the unit is “OFF”, by pressing and holding the key for at least 3
seconds

Data creazione 10/09/03 DS03I009GB--00 Pagina 6 di 59
SYSTEM COMPOSITION
The Clivet Talk modular system is made up of the following modules, which can communicate with each
other over the local network:
• Central module (Code = C5110671)
• Evaporator module (Code = C5110674)
• Trio module(Code = C5110672)
• Tandem module (Code = C5110673)
• Clivet Talk keypad (Code = C5110612)
CENTRAL MODULE CLIVETTALK.LOCAL.M1
1 2 3 4 5 6 7 8 9 10 11 12 13 14 15 16 17 18 19
20
21
22
23
24
25
26
27
28
29
37 36 35 34 33 32 31 3045 44 43 42 41 40 39 3847 46
demand
limit
Water
ReSet
Free
cooling
0-10V Out
0-10V Out
HL
gnd
J17
OFF
ON
1234
OFF
ON
1234
5678
JUMP4 JUMP1
JUMP2
JUMP3
STRIP
gnd
DIP1
DIP2
12V
6VA
RH%Ext.
4-20mA-In
0-10V or 4-20mA
0-10V or 4-20mA
T.OUT T.IN T.Ext

Data creazione 10/09/03 DS03I009GB--00 Pagina 7 di 59
DESCRIPTION OF THE JUMPERS
DIP1 To be defined
DIP2 Board address for CAN BUS
JUMP1 Reset board (jumper for normal operation)
JUMP2 programming (jumper for programming)
JUMP3 programming (jumper for programming)
JUMP4 CAN Bus terminator (jumper for insert terminator)
STRIP
Programming strip (pin sequence)
• +5V
• TX board
• RX board
• DTR
• gnd
Connection of the digital inputs
I/O CLIVETTALK.LOCAL.M1
Connector Pin Terminal Description Note
J6-1 1 12Vac power (common)
J6 J6-2 2 12Vac power (reference) Max. 6VA
J1-1 3 12V power (common)
J1-2 4 Remote On-Off input
J1-3 5 12V power (common)
J1-4 6 Remote Heat-Cool input
J1-5 7 12V power (common)
J1-6 8 Select second set point input
J1-7 9 12V power (common)
J1
J1-8 10 Mains monitor input
J2-1 11 12V power (common)
J2-2 12 Flow switch input
J2-3 13 12V power (common)
J2-4 14 Protector input pump 1
J2-5 15 12V power (common)
J2-6 16 Protector input pump 2
J2-7 17 12V power (common)
J2
J2-8 18 Check system pressure input
Max. 10mA for
each input
J16-1 19
J16-2 20 Relay 1 input
Relay 1, (pump 1 control signal)
J16-3 21
J16-4 22 Relay 2 input
Relay 2, (pump 2 control signal)
J16-5 23
J16-6 24 Relay 3 input
Relay 3, free
J16-7 25
J16-8 26 Relay 4 input
Relay 4, (freecooling control signal)
J7-1 27
J7-2 28
J16
J7
J7-3 29
Relay 5 input
Relay 5 NO, Cumulative alarms
Relay 5 NC, Cumulative alarms
5A-250V
AC1

Data creazione 10/09/03 DS03I009GB--00 Pagina 8 di 59
Connector Pin Terminal Description Note
J17-1 H
J17-2 L
J17
J17-3 GND
CAN OPEN
J18-1 30
J18-2 31 NTC input, outside air temperature
Gnd
J18-3 32
J18-4 33 NTC input, water temperature OUT 1
Gnd
J18-5 34
J18-6 35 NTC input, water temperature IN
Gnd
NTC
10K=25°C
J18-7 36
J18
J18-8 37 +15V
4-20mA input, outside RH% 4-20mA
J19-1 38
J19-2 39
J19-3 40
+15V
Demand Limit input
Gnd
4-20mA or 0-10V
from parameter
J19-4 41
J19-5 42
J19
J19-6 43
+15V
Water reset input
Gnd
4-20mA or 0-10V
from parameter
J20-1 44
J20-2 45 Freecooling proportional valve output
Gnd 0-10V
J20-3 46
J20
J20-4 47 Ext Free Cool proportional vent. output
Gnd 0-10V

Data creazione 10/09/03 DS03I009GB--00 Pagina 9 di 59
EVAPORATOR MODULE ClivetTalk.local.ex1
HLgnd
J17
J12
CN1
CN2
DIP1
DIP2
JUMP4
STRIP
gnd
OFF
ON
1234
OFF
ON
1234
5678
123456
97531
108426
246810
13579
JUMP1
JUMP2
JUMP3
TInTOut----
--
12V
4VA
out
0-10V
DESCRIPTION OF THE JUMPERS
DIP1 To be defined
DIP2 Board address for CAN BUS
JUMP1 Reset board (jumper for normal operation)
JUMP2 programming (jumper for programming)
JUMP3 programming (jumper for programming)
JUMP4 CAN Bus terminator (jumper for insert terminator)
STRIP
Programming strip (pin sequence)
• +5V
• TX board
• RX board
• DTR
• gnd

Data creazione 10/09/03 DS03I009GB--00 Pagina 10 di 59
I/O CLIVETTALK.LOCAL.EX1
Connector Pin Terminal Description Note
CN1-1
CN1-2 12Vac power
12Vac power Max. 4VA
CN1-3
CN1-4 Differential pressure switch
12V
CN1-5
CN1-6 Check system charge
12V
CN1-7
CN1-8 Safety devices pump 1
12V
CN1-9
CN1
CN1-10 Safety devices pump 2
12V
Max. 10mA for each input
CN2-1 Water inlet temperature NTC
CN2-2 Gnd
CN2-3 Water outlet temperature NTC
CN2-4 Gnd
CN2-5 Configurable NTC
CN2-6 Gnd
NTC
10k=25°C
CN2-7 Configurable 0-10 or 4-20
CN2-8 VRdd Hardware setting
CN2-9 0-10V output
CN2
CN2-10 Gnd 0-10V
J4-1 1
J4-2 2 C
Antifreeze heater control signal
J4-3 3
J4-4 4 C
Pump 1 control signal
J4-5 5
J4
J4-6 6 C
Pump 2 control signal
5A-250V
AC1

Data creazione 10/09/03 DS03I009GB--00 Pagina 11 di 59
TANDEM COMPRESSOR MODULE CLIVETTALK.LOCAL.C2
TRIO COMPRESSOR MODULE CLIVETTALK.LOCAL.C3
HL
gnd
8 9 10 11
JUMP4
123 4 5 67
DIP1
DIP2
STRIP
gnd
OFF
ON
1234
OFF
ON
12345678
JUMP1
JUMP2
JUMP3
13579
24810 6 CN2
CN1
161412108642
15131197531
J22
J15
T. BattT. Rec.HPLP
+-
12V
7VA
DESCRIPTION OF THE JUMPERS
DIP1 To be defined
DIP2 Board address for CAN BUS
JUMP1 Reset board (jumper for normal operation)
JUMP2 Firmware programming (jumper when programming)
JUMP3 Firmware programming (jumper when programming)
JUMP4 CAN Bus terminator (jumper for insert terminator)
STRIP Programming strip
• +5V
• TX board
• RX board
• DTR
• gnd

Data creazione 10/09/03 DS03I009GB--00 Pagina 12 di 59
CLIVETTALK.LOCAL.C2 AND CLIVETTALK.LOCAL.C3
Connector Pin Terminal Description Note
CN1-1
CN1-2 12Vac power
12Vac power Max. 7VA
CN1-3
CN1-4 Fan protector
12V
CN1-5
CN1-6 High pressure
12V
CN1-7
CN1-8 Low pressure
12V
CN1-9
CN1-10 Compressor 1 protector
12V
CN1-11
CN1-12 Compressor 2 protector
12V
CN1-13
CN1-14 Compressor 3 protector
12V
CN1-15
CN1
CN1-16 Free
12V
Max 10mA for each input
CN2-1
CN2-2 Coil temperature probe NTC
Gnd
CN2-3
CN2-4 Recovery temperature probe NTC
Gnd
NTC
10K=25°C
CN2-5
CN2-6 High pressure transducer
VRdd
CN2-7
CN2-8 Low pressure transducer
VRdd
4-20mA
CN2-9
CN2
CN2-10 Fan control output
Gnd 0-10V
J22-1 1 Common for the outputs
J22-2 2 Compressor 1 control signal
J22-3 3 Compressor 2 control signal
J22-4 4 Compressor 3 control signal
J22-5 5 Cap. control valve control signal
J22-6 6 Cap. control valve control signal
J22
J22-7 7 Cap. control valve control signal
5A-250V
AC1
J15-1 8 Liquid valve control signal
J15-2 9 4-way valve control signal
J15-3 10 Fan control signal
J15
J15-4 11 Common for the outputs
5A-250V
AC1

Data creazione 10/09/03 DS03I009GB--00 Pagina 13 di 59
INITIALISING THE MODULES
Each module configured and present in the Clivet Talk control system must be recognised by the local
network, which needs to know which device it is communicating with.
A series of basic rules must be observed when configuring the system, so as to avoid incorrect settings.
BASIC RULES FOR CONFIGURATION
Each module (central, evaporator, trio or tandem) will be identified by a network address, which must be set
using the corresponding dipswitches. The sequence of the addresses is not random, but rather must observe
the following rules.
• The address of the central module is always = 25
• The address of the local interface is always = 26
• The address of the remote interface is always = 27
• Modules with no address are not allowed
• The addresses of the modules that make up the same unit must be CONSECUTIVE.
• Each unit can only have one evaporator module (unit configurations are possible without an evaporator
module). The system can manage a maximum of 3 evaporator modules.
• Inside each unit, the addresses must be assigned considering the following sequence:
1. compressor module (trio or tandem)
2. evaporator module
3. In essence, the evaporator module must have the highest address inside each unit.
• Each unit can manage a maximum of 3 compressor modules (single, tandem or trio).
SETTING THE HARDWARE ADDRESS
The address of the modules must be set before any other configuration operation
• The local keypad and the remote keypad have no physical address set using the dipswitches
• The address of the central module is set using the combination of the dipswitches DIP2
• The address of the evaporator module is set using the combination of the dipswitches DIP1
• The address of the tandem module is set using the combination of the dipswitches DIP1
• The address of the trio module is set using the combination of the dipswitches DIP1

Data creazione 10/09/03 DS03I009GB--00 Pagina 14 di 59
SETTING THE SOFTWARE ADDRESS
The following parameters are used for the configuration of the system:
UNIT 1
Add Code Description Default
39 U1_Mcomp1 Type of compressors, module 1 unit 1 3
40 U1_RecoverEn1 Enable recovery, compressor module 1 unit 1 0
41 U1_Mcomp2 Type of compressors, module 2 unit 1 3
42 U1_RecoverEn2 Enable recovery, compressor module 2 unit 1 0
43 U1_Mcomp3 Type of compressors, module 3 unit 1 0
44 U1_RecoverEn3 Enable recovery, compressor module 3 unit 1 0
45 U1_MEvap Enable evaporator module, unit 1 1
69 U1_Weightprobe Weight on average Out, unit 1 100
46 U1_VentilType Type of ventilation, unit 1 1
UNIT 2
Add Code Description Default
47 U2_Mcomp1 Type of compressors, module 1 unit 2 3
48 U2_RecoverEn1 Enable recovery, compressor module 1 unit 2 0
49 U2_Mcomp2 Type of compressors, module 2 unit 2 3
50 U2_RecoverEn2 Enable recovery, compressor module 2 unit 2 0
51 U2_Mcomp3 Type of compressors, module 3 unit 2 0
52 U2_RecoverEn3 Enable recovery, compressor module 3 unit 2 0
53 U2_MEvap Enable evaporator module, unit 2 1
70 U2_Weightprobe Weight on average Out, unit 2 100
54 U2_VentilType Type of ventilation, unit 2 1
UNIT 3
Add Code Description Default
55 U3_Mcomp1 Type of compressors, module 1 unit 3 0
56 U3_RecoverEn1 Enable recovery, compressor module 1 unit 3 0
57 U3_Mcomp2 Type of compressors, module 2 unit 3 0
58 U3_RecoverEn2 Enable recovery, compressor module 2 unit 3 0
59 U3_Mcomp3 Type of compressors, module 3 unit 3 0
60 U3_RecoverEn3 Enable recovery, compressor module 3 unit 3 0
61 U3_MEvap Enable evaporator module, unit 3 0
71 U3_Weightprobe Weight on average Out, unit 3 0
62 U3_VentilType Type of ventilation, unit 3 0

Data creazione 10/09/03 DS03I009GB--00 Pagina 15 di 59
SETTING THE HARDWARE ADDRESS OF THE CENTRAL MODULE
43
44 4546 47
H
L
gnd
J20
J17
JUMP4
JUMP1
OF
F
ON 1
2
3
4
OF
F
ON 1
2
3
4
5
6
7
8
DIP1 DIP2
DIP2 = Dipswitches for setting the serial address
The address of the central module is always = 25
SETTING THE HARDWARE ADDRESS OF THE EVAPORATOR MODULE
1
2
3
4
1 3 5 7 9
2 4 6 8 10
CN1
DIP1
DIP
2
JUMP2
JUMP3
OF
F
O
N 1
2
3
4
OF
F
O
N 1
2
3
4
5
6
7
8
DIP1 = Dipswitches for setting the serial address
The address of the evaporator module is always
higher than the address of the compressor modules
SETTING THE HARDWARE ADDRESS OF THE TRIO AND TANDEM MODULES
8
9
10
11
J1
5
DIP1
DIP
2
STRI
P
gn
d
6
7
OFF
ON
1
2
3
4
OFF
ON
1
2
3
4
5
6
7
8
DIP1 = Dipswitches for setting the serial address
The address of the compressor module is always
lower than the address of the evaporator module

Data creazione 10/09/03 DS03I009GB--00 Pagina 16 di 59
TABLE FOR SETTING THE HARDWARE ADDRESS
Configuration DIP1 - DIP2
ADDRESS SW1 SW2 SW3 SW4 SW5 SW6 SW7 SW8 Device
0 OFF OFF OFF OFF OFF OFF OFF OFF NOT ALLOWED
1 ON
OFF OFF OFF OFF OFF OFF OFF -
2 OFF ON OFF OFF OFF OFF OFF OFF -
3 ON ON
OFF OFF OFF OFF OFF OFF -
4 OFF OFF ON OFF OFF OFF OFF OFF -
5 ON
OFF ON OFF OFF OFF OFF OFF -
6 OFF ON ON
OFF OFF OFF OFF OFF -
7 ON ON ON
OFF OFF OFF OFF OFF -
8 OFF OFF OFF ON OFF OFF OFF OFF -
9 ON
OFF OFF ON OFF OFF OFF OFF -
10 OFF ON OFF ON OFF OFF OFF OFF -
11 ON ON
OFF ON OFF OFF OFF OFF -
12 OFF OFF ON ON
OFF OFF OFF OFF -
13 ON
OFF ON ON
OFF OFF OFF OFF -
14 OFF ON ON ON
OFF OFF OFF OFF -
15 ON ON ON ON
OFF OFF OFF OFF -
16 OFF OFF OFF OFF ON OFF OFF OFF -
17 ON
OFF OFF OFF ON OFF OFF OFF -
18 OFF ON OFF OFF ON OFF OFF OFF -
19 ON ON
OFF OFF ON OFF OFF OFF -
20 OFF OFF ON OFF ON OFF OFF OFF -
21 ON
OFF ON OFF ON OFF OFF OFF -
22 OFF ON ON
OFF ON OFF OFF OFF -
23 ON ON ON
OFF ON OFF OFF OFF -
24 OFF OFF OFF ON ON
OFF OFF OFF -
25 ON
OFF OFF ON ON
OFF OFF OFF CENTRAL MODULE
NOTE
The hardware address of the modules that make up the system must be set before any other
configuration operation.

Data creazione 10/09/03 DS03I009GB--00 Pagina 17 di 59
LOCAL INTERFACE ADDRESS
By definition, it has been established that the LOCAL KEYPAD is recognised by the local network layout as
the module with address = 26. To initialise the local interface, use the screens as highlighted below:
F1 F4 F3 F2
? ESC
I HOME
ALARM MODE SETUP STATE
ON
C O O L
STEP:
03 / 12
15 / 02 / 03 08:03:51
7.
0 °C
SET
9.
3 °C
OUT
12.
2 °C IN
SETUP
F3
F1 F4F3F2
?ESC
IHOME
ENTER
ON
C O O L
STEP:
03 / 12
S E T U P
PARAMETERS
SCHEDULING
CLOCK SETUP
ID Tast-Cen
>PASSWORD ENTER
F1
F1 F4F3 F2
? ESC
I HOME
ENTER
ON
C O O L
STEP:
03 / 12
P A S W O R D
0 0 0
ENTER
F3
F1 F4 F3 F2
? ESC
I HOME
ENTER
ON
C O O L
STEP:
03 / 12
S E T U P
PARAMETERS
SCHEDULING
CLOCK SETUP
>ID Tast-Cen
PASSWORD ENTER
F1
F1 F4F3F2
?ESC
IHOME
ENTER
ON
C O O L
STEP:
03 / 12
A D D R E S S E S
Tast. 26
Cent. 25
Figure 2
NOTE
Figure 2 shows how the address of the local keypad requires a password (known by the Clivet service
centres).
REMOTE INTERFACE ADDRESS
By definition, it has been established that the REMOTE KEYPAD is recognised by the local network layout
as the module with address = 27.
Follow the instructions indicated in Figure 2, and then at the end set the address as shown in Figure 3
F1 F4F3F2
?
ESC
I
HOME
ENTER
ON
C O O L
STEP:
03 / 12
A D D R E S S E S
Tast. 27
C
ent. 25
Figure 3
NOTE
Figure 2 shows how the address of the local keypad requires a password (known by the Clivet service
centres).

Data creazione 10/09/03 DS03I009GB--00 Pagina 18 di 59
CONFIGURATION EXAMPLE
To better understand the configuration mode of the local network, the following refrigeration unit will be used
as an example:
Type of unit = WSAT-SC 65D_R-407C
No. of Central Modules = 1
No. of Evaporator Modules = 0
No. of Tandem Modules = 2
SETTING THE HARDWARE ADDRESS
CENTRAL MODULE. ADDRESS = 25 (See central module address)
OFF
ON
21436587
TANDEM MODULE 1 ADDRESS = 1 (See trio and tandem module address)
OFF
ON
21436587
TANDEM MODULE 2 ADDRESS = 2 (See trio and tandem module address)
OFF
ON
21436587
LOCAL KEYPAD ADDRESS = 26 (See local interface address)
F1 F4F3F2
?
ESC
I
HOME
ENTER
ON
C O O L
STEP:
03 / 12
A D D R E S S E S
Tast.
26
C
ent.
25

Data creazione 10/09/03 DS03I009GB--00 Pagina 19 di 59
SETTING THE SOFTWARE ADDRESS
To correctly configure the modules in a local network, set the parameters as shown below
UNIT 1
Add Code Description Default
39 U1_Mcomp1 Type of compressors, module 1 unit 1 2
40 U1_RecoverEn1 Enable recovery, compressor module 1 unit 1 0
41 U1_Mcomp2 Type of compressors, module 2 unit 1 2
42 U1_RecoverEn2 Enable recovery, compressor module 2 unit 1 0
43 U1_Mcomp3 Type of compressors, module 3 unit 1 0
44 U1_RecoverEn3 Enable recovery, compressor module 3 unit 1 0
45 U1_MEvap Enable evaporator module, unit 1 0
69 U1_Weightprobe Weight on average Out, unit 1 100
46 U1_VentilType Type of ventilation, unit 1 1
UNIT 2
Add Code Description Default
47 U2_Mcomp1 Type of compressors, module 1 unit 2 0
48 U2_RecoverEn1 Enable recovery, compressor module 1 unit 2 0
49 U2_Mcomp2 Type of compressors, module 2 unit 2 0
50 U2_RecoverEn2 Enable recovery, compressor module 2 unit 2 0
51 U2_Mcomp3 Type of compressors, module 3 unit 2 0
52 U2_RecoverEn3 Enable recovery, compressor module 3 unit 2 0
53 U2_MEvap Enable evaporator module, unit 2 0
70 U2_Weightprobe Weight on average Out, unit 2 0
54 U2_VentilType Type of ventilation, unit 2 0
UNIT 3
Add Code Description Default
55 U3_Mcomp1 Type of compressors, module 1 unit 3 0
56 U3_RecoverEn1 Enable recovery, compressor module 1 unit 3 0
57 U3_Mcomp2 Type of compressors, module 2 unit 3 0
58 U3_RecoverEn2 Enable recovery, compressor module 2 unit 3 0
59 U3_Mcomp3 Type of compressors, module 3 unit 3 0
60 U3_RecoverEn3 Enable recovery, compressor module 3 unit 3 0
61 U3_MEvap Enable evaporator module, unit 3 0
71 U3_Weightprobe Weight on average Out, unit 3 0
62 U3_VentilType Type of ventilation, unit 3 0
At this point, the local network is configured correctly to receive the setting of the unit operating
parameters.

Data creazione 10/09/03 DS03I009GB--00 Pagina 20 di 59
PARAMETER MENU TREE
Configuration Unit Compressors
Evaporators
Defrost
Fans
Various
Multi
List
List
List
List
List
Compressors
Evaporators
List
List
Pumps List
Sensori List
Unit_1 ModComp1
ModComp2
ModComp3
ModEvap
Various
List
List
List
List
List
Unit_2 ModComp1
ModComp2
ModComp3
ModEvap
Various
List
List
List
List
List
Unit_3 ModComp1
ModComp2
ModComp3
ModEvap
Various
List
List
List
List
List
Controls Antifrost List
Capacity compens List
Time compens List
Duty cycle compens List
Outside temp.
Compens. List
Demand Limit List
Free Cooling List
Maintainement List
Dripping time List
Set Point List
Water Reset List
ON
COOL
STEP:
03 / 12
F1 F2 F3 F4
ENTER
SETUP
PARAMETERS
SCHEDULING
CLOCK SETUP
LANGUAGE
>
ON
COOL
STEP:
03 / 12
F1 F2 F3 F4
MODE ALARM STATISETUP
12/12/04 13:00
12.2
7.2
7.0
°C
°C
°C
In
Out
Set
/