Page is loading ...

1
PRODIGY 2.0
(M3 UNIT CONTROLLER)
SETUP GUIDE
507241-07
10/2019
Supersedes 4/2019
WARNING
Improper installation, adjustment, alteration, service or maintenance can cause property damage, personal injury or loss of life.
Installation and service must be performed by a licensed professional HVAC installer (or equivalent) or service agency

2
Table of Contents
1. Prodigy 2.0 – M3 Unit Controller
Overview ....................................................3
2. Start-Up Procedure ...................................3
3. M3 Unit Controller - Connections,
Inputs / Outputs, Jumpers, and LEDs
Locations ...................................................3
4. System Status Screen ...............................5
4.1. Network Types ........................................6
4.2. Unit Operation .........................................6
4.3. Alarm Status Display...............................6
4.4. Normal Mode and Status Messages ....... 6
5. Firmware Update ......................................7
5.1. Unit Controller USB Flash Drive
Update Capability....................................7
5.2. Files Needed for Firmware Updating ......7
5.3. Where to Place the .P2F File on the
USB Thumb Drive. ..................................7
5.4. Updating Firmware..................................7
6. SavingandLoadingUserProle ............8
7. SavingandLoadingUSBProle ............8
8. ModelNumberandCongurationID1
and 2 ...........................................................8
8.1. Model ......................................................8
8.2. CongurationID1 ...................................9
8.3. CongurationID2 ...................................9
9. Menu Selection Overview .......................10
10. Menu Navigation ..................................... 11
10.1. Data ......................................................11
10.2. Setup.....................................................15
10.3. Service ..................................................20
10.4. Settings .................................................22
11. Thermal Protection Switches (S5, S7,
S8, S31 and S180) ....................................26
11.1. EnergenceUltra-HighEfciencyUnits
(3- to 6-ton) ...........................................26
11.2. Tandem Compressors — Energence
Ultra-HighEfciencyUnits(7-1/2to
12-1/2-ton) ............................................26
11.3. Tandem Compressors — Energence
Ultra-HighEfciencyUnits(15-and
20-ton) ..................................................26
12. Blower Operation with Effective
Occupancy ..............................................26
13. Economizer .............................................29
13.1. Enabling Economizer and Settings .......29
13.2. Damper Feedback Calibration ..............29
13.3. Damper Operation During Free
Cooling ................................................. 29
13.4. Free Cooling Compressor Lockout
Mode and Low Ambient Set Point ......... 29
13.5. Outdoor Air Suitable for Free Cooling ..29
13.6. Enthalpy Set Point ...............................30
13.7. Free Cooling Damper Maximum
Position ................................................30
13.8. Minimum Damper Position ................... 30
13.9. Motorized Outdoor Air Damper ............30
13.10. Economizer Checkout .......................... 30
14. Demand Control Ventilation ..................32
14.1. Default Operation ................................. 32
14.2. Maximum and Minimum Demand
Control Ventilation Damper Settings ....32
14.3. Parameter Adjustments ........................33
14.4. Set Point Control Option .......................33
14.5. Determining Indoor Air Quality Inputs ...33
14.6. BACNET ...............................................34
14.7. L CONNECTION ...................................34
15. Abbreviations ..........................................35
16. Parts and Kits ..........................................36
17. USB Service Report Example .................36
18. USBSmartAirowReport ....................... 37
19. Alarms .....................................................37
19.1. Phase - Voltage Detection ....................37
19.2. Service Relays ......................................38
20. M3 Unit Parameters ................................. 48
21. M3 Unit Controller Signal References ..73
22. M3 Unit Controller Connections
Diagram ....................................................74
23. M3 Unit Controller (A55) .........................75
23.1. GP3 Control (A187) ..............................81
23.2. C3 Control (A178) .................................82
24. Quick Start Guide ....................................84
25. Wiring Diagrams ...................................... 85
26. Prodigy 2.0 Release History ...................87

3
1. Prodigy 2.0 – M3 Unit Controller Overview
For all available Prodigy 2.0 documentation, go to the Lennox Commercial
website.
www.lennoxcommercial.com
The M3 unit controller:
• Provides control functions for both Energence® and Strategos® Rooftop Units,
• Includes a 4 x 20 LCD display, USB port, menu selection LED and various
navigation tools,
• Provides status and diagnostic information for troubleshooting,
• Allows adjustment of time delays and setpoints that enable advanced
features,
• Is controlled by a standard room thermostat, direct digital controller (DDC),
or a room sensor,
• Canbeconguredasadeviceonthenetworkwhendaisy-chainedtotheL
Connection® Network,
• May be connected to a PC which has been loaded with unit controller
software,
• Accepts add-on controls to build variations according to application or
equipment type. Unit Sizes
• USBvericationandprolesharing.
2. Start-Up Procedure
a. Turn on unit and dismiss alarm messages as necessary by pressing the
BACK button.
b. Press the SCROLL button down arrow repeatedly to navigate to the SETUP
option and press the SELECT button. Press the SELECT button again for the
INSTALLoption.Thiswillstartthecongurationprocess.
NOTE: The system needs to be in a normal operating mode as seen on display
(NO DEMAND, COOLING, HEATING, IDLE, etc).
c. To verify operation navigate to SERVICE > TEST menu.
See “24. Quick Start Guide” on page 84 for additional start up information.
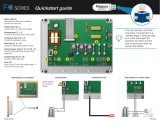
3. M3 Unit Controller - Connections, Inputs / Outputs, Jumpers, and LEDs Locations
HB
CA
D
G
E
F
I
NO DEMAND - OAS
ZAT: 56.0F
DAT: 75.0F UNOCC
A. TO DISCONNECT
TSTAT_COM FROM COM
JUMPER (CUT JUMPER)
B. TO DISCONNECT HMD_COM
FROM COM JUMPER (CUT
JUMPER)
C. USB INTERFACE
D. S-BUS INTERFACE
E. RJ-11 PHONE JACK
F. SMART WIRE INTERFACES
G. COMMUNICATION MODULE
INTERFACE
H. DEMAND STATUS LEDS
I. SYSTEM HEART BEAT LEDS
J. MODBUS CONNECTOR
(currently available only on
Energence Ultra-A Box M3
Unit Controller)
K. MODBUS TX AND RX LEDS
(available only on Energence
Ultra-A Box M3 Unit Controller)
J
K
Figure 1. M3 Unit Controller Interfaces and LEDs Locations

4
A. THERMOSTAT COMMON ISOLATION - TSTAT_COM Jumper
Thermostat (TSTAT) sensor commons are located on connector P298 and may
be isolated if they are powered remotely. Remove jumper.
This jumper is located to the left of P297 connector. This jumper would be
removed only in unique situations where the device supplying the thermostat
signals to the M3 unit controller has its own power source and does not share
a common reference voltage with the M3 unit controller. Otherwise the jumper
would remain installed across both pins, as shipped from the factory.
B. HUMIDISTAT COMMON ISOLATION -: HMD_COM Jumper
The humidity (HUM) sensor commons are located on connector P298 and may
be isolated if they are powered remotely. Remove jumper. This jumper is located
to the right of P299 connector. This jumper would be removed only in unique
situations where the device supplying the thermostat/humidistat signals to the M3
unit controller has its own power source and does not share a common reference
voltage with the M3 unit controller. Otherwise the jumper would remain installed
across both pins, as shipped from the factory.
C. USB FLASH DRIVE INTERFACE USAGE
The M3 interface uses a USB A to B male cable for PC connection. This USB
portisusedforverifyingservice,downloadingreports,transferringunitproles
andperformingrmwareupdates.On-sitedatacollectionrequiresuseofaUSB
ashdrive.Datawrittentothedriveincludesdate,time,serialnumber,catalog
number,basicdata,errorcodebuffer,andunitconguration.
D. S-BUS
This is the L-connection connection interface. This is a R485 network connection
with other devices (NCP, comfort sensors, other RTU, etc.).
E. RJ-11 PHONE JACK:
S-Bus connection is for factory tests. It is RS485 connection to the RJ-11 phone
jack. Some DDC controllers may also be connected.
A list of service connection kits is listed on “Table 14. Parts and Kits Available for
M3 Unit Controller” on page 36.
F. SMARTWIRE™ FIELD WIRING CONNECTIONS (P297, P298 AND P299)
These connectors allow for easy eld wiring connection points. The M3 unit
controller connects to the rooftop unit using SmartWire™ connectors. Each
connector is keyed so that no connector can be installed in the incorrect location.
Be sure all connectors are in place and completely inserted. See “21. M3 Unit
Controller Signal References” on page 73 for connector information.
G. COMMUNICATION MODULE INTERFACE
This connection is used for either BACnet® or LonTalk® communication modules.
H. DEMAND STATUS LEDS - Thermostat Input LED Indicators
Indicates active state for G, W1, W2, Y1 and Y2 demands. Indicators are also
available for occupied/unoccupied (OC) or global input (GLO). The indicators and
their meanings are described in “Table 1. LED Operation Indicators”.
I. HEART BEAT LED INDICATORS
Some indicators on the circuit board are visible with the cover in place; others are
not. The indicators and their meanings are described in “Table 1. LED Operation
Indicators”.
MODBUS CONNECTION (P358)
This is a TIA-485 serial line over MODBUS (messaging structure) communication.
The is currently used only in the Energence Ultra-A Box models. This connection
is used for communication between the M3 unit controller and inverter. See
“Table 31. P358 (Ultra-A Box Only M3 Unit Controller)” on page 80 for pin-out
information.
J. MODBUS LEDS
There is a transmit (TX) and receive (RX) activity indicated near the MODBUS
connector.
Table 1. LED Operation Indicators
LED Status Indication Meaning
Heartbeat (HB) (D33)
Green Slow Flash Normal Operation
Green Fast Flash Bootloader/rmwareupdatemode
No light Steady Off No voltage to M3 board or defective board
Green Steady On Unitinconguration/testmode(notinnormalmode)
S-BUS / PC Connection (D70 and
D71)
BUS (green) Flickering ON Networktrafcpresent
TX (yellow) Flickering ON Unit controller is transmitting
BACnet (option) - LEDs located on
module
RX (green) Flickering ON Unit controller is receiving
TX (yellow) Flickering ON Unit controller is transmitting

5
Table 1. LED Operation Indicators
LED Status Indication Meaning
LonTalk (option) - LEDs located on
module
RX (green) Flickering ON Unit controller is receiving
TX (yellow) Flickering ON Unit controller is transmitting
SERVICE (red) Flashing 1 sec. on; 1 sec. off Nodeisnotcongured;applicationloaded
SERVICE (UNLIT) Steady off Nodeiscompletelycongured
SERVICE (red) Constant on Nodeiscongured;noapplicationloaded
SERVICE (red) Quickashesduring
initialization Messages being passed to M3; normal operation
Thermostat Input Yellow Indicates a thermostat demand
G - Blower on (D17)
W1 - First-Stage Heating (D20)
W2 - Second -Stage Heating (D23)
Y1 - First-Stage Cooling (D26)
Y2 - Second-Stage Cooling (D29)
OCP - Occupied (D32)
GLO - Global input (D38)
MODBUS Two LEDs that indicate transmit (TX) and receive (RX) activity.
Thermostat LEDs indicate only with incoming thermostat connection via SmartWire™ connectors.
Slow Flash = 1 second on; 1 second off.
Fast Flash = ½ second on; ½ second off.
A“ickering”LEDashessignicantlyfasterthana“fastash“.
NOTE: LEDs are energized by 24VAC thermostat inputs.
4. System Status Screen
The display shows operating mode if in normal operation. Alarms will interrupt
the display.
Alarm messages will appear on the display and remain there until dismissed.
Dismissing an alarm is just clearing the alarm from using the entire screen to
display the condition(s). The alarm condition still exists and up to two alarm codes
are displayed along the right side of the screen above the thermostat demand
type status. To dismiss an alarm, press the BACK button.
COOLING
UNOCC
RAT: 76.0F
DAT: 57.0F
ZONE AND DISCHARGE
AIR TEMPERATURES OCCUPIED (OCC) OR
UNOCCUPIED (UNOCC)
FIRST TWO ALARMS THAT
ARE ACTIVE
NORMAL MODE
MESSAGE
Y1
THERMOSTAT
DEMAND TYPE
74, 93
LON ON
NETWORK
STATUS
Figure 2. System Status Display

6
4.1. Network Types
The second line on the left side (see “Figure 3. Alarm Code Readout Example”)
is used for displaying network status. The status will indicate either ON or OFF
for the network employed.
Table 2. Network Types
Screen Label Network Type
LON LonTalk
BACNET BACnet
LCONN L-Connection
RTU Rooftop Unit stand-alone mode status indicator
4.2. Unit Operation
Thissectiondescribesthedisplayandcontrolbuttons,howtoconguretheunit,
andhowtoreadstoredcongurationdata,status,andalarms.
The M3 unit controller is an input and output junction point. If in the thermostat
mode, thermostat inputs at P297 result in an output to unit components. If the
heartbeatLEDisnotashing,see”Table1.LEDOperationIndicators”onpage
4 for heartbeat operation. If the display shows an alarm. If the thermostat
input indicating lights are not responding appropriately, check the thermostat or a
DDC control acting as thermostat inputs into P297.
Basic cooling and heating functions may be energized to test major unit
components by using the M3 unit controller testing function or by using jumper
wires on the Field Wiring Termination plug P297.
4.3. Alarm Status Display
Figure 33 shows how alarms are displayed. Alarming value may indicate the
condition which triggered the alarm (temperature, voltage, pressure, time, etc.).
ALARM 173
2.4.2014 12: 02: 24
ALARMING VALUE = 0
AIR FLOW SWITCH CON
Alarms are present - alarm code, alarming value, and
date / time stamp (hour, minute and seconds) of alarm
event.
While the alarm is displayed on the screen, press the help
button for further details.
T
he down arrow on the screen indicates for information is
available by scrolling down.
Figure 3. Alarm Code Readout Example
4.4. Normal Mode and Status Messages
The format of the message is mode and set point (see table 61).
Table 3. Possible Mode and Status Messages
SCREEN NAME DESCRIPTION
COMP LOAD SHEDDING Unit is running at lower power capacity.
COOLING Cool demand present; unit is in mechanical cooling.
DEHUMIDIFICATION Unit is dehumidifying.
FREE COOLING Cooling demand is present, no compressor cooling.
FRESH AIR COOLING Cool ventilation air to neutral value.
FRESH AIR HEATING Heat ventilation air to neutral value.
HEATING Heat demand present; unit is heating.
CONTROLLER LOCKOUT User has disabled controller operation.
LOW AMBIENT LOCKOUT Outdoor air is too cold to allow compressors to run.
MORNING WARMUP Outdoor air damper closed.
OFF ON ALARM
Unit is off due presence of alarm(s) that the system has
determined will halt system operations.
NOTE:Notallalarmswillhaltsystemoperation.Thersttwo
active alarms are displayed on the main system status screen.
DELAY UP TO 5 MIN Ifthesystemhasclearedthealarmthereisusuallyaveminute
delay before resuming system operations.
DELAY UP TO 20 SEC In certain models, the compressor turns on a few seconds after
the outdoor fan is energized.
PRE-COOL
Compressornotallowed—freecooling.(Duringtherst30
minutesoftherstcoolingdemandfollowingachangefrom
unoccupied to occupied, calls for mechanical [compressor]
cooling are ignored if an economizer is installed and if outdoor
air is suitable for free cooling.)
PREINSTALL Unit has not been set up for operation. Must follow installation
menus.
START UP Default start up delay before servicing demands. Go to M3 user
interface: SETUP > INSTALL
SMOKE ALARM Smoke input detected.
TEST Network has unit in test mode.
BLOWER ON Indoor blower is on.
BLOWER ON - OAS Indoor blower is on and outdoor air is suitable.
NO DEMAND System not receiving a demand for cooling or heating.
NO DEMAND - OAS System not receiving a demand for cooling or heating and
outdoor air is suitable.
COOL + MAX OPEN ECON Mechanical cooling is operating with maximum free cooling.
COOL + MODULATE ECON Mechanical cooling is operating with variable free cooling.

7
5. Firmware Update
ThermwareontheM3unitcontrollercanbeupdatedbyinsertingaUSBthumb
drive containing the update.
NOTE: Flash drive media must be formatted using the either FAT or FAT32 le
systems.
5.1. Unit Controller USB Flash Drive Update Capability
FirmwareupdatingisavailableusingtheUSBport.Todisplaythecurrentrmware
version:
Go to DATA > FACTORY > SOFTWARE VERSION.
5.2. Files Needed for Firmware Updating
Files needed to upgrade M3 unit controller from USB thumb drive:
M3XXXXXXXX.P2F
(ALL UPPERCASE IS RECOMNMEND, BUT NOT MANDATORY)
The xxxxxxxx are place holders for major and minor versions and build number
informationintheactuallename,andvariesfromoneversiontothenext.
5.3. Where to Place the .P2F File on the USB Thumb
Drive.
a. Create folder name Firmware folder on the root directory of the USB thumb
drive.
NOTE: Drive letter may differ from the one illustrated below.
b. Create a M3 folder under the Firmware folder.
c. Placeacopyofthe.P2FleintotheM3 folder.
M3XXXXXXXX.P2F file goes here. (.P2F) file
name suffix is recommended to be in all CAPS
but not mandatory.
5.4. Updating Firmware
a. After inserting the USB thumb drive:
Go to SERVICE > SOFTWARE UPDATE.
b. Press the SELECT button, then use the adjust values (up/down) arrows to
select armwareversion.
NOTE: If you get a message indicating “software update failed - sw update le
not found”, check to make sure the P2F le is located in the Firmware
> M3 folder.
NOTE: If you get the message “Not Applicable Equipment not Present”, may
indicate the Prodigy Unit Controller does not recognized the USB
thumb drive inserted. Try a different thumb drive.
c. Press SAVE.
The following update sequence should occur:
• SOFTWARE UPDATE STARTING
• SOFTWARE UPDATE ERASING FLASH
• SOFTWARE UPDATE PROGRAMMING FLASH

8
• SOFTWARE UPDATE PROGRAMMING FLASH PROGRESS xx% (xx%
indicates update percentage completed)
• SOFTWARE UPDATE RESETTING CONTROLLER.
d. After the unit controller resets, the rst screen to appear will display the
following (xx.xx.xxxx indicates the software version number):
PRODIGY 2.0
M3 CONTROLLER
xx.xx.xxxx
e. You may remove the USB thumb drive anytime after the reset is completed.
f. Firmware version can also be verify
Go to DATA > FACTORY > SOFTWARE VERSION.
NOTE: Firmware updates do not alter the unit controller conguration settings.
All settings will be retained after the rmware has been updated.
6. SavingandLoadingUserProle
When saving the user prole, all information concerning model number,
congurationID1/ID2,parametersmodiedusingtheEDITPARAMETERoption
and Test & Balance information are all stored to a non-volatile location in memory.
The reference tasks are available from the M3 unit controller user interface:
a. ToSAVEauserprole:
Go to SERVICE > REPORT > SAVE USER PROFILE = YES
b. ToLOADauserprole:
Go to SERVICE > REPORT > LOAD USER PROFILE = YES
7. SavingandLoadingUSBProle
TheUSBProleutilityallowsacopyoftheproletobesavetoaUSBstorage
device. Only EDIT PARAMETER changed settings and Test & Balance
informationissaved.TheinstallerwillneedtoconguretheModelNumber,and
CongurationsID1/ID2rstbeforeloadingthesavedUSBprole.TheUSB
ProleistypicallyusedwhenreplacingtheM3unitcontrollerwithanewone.
The reference tasks are available from the M3 unit controller user interface:
a. TosaveaUSBProle:
Go to SERVICE > REPORT > USB PROFILE SAVE
> enter a unique name for the prole and press SAVE.
b. ToloadaUSBProle:
Go to SERVICE > REPORT > USB PROFILE LOAD
NOTE: Use the adjust and save values arrows to select highlight the desired
prole and press SAVE.
8. Model Number and CongurationID1and2
This section addresses the requirement that specic conguration information
must be completed using the SETUP / INSTALL feature if a new unit controller
was being installed. Other requirements are the addition of accessories that were
notfactory-installed.Modelnumber,congurationID1 and2,catalognumber,
serial number and RTU description are all key items required to be completed for
the system to operate correctly. Running the SETUP / INSTALL wizard allows the
installertoverifythatalleldshavebeencompletedasrequired.
8.1. Model
Model Number
Type [1, 2, 3]
Electric = LCH or SCC
Gas = LGH or SGC
Tonnage [4, 5, 6]
Efficiency [7]
High Efficiency = H
Standard Efficiency = S
Ultra-High Efficiency = U
[10] Factory Electric or Gas
Heat
See unit nameplate for applicable electric
or gas heat designation.
[11] Design Sequence
1 = First revision
[12] Voltage
See unit nameplate for
applicable electric voltage
designation.
Refrigerant [8]
HFC-410A = 4
Blower Type [9]
Belt Drive (1 speed) = B
Direct Drive = D
Direct Drive ECM = E
MSAV Belt Drive = M
Belt Drive (2 speed) = T
IMPORTANT: Always refer to the model
information listed on the unit nameplate when
setting these options.
See unit nameplate for
applicable tonnage
designation.
7 8 9 10 11 121 2 34 5 6
VAV Belt Drive = V
NOTE: Options D, E, T and V
not available on SGC/SCC units.
Figure 4. Model Number

9
8.2. CongurationID1
CONFIGURATION ID 1
*Humiditrol [1]
Not Installed = N
Humiditrol Installed = H
Unconfigured = U
Economizer [2]
Not Installed = N
Motorized Outdoor Air
Damper Only = M
Economizer - Te mperature = T
Economizer Global = G
Economizer - Single
Enthalpy = S
Economizer - Dual Enthalpy = D
Unconfigured = U
Power Exhaust [3]
Not Installed = N
Single-Stage = S
Dual-Stage = D
*Variable Speed Drive = V
Unconfigured = U
Power Exhaust Control [4]
Not Installed = N
Damper Position = A
*Pressure Switches = B
*A34 Pressure Sensor = C
[5] Network Module
N = Not Installed
B = BACnet
L = LonTalk (Lennox)
[6] *Blower Variable
Frequency Drive Bypass
N = Not Installed
A = Automatic Bypass
M = Manual Bypass
U = Electronic Bypass Field
Un-configured
[7] *Advanced Air Flow
Control System
N = Not Installed
S = Installed with Standard
Economizer
L = Installed with High Performance
Economizer
U = Unconfigured
[8] *Outdoor Air CFM Control
N = Not applicable (for future use)
L = Outdoor Air Control Installed
with A24 Sensor set for low range.
M = Outdoor Air Control Installed
with A24 Sensor set for medium
range.
H = Outdoor Air Control Installed
with A24 Sensor set for high
range.
IMPORTANT: Always refer to the white sticker titled ORIGINAL FACTORY UNIT CONFIGURATION located inside the control box area.
NOTE: The M3 unit controller will display applicable alarm(s) if any positions is left unconfigured (U).
1 2 3 4 5 6 7 8
NOTE: *Option not available on SCC/SGC rooftop units.
Figure 5. CongurationID1
8.3. CongurationID2
CONFIGURATION ID 2
Not Installed = N
Installed on M3 = C
Installed on DDC
Controller = D
Dirty Filter Switch (S27) [2]
Not Installed = N
Installed on M3 = C
Installed on DDC Controller = D
Not Installed = N
Installed on DI-2 = 2
Installed on DI-3 = 3
[5] Phase / Voltage
Detection
N = Not Installed
1 = Enabled Internal (Lennox)
2 = *External (A42) Phase Detection
on DI-2
3 = *External (A42) Phase Detection
on DI-3
N = Not Installed
Y = Installed
[8] *Load Shedding
N = Not Installed
G = Global (P297 - pin 9)
2 = Installed on DI-2
3 = Installed on DI-3
[9] Electric Heat
[1]
Air Flow Proving
Switch (S52)
[3]
Overflow Switch
(S149 / S179)
[4]
Motor Overload
Switch (S42)
Not Installed = N
Installed on DI-2 = 2
Installed on DI-3 = 3
[7] *Zone Bypass Damper
N = Not Installed
Y = Installed
[6] *Ultra Violet Lamp
N = Not Installed
Y = Installed
* When Phase / Voltage detection monitoring is enabled on three-phase system and
configured incorrectly will cause the system to go to demand hold and restart after
3 minutes.
1 2 3 4 5 6 7 8 9
NOTE: *Option not available on SCC/SGC rooftop units.
Figure 6. CongurationID2

10
9. Menu Selection Overview
IN/OUTPUTS
FACTORY
NETWORK
INSTALL
NETWORK
INTEGRATION
TEST &
BALANCE
Use
SCROLL
arrows to
move
SETUP
DATA
SHOW STATUS
SERVICE
SETTINGS
ALARMS
PRESENT?
BACK
SELECT
SCROLL
Use
SCROLL
arrows to
move
TEST
REPLACE
Use
SCROLL
arrows to
move
OFFLINE
REPORT
SOFTWARE
UPDATE
INSTALL
CONTROL
RTU
OPTIONS
GENERAL
Use
SCROLL
arrows to
move
ADVANCED
STATUS
RUNTIMES
HISTORY
ALARMS, ZAT, DAT,
OCC OR UNOCC,
DEMAND STATUS
ZAT, DAT, OCC
OR UNOCC,
DEMAND
STATUS
YES
NO

11
10. Menu Navigation
The following tables indicate all levels of the menu interface. Many of these options have more levels which are described in the following sections that detail the
major categories of DATA, SETUP, SERVICE, and SETTINGS.
• Use the SELECT button to progress to the next menu level (i.e. level 1 to level 2).
• UsetheSCROLLarrows▲▼tomove(scroll)withinamenulevel.
• Use the BACK button to return to the previous menu level.
• UsetheAdjustandsetvaluearrows▲▼tochangevaluesofselecteditem.
10.1. Data
Table 4. Menu Interface (Level 1 - DATA)
NOTE: AVAILABLE MENU OPTIONS ARE DEPENDENT ON MODEL AND CONFIGURATION 1 AND 2 SETTINGS. USE THE ADJUST AND SET VALUES ARROWS TO SCROLL UP OR DOWN FOR
SELECTION OPTIONS.
Level 2 Level 3 Level 4 Level 5 Level 6
HISTORY
ALARMS
CLEAR ALARM HISTORY = NO or YES
LAST SERVICE (time stamp of last service)
IN/OUTPUTS SENSORS LOCAL THERMOSTAT G: ON/OFF
W1: ON/OFF
W2: ON/OFF
Y1: ON/OFF
Y2: ON/OFF
BLOWER SPEED: X
OAT: xx F
RAT: xx F
DAT: xx F
ZAT (A2): xx F
C02: xx PPM
OAV: xx ft/min
BP: xx in h20
RH: xx %
IE
OE
GLO: ON/OFF
OCP: ON/OFF
SMOKE: ON/OFF
D12: ON/OFF
D13: ON/OFF
REHEAT D14: ON/OFF

12
Table 4. Menu Interface (Level 1 - DATA)
NOTE: AVAILABLE MENU OPTIONS ARE DEPENDENT ON MODEL AND CONFIGURATION 1 AND 2 SETTINGS. USE THE ADJUST AND SET VALUES ARROWS TO SCROLL UP OR DOWN FOR
SELECTION OPTIONS.
Level 2 Level 3 Level 4 Level 5 Level 6
SUCTION1: xx PSIG
SUCTION2: xx PSIG
C1 SUMP: xx F
C2 SUMP: xx F
C3 SUMP: xx F
C4 SUMP: xx F
DUCT PRESSURE: When a reading is available it will be displayed here. If
nothing is read a “-” will be displayed.
NETWORK THERMOSTAT G: ON/OFF
W1: ON/OFF
W2: ON/OFF
Y1: ON/OFF
Y2: ON/OFF
ZAT (A2): xx F
C02: xx PPM
RH: xx %
OUTPUTS COMPRESSOR 1: ON/OFF
COMPRESSOR 1: ON/OFF
COMPRESSOR 3: ON/OFF
COMPRESSOR 4: ON/OFF
BLOWER: ON/OFF
EXHAUST: ON/OFF
FAN 1: ON/OFF
FAN 2: ON/OFF
FAN 3: ON/OFF
FAN 4: ON/OFF
FAN 5: ON/OFF
FAN 6: ON/OFF
HEAT 1: ON/OFF
HEAT 2: ON/OFF
HEAT 3: ON/OFF
HEAT 4: ON/OFF
REHEAT COIL 1: ON/OFF
REHEAT COIL 2: ON/OFF
SERVICE RELAY: ON/OFF

13
Table 4. Menu Interface (Level 1 - DATA)
NOTE: AVAILABLE MENU OPTIONS ARE DEPENDENT ON MODEL AND CONFIGURATION 1 AND 2 SETTINGS. USE THE ADJUST AND SET VALUES ARROWS TO SCROLL UP OR DOWN FOR
SELECTION OPTIONS.
Level 2 Level 3 Level 4 Level 5 Level 6
LCD HEATER: ON/OFF
CRANKCASE HEATER 1: ON/OFF
CRANKCASE HEATER 2: ON/OFF
CRANKCASE HEATER 3: ON/OFF
CRANKCASE HEATER 4: ON/OFF
MGV: “CLOSED” (NOTE: BLOWER SPEED IS SHOWN AS A PERCENTAGE ONLY ON VAV BLOWER CASE UNITS.)
FACTORY SOFTWARE VERSION
RTU DESCRIPTION
CATALOG NUMBER
MODEL NUMBER
SERIAL NUMBER
CONFIGURATION ID 1
CONFIGURATION ID 2
NETWORK BACNET MAC ADDRESS: XXX
BAUD RATE: XXXXX
DEVICE INSTANCE: X
LONTALK PROGRAM ID
NEURON ID
L-CONNECTION LCONN ADDRESS: X
ADVANCED STATUS CURRENT ALARMS ACTIVE ALARMS xxx
SETPOINTS OCC HEATt
UNOCC HEAT
OCC COOL
UNOCC COOL
APP MODE
BLOWER BLOWER STATUS BLOWER SPEED x %
SUPPLY TARGET x CFM
SUPPLY ACTUAL x CFM
DAMPER DAMPER STATUS TARGET: x%
ACTUAL x%
ACTUAL OA CFM
TARGET OA CFM
ECON DIFF PRESSURE
VAR SPEED COMPRESSOR COMPRESSOR SPEED TARGET: x%
ACTUAL: x%

14
Table 4. Menu Interface (Level 1 - DATA)
NOTE: AVAILABLE MENU OPTIONS ARE DEPENDENT ON MODEL AND CONFIGURATION 1 AND 2 SETTINGS. USE THE ADJUST AND SET VALUES ARROWS TO SCROLL UP OR DOWN FOR
SELECTION OPTIONS.
Level 2 Level 3 Level 4 Level 5 Level 6
EXHAUST EXHAUST STATUS EXHAUST: OFF or ON
EXHAUST1: OFF or ON
(For more information concerning relationships
between pressure switch, sensor and power
exhaust, refer to the Prodigy Application Guide).
EXHAUST2: OFF or ON
PRESWITCH37: OFF or ON
PRESWITCH39: OFF or ON
SPEED: 0%
BLDGP: -0.30 IN H20
RUNTIMES BELT x HRS
BLOWER x HRS
BLOWER x CYC
COOLING COMP 1: XX HRS - XX CYCLES
COMP 2: XX HRS - XX CYCLES
COMP 3: XX HRS - XX CYCLES
COMP 4: XX HRS - XX CYCLES
EXHAUST x HRS STAGE 1: XX HRS - XX CYCLES
STAGE 2: xx HRS - XX CYCLES
FANS FAN 1: xx HRS - CYCLES
FAN 2: xx HRS - CYCLES
FAN 3: xx HRS - CYCLES
FAN 4: xx HRS - CYCLES
FAN 5: xx HRS - CYCLES
FAN 6: xx HRS - CYCLES
FILTER x HRS FILTER x HRS
FREE COOL x HRS FREE COOL x HRS
FREE COOL x CYC FREE COOL x CYC
HEATING HEAT 1: xx HRS - XX CYCLES
HEAT 2: xx HRS - XX CYCLES
HEAT 3: xx HRS - XX CYCLES
HEAT 4: xx HRS - XX CYCLES
DEHUMID x HRS DEHUMID x HRS
DEHUMID x CRC DEHUMID x CRC
POWER ON x CYC POWER ON x CYC
POWER ON x HRS POWER ON x HRS
PREINSTALL x HRS PREINSTALL x HRS
UV LAMP xxx HRS UV LAMP xxx HRS

15
10.2. Setup
Table 5. Menu Interface (Level 1 - SETUP)
NOTE: AVAILABLE MENU OPTIONS ARE DEPENDENT ON MODEL AND CONFIGURATION 1 AND 2 SETTINGS. USE THE ADJUST AND SET VALUES ARROWS TO SCROLL UP OR DOWN FOR
SELECTION OPTIONS.
LEVEL 2 LEVEL 3 LEVEL 4 LEVEL 5 LEVEL 6 LEVEL 7
INSTALL LANGUAGE ENGLISH, ESPANOL, OR FRANCAIS
DATE/TIME DAY, MONTH, YEAR, HOURS, MINUTES, SECONDS
DISPLAY UNITS F/C FAHRENHEIT OR CELSIUS
MODEL NUMBER LOCATED ON UNIT NAMEPLATE.
CONFIGURATION ID 1 SEE WHITE STICKER TITLED “ORIGINAL FACTORY UNIT CONFIGURATION” LOCATED ON THE RIGHT SIDE OF THE CONTROL BOX
NEAR THE M3 CONTROLLER.
CONFIGURATION ID 2
CATALOG NUMBER LOCATED ON UNIT NAMEPLATE
SERIAL NUMBER LOCATED ON UNIT NAMEPLATE
RTU DESCRIPTION UP TO 18 ALPHA/NUMERIC CHARACTERS
DEHUMIDIFIER MODE
(OPTIONS ARE
DEPENDENT OF
CONFIGURATION).
FOR MORE INFORMATION
CONCERNING DACC
AND DACH AND MGV,
REF TO THE PRODIGY
APPLICATION SECTION
ON MODULATING GAS
VALVE.
BLOWER, OCCUPIED LOCAL SENSOR, NETWORK SENSOR DEHUMIDIFIER DEHUMID SETPOINT = X.XX %
DEHUMIDIFIER DEHUMID DEADBAND = X.X %
REHEAT DI4
NO CONDITIONS LOCAL SENSOR OR NETWORK
SENSOR DEHUMIDIFIER DEHUMID SETPOINT = X.XX %
DEHUMIDIFIER DEHUMID DEADBAND = X.X %
REHEAT DI4
REPORT RH ONLY LOCAL SENSOR OR NETWORK
SENSOR
DISCHRG AIR
CONTROL ENABLE = NO
DISABLED
BLWR, OCC, PREV COOL LOCAL SENSOR OR NETWORK
SENSOR DEHUMIDIFIER DEHUMID SETPOINT = X.XX %
DEHUMIDIFIER DEHUMID DEADBAND = X.X %
REHEAT DI4
PREVIOUS COOLING LOCAL SENSOR, OR NETWORK
SENSOR DEHUMIDIFIER DEHUMID SETPOINT = X.XX %
DEHUMIDIFIER DEHUMID DEADBAND = X.X %
REHEAT DI4

16
Table 5. Menu Interface (Level 1 - SETUP)
NOTE: AVAILABLE MENU OPTIONS ARE DEPENDENT ON MODEL AND CONFIGURATION 1 AND 2 SETTINGS. USE THE ADJUST AND SET VALUES ARROWS TO SCROLL UP OR DOWN FOR
SELECTION OPTIONS.
LEVEL 2 LEVEL 3 LEVEL 4 LEVEL 5 LEVEL 6 LEVEL 7
DACC ENABLE ENABLED OR DISABLED
DACH ENABLE YES OR NO (NOTE: IF MGV IS NOT PRESENT, DACH IS NOT AN OPTION.)
DACH OCC SETPOINT 110 F (RANGE 80 F TO 140 F)
DACH UNOCC SETPOINT 95 F (RANGE 80 F TO 140 F)
SPMKT REHT W STAT
SPNJT REGT W SENSR
NETWORK
INTEGRATION
NETWORK =
L-CONNECTION LCONN ADDRESS = X
CONTROL MODE = ROOM
SENSOR, MONITOR
ONLY OR NETWORK
THERMOSTAT
NETWORK SENSOR CO2 = YES OR NO
NETWORK SENSOR RELATIVE HUMIDITY = YES OR NO
NETWORK SENSOR TEMPERATURE = YES OR NO
ROOM SENSOR OCC BLOWER MODE= AUTO CYCLES OR ON-CONTINUOUS 1, 2 OR 3 *
BACKUP MODE = NONE, ROOM SENSOR, RETURN AIR BACKUP OR THERMOSTAT
BACKUP SETPOINTS OCCUPIED HEAT = XX.X F
BACKUP SETPOINTS UNOCCUPIED HEAT = XX.X F
BACKUP SETPOINTS OCCUPIED COOL = XX.X F
BACKUP SETPOINTS UNOCCUPIED COOL = XX.X F
OCC (OCCUPIED) BLOWER MODE DESCRIPTION:
AUTO CYCLE: BLOWER CYCLES WITH DEMAND
ON-CONTINUOUS 1: BLOWER IS ON WITH EITHER THE OCCUPANCY SENSOR OR OCCUPANCY SCHEDULER INDICATES OCCUPIED.
ON-CONTINUOUS 2: BLOWER IS ON ONLY WITH BOTH THE OCCUPANCY SENSOR AND OCCUPANCY SCHEDULER, BOTH INDICATES
OCCUPIED.
ON-CONTINUOUS 3: BLOWER IS ON ONLY WHEN BOTH THE OCCUPANCY SENSOR AND OCCUPANCY SCHEDULER INDICATES
OCCUPIED. IN ADDITION, BLOWER WILL BE ON A MINIMUM OF 25% OF THE TIME WHEN OCCUPANCY SCHEDULER INDICATES
OCCUPIED HOWEVER THE OCCUPANCY SENSOR INDICATES NOT OCCUPIED. THE 25% MINIMUM IS ACHIEVED BY TURNING
BLOWER ON FOR 30 MINUTES AND OFF FOR 90 MINUTES.
NETWORK = BACNET BACNET MAC ADDRESS = X
BACNET BAUD RATE = 9.6, 19.2, 38.4 OR 76.8 K
CONTROL MODE = ROOM
SENSOR, MONITOR
ONLY OR NETWORK
THERMOSTAT
NETWORK SENSOR CO2 = YES OR NO
NETWORK SENSOR RELATIVE HUMIDITY = YES OR NO
NETWORK SENSOR TEMPERATURE = YES OR NO
ROOM SENSOR OCC BLOWER MODE= AUTO CYCLES OR ON-CONTINUOUS 1, 2 OR 3 (SEE
DESCRIPTION ABOVE)

17
Table 5. Menu Interface (Level 1 - SETUP)
NOTE: AVAILABLE MENU OPTIONS ARE DEPENDENT ON MODEL AND CONFIGURATION 1 AND 2 SETTINGS. USE THE ADJUST AND SET VALUES ARROWS TO SCROLL UP OR DOWN FOR
SELECTION OPTIONS.
LEVEL 2 LEVEL 3 LEVEL 4 LEVEL 5 LEVEL 6 LEVEL 7
BACKUP MODE = NONE, ROOM SENSOR, RETURN AIR BACKUP OR THERMOSTAT
BACKUP SETPOINTS OCCUPIED HEAT = XX.X F
BACKUP SETPOINTS UNOCCUPIED HEAT = XX.X F
BACKUP SETPOINTS OCCUPIED COOL = XX.X F
BACKUP SETPOINTS UNOCCUPIED COOL = XX.X F
NETWORK = LONTALK
CONTROL MODE = ROOM
SENSOR, MONITOR
ONLY OR NETWORK
THERMOSTAT
NETWORK SENSOR CO2 = YES OR NO
NETWORK SENSOR RELATIVE HUMIDITY = YES OR NO
NETWORK SENSOR TEMPERATURE = YES OR NO
ROOM SENSOR OCC BLOWER MODE= AUTO CYCLES OR ON-CONTINUOUS 1, 2 OR 3 (SEE
DESCRIPTION ABOVE)
BACKUP MODE = NONE, RETURN AIR BACKUP OR THERMOSTAT
BACKUP SETPOINTS OCCUPIED HEAT = XX.X F
BACKUP SETPOINTS UNOCCUPIED HEAT = XX.X F
BACKUP SETPOINTS OCCUPIED COOL = XX.X F
BACKUP SETPOINTS UNOCCUPIED COOL = XX.X F
NETWORK = RTU
STANDALONE
BACKUP MODE = NONE
OR RETURN AIR BACKUP SETPOINTS HEAT = XX.X F
SETPOINTS COOL = XX.X F
TEST & BALANCE BLOWER BLOWER HEATING HIGH = XXXX CFM
BLOWER COOLING HIGH = XXXX CFM
BLOWER COOLING LOW = XXXX CFM
BLOWER VENTILATION = XXXX CFM
ON (TARGET XXXX CFM) ADJUST BLOWER RPM = XXXX RPM
A BOX (NON-EP) -
HEATING, HIGH SPEED
AND LOW SPEED
HEATING HIGH = %
HEATING LOW = %
NOTE: Depending on conguration, HEATING LOW speed may be an option and is used for low heat.
COOLING HIGH = %
COOLING LOW = %
ADJUST BLOWER % = xx

18
Table 5. Menu Interface (Level 1 - SETUP)
NOTE: AVAILABLE MENU OPTIONS ARE DEPENDENT ON MODEL AND CONFIGURATION 1 AND 2 SETTINGS. USE THE ADJUST AND SET VALUES ARROWS TO SCROLL UP OR DOWN FOR
SELECTION OPTIONS.
LEVEL 2 LEVEL 3 LEVEL 4 LEVEL 5 LEVEL 6 LEVEL 7
TEST & BALANCE BLOWER
ADVANCED AIRFLOW
A BOX AND B BOX OR
BIGGER
HEATING, COOLING HIGH,
COOLING MED, COOLING
MED HIGH, COOLING MED
LOW, COOLOW LOW and
VENTILATION
BLOWER CALIBRATION (HEATING, HIGH SPEED,
LOW SPEED OR VENTILATION = CALIBRATION
DONE OR TURN BLOWER ON.
IF TURN BLOWER ON IS SELECTED, BLOWER ON
XXXXX > TURN BLOWER OFF= NO OR YES.
AUTO CALIBRATE =
START CALIBRATION OR
CALIBRATION DONE
STARTING BLOWER > BLOWER ON > CLOSING DAMPER > PROGRESS % WILL BE DISPLAYED. WILL
RETURN TO AUTO CALIBRATE SCREEN AFTER REACHING 100%. PRESS THE ADJUST AND SET
VALUE BUTTON FOR THE OPTION = CALIBRATION DONE. PRESS SAVE TO CONTINUE. RESULTS OF
CALIBRATION ARE AVAILABLE IN SERVICE REPORT.
ZONE BOXES OPEN? =NO OR YES YES SELECTED
ENSURE CALIBRATION DONE OR TURN
BLOWER ON.
TURN BLOWER ON = BLOWER ON = 51%
(RANGE 35 TO 100%)
STATIC PRES SP = 1.0 IN H20 (RANGE 0.1
TO 5.0)
DAMPER DAMPER FDBK CALIB > IS
DAMPER CLOSED?
=NO OR YES = IF YES, THEN PRESS
SAVE
NOTE: Installer will need to visually
inspect the damper to ensure
that it is closed.
IS DMPR FULLY
OPEN?”
=NO OR YES = IF YES, PRESS SAVE.
NOTE: Installer will need to visually inspect
the damper to ensure that it is
opened.
MIN DAMPER POSITION >
ZONE BOXES OPEN = NO
OR YES (START BLOWER)
YES = BLOWER ON HIGH = 0% (RANGE 0 TO 100%)
MIN DAMPER POSITION > BLOWER ON HIGH = XX %
MIN DAMPER POSITION > BLOWER ON LOW= XX %
ECONOMIZER
TEMP ECON TYPE =
TEMPERATURE OFFSET
OR TEMPERATURE SETPT
NOTE: This option is dependant on conguration ID 1 setup.
ECONOMIZER OAT SETPOINT = XX.X F.
ECONOMIZER ENTHALPY SETPOINT = XX MA
NOTE: These options are dependant on conguration ID 1 setup.
ECONOMIZER ENTHALPY OFFSET = XX MA
FREE COOLING SUPPLY AIR SETPOINT = XX.X F
DAMPER OUTDOOR AIRFLOW = XXX CFM

19
Table 5. Menu Interface (Level 1 - SETUP)
NOTE: AVAILABLE MENU OPTIONS ARE DEPENDENT ON MODEL AND CONFIGURATION 1 AND 2 SETTINGS. USE THE ADJUST AND SET VALUES ARROWS TO SCROLL UP OR DOWN FOR
SELECTION OPTIONS.
LEVEL 2 LEVEL 3 LEVEL 4 LEVEL 5 LEVEL 6 LEVEL 7
ADVANCED AIRFLOW
ALARMS = ENABLED OR
DISABLED (ONLY VISIBLE
IF CONFIGURATION ID
1, POSITION 2 IS SET
CORRECTLY).
ADV AIRFLOW ALARMS LO SPLY AIRFLOW ALM = XX%
ADV AIRFLOW ALARMS LO OD AIRFLOW ALM = XX%
ADV AIRFLOW ALARMS HI OD AIFLOW ALM = XX%
ADV AIRFLOW ALARMS ALM TRIGGER PERIOD = XXXX SEC
VENTILATION OPTIONS
= NONE
= DEMAND CONTROL VENTILATION
= BUILDING PRESSURE CONTROL
IF DCV DEMAND CONTROL VENT > DAMPER START OPEN = XXX PPM
DEMAND CONTROL VENT > DAMPER FULL OPEN = XXXX.X PPM
DEMAND CONTROL VENT > DAMPER MAX OA CFM = X CFM
(ONLY VISIBLE IF CONFIGURATION ID 1, POSITION 2 IS SET CORRECTLY).
DEMAND CONTROL VENT > DAMPER MAX OPENING = XXX.X %.
IF BPC BUILDING PRESS CTROL > PRESSURE SETPOINT = X.X IN H20.
OUTDOOR AIR CONTROL
(ONLY VISIBLE IF
CONFIGURATION ID
1, POSITION 8 IS SET
CORRECTLY)
VELOCITY SETPOINT = XXX FT/MIN
POWER EXHAUST ON BY ECON TRAVEL = XX.X %
POWER EXHAUST MODE = BLOWER ON, EXTERNAL ENABLE, OCCUPIED AND ALWAYS
EXHAUST PRESSURE SETPOINT = 0.05 IN H20 (RANGE -0.49 TO 0.50 IN H20)
FRESH AIR HEATING
ENABLE FAH = NO OR YES FRESH AIR HEATING FAH SETPOINT = XX F
FRESH AIR COOLING
ENABLE FAC = YES OR NO FRESH AIR COOLING AFC SETPOINT = XX F

20
10.3. Service
Table 6. Menu Interface (Level 1 - SERVICE)
NOTE: AVAILABLE MENU OPTIONS ARE DEPENDENT ON HARDWARE CONFIGURATION. USE THE ADJUST AND SET VALUES ARROWS TO SCROLL UP OR DOWN FOR SELECTION
OPTIONS.
LEVEL 2 LEVEL 3 USE THE ADJUST AND SET VALUES ARROWS TO
SCROLL UP OR DOWN FOR SELECTION OPTIONS. WHEN SELECTED (PRESS BACK TO RETURN TO THE PREVIOUS MENU)
TEST COOL OPTIONS ARE COOL 1, COOL 2, COOL 3 AND COOL 4. COOL X ODN
RAT: XX.X F
DAT: XX.X F
(IF ADVANCED AIRFLOW IS ENABLED THEN ACTUAL CFM IS DISPLAYED OR NOT
APPLICABLE EQUIPMENT NOT PRESENT.
HEAT OPTIONS ARE HEAT 1, HEAT 2, HEAT 3 AND HEAT 4. HEAT X ON
RAT: XX.X F
NOTE: HEAT 3 and heat 4 are not supported for MGV.
DAT: XX.X F
IF ADVANCED AIRFLOW IS ENABLED THEN ACTUAL CFM IS DISPLAYED OR NOT
APPLICABLE EQUIPMENT NOT PRESENT)
BLOWER BLOWER HI BLH ON/OFF SET POINT
BLOWER LOW BLL ON/OFF SET POINT
PROVING SWITCH PSW CLOSED/OPEN SET POINT
BLOWER FILTER SWITCH FSW CLOSED/OPEN SET POINT
RPM XX RPM FSW CLOSED/OPEN SET POINT
SPEED XX RPM TD: XX (IF COMPRESSOR IS TURNED ON)
DAMPER POSITION ACTUAL: 0.1%.
NOTE: This function is only available if conguration ID 1, position 2 has been congured.
EXHAUST 1 OR 2 SET ON/OFF SETPOINT (EX1 OR EX2 ON/OFF ACTUAL)
FANS FAN 1 (OR FAN L) FN1 (OR FL) ON/OFF SETPOINT
FAN 2 (OR FAN H) FN2 (OR FH) ON/OFF SETPOINT
FAN 3 THROUGH 6. ON/OFF
DEHUMIDIFIER OPTIONS ARE HUM 1 AND HUM 2 WHEN SELECTING OPTION, RESPONSE WILL BE EITHER DEHUMIDIFIER X ON OR
NOT APPLICABLE EQUIPMENT NOT PRESENT.
OUTPUTS SERVICE RELAY SERVICE RELAY ON
REPLACE
FILTER RESET RUNTIME? = NO OR YES
BELT
(ONLY AVAILABLE
BASED ON MODEL
NUMBER)
RESET RUNTIME? = NO OR YES
UV LAMP RESET RUNTIME? = NO OR YES OR NOT APPLICABLE EQUIPMENT NOT PRESENT
FANS (1 THROUGH 6) RESET RUNTIME? = NO OR YES OR NOT APPLICABLE EQUIPMENT NOT PRESENT
BLOWER RESET RUNTIME? = NO OR YES
COMPRESSOR (1
THROUGH 4) RESET RUNTIME? = NO OR YES OR NOT APPLICABLE EQUIPMENT NOT PRESENT
/