Page is loading ...

Product Mounting Disclaimer
Gamber-Johnson is not liable under any theory of contract or tort law for any loss, damage, personal injury, special, incidental or consequential damages for personal injury or other damage
of any nature arising directly or indirectly as a result of the improper installation or use of its products in vehicle or any other application. In order to safely install and use Gamber-Johnson
products full consideration of vehicle occupants, vehicle systems (i.e., the location of fuel lines, brakes lines, electrical, drive train or other systems), air-bags and other safety equipment is
required. Gamber-Johnson specifically disclaims any responsibility for the improper use or installation of its products not consistent with the original vehicle manufactures specifications
and recommendations, Gamber-Johnson product instruction sheets, or workmanship standards as endorsed through the Gamber-Johnson Certified Installer Program.
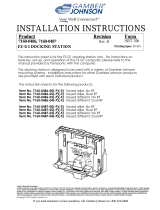
Cover
Handle
Cover
7160-0888: PRINTER BRACKET, DATAMAX O'NEIL RL4
Mounting
Hardware
INSTALLATION INSTRUCTIONS
Product
Revision
Form
If you need assistance or have questions, call Gamber-Johnson at 1-800-456-6868
Printing Spec:
PS-001
INST-750
REV. A
The Datamax O'Neil RL4 Printer Mount 7160-0888,
is typically mounted to the forklift Overhead
Guard Leg using 7160-0357 Small Plate with
Clamshell or 7160-0370 Large Plate with Clamshell
assemblies.
Attach the Printer Mount to the Clamshell using
(4) 1/4-20 Hex Bolts, (4) 1/4-20 Nylok Hex Nuts,
and (8) flat washers supplied in hardware bag.
(NOTE: If printer is equipped with a battery
eliminator the power cord will have to be routed
through the Printer Mount before mounting.)
Loosen cover handle and tip cover forward.
Insert printer into the mount if not already
inserted.
Move cover up over the printer and tighten
cover handle to secure the printer.
Plug in any power and data cables as needed.
NOTE: Printer Mount is capable of mounting to
any VESA 75 mounting hole pattern.
/