Step 1 – Clean wall with degreaser (Wall must be dirt, dust and grease free for proper adhesion)

Step 2 - Measure and Cut

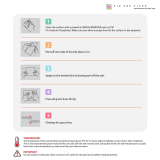
Step 3 - Peel and Stick-It!
Avoid touching adhesive
Overlap the tiles
Press firmly on “grout” lines during installation

Step 4 - Apply silicone based sealant on all borders between tile and wall. This completes the
look of real tiles and extends the life of the project!

FAQ’s
Q: Should I buy glue prior to installing stick-It tiles?
A: Though it should not be necessary, from time to time supplemental adhesive may be
needed due to various installation conditions (cold tiles, dust, excess humidity, poor adhesion
to certain surfaces, air bubbles, human error). Should the glue not be needed a few days after
installation, the product can always be returned. 3M’s Super 77 spray adhesive is what we
recommend.
Q: I just painted my walls. How long must I wait before putting up “Stick-It” tiles?
A: It is recommended to wait a minimum of 3 weeks. Installing “Stick-It” tiles on freshly
painted walls will impact the effectiveness of the adhesive.
Q: I installed “Stick-It” tiles a week after painting my wall and now they are peeling off the wall.
What can I do?
A: Should the tile begin to peel, we recommend applying a small amount of 3M’s multi-
purpose spray adhesive to the back of the tile. Spray evenly across exposed area and press
firmly. The finished look will not be impacted.

FAQ’s
Q: My wall gets extremely cold in the winter. Can I still use “Stick-It tiles” on these walls?
A: Yes with some additional adhesive to secure the bond between the tile and the cold walls.
Inside/interior walls should not be impacted.
The spray adhesive can be applied to the back of the tile directly (after removing the paper
backing) or spray directly onto the wall and apply the tile onto the area that was sprayed.
Apply pressure as directed.
Q: The week after putting up “Stick-It” tiles, the edges connecting one tile to another are
separating. Help!
A: Should the tiles be separating from each other, do the following:
•Peel the tile pack an additional inch.
•Apply a conservative amount of glue with a small applicator to the exposed area.
•Using pressure reapply to adjacent tile
•Super Glue, Gorilla Glue or strong spray adhesive (3M77) works fine. Remember to wear
protective gloves!

FAQ’s
Q: I put up my “Stick-It” tiles but did not apply the caulking around the border. Should I?
A: Should the tiles be placed near a high moisture area (behind sink, around tub etc) it is
recommended to create a vapour barrier, not allowing moisture to seep behind the tile and
impact the adhesive.
Adding caulking to the project will also give it a more finished/authentic look.
Q: I don’t have the steadiest hands in the world, and it take a few tries to get the tiles on straight
or the overlap perfect. Will this impact the quality of the tiles? If so, what do I do?
A: Once the tile is placed the adhesive will start to set immediately. If you are peeling the tile
off the wall to straighten it, or if your overlaps are not perfect, additional adhesive will be
required to secure the tile to the wall. This is why it is best to go very slowly, or be ready to
apply a secondary adhesive. The finished look however, will be perfect.

FAQ’s
Q: I followed the installation instructions to the letter, but two days later, the tiles are starting to
peel off my wall. What can I do to resolve this issue?
A: In this case, we recommend a spray adhesive (3M 77, for instance). Apply this to the back
of tiles or directly onto the wall, then re-apply the tile. Using additional spray adhesive,
applied during or post installation, will not impact the final look of “Stick-It” tiles.
Follow all other installation instructions as indicated.
Please contact customer_service@pctvinyl.com or call 1-800- 713-0112 should you have any
questions or issues regarding our product. We will get back to you ASAP.

FAQ’s – SHOWER INSTALLATION
Q: Can I install the tiles in or above my shower?
A: Using the product on the ceiling of an extreme moisture area, will strain the existing products
adhesive to its limit. Though our product is moisture resistant, we do not recommend it is used
in or above the shower. It is a backsplash tile.
That being said, should you feel adventurous, please follow the instructions below.
1) Procure an additional “extra strength adhesive” – 3M SUPER 77
2) For the first tile (which we recommend start in a corner) Spray the area there you will be
placing the tile with the adhesive (one tile at a time)
3) Peel back our protective paper and place the tile onto the adhesive you place on the
wall. Hold in place for a few second to ensure a bond is formed.
4) For all subsequent tiles, spray the next area on the ceiling; ALSO spray the back of the tile,
where it will be overlapping with the adjacent tile (borders of each tie). This will ensure a solid
contact with the neighboring tile, creating a needed a vapour barrier.
5) Repeat this step until all tiles have been put in place.
6) Procure a clear sealant and apply it to the border of the entire project. This again is to
create a vapour barrier, to resist water and humidity from affecting the adhesive.
7) Lastly, once you have allowed the product to dry (give it a few days) make sure all tiles are
secure to the wall and that they are firmly connected on the overlaps. Repeated exposure to
excessive humidity on tile that isn’t completely flat will hinder the adhesive.
Should all these steps be taken, in addition to wiping off the humidity post shower, you should,
in theory, have a great shower border. But we are unable to guarantee the results.
/