Page is loading ...

Surface Prep / TDS-102
1 Product Name
EasyMat®Tile&StoneUnderlayment
2 Manufacturer
Custom Building Products
13001 Seal Beach Blvd.
Seal Beach, CA 90740-2757
Customer Support: 800-272-8786
Technical Services: 800-282-8786
Fax: 800- 200-7765
Email: [email protected]
custombuildingproducts.com
3 Product Description
A versatile mat underlayment for setting tile and stone over any
acceptablesubfloor.EasyMat®issofastandeasytoinstallbecauseit
is up to 25 times lighter than 1/4" (6 mm) backerboard, cuts easily
with a utility knife, doesn't require any nails or screws, and comes in a
peel & stick version. The mat was specially designed so that the
mortar locks in, creating a bonded crack-prevention system for
subfloor movement up to 1/4" (6 mm). This bonded system will
withstand repeated stress and still maintain its tenacious bond. It is a
superior alternative to cork underlayments because it will not rot,
shrink,orabsorbwater.EasyMat®hasSoundGard®Technologyand
therefore offers high and credible impact sound reduction. Use
EasyMat®withotherCustom®materialstoqualifyforalifetime
warranty.
Key Features
Set tile and stone over any acceptable subfloor
Highest level of impact and sound reduction
Specially designed so the mortar locks in and forms a bonded crack
prevention system
No mechanical fasteners required
Up to 9 times lighter than other sound reduction mats
Will not shrink, rot or absorb water
Use as thermal break under floor heating systems
Suitable Tile Types
EasyMat®canbeusedwiththefollowingtiletypes:
Ceramic tile, all types including impervious porcelain
Natural stone tile
Precast cement terrazzo tile
Suitable Substrates
Concrete, cement mortar, masonry
Cement Backerboard
Exterior Plywood and OSB (interior, dry areas only)
ExteriorDecks–ContactTechnicalServices
PostTensionConcrete–ContactTechnicalServices
Lightweight Concrete (min. 2000 psi compressive strength)
Gypsum-Based cement topping (min. 2000 psi compressive strength)
Existing ceramic tile and resilient flooring
Composition of Product
Polypropylene foam spheres bonded together with the use of
Polyurethane Adhesive in sheet format.
Sizes
4' x 100' x 3 mm
4' x 75' x 5 mm
4' x 30' x 12 mm
4' x 10' x 5 mm
Benefits of Product in the Installation
Set tile and stone over any acceptable subfloor
Up to four times faster to install than 1/4" (6 mm) backerboard
Optional peel & stick version
Up to 25 times lighter than 1/4" (6 mm) backerboard
Cuts easily with a utility knife
Mortar locks in to form a bonded-crack prevention system
No mechanical fasteners or tape needed
High and reliable-impact sound reduction
Limitations to the Product
Do not bond directly to hardwood, Luan plywood, particle board,
parquet, cushion or sponge-back vinyl flooring, metal, fiberglass or
plastic.
Do not use as a wear surface.
When setting glass tile, contact Custom's Technical Services for
recommendations.
When setting dimensional stone larger than 12" x 12" (30 x 30 cm),
contact Custom's Technical Services for recommendations regarding
subfloor deflection requirements.
Not for controlling vertical or differential movement cracks.
Suitable for residential and light commercial applications only
4 Technical Data
Applicable Standards
American National Standards Institute (ANSI) ANSI A108.01, A108.17,
A118.12 and A118.13 American National Standards for the Installation
of Ceramic Tile ASTM International (ASTM)
ASTM C627 Standard Test Method for Evaluating Ceramic Floor Tile
Installation Systems Using the Robinson-Type Floor Tester
ASTM D638 Standard Test Method for Tensile Properties of Plastics
EasyMat®Tile&StoneUnderlayment
Published Date: 9/9/2014

Surface Prep / TDS-102
Tile Council of North America (TCNA) TCNA Handbook for Ceramic Tile
Installation, TCNA Method EJ171, F125 & F125A
Technical Chart
Property Test Method Requirement Typical Results
Thermal Resistance
(R Value)
ASTM C518 0.4 for 3 mm
0.8 for 5 mm
1.8 for 12 mm
Fungus Resistance A118.10
Section 4.1
No Growth No Growth
Seam Strength A118.10
Section 4.2
> 8 lbs/ inch
width
>8 pli
Breaking Strength A118.10
Section 4.3
> 170 psi >170 psi
Dimensional Stability A118.10
Section 4.4
+/- 0.7% <0.7%
Waterproofness A118.10
Section 4.5
No Water
Penetration
N/A
Shear Bond Strength to Cement Mortar
Four Week Shear
Strength
A118.10
Section 5.5
> 50 psi >50 psi
Shear Strength After
Water Immersion
A118.10
Section 5.4
> 50 psi >50 psi
System Crack Resistance
Standard
Performance
A118.12
Section 5.4
> 1/16" and <
1/8"
Pass
High Performance A118.12
Section 5.4
> 1/8" Pass
Point Load A118.12
Section 5.2
> 1000 lbs >1000 psi
Robinson Test A118.12
Section 5.3
As Specified Light
Commercial
Sound Transmission
Reduction (IIC)
A118.13
Section 5.3
> 10 16 for 3 mm
20 for 5 mm
23 for 12 mm
Environmental Consideration
Custom®BuildingProductsiscommittedtoenvironmental
responsibility in both products produced and in manufacturing
practices.UseofthisproductmaycontributetoLEED®certification.
5 Instructions
General Surface Prep
Exterior and wet areas must have proper sloping to drains. All surfaces
must be structurally sound, clean, dry and free from contaminants that
would prevent a good bond. Newly prepared concrete must be
troweled smooth and textured to a fine broom finish and cured for 28
days. Existing surfaces must be scarified and flattened, and all defects
must be repaired. Cracks exceeding 1/8" (3 mm) should be treated in
accordance with TCNA F125 or TCNA F125A.
Bonding to Gypsum Surfaces
Gypsum substrates must have a PSI greater than 2000 and must first
be primed or sealed per manufacturers instructions. When using thin-
setappliedEasyMat®,allgypsumsubstratesmustbecoatedwith
RedGard®WaterproofingandCrackPreventionMembrane or
Custom9240®WaterproofingandAntiFractureMembrane. Interior
dry areas must be primed with Peel & Stick Primer where peel & stick
EasyMat®isused.
Bonding to Plywood Surfaces
Plywood flooring including those under resilient flooring must be
structurally sound, built to industry standards, and deflection should
not exceed L/360.
Detailed wood subfloor minimum requirements as follows:
16" oc Floor Joist
3 mm EasyMat with 5/8" + 3/8" plywood
5 mm EasyMat with 5/8" plywood
12 mm EasyMat with 5/8" plywood
19.2" oc Floor Joist
3 mm EasyMat with 3/4" + 3/8" plywood
5 mm EasyMat with 3/4" plywood
12 mm EasyMat with 3/4" plywood
24" oc Floor Joist
3 mm EasyMat with 3/4" + 3/8" plywood
5 mm EasyMat with 3/4" + 3/8" plywood
12 mm EasyMat with 3/4" + 3/8" plywood
Bonding to Existing Surfacing Material
Resilient flooring or plastic laminates must be well-bonded, clean and
free of all contaminates. Roughen the surface by sanding or scarifying,
rinse and allow to dry. Do not sand flooring containing asbestos. For
existing well-bonded ceramic tile, mechanically abrade with
carborundum stone. Rinse and allow to dry. When sanding, the use of
an approved respirator is recommended. CUSTOM's MBP Multi-Surface
Bonding Primer may be used in place of mechanically abrading the
surface of existing covering.
Bonding to Cutback Adhesive
Adhesive layers must be removed as they reduce mortar bond strength
to cement surfaces. Use extreme caution as adhesives may contain
asbestos fibers. Do not sand or grind adhesive residue, as harmful
dust may result. Never use adhesive removers or solvents, as they
soften the adhesive and may cause it to penetrate into the concrete.
Adhesive residue must be wet-scraped to the finished surface of the
concrete, leaving only the transparent staining from the glue. Do a test
bond area first, to determine desirable results. Refer to the RFCI
Pamphlet, "Recommended Work Practices for Removal of Resilient
Floor Coverings", for further information.
Expansion Joint placement
Expansion joints and cold joints, as described in ANSI A108.01, should
never be bridged with setting material. They must be brought through
the tile work and filled with an appropriate elastomeric sealant, such
as Custom's 100% Silicone Caulk. Contact Custom's Technical Services
for the proper treatment of control or saw cut joints. Refer to TCNA
EJ171, F125 & F125A.
EasyMat®Tile&StoneUnderlayment
Published Date: 9/9/2014

Surface Prep / TDS-102
Application of Product
Basic Non Peel & Stick Application
UnrollEasyMat®,layingoutthematerialtouseyourcutsefficiently.
Cuteachrolltotherequiredlength.LayEasyMat®perpendicularto
the subsequent installation direction of the substrate. Roll out a section
ofEasyMat®andfoldthematerialbackhalfway.
EasyMat®canbebondedwithaCustom®polymermodifiedmortar
meeting ANSI A118.4, A118.15 or A118.11. Apply with a 3/16" x 1/4"
(5 x 6 mm) V-notch trowel for 3 mm and 5 mm or use a 1/4" x 1/4" x
1/4" (6 x 6 x 6 mm) square-notch trowel for 12 mm. Apply only
enoughmortarascanbecoveredwithEasyMat®within2030
minutes. As a second alternative, OmniGrip®MaximumStrength
Adhesive or ReliaBond®CeramicTileAdhesive can be used to bond
EasyMat®tothesubstrateindryareas.
EmbedEasyMat®insidefacedown(againstthecurloftheroll),into
the wet bonding material. Do not allow the material to flop into place,
as this may cause air entrapment. Immediately roll the mat using a 30-
50 lb (13-26 kg) roller for 3 mm and 5 mm and a 100 lb (45 kg) roller
for 12 mm. Or use a hand roller applying 30 - 50 lbs (13-26 kg) of
pressure for 3 mm and 5 mm mats and 100 lbs (45 kg) of pressure for
the 12 mm mat to ensure proper adhesive transfer. Overlap each roll
of the roller 50% of the previous pass. Roll the width first, then the
length. Fold the second half of the roll back over the first half of the
material. Spread the adhesive at right angles to the seams in order to
prevent the adhesive from oozing up through the seam. Ensure the
lengthwise edge of the material is aligned exactly with the neighboring
section. Edges must contact but not overlap.
For the 12 mm, as with all thicker-rolled soft-flooring products, back-
curling/lifting may occur at the ends. Once laid out and in position,
seams and ends may need to be weighted (a few inches in) with a
short board, straightedge, or tile until the mortar takes set. Repeat
procedureforthenextsectionofEasyMat®.
TilemaybeinstalledimmediatelyafterinstallationofEasyMat®is
complete, provided that full coverage with the thin-set bond coat has
beenattainedbetweenthesubstrateandEasyMat®,andthatsteps
aretakentoensurethebondbetweenthesubstrateandEasyMat®is
not broken as the tile is set.
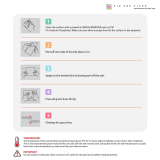
Basic Peel & Stick Application
FirstapplyCustom's®Peel & Stick Primer with a paint brush, short-
nap roller, or a soft-push broom. Apply an even coat (5-10 mils) and
allow to dry until tacky to the touch, about 30-45 minutes. When the
primer does not transfer to your finger, the surface is ready for
application. Unroll the mat while the release sheet is still attached,
position it over the area to be treated, and cut to appropriate length.
Roll up half of the cut mat leaving the other half still in position. Cut
release sheet from the rolled-up portion and pull it towards you
exposing and unrolling the self-stick portion of the mat. Reroll the
unrolled portion of the mat and follow the same procedure.
Immediately roll the mat using a 30-50 lbs (13-26 kg) roller, or use a
hand roller, applying 30-50 lbs (13-26 kg) of pressure, to ensure
proper adhesive transfer. Air pockets and wrinkles should be slit and
smoothed with a roller or the flat side of a trowel. Align subsequent
sheets and butt-join the seams tightly but do not overlap them.
Sound Control Application
Beforeapplication,firstcut3"(7.6cm)widestripsofEasyMat®and
bond them (using a bonding material above) to the wall perimeter of
the entire subfloor, as well as around the perimeter of any protrusions,
in order to isolate or break the vibration transmission path between
the floor and the wall. Assume that the walls you are butting up
against are not square. Using a chalk line, create a starting point for
an edge of the material to follow. Trim the ends of each section to
exact dimensions to fit the surface area to be covered (e.g., joints with
walls, etc.).
Installation of Baseboard/Cove base
If a cove base or baseboard is required, install it after the finished
floor has been installed. After the finished floor is installed, trim the
excess perimeter-isolation strip around the entire perimeter of the
finished floor. Nail the cove base or baseboard to the wall above the
perimeter-isolation strip. To isolate or break the vibration transmission
path between floor and wall, the baseboard must not touch the
finished floor. Adhere the cover to the wall above the finished floor.
Toe gap between the floor and the cover must be caulked, not
grouted. Grout will allow vibration to flank through the walls.
For a Waterproofing System
Waterproof subfloor using RedGard®WaterproofingandCrack
Prevention Membrane as per package instructions. Then bond
EasyMat®tosubflooraspergeneralapplicationinstructions.
Alternate Usage
Floating Floor Systems (Laminate or Engineered Wood):
EasyMat®isapprovedforuseunderfloatingfloorsystems.Follow
instructionsaboveforbondingEasyMat®tosubfloor,thenfollowfloor
manufacturer’sinstructionsforinstallationofthefloor.
Hardwood
EasyMat®isapprovedforuseunderhardwoodfloorsystems.After
bondingEasyMat®tothesubfloor(seebasicinstructions):
1) Consult with the wood adhesive manufacturer for compatibility with
EasyMat®.
or
2)Applyafull,minimum1/16"(1.6mm)skimcoatofeitherCustom’s
SkimCoat&PatchorSpeedFinish™Patching&FinishingCompoundto
the top. Allow the skim coat to cure, then bond the hardwood to the
cementitioussurfacefollowingmanufacturer’sinstructions.
Protection
If tile or stone will not be set immediately after curing, protect the
application from heavy traffic damage. Protect from rain, direct
sunlight and inclement weather for 72 hours after application. If delays
longer than 72 hours are expected, cover the area with felt paper.
Care should be taken to prevent the application from becoming soiled
or punctured during and after application.
Tile and Stone Installation
InstalltileorstonewithaCustom®BuildingProductspolymer
modified mortar that meets ANSI A118.4, A118.15 or A118.11
standards.
EasyMat®Tile&StoneUnderlayment
Published Date: 9/9/2014

Surface Prep / TDS-102
Cleaning of equipment
Clean tools and hands with water before the material dries. Clean all
spray equipment immediately after use.
Health Precautions
Wear rubber gloves and eye protection while using this product. Avoid
eye contact or prolonged contact with skin and wash thoroughly after
handling. If eye contact occurs, flush with water for 15 minutes and
consult a physician. Wash thoroughly after handling. Do not take
internally. Keep out of the reach of children.
Conformance to Building Codes
Installation must comply with the requirements of all applicable local,
state and federal code jurisdictions.
6 Availability & Cost
Location Item
Code
Size Thickness Peel &
Stick
Package
USA SGL3 4' x 100'
(1.2 M x 30.5 M)
3 mm No Roll
USA SGL3P 4' x 100'
(1.2 M x 30.5 M)
3 mm Yes Roll
USA SGL5 4' x 75'
(1.2 M x 22.9 M)
5 mm No Roll
USA SGL5P 4' x 75'
(1.2 M x 22.9 M)
5 mm Yes Roll
USA SGL12 4' x 30'
(1.2 M x 9.14 M)
12 mm No Roll
USA EM40-4 4' x 10'
(1.2 M x 3 M)
5 mm Yes Roll
USA CEM40-4 4' x 10'
(1.2 M x 3 M)
5 mm Yes Roll
7 Product Warranty
Custom®BuildingProductswarrantstotheoriginalconsumer
purchaser that its product shall be free from defects in material and
workmanship under normal and proper usage for a period of one year
following the date of original purchase. CUSTOM's sole liability under
this warranty shall be limited to the replacement of the product. Some
states, countries or territories do not allow the exclusion or limitation
of incidental or consequential damages, so the above limitation or
exclusion may not apply to you. This warranty will not extend to any
product which has been modified in any way or which has not been
used in accordance with CUSTOM's printed instructions. CUSTOM
makes no other warranties either expressed or implied. This warranty
gives you specific legal rights, and you may have other rights that vary
from state to state or from one country/territory to another. This
warranty is not transferrable.
WhenEasyMat®Tile&StoneUnderlaymentisusedasapartofa
qualifying full installation system of CUSTOM products, the installation
can qualify for up to a lifetime system warranty. CUSTOM will repair
and/or replace, at its discretion, the affected area of the system. For
more information, find details and limitations to this warranty at
custombuildingproducts.com.
8 Product Maintenance
Properly installed product requires no special maintenance. Do not use
as a wear surface.
9 Technical Services Information
For technical assistance, contact Custom technical services at 800-282-
8786 or visit custombuildingproducts.com.
10 Filing System
Additional product information is available from the manufacturer upon
request.
Related Products
Prism®SureColor®Grout
FlexBond®CrackPreventionMortar
FusionPro®SingleComponent®Grout
EasyMat®Tile&StoneUnderlayment
Published Date: 9/9/2014

Surface Prep / TDS-102
Coverage
Size Thickness Coverage
4' x 10' (1.2 M x 3 M) 5 mm 40ft²(3.7M²)
4' x 30' (1.2 M x 9.14 M) 12 mm 120ft²(11.1M²)
4' x 75' (1.2 M x 22.9 M) 5 mm 300ft²(28M²)
4' x 100' (1.2 M x 30.5 M) 3 mm 400ft²(37M²)
EasyMat®Tile&StoneUnderlayment
Published Date: 9/9/2014
/