Deutsch
Fig.
2
Bedienungsanleitung
XEVOX
PET
Plazieren des
Melde
r
s
Vor der Montage des Melders sollten Sie
die folgenden Punkte
berücksic
htigen:
•Wählen
Sie eine Stelle, von der aus die Erfassung einer Person
dur
c
h den
Bewegungsmelder im Falle eines Einbruchs am besten erfolgen
kann.
•B
ef
estigen
Sie den Melder in der empfohlenen Montagehöhe von
2,5m.
•Verdecken Sie nicht den
Melder mit Vorhängen
oder sperrigen Objekten.
•Vermeiden Sie die unmittelbare Nähe von Radiatoren, Heizungs- bzw.
Kühlrohren oder Lüftungsausgängen von
K
limaanlage
n.
•Plazieren
Sie den Melder nicht
an Stellen in Fensternähe, die
unmittelbarem Sonnenlicht oder
Zug
ausgesetzt sind.
•Installieren
Sie den Melder vertikal, rechtwinklig
zum Boden.
•Stellen
Sie sicher, dass Haustier nicht auf höher liegende Gegenstände
z.B. Möbelstücke
gelangen können. Trotz der Angabe „tierimmun bis xx
kg“ kann es vorkommen, dass Tiere mit geringerem Gewicht, den
Melder auslösen. Die Gefahr einer Falschauslösung ist besonders hoch,
wenn sich das Tier im Nahbereich des Melders bewegt, springt oder
fliegt.
•Den
Melder nicht gegenüber Treppenaufgängen installieren, zu
denen
Haustiere Zugang
haben.
Installationsanweisung
en
1. Öffnen Sie das Gehäuse, indem Sie den Frontdeckel
entfernen. Setzen
Sie dazu einen flachen Schraubendreher im Schlitz an der Unterseite
des
Melders an und hebeln Sie den Deckel vorsichtig aus
d
e
r
Gehäuserücks
eite
heraus
2. Entfernen der Leiterplatte: Lösen
Sie die Befestigungsschraube auf der
Platine. Biegen Sie nun mit einem flachen Schraubendreher die
Haltenase
auf der linken Seite de Gehäuses vorsichtig nach außen
und
entnehmen Sie die Leiterplatte.
Anmerkung: Vermeiden Sie jegliche Berührung mit dem
I
R
-
E
le
ment
.
3. Öffnen Sie die erforderlichen Montage- und Kabellö
cher.
4. Führen Sie das Kabel durch die Kabeleinlässe (von der Außenseite
der
Einheit) in das
Gehä
use.
5. Befestigen Sie die Zugentlastung (Kabelbinder) so an der Leitung
im
inneren des Gehäuses, dass der Kabel sich nicht mehr
aus dem Gehäuse
heraus ziehen lässt
6. Versiegeln Sie die Öffnung der Kabeleinlässe mit Silikon zum
Sc
hutz
vor
Staub und Insekten.
7. Befestigen Sie die Gehäuserückseite in einer Montagehöhe von
2,4 m
bis 2,7 m an der Wand.
8. Verbinden Sie die Drähte mit den Anschlussklemmen (Fig.
2).
9. Setzen Sie die Leiterplatte wieder in das Gehäuse und schrauben Sie
diese an dem Bodengehäuse fest.
10. Schließen Sie das Gehäuse und vergessen Sie nicht, den Gehäuse-
deckel mit der Gehäuseschraube zu
befestigen
Betrieb und
Aus
r
ichtu
n
g
Vertikale
Ausrichtung
:
Der
XEVOX PET
ist nur bei der Einstellung
„Long“ zu
betreiben.
Einstellung des Impulszählers:
Der
Impulszähler regelt die Anzahl von
Impulsen, die erkannt werden müssen, bevor der Melder das Alarmrelais
öffnet. Die
Einstellung des Impulszählers kann über die jeweilige
Jumperstellung verändert werden (Abb. 1). Werkseinstellung ist
die
Impulswahl
2.
Bitte achten Sie darauf, dass der Jumper horizontal gesteckt wird!
Fig.
1
Einstellung der
LED
Anz
eige:
Setzen Sie die
LED
Brücke ein, um die
LED
Anzeige zu aktivieren
und
entfernen Sie sie, um die Anzeige zu
deaktivieren.
Aufwärmzeit:
Nach der Versorgung mit einer Gleichspannung von
9-16V
DC
benötigt der Melder eine Aufwärmzeit von ca.
3min
.
Gehtest für den
M
elder:
Um das
Li
nsen
Abdeckmuster des Melders zu bestimmen, wird ein Gehtest
durchgeführt. Dabei laufen Sie den Erfassungsbereich des Melders
entlang. Beachten Sie hierzu das Diagramm des Erfassungsbereiches (Fig.
3). Beobachten Sie die
LED
um die vollständige
Abdec
k
ung
sicherzustellen. Dieser Test sollte wöchentlich durchgeführt
werden.
Technische
Daten
:
Betriebsspannung:
9-16V
DC
(nom
.12VDC)
Stromaufnahme:
9m
A
bei 12V
Alarmkontakt:
NC,
100m
A,
24VDC
m
a
x.
Sabotagekontakt:
NC,
100m
A,
24VDC
m
a
x.
Erfassungsbereich:
12m
x
12m
Installationshöhe:
2,4m bis
2,7m
Impulszähler:
1,2,3
(St
e
ckbrücken)
Pyroelement:
duales
PIR-Elem
e
nt
Alarmdauer:
min. 2,2 Sekunde
Haustier Immunität:
30kg bei Hunden
Betriebstemperatur:
-10
0
bis
+55
0
C
Lagertemperatur:
-20
0
C
bis
+60
0
C
Abmessungen (HxBxT):
107
x 60 x
48m
m
Gewicht:
80g
LED-Anzeige:
wählbar (Steckbrücke)
English
Manual
XEVOX
PET
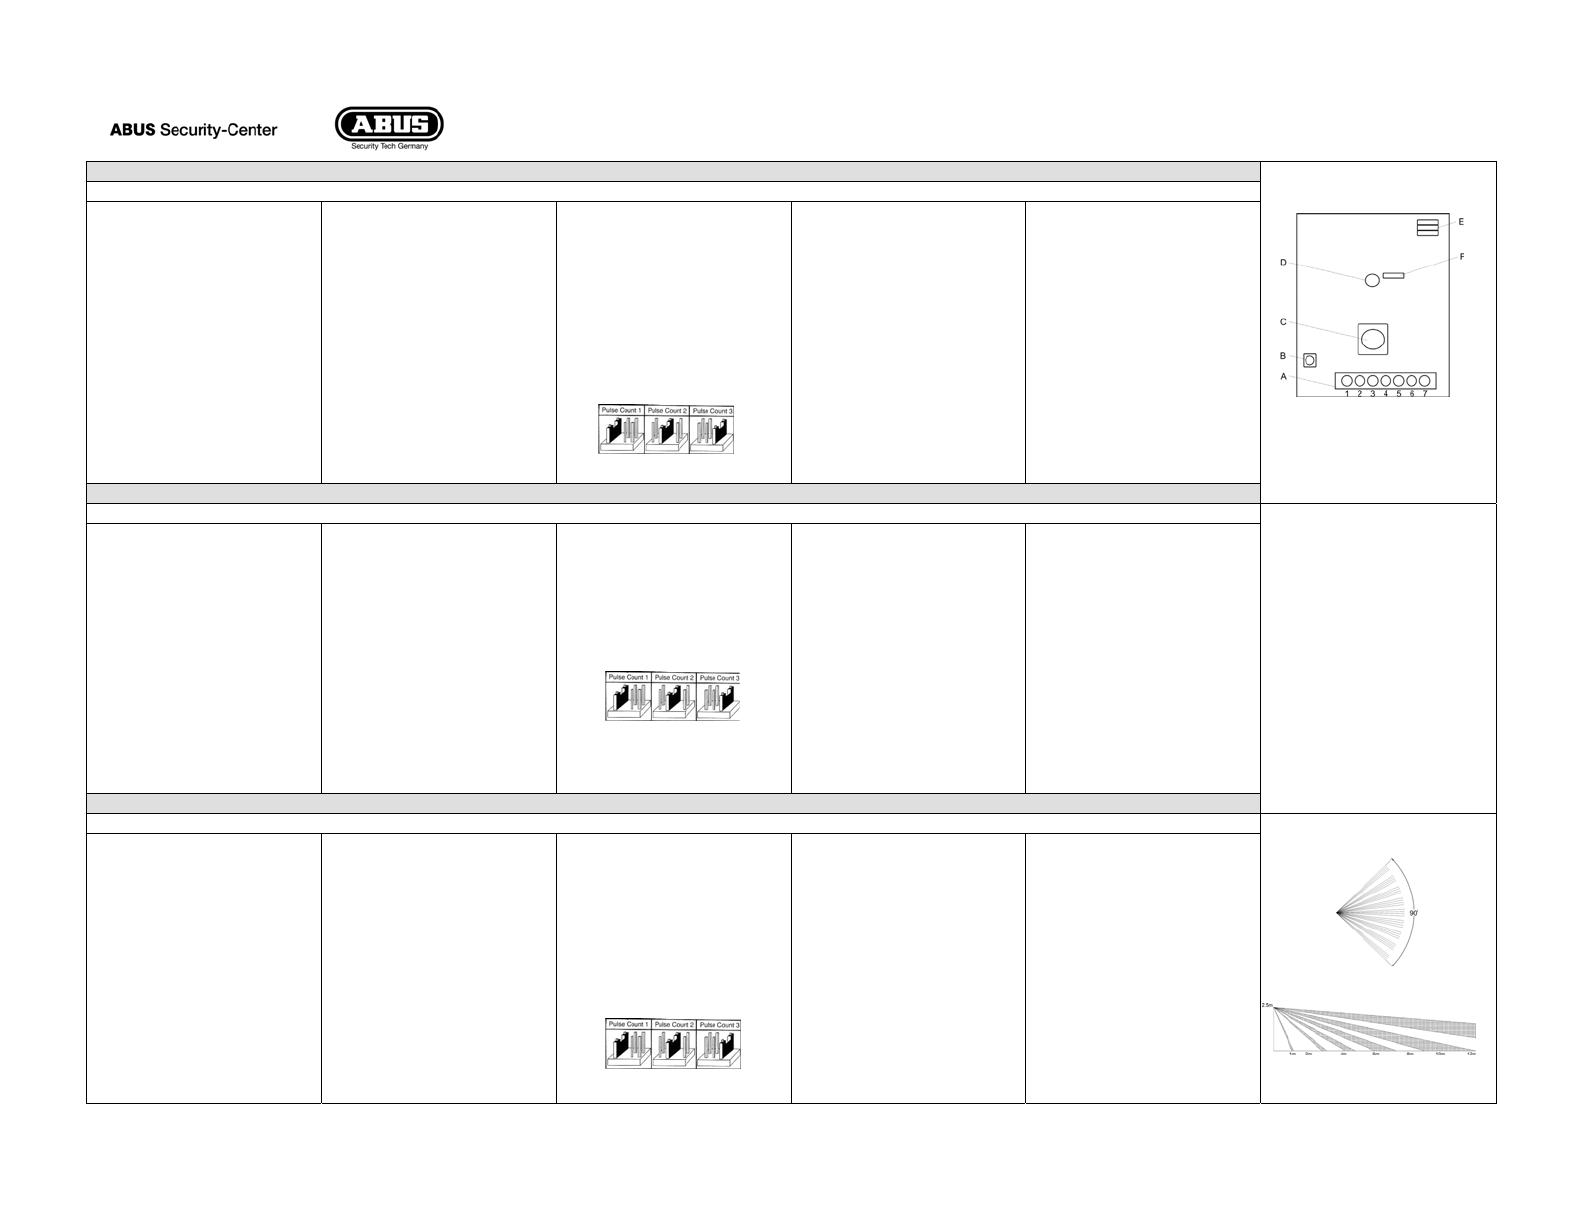
A:
Connection Terminal/Anschlussleiste/ Bornes
de raccordement
B: Tamper Contact/Sabotage/ Contacte
Autoprotectio
n
C:
PIR-element/ Composent PIR
D: LED/ DEL
E:
Pulse Counter/Impulszähler/ Compteur d’impulsion
F: Jumper LED/LED-Steckbrücke/
Pont enfichable
C
onnection
Terminal/ Anschlussleiste/ Bornes de
reccordemen
t
1&2
Tamper/Sabotage/ Autoprotection
3
Free/Frei/ libre
4&5
Alarm
/
Alarm
e
6&7
Voltage
input/Spannungseingang/
Alimentation
de
tension (GND,
+12V)
Detector
placement
Before mounting the detector, you should observe the following:
•Choose a
place where it is most likely that a person will
be detected by
the motion detector in the event of a
burglary
.
•
M
ount
the detector at the recommended height of 2,5 m
e
ters.
•Do
not conceal the detector with curtains or objects which can block
detection.
•Avoid immediate proximity to radiators, heating and refrigeration
pipes,
and air conditioning ventilation
outlets.
•Do
not place the detector near a window where it may be exposed
to
direct sunlight or
draught.
•Mount
the sensor vertically at right angles to the
flo
o
r.
•Make
sure an animal cannot get on height by jumping on furniture or
shelving. Despite the words "pet immune to xx kg" it is possible that
animals with a lower weight, trigger the detector. The risk of false
triggering is particularly high when the animal is moving in the vicinity of
the detector, jump or fly.
•Do not mount unit opposite stairways where animals have access.
Installation
inst
ructions
1. Open the housing by removing the front cover. This is done
by twisting
a
flat screwdriver in the slot between the cover
and the base at the
bottom of
the detector.
2. Remove the circuit
board by loosing the PC-board holding screw.
Note: Avoid any contact with the IR
component.
3. Open the required mounting and cable holes.
4. Feed the cable into the housing through the cable inlets (from
the
outside of
the unit).
5. Attach the strain relief with the cable inside the bottom cover.
Pay
attention that the cable can not be pulled out of the cover.
6. Seal the opening of the cable inlets with silicon to protect
against dust
and insects.
7. Mount the back side of the housing on the wall at a
height between
2,4 or 2,7
m
e
ters.
8. Attach the wires to the connection terminal (Fig.
2).
9. Mount the circuit board and screw it tightly with the bottom cover.
10. Close the housing and don’t forget to fasten the housing cover
with
the housing screws.
Operation and orient
ation
Vertical
orientation:
By using the
XENOX PET
only the setting “Long”
can be chosen.
Setting the pulse counter
:
The detector is supplied in the 3 pulse count mode. The adjustment of
the
counter can be changed by setting the “Pulses” jumper (fig. 1).
No
rmally
the setting is pulse
2.
Please pay attention that the jumper is in a horizontal position.
Fig.
1
Setting the LED
indicator:
Removing the
LED
jumper disables the
LED
ind
i
cator.
Stabilizing
the detector:
After
applying 9-16Vdc, allow the detector to stabilize for circa
3 minutes
Walk testing the
d
e
tector
:
A
walk test is performed to determine whether the detector is fully
functional.
To
do so, walk across the detection pattern of the detector
(refer to Fig. 3) Confirm that the
LED
activates and deactivates
accordingly). This
test should be performed weekly.
Technical
specifications:
Input voltage:
9-16V
DC
(nom
.12VDC)
Current consumption:
9mA
at 12V
Alarm contacts:
NC,
100m
A,
24VDC
m
a
x.
Tamper contacts:
NC,
100m
A,
24VDC
m
a
x.
Coverage:
12m x
12m
Installation height:
2,4m to
2,7m
Puls count:
selectable 1,2,3 (Jumpers)
Pyroelement:
dual PIR
element
Alarm duration:
2,2 seconds
m
i
nimum
Pet immunity:
30kg (66 lbs.) dog
Operating temperature:
-10
0
to
+55
0
C
(14
0
to
+
131
0
F)
Storage temperature:
-20
0
C
to
+60
0
C
(-4
0
to
+140
0
F)
Dimensions (HxWxD):
107 x 60 x
48m
m
Weight:
80g
LED-indicator:
selectable (Jumper)
FRANÇAIS
Instructions d’installation
XEVOX
P
ET
Fig
3
Positionnement du détecteur
Préalablement au montage
:
•choisir un site permettant au détecteur de mouvement la meilleure
détection possible d’une personne, en cas d’effraction
•Fixer le détecteur à la hauteur de montage conseillée à savoir
2,5 m
•Installer
le détecteur verticalement au sol
•Le détecteur
XEVOX
ne doit pas être installé devant des escaliers dont
les
anima
u
x
ont accès. Malgré les mots «animaux de compagnie à l'abri de
xx kg est possible que les animaux ayant un poids inférieur peut déclencher
une alarme. Le risque de déclenchement intempestif est particulièrement
élevé lorsque l'animal à proximité du détecteur peut se déplacer, sauter ou
voler.
•Les animaux ne doivent pas arriver à la hauteur du détecteur
(mêm
e
sur des meubles).
•Ne
pas masquer le détecteur par des rideaux ou des objets encombrants
•Eviter la proximité de radiateurs, de tuyaux de chauffage ou
de
refroidissement, voir les sorties d’aération de système de
climatisatio
n
•Ne
pas placer le détecteur à des endroits proches de fenêtres ni
directement exposés au courant d’air
Instructions
d’ins
t
allat
i
on
1-Ouvrir le boîtier en enlevant le couvercle avant. Pour
cela mettez un
tournevis plat dans l’échancrure du pied du détecteur, et
soulevez le
couvercle
doucem
e
n
t.
2-Retirer la carte de circuits imprimés : desserrer la vis de fixation
et
appuyer avec un tournevis plat sur le support de la
car
te
(Coté gauche du boîtier) et retirer cette dernière
douc
emen
t.
3-Ouvrir les perforations nécessaires
au montage et au câblage
4-Introduire les câbles dans le boîtier
en les faisant passer par les entrées
de câbles (à l’extérieur de
l
’
unité)
5-serrer l’attache câble de telle façon que les câbles à l’intérieur
du
boîtier soient bien fixer.
6- pour la protection contre la poussière et les insectes,
Colm
ater
l’ouverture des entrées de câbles à l’aide de silicone
7-Fixer la face arrière du boîtier au mur,
à une hauteur de montage de
2,4 m jusqu’à 2,7 m
8-Brancher les files aux bornes de raccordement (comme indiqué
/
figu
re.2)
9-Remettre la carte dans le boîtier et serrer la vis de fixation
10-Refermer le boîtier sans oublier de
fixer le couvercle de ce dernier
à
l’aide de la vis.
Mise en service et
orie
ntation
Orientation verticale :
Le détecteur
XEVOX PET
ne peut être
e
x
ploité
qu’avec le réglage « Long
».
-Réglage du compteur d’impulsion : Le compteur d’impulsion
règle le
nombre des zones protégées que le cambrioleur doit
dépasser avant
qu’une alarme se déclanche. La position du cavalier définit le
réglage du
compteur (Figure 1). Le
réglage d’usine est de 2 impulsions.
Prière de prendre en considération que le cavalier doit être mis
verticalement.
Fig.
1
-Réglage de la
DEL
d’indication
:
Mettre le cavalier pour activer la
DEL
d’indication et l’enlever pour
la
désactiver.
-Temps
de stabilisation :
Après l’alimentation d’une tension de 9-16V
DC,
le détecteur à besoin de
3 min pour la
stabilisatio
n.
-Test de fonctionnement :
Un test de fonctionnement est performé afin de déterminer si le détecteur
est en fonctionnement total. Pour faire cela, passez à travers la zone
de
couverture du détecteur (référez vous la figure 3). Contrôler la
DEL
pour
assurer une couverture complète.
Ce test doit être fait chaque
semain
e.
Fiche technique
:
Tension d’alimentation :
9-16V
DC
(nor.12VDC)
Consommation du courant:
9m
A
/
12V
Relais
d’alarm
e
:
NC,
100m
A,
24VDC
m
a
x
Relais d’autoprotection:
NC,
100m
A,
24VDC
m
a
x
Zone de couverture:
15m x
15m
Hauteur de montage:
2,4 m jusqu’à 2,7 m
Compteur d’impulsion:
(cavalier)
1,2,3
Composent PIR:
Composent PIR
dual
Durée d’alarme:
minimum 2,2
se
conde
Immunité :
jusqu’à 30Kg(ex
: chien)
Temp. de fonctionnement:
-10° jusqu’à
+55°C
Temp. de stockage :
-20° jusqu’à
+60°C
Dimension :
107 x 60 x
48m
m
Poids:
80g
DEL
D’indication:
sélectionnable
(cavalier
)
5INPLBW8070
