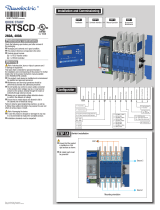
Socomec ATyS g Quick Start

Type
Quick Start

Socomec ATyS g is a motorized source changeover switch, suitable for a wide range of applications in the power distribution industry. It offers automatic and reliable transfer of power between two sources, ensuring continuity of supply to critical loads. The ATyS g is equipped with advanced features such as voltage sensing, load monitoring, and communication capabilities, making it an ideal solution for various sectors, including healthcare, data centers, and industrial facilities.

Socomec ATyS g is a motorized source changeover switch, suitable for a wide range of applications in the power distribution industry. It offers automatic and reliable transfer of power between two sources, ensuring continuity of supply to critical loads. The ATyS g is equipped with advanced features such as voltage sensing, load monitoring, and communication capabilities, making it an ideal solution for various sectors, including healthcare, data centers, and industrial facilities.

QUICK START
ATyS g
800 A-3200 A
1
2
800 A 1000 A 1250 A 1600 A 2000 A 2500 A 3200 A
2x185 - - - - - -
2x50x5 2x63x5 2x63x7 2x100x5
3x100x5 2x100x10 3x100x10
4x185
4x185 4x185 6x185
- - -
63 63 63 100
100 100 100
M8 M8 M10 M12 M12 M12 M12
73.46/8.3 73.46/8.3 177.02/20 354.04/40 354.04/40 354.04/40 354.04/40
115.06/13 115.06/13 230.13/26 398.30/45 398.30/45 398.30/45 398.30/45
549680C
Motorised Source Changeover Switch
Automatic Transfer Switching Equipment
EN
STEP 1
Cabinet / Back
Plate Installation
STEP 3
COMMAND /
CONTROL
terminal
connections
STEP 2
Power Terminal
Connections
STEP 4
Power SUPPLY and
ATS Controller
Terminal
Connections
STEP 5
CHECK
STEP 6
PROGRAMMING
STEP 7A
AUT Mode
(Automatic Control)
STEP 7C
Manual Mode
STEP 7B
AUT Mode
(Remote Control)
STEP 7D
Padlocking Mode
Installation and Commissioning
Installation
Power Terminal Connections
M8 Type Z
M8
Caution: ensure that the
product is installed on a
flat rigid surface.
Recommended
orientation
OK OK
FRAME B6 FRAME B7 FRAME B8
Minimum cable section Cu (mm²)
Recommended cable section Cu (mm²)
Maximum Cu cable cross-section (mm²)
Maximum Cu busbar width (mm)
Type of screw
Recommended tightening torque(lb.in/N.m)
Maximum tightening torque (lb.in/N.m)
To be connected using terminal lugs, rigid or flexable busbars.
Preliminary operations
Check the following upon delivery and after removal of the
packaging:
- Packaging and contents are in good condition
- The product reference corresponds to the order
- Contents should include:
Qty 1 x ATyS g
Qty 1 x Emergency handle and fixing clip
Quick Start instruction sheet
Warning
Risk of electrocution, burns or injury to persons and /
or damage to equipment.
This Quick Start is intended for personnel trained in the
installation and commissioning of this product. For further
details refer to the product instruction manual available on
the SOCOMEC website.
This product must always be installed and
commissioned by qualified and approved personnel.
Maintenance and servicing operations should be
performed by trained and authorised personnel.
Do not handle any control or power cables connected to
the product when voltage may be, or may become
present on the product, directly through the mains or
indirectly through external circuits.
Always use an appropriate voltage detection device to
confirm the absence of voltage.
Ensure that no metal objects are allowed to fall in the
cabinet (risk of electrical arcing).
- For 800 - 3200 A (Uimp = 12 kV). Terminations must respect
a minimum of 14 mm clearance from live parts to parts
intended to be earthed and between poles.
Failure to observe good enginering practises as well as to
follow these safety instructions may expose the user and
others to serious injury or death.
Risk of damaging the device
In case the product is dropped or damaged in any way it is
recommended to replace the complete product.
Accessories
Bridging bars and connection kits.
Control voltage transformer (400 VAC
230 VAC).
DC power supply (12/24 VDC
230 VAC).
Phase barriers.
Terminal shrouds.
Terminal screens.
Auxiliary contacts (Additional).
Padlocking in 3 positions (I - O - II).
Lockout accessories (RONIS - EL 11 AP).
Door escutcheon frame.
ATyS D10 Interface (remote display).
Voltage sensing kit.
Sealable cover.
RJ45 cable for ATyS D10.
Plug-in optional Modbus RS485 communication module.
For further details refer to the product instruction manual
under chapter "Spares and Accessories".
www.socomec.com
To download, brochures, catalogues
and technical manuals:
https://www.socomec.com/range-
automatic-transfer-switches_
en.html?product=/atys-t-atys-g_
en.html
STEP 1
STEP 2
Clip for
storage of
the
emergency
handle
2
1
Dual auxiliary supply:
Uc 208-277V~ +/-20% 50/60Hz
Power comsumption: 22VA
See instruction sheet
ATS CONTROLLER
To D10
To D20
64B 63B
64B 63B
417 416 415 414 413
207 208 209 210
417 416 415 414 413
207 208 209 210
7172 74
7172 74
ATyS t
Dual auxiliary supply:
Uc 208-277V~ +/-20% 50/60Hz
Power comsumption: 22VA
See instruction sheet
ATS CONTROLLER
ATyS p
Dual auxiliary supply:
Uc 208-277V~ +/-20% 50/60Hz
Power comsumption: 22VA
See instruction sheet
ATS CONTROLLER
ATyS g
Dual auxiliary supply:
Uc 208-277V~ +/-20% 50/60Hz
Power comsumption: 22VA
See instruction sheet
ATS CONTROLLER
To D10
To D20
64B 63B
64B 63B
417 416 415 414 413
207 208 209 210
417 416 415 414 413
207 208 209 210
7172 74
7172 74
ATyS t
Dual auxiliary supply:
Uc 208-277V~ +/-20% 50/60Hz
Power comsumption: 22VA
See instruction sheet
ATS CONTROLLER
ATyS p
Dual auxiliary supply:
Uc 208-277V~ +/-20% 50/60Hz
Power comsumption: 22VA
See instruction sheet
ATS CONTROLLER
ATyS g
5
6
4
3
2 1
2
7
104 103
312313 314315 316317 63A64A 24 14 04 13
8 9
10
RJ
102 101
105106
414 413415416417
64B 63B
72
201
71
202
205 206204203
210209208207
74
15
14
13
12
11
1
F1
F2
19
20
16
17
18
I/1-2 I/3-4 I/5-6 I/7-8
II/1-2 II/3-4 II/5-6 II/7-8
Optional:
Fus. 4A
type gG
Optional:
Fus. 4A
type gG
23
3
Opt. 3
2
Opt. 2
1
Opt. 1
4
Opt. 4
21
21
22
22
Ensure that the product is in Manual Mode.
CONTROL / COMMAND Terminals
1
preferred source
2
alternate source
1. Position 0 order
2. Position 1 order
3. Position 2 order
4. Zero position priority order
5. Remote Control Enable (Priority over Auto)
6. Product Available output (Motor)
7. Position II aux contact
8. Position I aux contact
9. Position 0 aux contact
10. O/P to ATyS D10 remote display
11. Product Available output (ATS)
12. I/P Inhibition of the ATS controls
13. I/P Manual retransfer
14. S2 Stability Time Bypass: 2AT
15. M-G: Priority to TON / M-M: Priority
enable/disable
16. TEST OFF LOAD Signal : TOF
17. M-G: Test On Load Input (TON) /M-M:
Priority source selection
18. Not used
19. Contact “Start/Stop Genset” : if S1 is not
available the NC contact (71-72) is close
20. Contact “Start/Stop Genset” : if S1 is not
available the NO contact (71-74) is open
21. Voltage Sensing Inputs
22. Power Supply Inputs
23. Option module slots 1 to 4
Power Supply, Sensing and Control wiring (ATS Controller)
Communication between the software and the ATyS g may be done
through the Modbus RTU module which is available as an option. The
MODBUS module is to be installed in one of the slots provided in the
ATyS g ATS control unit. Easy Config may be installed on a PC
connected through MODBUS module for a direct ATyS configuration,
either isolated with possibility to create a specific configuration for a
later upload and use in ATyS.
Note: The ATyS g may accept 1 additional MODBUS communication
module. Refer to the ATyS p accessory section for details.
Modbus RS485 Ref. 48250092 Factory settings:
Address: 10
Baud Rate: 38400
Stop Bit: 1
Parity: None
Optional Module
Slots for optional module
See STEP 4B
ATS Module
Control Inputs
(Fixed)
ATS Module
Control Inputs
(Fixed)
ATS Module
Output Contact
(Product available)
Genset Start/Stop
Signal
Remote interface
RJ45 - to ATyS D10
ATS Voltage
Sensing Input
Source supply I
S I - Phase 1
S I - Phase 2
S I - Phase 3
575 VAC (ph-ph) max
S I - Neutral
332 VAC (ph-n) max
ATS Power Supply
InputI
Power supply I - L/N
Power supply I - N
208-277VAC ±20%:
50/60 Hz
Recommanded to
use SOCOMEC
Voltage Sensing Kit
(refer to ATyS g
accessories
for details)
ATS Voltage Sensing
Input
Source supply II
S II - Phase 1
S II - Phase 2
S II - Phase 3
575 VAC (ph-ph) max
S II - Neutral
332 VAC (ph-n) max
ATS Power Supply
InputII
Power supply II - L/N
Power supply II - N
208-277VAC ±20%:
50/60 Hz
Example: Control wiring for a 400 VAC application having a 3 phase and neutral supply.
ATyS D10
Remote
Display Unit
STEP 3
STEP 4B
STEP 4A
STEP 5
Check
ATyS Voltage
Sensing and
Power supply
Kit excludes the
need for fuses
F1 & F2.
Connect the product with a cable of section of 1,5 to 2,5 mm
2
.
Screw M3 - Tightening torque:
min.: 0.5 Nm - max.: 0.6 Nm / min.: 4.43 lbin - max.: 5.31 lbin
Programming the ATyS g
STEP 6
As a safety measure the READY LED will
flash when any of the settings shown on the
controller are different to those that are saved.
To return to the steady READY LED revert to
the saved setting values or save the displayed
value by pressing the PROG OK button briefly.
(This is intended as a visual alarm in case one
has changed the configuration settings but has
not yet saved the new values in the product).
For added security the ATyS g may be
equipped with a sealable cover so as to limit
the access to configuration settings. Refer
to the product accessory section for details.
WARNING
WARNING
Dip Switch Setting Options Auto Configuration of Mains Voltage and Frequency
Depending on the state of the ATyS g the ATS automation may change the
switch position as soon as the mode selector is switched to AUT. This is a
normal operation.
POWER
AUT
Ø 4 ... 8mm
PROG
OK
AUT
READY
TEST ON LOAD
TEST OFF LOAD
ATyS g
Un
Auto Conf
5
1
10
14
5
1
10
13
0
1
5
10
20
60
0
1
5
10
20
60
G:
H:
E:
F:
REMOTE CONTROL
A: 3 Ph
B: 1 Ph
C: Neutral
D: Neutral
ATyS
Un
PP / PN
1: 220 / 127
2: 380 / 220
3: 400 / 230
4: 415 / 240
5: 480 / 277
6: 208 / 120
7: 220 / 127
8: 230 / 132
9: 240 / 138
10: 380 / 220
11: 400 / 230
12: 415 / 240
13: 480 / 277
5
6
7
8
9
10
11
12
13
14
15
16
18
20
1:
2:
3:
4:
5:
6:
7:
8:
9:
10:
11:
12:
13:
14:
3
3
4
4
5
5
6
6
7
7
8
8
9
10
N°: Δ
U ΔF %
XXX
50 Hz60 Hz
XXXXXXXX
Motorised Changeover Switch
1600A Ref : 95054160
POWER
AUT
Ø 4 ... 8mm
PROG
OK
AUT
READY
TEST ON LOAD
TEST OFF LOAD
ATyS g
Un
Auto Conf
5
1
10
14
5
1
10
13
0
1
5
10
20
60
0
1
5
10
20
60
G:
H:
E:
F:
REMOTE CONTROL
A: 3 Ph
B: 1 Ph
C: Neutral
D: Neutral
ATyS
Un PP / PN
1: 220 / 127
2: 380 / 220
3: 400 / 230
4: 415 / 240
5: 480 / 277
6: 208 / 120
7: 220 / 127
8: 230 / 132
9: 240 / 138
10: 380 / 220
11: 400 / 230
12: 415 / 240
13: 480 / 277
5
6
7
8
9
10
11
12
13
14
15
16
18
20
1:
2:
3:
4:
5:
6:
7:
8:
9:
10:
11:
12:
13:
14:
3
3
4
4
5
5
6
6
7
7
8
8
9
10
N°: Δ
U ΔF %
XXX
50 Hz60 Hz
XXXXXXXX
Motorised Changeover Switch
1600A Ref : 95054160
POWER
AUT
Ø 4 ... 8mm
PROG
OK
AUT
READY
TEST
ON LOAD
TEST OFF LOAD
ATyS g
Un
Auto Conf
5
1
10
14
5
1
10
13
0
1
5
10
20
60
0
1
5
10
20
60
G:
H:
E:
F:
REMOTE CONTROL
A: 3 Ph
B: 1 Ph
C: Neutral
D: Neutral
ATyS
Un PP / PN
1: 220 / 127
2: 380 / 220
3: 400 / 230
4: 415 / 240
5: 480 / 277
6: 208 / 120
7: 220 / 127
8: 230 / 132
9: 240 / 138
10: 380 / 220
11: 400 / 230
12: 415 / 240
13: 480 / 277
5
6
7
8
9
10
11
12
13
14
15
16
18
20
1:
2:
3:
4:
5:
6:
7:
8:
9:
10:
11:
12:
13:
14:
3
3
4
4
5
5
6
6
7
7
8
8
9
10
N°: Δ
U ΔF %
XXX
50 Hz60 Hz
XXXXXXXX
Motorised Changeover Switch
1600A Ref : 95054160
POWER
AUT
Ø 4 ... 8mm
PROG
OK
AUT
READY
TEST ON LOAD
TEST OFF LOAD
ATyS g
Un
Auto Conf
5
1
10
14
5
1
10
13
0
1
5
10
20
60
0
1
5
10
20
60
G:
H:
E:
F:
REMOTE CONTROL
A: 3 Ph
B: 1 Ph
C: Neutral
D: Neutral
ATyS
Un PP / PN
1: 220 / 127
2: 380 / 220
3: 400 / 230
4: 415 / 240
5: 480 / 277
6: 208 / 120
7: 220 / 127
8: 230 / 132
9: 240 / 138
10: 380 / 220
11: 400 / 230
12: 415 / 240
13: 480 / 277
5
6
7
8
9
10
11
12
13
14
15
16
18
20
1:
2:
3:
4:
5:
6:
7:
8:
9:
10:
11:
12:
13:
14:
3
3
4
4
5
5
6
6
7
7
8
8
9
10
N°: Δ
U ΔF %
XXX
50 Hz60 Hz
XXXXXXXX
Motorised Changeover Switch
1600A Ref : 95054160
POWER
AUT
Ø 4 ... 8mm
PROG
OK
AUT
READY
TEST ON LOAD
TEST OFF LOAD
ATyS g
Un
Auto Conf
5
1
10
14
5
1
10
13
0
1
5
10
20
60
0
1
5
10
20
60
G:
H:
E:
F:
REMOTE CONTROL
A: 3 Ph
B: 1 Ph
C: Neutral
D: Neutral
ATyS
Un PP / PN
1: 220 / 127
2: 380 / 220
3: 400 / 230
4: 415 / 240
5: 480 / 277
6: 208 / 120
7: 220 / 127
8: 230 / 132
9: 240 / 138
10: 380 / 220
11: 400 / 230
12: 415 / 240
13: 480 / 277
5
6
7
8
9
10
11
12
13
14
15
16
18
20
1:
2:
3:
4:
5:
6:
7:
8:
9:
10:
11:
12:
13:
14:
3
3
4
4
5
5
6
6
7
7
8
8
9
10
N°: Δ
U ΔF %
XXX
50 Hz60 Hz
XXXXXXXX
Motorised Changeover Switch
1600A Ref : 95054160
SET the 4 Dip Switches using a small screw driver. Possible variants vary from positions “A to
H” as described in the table below. For convenience, the position functions are also described
on the front of the ATS controller adjacent to the dip switches.
Note: The READY LED will flash green as soon as settings are changed and until the new
settings have been saved by pressing the PROG OK button momentarily.
Dip Switch Setting Options
Dipswitch 1
A / B
A Three Phase Network
B
Single Phase Network
(Attn : Dipswitch 2 is inactive in this position)
Dipswitch 2
C / D
C
Three Phase 4 wire Network (Including Neutral)
(Allows to detect a loss of neutral for unbalanced loads)
D Three Phase 3 wire Network (Without Neutral)
Dipswitch 3
E / F
E Load supply down time of 0 second (0DT = 0 sec)
F Load supply down time of 2 seconds (0DT = 2 sec)
Dipswitch 4
G / H
G Main - Generator Application
H Main - Main Application
WARNING
Whatever Pot 1 trimming, it is IMPERATIVE to set Pots 2 to 4.
5
1
10
14
5
1
10
13
0
1
5
60
0
1
5
10
20
60
Potentiometer Setting Options
SET the 4 potentiometers using a small screw driver paying attention to the arrow indicating
the position. There are a total of 14 positions for which the specific settings are described in
the table below.
Note: The READY LED will flash green as soon as settings are changed and until the new
settings have been saved by pressing the PROG OK button momentarily.
Potentiometer Conguration
Un
Position
Auto
Conf
1 2 3 4 5 6 7 8 9 10 11 12 13
PP / PN
Mesured
220 /
127V
380 /
220V
400 /
230V
415 /
240V
480 /
277V
208 /
120V
220 /
127V
230 /
132V
240 /
138V
380 /
220V
400 /
230V
415 /
240V
480 /
277V
F
50Hz 60Hz
∆U/
∆F
Position 1
2 3 4 5 6 7 8 9 10 11 12 13 14
U threshold in % of Un 5%
6% 7% 8% 9% 10% 11% 12% 13% 14% 15% 16% 18% 20%
F threshold in % of Fn 3%
3% 4% 4% 5% 5% 6% 6% 7% 7% 8% 8% 9% 10%
Hysteresis 20% of ∆U/ ∆F settings
FT Source Failure Timer (s) 0
1 2 3 4 5 8 10 15 20 30 40 50 60
RT
Source Return Timer (min)
0
1 2 3 4 5 8 10 15 20 30 40 50 60
Saving the configured values
To SAVE the recorded setting configuration press the PROG OK button momentarily: <60ms.
Note: The flashing READY LED goes off once the values are saved in the ATS controller.
At least one of the source availability LED must be ON.
If the 1st potentiometer is not on “Auto Conf”,
go to STEP 4.
Putting the ATyS g into Auto Operation
After following Steps 1 to 4, and once ready to put the ATyS g into AUTO operation turn the
mode selector switch to Auto.
Note: When the product is powered and properly configured, after switching the product from
Manual Mode to Auto Mode the READY light should be a steady green light
The ATyS g includes an “Auto Configuration” feature to detect the mains voltage and frequency
nominal values, phase rotation and neutral position and saves them in the ATS controller.
Note: Before configuring the nominal values ensure that the product is properly wired, verified
and ready for commissioning. It is imperative that the network supply is available and that the
wiring to the ATyS g voltage sensing terminals 103 – 106 and 203 – 206 has been done. It is
preferable to use the ATyS sensing kit that may be provided as an accessory.
Press and hold the Red “PROG OK” button for >2s to measure the mains voltage and
frequency.
Note: The source available LED will flash while the available network is being measured. The
READY LED will flash green as soon as settings are measured and until these settings have
been saved by pressing the PROG OK button a second time momentarily. (Refer to STEP 4).
Note: Ensure that the ATyS g is in
“Manual Mode”, powered and with at
least one network supply available.
The ATyS g is programmed after wiring
verification tests through the front of
the ATS Controller in 5 steps:
POWER
AUT
Ø 4 ... 8mm
PROG
OK
AUT
READY
TEST ON LOAD
TEST OFF LOAD
ATyS g
Un
Auto Conf
5
1
10
14
5
1
10
13
0
1
5
10
20
60
0
1
5
10
20
60
G:
H:
E:
F:
REMOTE CONTROL
A: 3 Ph
B: 1 Ph
C: Neutral
D: Neutral
ATyS
Un
PP / PN
1: 220 / 127
2: 380 / 220
3: 400 / 230
4: 415 / 240
5: 480 / 277
6: 208 / 120
7: 220 / 127
8: 230 / 132
9: 240 / 138
10: 380 / 220
11: 400 / 230
12: 415 / 240
13: 480 / 277
5
6
7
8
9
10
11
12
13
14
15
16
18
20
1:
2:
3:
4:
5:
6:
7:
8:
9:
10:
11:
12:
13:
14:
3
3
4
4
5
5
6
6
7
7
8
8
9
10
N°: Δ
U
Δ
F
%
XXX
50 Hz60 Hz
XXXXXXXX
Motorised Changeover Switch
1600A Ref : 95054160
3x
Ø 4-8 mm
POWER
AUT
Ø 4 ... 8mm
PROG
OK
AUT
READY
TEST ON LOAD
TEST OFF LOAD
ATyS g
Un
Auto Conf
5
1
10
14
5
1
10
13
0
1
5
10
20
60
0
1
5
10
20
60
G:
H:
E:
F:
REMOTE CONTROL
A: 3 Ph
B: 1 Ph
C: Neutral
D: Neutral
ATyS
Un
PP / PN
1: 220 / 127
2: 380 / 220
3: 400 / 230
4: 415 / 240
5: 480 / 277
6: 208 / 120
7: 220 / 127
8: 230 / 132
9: 240 / 138
10: 380 / 220
11: 400 / 230
12: 415 / 240
13: 480 / 277
5
6
7
8
9
10
11
12
13
14
15
16
18
20
1:
2:
3:
4:
5:
6:
7:
8:
9:
10:
11:
12:
13:
14:
3
3
4
4
5
5
6
6
7
7
8
8
9
10
N°: Δ
U
Δ
F
%
XXX
50 Hz60 Hz
XXXXXXXX
Motorised Changeover Switch
1600A Ref : 95054160
800 A 1000 A 1250 A 1600 A 2000 A 2500 A 3200 A
3 P 4 P 3 P 4 P 3 P 4 P 3 P 4 P 3 P 4 P 3 P 4 P 3 P 4 P
in mm in mm in mm in mm in mm in mm in mm in mm in mm in mm in mm in mm in mm in mm
C
15.39 391 15.39 391 15.39 391 15.39 391 15.39 391 15.39 391 15.39 391 15.39 391 523 20.59 523 20.59 523 20.59 523 20.59 523 20.59 523 20.59
F
19.84 504 22.99 584 19.84 504 22.99 584 19.84 504 22.99 584 23.46 596 28.19 716 23.46 596 28.19 716 23.46 596 28.19 716 23.46 596 28.19 716
M
10.04 255 13.19 335 10.04 255 13.19 335 10.04 255 13.19 335 13.66 347 18.39 467 13.66 347 18.39 467 13.66 347 18.39 467 13.66 347 18.39 467
T
3.15 80 3.15 80 3.15 80 3.15 80 3.15 80 3.15 80 4.72 120 4.72 120 4.72 120 4.72 120 4.72 120 4.72 120 4.72 120 4.72 120
X
1.87 47.5 1.87 47.5 1.87 47.5 1.87 47.5 1.87 47.5 1.87 47.5 2.09 53 2.09 53 2.11 53,5 2.11 53,5 2.11 53,5 2.11 53,5 2.11 53,5 2.11 53,5
90°
90°
I
II
0
POWER
AUT
Ø 4 ... 8mm
PROG
OK
AUT
READY
TEST ON LOAD
TEST OFF LOAD
ATyS g
Un
Auto Conf
5
1
10
14
5
1
10
13
0
1
5
10
20
60
0
1
5
10
20
60
G:
H:
E:
F:
REMOTE CONTROL
A: 3 Ph
B: 1 Ph
C: Neutral
D: Neutral
ATyS
Un
PP / PN
1: 220 / 127
2: 380 / 220
3: 400 / 230
4: 415 / 240
5: 480 / 277
6: 208 / 120
7: 220 / 127
8: 230 / 132
9: 240 / 138
10: 380 / 220
11: 400 / 230
12: 415 / 240
13: 480 / 277
5
6
7
8
9
10
11
12
13
14
15
16
18
20
1:
2:
3:
4:
5:
6:
7:
8:
9:
10:
11:
12:
13:
14:
3
3
4
4
5
5
6
6
7
7
8
8
9
10
N°: Δ
U
Δ
F
%
XXX
50 Hz60 Hz
XXXXXXXX
Motorised Changeover Switch
1600A Ref : 95054160
AUT
5.43
138
8.43
214
X
T
Fix. M
F
C
C
Fix. 9.84
250
11.02
280
11.02
280
0.83
21
0.83
21
0.35
9
0.49
12.5
0.33
8,5
0.62
15,75
0.62
15,75
0.20
5
0.20
5
0.63x0.43
16x11
ø 0.35
ø 9
ø 0.59
ø 15
0.59
15
ø 0.49
ø 12,5
0.59
15
1.12
28,5
1.12
28,5
0.33
8,5
1.97
50
2.36
60
3.54
90
1.30
33
1.18
30
1.18
30
1.77
45
1.77
45
0.98
25
0.98
25
1.30
33
0.39
10
800 A - 1000 A
2000 A - 3200 A
800 A - 1600 A
1250 A
1600 A -
3200 A
CORPORATE HQ CONTACT: SOCOMEC SAS 1-4 RUE DE WESTHOUSE - 67235 BENFELD, FRANCE - WWW.SOCOMEC.COM
2324
25
26
7
6
2
1
3
4
17
21
22
18
19
16
20
10 118 9 1412 1513
5
Padlocking Mode
(as standard : in position O)
To enable control, close contact 312 with 317. For
contactor logic bridge contact 316 with 317. To operate:
close the contact corresponding to the desired position.
To force the product to 0 position “OFF” bridge contact
313 with 317.
Non contractual document.
Subject to change without notice.
1. MANUAL Mode LED indication.
(Yellow steady light when in Manual Mode).
2. AUTO Mode LED indication
Green steady light when in Auto mode with
no timers running.
Green flashing light when in Auto with timers
running in the background.
3. REMOTE CONTROL Mode LED indication.
Yellow steady light when in remote control
mode.
Remote control mode is achieved with the
Auto/Manu selector switched to Auto and
terminals 312 closed with terminal 317.
Remote control orders are received through
closing 314 to 316 with 317.
4. TEST ON LOAD CONTROL Mode LED
indication. (Yellow steady light when in
TON mode)
5. TEST OFF LOAD CONTROL Mode LED
indication. (Yellow steady light when in
TOF mode).
6. Switch 1 LED position indication.
(Green when in position 1).
7. Source supply I availability LED indication.
(Green when supply I voltage is within the
set limits).
8. Zero position LED indication.
(Yellow when in position 0).
9. Switch 2 LED position indication.
(Green when in position 2).
10. Source supply II availability LED indication.
(Green when supply II voltage is within the
set limits).
11. Sealing screw location 1 for use with
sealing cover (Available as an accessory)
12. Potentiometer 1 : Network Configuration.
(Auto Configuration or refer to the
configuration guide sticker on the front
of the ATyS g when using the predefined
setting positions 1 to 13).
13. Potentiometer 2 : Voltage and Frequency
threshold settings. (Refer to the
configuration guide sticker on the front
of the ATyS g to set the V / Hz threshold.
Positions 1 to 14).
14. Potentiometer 3: Supply FAILURE Time (FT)
Adjustable from 0 to 60 seconds.
15. Potentiometer 4: Supply RETURN Time (RT)
Adjustable from 0 to 60 minutes.
16. READY LED indication
Green steady light : Product in AUTO,
Watchdog OK, Product Available to
changeover.
Green flashing: Settings displayed not
saved or have been changed since last
saved.
(Press PROG OK button in manual mode to
save or revert to last saved settings).
17. Sealing screw location 2 for use with the
sealing cover.
18. FAULT LED indication. (Red steady light in
case of an ATS controller internal fault).
19. Configuration dip switches :
(4 dip switches with 2 positions in each
A to H).
20. PROG OK: Configuration save push button.
(ATTN: Active in Manual Mode ONLY).
Press briefly to confirm and save all set
configuration settings.
Hold pressed for 2 seconds to set the
network supply voltage and frequency by
Auto Configuration.
This is to be followed by pressing briefly to
save the set value configured.
21. Green LED Indication: Power
22. Red LED Indication: Product Unavailable /
Manual Mode / Fault Condition
23. Auto / Manual mode selector switch
(Key version available as an option)
24. Padlocking facility
(Up to 3 padlocks of dia. 4 – 8mm)
25. Emergency manual operation shaft location
(Accessible only in manual mode)
26. Switch position indication window:
I (On switch I) O (Off) II (On switch II).
AUT Mode (RemoteControl)
Imp. 60ms maintened
order I
position I
order 0
position 0
order II
position II
Contactor logicImpulse logic
STEP 7B
AUT Mode (AutomaticControl)
STEP 7A
Ensure that the emergency handle is not
inserted in the product and turn the mode
selector to the AUT position.
LED “Power” Green: ON
LED Manuel/Default: OFF
STEP 7D
Dimensions in./mm.
Manual Operation
STEP 7C
  • Page 1 1
  • Page 2 2
  • Page 3 3
  • Page 4 4

Socomec ATyS g Quick Start

Type
Quick Start

Socomec ATyS g is a motorized source changeover switch, suitable for a wide range of applications in the power distribution industry. It offers automatic and reliable transfer of power between two sources, ensuring continuity of supply to critical loads. The ATyS g is equipped with advanced features such as voltage sensing, load monitoring, and communication capabilities, making it an ideal solution for various sectors, including healthcare, data centers, and industrial facilities.

Ask a question and I''ll find the answer in the document

Finding information in a document is now easier with AI