Garmin GPS GPS III A User manual

Category
Car navigation systems
Type
User manual
Owner’s
Manual &
Reference
®
GPS III A 7/21/98 8:50 AM Page 1
Software Version 2.0 or above
© 1997 GARMIN Corporation, 1200 E. 151st Street, Olathe, Kansas 66062 USA
Tel: 913-397-8200 Fax: 913-397-8282
GARMIN (Europe) Ltd., Unit 5, The Quadrangle, Abbey Park, Romsey, Hampshire SO51 9AQ UK
Tel: 011-44-1794-519944 Fax: 011-44-1794-519222
GARMIN (Asia) Corp., 4th Fl., No.1, Lane 45, Pao-Hsing Road, Hsin Tien, Taiwan R.O.C.
Tel: 011-886-02-917-3773 Fax: 011-886-02-917-1758
Web Site Address: www.garmin.com
All rights reserved. No part of this manual may be reproduced or transmitted in any form or by any means including
photocopying and recording, for any purpose without the express written permission of GARMIN.
Information in this document is subject to change without notice. GARMIN reserves the right to change or improve its
products and to make changes in the content without obligation to notify any person or organization of such changes.
GARMIN, GPS III, Personal Navigator, AutoLocate, TracBack, and PhaseTrac12 are all trademarks of GARMIN
Corporation and may not be used without the expressed permission of GARMIN.
August 1997 Part # 190-00128-00 Rev. A Printed in Taiwan.
GPS III A 7/21/98 8:50 AM Page 2
Thank You!
Thank you for choosing the GARMIN GPS III —the smallest, easiest-to-use GPS navigator for marine, auto-
motive and outdoor use! The GPS III represents GARMIN’s continuing commitment to provide quality naviga-
tion information in a versatile and user-friendly flexible design you’ll enjoy for years. To get the most from your
new GPS, take the time to read through the owner’s manual in order to understand the operating features of the
GPS III. This manual is organized into three sections for your convenience:
Section One (Getting Started) introduces you to the basic features of the unit and provides a quick-start
orientation to the GPS III.
Section Two (Simulator Tour) provides a step-by-step lesson in how your new GPS III would operate in
the real world by utilizing the built-in simulator mode.
Section Three (Reference) provides details about the advanced features and operations of the GPS III by
topic.
Before getting started with your GPS, check to see that your GARMIN GPS III package includes the
following items. If you are missing any parts, please contact your dealer immediately.
Standard Package:
• GPS III Unit with Detachable Antenna
• Wrist Strap
• GPS III Owner’s Manual
• Quick Reference Card
• Velcro Mount
i
INTRODUCTION
About This Manual
GPS III A 7/21/98 8:50 AM Page i
CAUTION: The Global Positioning System (GPS) is operated by the government of the United States,
which is solely responsible for its accuracy and maintenance. The system is subject to changes which could
affect the accuracy and performance of all GPS equipment. Although the GPS III is a precision electronic
NAVigation AID (NAVAID), any NAVAID can be misused or misinterpreted and, therefore, become unsafe.
WARNING: For vehicular applications, it’s the sole responsibility of the owner/operator of the GPS III to
secure the GPS unit so that it will not cause damage or personal injury in the event of an accident. Do not mount
the GPS III over airbag panels or in a place where the driver or passengers are likely to have an impact with it
in an accident or collision. The mounting hardware provided by GARMIN is not warranted against collision
damage or the consequences thereof.
WARNING: For vehicular operations, it is the sole responsibility of the operator of the vehicle to operate
his or her vehicle in a safe manner, maintain full surveillance of all driving conditions at all times, and never
become distracted by the GPS III to the exclusion of safe operating practices. It is unsafe to operate the GPS III
while you are driving. Failure by the operator of a vehicle equipped with a GPS III to pay full attention to oper-
ating the vehicle and road conditions while the vehicle is in motion could result in an accident or collision with
property damage and personal injury.
INTRODUCTION
Cautions
ii
#
!
#
!
#
!
GPS III A 7/21/98 8:50 AM Page ii
INTRODUCTION
FCC Compliance
iii
This device complies with Part 15 of the FCC limits for Class B digital devices. This equipment generates,
uses, and can radiate radio frequency energy and, if not installed and used in accordance with the instructions,
may cause harmful interference to radio communications.
There is no guarantee that interference will not occur in a particular installation. If this equipment does
cause harmful interference to other equipment, which can be determined by turning the affected equipment off
and on, the user is encouraged to try and correct the interference by relocating the equipment or connecting
the equipment to a different circuit than the affected equipment.
Consult an authorized dealer or other qualified service technician for additional help if these remedies do
not correct the problem. Operation is subject to the following conditions: (1) This device cannot cause harm-
ful interference, and (2) this device must accept any interference received, including interference that may cause
undesired operation.
The GPS III does not contain any user-serviceable parts. Repairs should only be made by an authorized
GARMIN service center. Unauthorized repairs or modifications could void your warranty and your authority to
operate this device under Part 15 regulations.
GPS III A 7/21/98 8:50 AM Page iii
INTRODUCTION
Limited Warranty
iv
GARMIN Corporation warrants this product to be free from defects in materials and workmanship for one
year from the date of purchase. GARMIN will, at its sole option, repair or replace any components which fail in
normal use. Such repairs or replacement will be made at no charge to the customer for parts or labor. The cus-
tomer is, however, responsible for any transportation costs. This warranty does not cover failures due to abuse,
misuse, accident or unauthorized alteration or repairs. GARMIN assumes no responsibility for special, inciden-
tal, punitive or consequential damages, or loss of use.
The warranties and remedies contained herein are exclusive and in lieu of all other warranties expressed or
implied, including any liability arising under warranty of merchantability or fitness for a particular purpose,
statutory or otherwise. This warranty gives you specific legal rights, which may vary from state to state.
To obtain warranty service, call the GARMIN Customer Service department (913-397-8200) for a returned
merchandise tracking number. The unit should be securely packaged with the tracking number clearly marked
on the outside of the package and sent freight prepaid and insured to a GARMIN warranty service station. A
copy of the original sales receipt is required as the proof of purchase for warranty repairs. GARMIN retains the
exclusive right to repair or replace the unit or software at its sole discretion.
GPS III A 7/21/98 8:50 AM Page iv
INTRODUCTION
About This Manual . . . . . . . . . . . . . . . . . . . .i
Cautions . . . . . . . . . . . . . . . . . . . . . . . . . . .ii
FCC Compliance . . . . . . . . . . . . . . . . . . . . .iii
Limited Warranty . . . . . . . . . . . . . . . . . . . . .iv
GETTING STARTED
Unit Features . . . . . . . . . . . . . . . . . . . . . . . .1
Keypad Usage / Display . . . . . . . . . . . . . . . . .2
Battery Installation . . . . . . . . . . . . . . . . . . . .3
What is GPS? . . . . . . . . . . . . . . . . . . . . . . . .4
Initialization . . . . . . . . . . . . . . . . . . . . . . . . .5
Main Page Sequence . . . . . . . . . . . . . . . . . . .7
Satellite Status Page . . . . . . . . . . . . . . . . . . .8
Position Page . . . . . . . . . . . . . . . . . . . . . . . .9
Map Page . . . . . . . . . . . . . . . . . . . . . . . . . .10
Compass Page . . . . . . . . . . . . . . . . . . . . . .11
Highway Page . . . . . . . . . . . . . . . . . . . . . . .12
Main Menu . . . . . . . . . . . . . . . . . . . . . . . . .13
Marking Waypoint Positions . . . . . . . . . . . .14
Going to a Waypoint . . . . . . . . . . . . . . . . . .15
Active Route Page . . . . . . . . . . . . . . . . . . . .16
SIMULATOR TOUR . . . . . . . . . . . . . . . . . . .17
REFERENCE
Satellite Status Page . . . . . . . . . . . . . . . . . .25
Satellite Status Page Options . . . . . . . . . . . .28
Position Page . . . . . . . . . . . . . . . . . . . . . . .30
Position Page Options . . . . . . . . . . . . . . . . .31
Map Page . . . . . . . . . . . . . . . . . . . . . . . . . .33
Map Page Options . . . . . . . . . . . . . . . . . . .35
Compass Page . . . . . . . . . . . . . . . . . . . . . .38
Compass Page Options . . . . . . . . . . . . . . . .39
Highway Page . . . . . . . . . . . . . . . . . . . . . . .40
Highway Page Options . . . . . . . . . . . . . . . .41
Waypoints . . . . . . . . . . . . . . . . . . . . . . . . .42
Waypoint Options . . . . . . . . . . . . . . . . . . .47
Nearest Waypoints . . . . . . . . . . . . . . . . . . .48
v
INTRODUCTION
Table of Contents
GPS III A 7/21/98 8:50 AM Page v
vi
INTRODUCTION
Table of Contents
GOTO . . . . . . . . . . . . . . . . . . . . . . . . . . . .49
GOTO Options . . . . . . . . . . . . . . . . . . . . . .50
MOB . . . . . . . . . . . . . . . . . . . . . . . . . . . . .51
TracBack . . . . . . . . . . . . . . . . . . . . . . . . . .52
Routes . . . . . . . . . . . . . . . . . . . . . . . . . . . .54
Route Options . . . . . . . . . . . . . . . . . . . . . .59
Active Route Page . . . . . . . . . . . . . . . . . . . .60
Active Route Page Options . . . . . . . . . . . . .61
Main Menu . . . . . . . . . . . . . . . . . . . . . . . . .63
Setup Menu . . . . . . . . . . . . . . . . . . . . . . . .66
APPENDIX A: Dashboard Mounting . . . . . . . . .76
APPENDIX B: Specifications . . . . . . . . . . . . . . .77
APPENDIX C: Wiring/Interfacing . . . . . . . . . . .78
APPENDIX D: Antenna/Remote Mounting . . . . .79
APPENDIX E: Messages . . . . . . . . . . . . . . . . . .80
APPENDIX F: Map Datums . . . . . . . . . . . . . . .82
APPENDIX G: Navigation Terms . . . . . . . . . . . .85
APPENDIX H: Index . . . . . . . . . . . . . . . . . . . .87
GPS III A 7/21/98 8:50 AM Page vi
1
GETTING STARTED
Unit Features
Antenna
(detachable)
Function Keys
LCD Display
Battery Door
Rocker Keypad
Power/Backlight
Key (red)
To change the screen
orientation, press and
hold the PAGE key.
GPS III A 7/21/98 8:50 AM Page 1
2
GETTING STARTED
Keypad Usage / Display
(POWER)— Red key turns the unit on and off, and
controls three levels of screen backlighting intensity.
(PAGE)— Scrolls main pages in sequence and returns
display from a menu/options page to a main page.
Press and hold this key to change screen orientation.
(MENU)— Displays a menu of available options for
the current page. Press twice to display the Main Menu.
(GOTO)— Displays the GOTO waypoint window,
allowing you to select the destination waypoint. Press
and hold this key to activate MOB feature.
(ENTER/
MARK
)— Activates highlighted fields and
confirms menu options and data entry. Press and hold
this key to mark present position as a waypoint.
(QUIT)— Returns the display to a previous page or
restores a data field’s previous value.
(IN and OUT)— Allows you to zoom in/out through
24 scales on the Map Page. Also adjusts scale on the
Highway Page.
(ROCKER KEYPAD)— Controls the movement of
the cursor, is used to select options and positions, and
to enter data.
CURSOR— A solid black bar which can be moved
up, down, left, and right with the keypad to select indi-
vidual fields on the display (see above).
DEFAULT— A system-selected format, built into the
operating software or the unit’s memory, that will be
followed unless the user chooses a different setting.
FIELD— The location on a page (see above) where a
group of characters or option is entered and displayed.
HIGHLIGHT— The act of using the cursor to select a
field for the purpose of entering data.
SCROLL— The act of moving through characters or
options from a selected field.
DATA ENTRY— Entering data, such as waypoint
names, typically begins and ends with the ENTER/
MARK key. Use the rocker keypad to enter the actual
data: UP/DOWN to change the highlighted character,
RIGHT to move on to the next character..
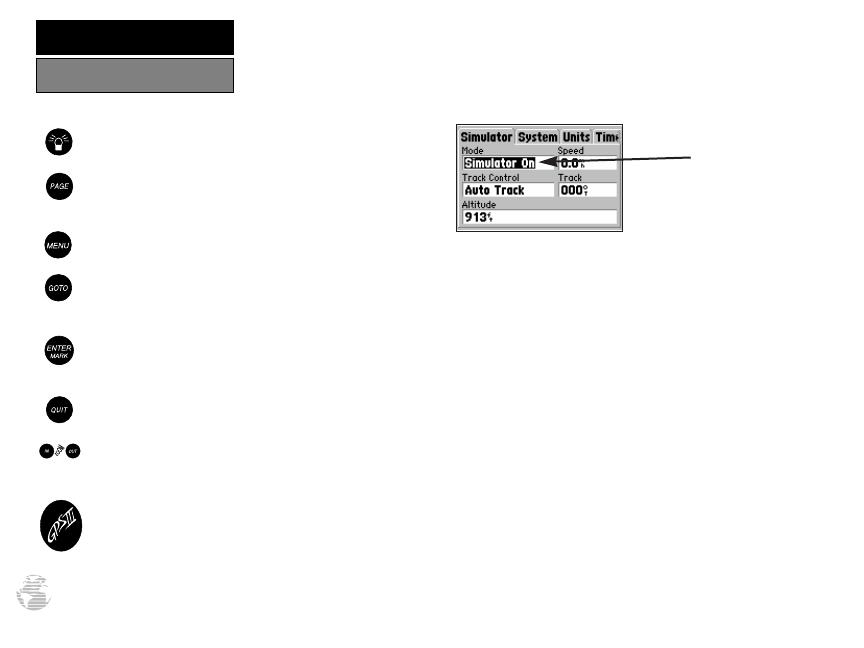
Example of
Cursor on the
‘Mode’ Field
GPS III A 7/21/98 8:51 AM Page 2
GETTING STARTED
Battery Installation
3
The GPS III operates on 4 AA batteries (not included), which are installed at the
base of the unit. These batteries provide up to 8 hours of continuous use.
Rechargeable NiCad or lithium batteries may also be used.
NOTE: The on-screen battery level indicator is calibrated for alkaline batteries,
and will not be accurate when using NiCad or lithium batteries (see page 69).
To install the batteries:
1. Flip up the metal ring at the base of the unit, and turn the ring 90˚ counterclockwise.
2. Install the batteries and close the battery compartment door. When replacing the
GPS III’s batteries, observe the polarity markings engraved in the plastic case.
3. Lock the door in the closed position by rotating the metal ring 90˚ clockwise.
Battery life varies due to a variety of factors, including temperature and
backlighting. You may find that the battery life varies in different conditions and
that lithium batteries provide longer life in colder conditions. An internal 10-
year lithium battery will retain your data while you’re changing batteries.
Polarity
Markings
#
?
GPS III A 7/21/98 8:51 AM Page 3
What is GPS?
GETTING STARTED
The Global Positioning System (GPS) is a system of 24 satellites which circle the
earth twice a day in a very precise orbit and transmit information to earth. The GPS
III must continuously “see” at least three of these satellites to calculate your position
and track your movement. At times, additional satellites may be needed to determine
a position.
By using an almanac (a timetable of satellite numbers and their orbits) stored in
the receiver’s memory, the GPS III can determine the distance and position of any
GPS satellite and use this information to compute your position.
Your GPS receiver can only see satellites above the horizon, so it needs to know
what satellites to look for at any given time. To use this almanac data, your GPS
needs to either be told its general location (“initialized”) or given the opportunity to
find itself. Once you initialize the unit to a position, it will typically compute a fix
within a few minutes. We’ll show you how to initialize your new GPS III on page 5.
Initialization is only necessary under the following conditions:
• The first time you use your receiver (new from the factory).
After the receiver has been moved over 500 miles (with the power off) from
the last time you used it.
• If the receiver’s memory has been cleared and all internally stored data has
been lost.
Because the GPS III relies on satellite signals to provide you with navigation
guidance, the receiver needs to have an unobstructed, clear view of the sky for best
performance. In a nutshell, the GPS receiver’s view of the sky will generally deter-
mine how fast you get a position fix—or if you get a fix at all. GPS signals are rela-
tively weak and do not travel through rocks, buildings, people, metal, or heavy tree
cover, so remember to keep a clear view of the sky at all times for best performance.
Hold the receiver at a
comfortable height with the
antenna pointing up.
When new (or if a position
cannot be determined after 10
minutes), the GPS III will
prompt you to initialize the
receiver. The unit needs a
starting position to determine
which satellites are in view.
4
GPS III A 7/21/98 8:51 AM Page 4
Once the GPS III has calculated a position fix, you’ll usually have anywhere from
five to twelve satellites in view. The receiver will then continuously select the best
satellites in view to update your position. If some of the satellites in view get blocked
or “shaded,” the receiver can simply use an alternate satellite to maintain the position
fix. Although a GPS receiver needs four satellites to provide a three-dimensional
(3D) fix, it can maintain a two-dimensional (2D) fix with only three satellites. A
three-dimensional fix means the unit knows its latitude, longitude, and altitude, while
a two-dimensional fix means the unit knows only its latitude and longitude.
Initializing Your GPS III
To initialize the GPS III, take the receiver outside and find an open area where the
antenna has a clear view of the sky. You may either hold the receiver at a comfortable
height with the antenna pointing up (see page 4), or mount the receiver on the dash of
a vehicle (Appendix A) or on a bike. (Likewise, when you use your GPS III in a
vehicle, make sure the antenna is pointing up.)
To turn the GPS III on, press and hold the red power key.
The Welcome Page will be displayed while the unit conducts a self test. Once
testing is complete, the Welcome Page will be replaced by a warning page, then by the
Satellite Status Page. A message will inform you to “select initialization method”. (If the
initialization prompt has not automatically appeared, press MENU and highlight
‘Initialize Position’.)
To initialize your unit:
1. Press ENTER to acknowledge the message and see a list of initialization options.
2. Use the rocker keypad to highlight ‘Use Map’, and press ENTER.
3. Use the rocker keypad to point the map cursor to your approximate location (within 250
miles). You may also wish to use the IN and OUT zoom keys to make it easier to identify
your approximate position.
4. Press ENTER to select the position and begin searching for satellites.
Check the Satellite Status
Page for ‘2D Navigation’ or
‘3D Navigation’ to verify a
position fix.
The Welcome Page is
displayed when the GPS III is
first turned on. During this
time the receiver is conducting
a self test.
5
GETTING STARTED
Initialization
GPS III A 7/21/98 8:51 AM Page 5
This usually provides a position fix in 1 minute. You’ll know you have a fix when
the unit automatically transitions from the Satellite Page to the Map Page (shown
left). Your receiver is now ready to use!
To turn the unit off:
1. Press and hold the red power key for 1 second.
Troubleshooting
If you have trouble initializing or getting a position fix, check the following:
• Does the receiver have a clear view of the sky?
If there are large buildings or mountains, or if there is heavy tree cover, the
receiver may not be receiving enough satellite signals to calculate a fix. Also, if
you’re using the GPS III on a car dash, make sure the unit is placed so that it has
the clearest possible view of the sky. Your GPS will only be able to detect satel-
lites that it can “see” through your vehicle’s windshield. Depending on the slope
of your dash or the overall surface area of the window, it may be necessary to
mount an external antenna on your vehicle’s roof or trunk in order to give the
unit a better view of the sky. (Contact your local GARMIN dealer and inquire
about the GA 26 low-profile remote antenna, part number 010-10052-02.)
• Have you selected the right area when initializing?
Check for the correct approximate position on the Map Page (press PAGE until
the Map Page appears; see pages 7 and 10), or reselect your approximate
location to restart the initialization.
• Have you moved more than 500 miles from the last calculated position
with the receiver off?
Reinitialize the receiver by selecting your approximate position on the map, or
select ‘AutoLocate’ from the Satellite Status Page options (see page 29).
To initialize the GPS III,
designate your approximate
location directly on the map
display. Use the rocker keypad
and IN/OUT zoom keys to
position the cursor on the map.
Once the GPS III has a posi-
tion fix, it will automatically
transition from the Satellite
Status Page to the Map Page.
6
GETTING STARTED
Initialization
GPS III A 7/21/98 8:51 AM Page 6
To turn the GPS III back on, press and hold the red power key.
The GPS III features six main pages which are linked together in a chain. You can
quickly scroll through the pages in either direction using the PAGE or QUIT keys. Let’s
briefly tour each of these pages in order to give you some insight into how they help
you navigate. We’ll go over all of them in more detail in the reference section.
Press the PAGE key to move
through each of the main
pages in normal fashion.
Press the QUIT key to
sequence through the main
pages in reverse order.
7
GETTING STARTED
Main Page Sequence
Compass Page
Highway Page
Map PageActive Route Page
Position PageSatellite Status Page
GPS III A 7/21/98 8:51 AM Page 7
Let’s start with the Satellite Status Page, which is the page you’ll view while your
unit is getting a position fix. If you’re not already on this page, press PAGE or QUIT
until it appears. The Satellite Status Page shows you status information that helps
you understand what the receiver is doing at any given time, and it’s a page that
you’ll want to occasionally refer back to as you use your unit. It features a sky view
of available satellites, corresponding signal strength bars, the status of your current
position fix (acquiring, 2D, 3D, etc.), and your estimated position error (EPE). You
can also tell how much battery power is remaining, and you can adjust the screen
contrast by pressing the rocker keypad.
Satellites are indicated on the sky view and the signal strength bars by their cor-
responding number, from 01 through 32. The sky view shows where it is looking in
the sky for each satellite, by indicating the direction and elevation (angle above the
horizon). The signal strength bars depict the relative strength of the signal from each
satellite being received. The taller the bar, the stronger the signal.
The signal strength bars give
you an indication of what
satellites are visible to the
receiver, whether or not they’re
being used to calculate a posi-
tion fix, and the signal quality.
If satellite reception is lost, or
an insufficient number of
satellites are available, you
will be alerted with a ‘Poor
Coverage’ receiver status and
message.
8
GETTING STARTED
Satellite Status Page
Receiver Status
Battery Level
Indicator
Signal Strength Bar
Sky View
GPS III A 7/21/98 8:51 AM Page 8
The Position Page shows you where you are, what direction you’re heading, and
how fast you’re going—and it’s the page you’ll want to use when you don’t have a
destination selected.
A graphic compass display at the top of the page shows your direction of travel
(track) while you’re moving, while six user-selectable data fields below display your
current speed, average speed, trip odometer, trip timer, and sunrise/sunset times at
your current position. “User-selectable” means you can change them to display other
information. We’ll cover these fields more in the reference section.
Below the user-selectable data fields are additional data fields to display your
current position, along with current time and date. The current position readout can
be in latitude/longitude, UTM/UPS, Maidenhead or one of several regional grids.
Current time and date can be in local time or UTC (Coordinated Universal Time).
Position Page showing UTM
coordinates for use with
USGS topographic maps, etc.
The trip odometer, trip timer
and average speed readings
can all be reset from the ‘Trip
Computer’ option on the Main
Menu. See page 66.
9
GETTING STARTED
Position Page
Position Page
Track Compass
Trip Odometer
Current Time
and Date
Current Position
Coordinates
GPS III A 7/21/98 8:51 AM Page 9
The Map Page shows your movement using a real-time track log (an electronic
breadcrumb trail that appears directly on the map as you’re traveling), and your
present position as a pointer icon in the center of the map. The Map Page also shows
any nearby lakes, rivers, highways and towns. Use the zoom keys (IN and OUT) to
adjust the map to the desired scale.
To change the map scale:
1. Press the IN zoom key to select a smaller scale and more detail for a smaller area.
2. Press the OUT zoom key to select a larger scale and display a larger area.
The map can be oriented with the top of the page always pointing north,
oriented along your desired course, or it can automatically rotate to keep your
current direction of travel (track) at the top of the screen. The default setting is
‘North Up’, which keeps the top of the page always pointing north.
Nearby waypoints are depicted on the map with any one of over 40 different
symbols, with the waypoint name shown directly above the symbol. We’ll cover
more about the GPS III’s waypoint features and the Map Page in the reference
section of this manual.
With the map oriented to
‘track up’, the pointer always
points up and the map rotates
to your current direction of
travel (track). Note the north
indicator on the map.
You can also select a full-
screen map from the Map
Page Options. See page 35.
10
GETTING STARTED
Map Page
Map Page
Present Position
Data Fields
Nearby Waypoint
GPS III A 7/21/98 8:51 AM Page 10
The GPS III features two different navigation pages: Compass and Highway. The
Compass Page is first. This page provides graphic steering guidance to a destination
waypoint, with an emphasis on the bearing to your destination and current direction
of travel. (The Highway Page places greater emphasis on the straight-line desired
course and the distance and direction you are off course.) The middle of the page fea-
tures a rotating ‘compass ring’ that shows your course over ground (track) while you’re
moving, and a bearing pointer that indicates the direction of the destination (bearing)
relative to the course over ground. The compass ring and pointer arrow work inde-
pendently to show—at a glance—the direction of your movement and the direction to
your destination. For instance, if the arrow points up, you are going directly to the
waypoint. If the arrow points any direction other than up, turn toward the arrow until
it points up—then continue in that direction.
The current speed and distance to the destination waypoint are displayed at the
top of the screen. The bottom of the page displays the time to the destination
waypoint and the current time. This page provides better steering guidance than the
Highway Page when travelling at slower speeds and/or when making frequent
directional changes.
If the bearing pointer points
up, your are going directly to
your destination. If not, turn
toward the arrow until it
points up, then continue in
that direction.
The ‘Big Numbers’ option
(available from the Compass
Page Options) shows a much
smaller compass display and
larger data field characters.
See page 39.
11
GETTING STARTED
Compass Page
Compass Page
Compass Ring
Current Speed
and Distance to
Waypoint
Time to Waypoint
and Current Time
Pointer
(Bearing to
Destination)
GPS III A 7/21/98 8:51 AM Page 11
The GPS III’s Highway Page also provides graphic steering guidance to a destina-
tion waypoint. As you head toward your destination, the middle of the screen pro-
vides visual guidance to your waypoint on a moving graphic “highway.” Your present
position is at the bottom center of the highway display. The line down the middle of
the highway represents your desired course. As you navigate toward a waypoint, the
highway will actually move—indicating the direction you’re off course. To stay on
course, simply move toward the center of the highway.
The top of the page indicates speed and distance to your destination (or the next
waypoint in a route), along with a track compass showing current direction of
travel. Directly below the distance reading is the time required to reach your desti-
nation (or the next waypoint in a route), in hours/minutes or minutes/seconds. The
pointer at the bottom of the page also shows the bearing to your destination, relative
to your current track. If the pointer points straight ahead, you’re heading directly to
your destination!
Use the Highway Page as your primary navigation page (in lieu of the Compass
Page) when your main concern is following a defined course.
If you move off course the
highway display will move,
indicating the direction you
are off course. To stay on
course, simply move toward
the center of the highway.
As you approach your desti-
nation, the graphic highway
will stop at the destination
waypoint. You have arrived
when the waypoint is at the
bottom center of the display.
12
GETTING STARTED
Highway Page
Highway Page
Highway Display
Distance to
Destination (or Next
Route Waypoint)
Pointer
(Bearing to
Destination)
Track Compass
GPS III A 7/21/98 8:51 AM Page 12
  • Page 1 1
  • Page 2 2
  • Page 3 3
  • Page 4 4
  • Page 5 5
  • Page 6 6
  • Page 7 7
  • Page 8 8
  • Page 9 9
  • Page 10 10
  • Page 11 11
  • Page 12 12
  • Page 13 13
  • Page 14 14
  • Page 15 15
  • Page 16 16
  • Page 17 17
  • Page 18 18
  • Page 19 19
  • Page 20 20
  • Page 21 21
  • Page 22 22
  • Page 23 23
  • Page 24 24
  • Page 25 25
  • Page 26 26
  • Page 27 27
  • Page 28 28
  • Page 29 29
  • Page 30 30
  • Page 31 31
  • Page 32 32
  • Page 33 33
  • Page 34 34
  • Page 35 35
  • Page 36 36
  • Page 37 37
  • Page 38 38
  • Page 39 39
  • Page 40 40
  • Page 41 41
  • Page 42 42
  • Page 43 43
  • Page 44 44
  • Page 45 45
  • Page 46 46
  • Page 47 47
  • Page 48 48
  • Page 49 49
  • Page 50 50
  • Page 51 51
  • Page 52 52
  • Page 53 53
  • Page 54 54
  • Page 55 55
  • Page 56 56
  • Page 57 57
  • Page 58 58
  • Page 59 59
  • Page 60 60
  • Page 61 61
  • Page 62 62
  • Page 63 63
  • Page 64 64
  • Page 65 65
  • Page 66 66
  • Page 67 67
  • Page 68 68
  • Page 69 69
  • Page 70 70
  • Page 71 71
  • Page 72 72
  • Page 73 73
  • Page 74 74
  • Page 75 75
  • Page 76 76
  • Page 77 77
  • Page 78 78
  • Page 79 79
  • Page 80 80
  • Page 81 81
  • Page 82 82
  • Page 83 83
  • Page 84 84
  • Page 85 85
  • Page 86 86
  • Page 87 87
  • Page 88 88
  • Page 89 89
  • Page 90 90
  • Page 91 91
  • Page 92 92
  • Page 93 93
  • Page 94 94
  • Page 95 95
  • Page 96 96
  • Page 97 97
  • Page 98 98
  • Page 99 99
  • Page 100 100

Garmin GPS GPS III A User manual

Category
Car navigation systems
Type
User manual

Ask a question and I''ll find the answer in the document

Finding information in a document is now easier with AI