Moxa NPORT 5110A Installation guide
- Category
- Serial servers
- Type
- Installation guide
This manual is also suitable for
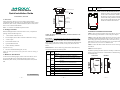
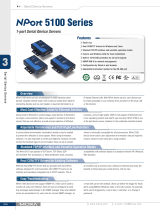
Moxa NPORT 5110A is a compact serial device server that enables control of RS-232 serial devices over Ethernet networks. With its DIN-rail or wall-mount options, it offers flexible placement possibilities. The device features a 10/100M Ethernet port, a male DB9 serial port, and adjustable pull high/low resistors for RS-422/485 communication. It supports various operating systems and comes with NPort Administration Suite software for easy configuration and management.
Moxa NPORT 5110A is a compact serial device server that enables control of RS-232 serial devices over Ethernet networks. With its DIN-rail or wall-mount options, it offers flexible placement possibilities. The device features a 10/100M Ethernet port, a male DB9 serial port, and adjustable pull high/low resistors for RS-422/485 communication. It supports various operating systems and comes with NPort Administration Suite software for easy configuration and management.


-
 1
1
-
 2
2


Moxa NPORT 5110A Installation guide
- Category
- Serial servers
- Type
- Installation guide
- This manual is also suitable for
Moxa NPORT 5110A is a compact serial device server that enables control of RS-232 serial devices over Ethernet networks. With its DIN-rail or wall-mount options, it offers flexible placement possibilities. The device features a 10/100M Ethernet port, a male DB9 serial port, and adjustable pull high/low resistors for RS-422/485 communication. It supports various operating systems and comes with NPort Administration Suite software for easy configuration and management.
Ask a question and I''ll find the answer in the document
Finding information in a document is now easier with AI
Related papers
-
Moxa NPort 5100A Series Quick setup guide
-
-
-
 Moxa Technologies S9450I Series Quick Install Guide
-
Moxa NPort 5000AI-M12 Series User manual
-
Moxa NPort 5100 Series Quick setup guide
-
-
Moxa NPort IA5000A Series User manual
-
-

Other documents
-
 Moxa Technologies NPort P5250A Series Quick Installation Manual
-
Moxa Technologies NPort IA5150 series Quick Installation Manual
-
-
 Moxa Technologies 5100 User manual
-
 Moxa Technologies 5600 User manual
-
 Moxa Technologies 6450 User manual
-
 Moxa Technologies Switch NPort 6110 User manual
-
 Moxa Technologies NPort Express DE-211 User manual
-
 Q5X QT-5100A User manual
-
 AGF Collect and Drain 5100A Owner's manual


