
UNIVERSAL DIGITAL CONNECT LIMITED
Universal Digital Connect Limited, Fort House, Second Floor, 221 Dr. D. N. Road, Fort,
“Videocon” and “d2h” Trademarks are used Pursuant to the rights granted by the holders of respective Trademarks
Mumbai- 400001 Maharashtra, India.
1860 8810 111
092500 92500
Landline/Mobile
VIDEOCON Freeman (1100088259)
Rev.04 Rajmudra
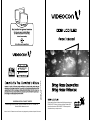
name & serial number of DDB LCD/LED TV. Please quote this
Please read this Owner's Manual carefully before operating your
DDB LCD/LED TV Retain it for future reference. Record model
information when you require service.

SOUTH ZONE
CENTRAL ZONE
HINDI ZONE
HYDERABAD: 040-32449623 WARANGAL: 0870-3293311/22
KURNOOL: 08518-275859 NIZAMABAD:08462-245666 VIJAYAWADA: 0866-3248833/55
VISHAKHAPATNAM : 0891-3260033/44/55 RAJAHMUNDRY : 9000990236
TIRUPATI: 0877-2270013/14 BANGALORE: 080-324491144/66/77
HUBLI : 0836-3246633/44/55 MANGALORE : 0824-3257994/96 DAVANGERE: 0819-2261337
MYSORE: 0821-2372616 COCHIN: 0484-3113155 / 66 / 77 CALICUT : 0495-3233511 / 22 / 33
CHENNAI: 044 – 26209378 MADURAI: 0452 - 3268877 /55/66
COIMBATORE: 0422 - 2333145/146 SALEM: 0427 - 2403199 TRICHY: 0431 – 2411045
MUMBAI: 022 – 42324545 THANE: 022 – 32162709 PUNE: 020 – 24260489, 020 – 24260329
NAGPUR: 0712-254307079 SANGLI: 0233 – 2276266 NASIK: 0253 – 2582703,0251 – 2582704
AURANGABAD: 0240 - 2471201 SOLAPUR: 0217 – 2357057 JALGAON: 0257 – 2020002
GOA: 0283-2462554 AHMEDABAD: 079 – 26400418, 079 – 40268555 SURAT: 0261 – 2461569
RAJKOT: 0281 – 2465041 INDORE: 0731 – 2544536, 0731 – 2544537 BHOPAL: 0755 – 4097500
JABALPUR: 0761 – 4218460,0761 – 4218472 RAIPUR: 0771 – 2445196
KOLKATA: 033 – 44031403 GUWAHATI: 0 9954746944 ASANSOL: 0341 – 2221017
BHUBNESHWAR: 0674 – 2597281
AGRA: 0562-4051151 CHANDIGARH: 0124-5042140 DEHRADUN: 0135-3243553
DELHI: 011-32062775 GHAZIABAD: 0120-4162000 JAIPUR: 0141-4085001
JALANDHAR: 0181-5020297 JAMMU: 0191-2434959 JODHPUR: 0291-2741661
KARNAL: 9254304822 LUCKNOW: 0522-4017315 LUDHIANA: 0161-5092741 / 50292752
VARANASI : 0542-2363383/6541202 GURGAON: 0124-4094358 RANCHI: 0651 – 2340362
PATNA: 0612-2200048 GWALIOR: 9009799125

MESSAGE FROM THE VICE CHAIRMAN & CEO
Dear Customer,
It gives me great pleasure to welcome you to the VIDEOCON DDB LCD/LED family.
Our sincere endeavour is to provide you with best quality products & impeccable
service, thus laying the foundation for a binding relationship with you. One that stands
the test of time to grow stronger with our every interaction.
At Videocon, we have set ourselves a goal to continuously challenge ourselves and
contribute towards good health, happiness and a bigger cause - a greener tomorrow.
Our initiative is to help create a tomorrow that promises clean air, pure water and a
green earth.
With extensive research, creativity and technology, we present a whole new range of
products - designed super efficient, built super sensitive to your needs. They forward
the urgent cause of environmental protection by becoming the machines of the
future, today.
That is the Videocon philosophy. That is Eco Logic.
Warm Regards,
(Vice Chairman & CEO)

15
16
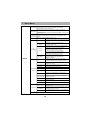
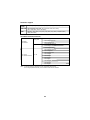
10. INSTALLATION MENU...................................................................................
9. FEATURE MENU.........................................................................................
1
: Subscription of DTH service is subject to separate contract with DTH
NOTE : Pictures shown in this Owner's Manual are just for representation.
: Actual product may differ from the representation.
: Subscription of DTH service is not mandatory.
service provider.
16. STAND ASSY. & WALL MOUNTING INSTRUCTION................................. 27
12. INTERNET FEATURES (OPTIONAL)........................................................ 19
11. WIRELESS AND INTERNET SETTINGS ................................................. 17
5.1. RF QWERTY REMOTE..................................................................... 13
13. MULTIMEDIA FORMAT SUPPORT............................................................ 21
6. BATTERY INSTALLATION ....................................................................... 13
7. VIDEO MENU ........................................................................................... 14
8. AUDIO MENU ........................................................................................... 15
14. TECHNICAL SPECIFICATIONS................................................................. 24
15. TROUBLESHOOTING................................................................................ 26
CONTENTS
1. INTRODUCTION ........................................................................................ 2
2. WARNINGS AND SAFETY PRECAUTIONS.............................................. 2
3. ANTENNA AND EXTERNAL EQUIPMENT CONNECTION....................... 4
4. NAMES AND FUNCTION OF CONTROLS ON SET ................................. 6
5. NAMES AND FUNCTION OF CONTROLS ON REMOTE.......................... 9

2
ating manual.
The LCD/LED Screen is a high-te
moisture.
Do not rub or strike the Active matrix LCD/LED wit
or damage the active matrix LCD/LED per
Do not keep any magnetic object (i.e speaker etc.) near LCD/LED.
on or near the TV.
g water,
Service :
ate properly, unplug it and call Customer Care.
and keep it somewhere you have
quick access to, if required.
Do not touch any pa
e the set in an enclosure or very
close to the wall.
Avoid excessively warm locations to preve
Ensure that the set is placed in a po
Location:

3
For safety, remove the Power plug from the power socket before cleaning the set.
Clean
Cleaning
Remove the Power plug from the power socket when the TV set is not used for a prolonged
Period of
No warranty claims are accepted for damage caused by incorrect handling.
This LCD/LED TV Set is designed to receive and display video and audio signals
and for use as PC monitor, any other use is prohibited.
Caution
the dust on set by wiping the screen and the
here the power cord is subject to damage.
and
the Aerial socket.
unplug the set in ca
Despite the high quality of the television, a random disturbances or interference may
cause occasional malfunctioning, in this case the correct function of the apparatus can
be restored by switching Off the TV through the main On/Off button or removing the
main plug, then switch ON only after the LED light disappears.
Note:
enzol, petroleum or chemicals.
For the purpose of recycling to facilitate effective utilization of resources, please
return this product to a nearby authorized collection center, registered dismantler,
recycler, service center when disposing of this product.
In case of further assistance, you may contact nearest authorized service center.
Or Please see the Company website for further information on collection centers etc.
Visit-http://www.videoconworld.com
( )
Product disposal Guidelines:

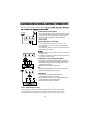
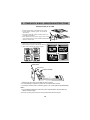
RF IN/ANT IN
VIDEO INPUT
1. Connect the composite output VIDEO out
of VCR/Cable receiver to AV1 & AV2.
2. Connect audio outputs (L, R) of a DVD player to the
audio input AV1and AV2 respectively.
3. Press the PLAY button on the VCR.
VGA AUDIO IN
AV OUT
USB
YPbPr
AV 1 IN
AV 2 IN
YpbPr
1. The Aerial cable / IF Signal Cable should not be bundled to
- Connect RG-6 Cable in IF IN socket on rear of TV.
- For good operation of the set, angle of Reflector should
not be disturbed.
- Dont Disturb any Reflector connection unless & until advised
by authorised service person.
IF IN
COMPONENT (YCbCr/YPbPr) DVD INPUT
1. Connect the component outputs (YCbCr / YPbPr) of
DVD player to the component (YPbPr) input of the TV.
2. Connect audio outputs (L,R) of a DVD player to the
audio input component.
3. Press the PLAY button on DVD player.
Note :
1. While using component Source we need to provide
audio input through AV Source (L,R).
RF Antenna
Reflector
Connect Antenna cable to the RF IN / ANT IN socket on rear of the
TV For good operation of the set, good signal is required.
In the Strong area with the strong signal an indoor Antenna
A) RF Antenna Connection
B) DTH Reflector Connection
2. Installation of the Reflector & LNBF cabling must be done by
by authorised service person.
the power cord.
You can connect Antenna,external equipm
could be used but otherwise an outdoor Antenna
Note : Selecting a Source
Press TV/AV key on front panel keypad or SOURCE key on remote. A source OSD
will appear to select the required source navigate by pressing up/down key or Source
key repeatedly. After selecting the required source press “OK” key to confirm source.
4

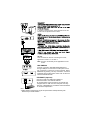
3. Switch on the PC and PC screen appears on the set.
The set can be operated as PC monitor.
HDMI socket on the TV.
HDMI
USB
HDMI
5
Note :
1) Above sketch and connectivity are just for representation actual product may look
different as per model selection.
MULTIMEDIA
Connect / Insert any Standard Multimedia Device
through USB port. To view Source OSD press source
key on Remote or TV/AV key on the front panel. Select
Multimedia by pressing “OK” key on Remote, connected
multimedia device will be listed. Press “OK” to enter the
R
L
VIDEO
YpbPr
AV 2 IN
AV OUT
This connection is used for connecting the TV/AV,
AV OUT
signal from TV SET 1 to TV SET 2.
Note- AV OUT functionality is not applicable for DTH
selected USB Multimedia.
source.
ETHERNET (Optional)
Connect / Insert LAN cable from Modem to
Ethernet socket to use Internet features.
To use the feature, press source key on remote and
navigate down to “Net Connect” and press “OK” key.
Then use “UP/DOWN” key to select the internet feature
on screen and press”OK”.
ETHERNET
AV1

6
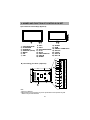
4. NAMES AND FUNCTION OF CONTROLS ON SET
Note :
3
1 2
1) LED INDICATOR
2) IR SENSOR
3) STAND BY
4) SOURCE (TV/AV)
5) MENU
6) CH-
7) CH+
8) VOL-
9) VOL+
10) AC POWER CORD
11) IF IN
12) RF IN
14) VGA IN
13) VGA AUDIO IN
15) HDMI 1
1) Point 10 is Optional.
A) Front Panel Control/Keys (Optional)
1
2
9
8
7
6
5
4
3
VGA IN
IF IN
11
12
13
AV 1 IN
22
VGA
AUDIO IN
21
14
15
16
17
RF IN
20
YPbPr
AV 2 IN
USB
HDMI 2HDMI 1
18
16) HDMI 2
17) USB
18) SMART CARD SLOT
19) AV OUT
20) YPbPr
21) AV 2 IN
B) connecting your Unit:- (Optional)
2) Above sketch and connectivity are just for representation actual product may look
different as per model selection.
19
AV OUT
22) AV 1 IN
10

7
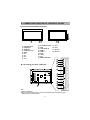
Note :
1) Point 10 is Optional.
A) Front Panel Control/Keys (Optional)
3 1 2 1
2
9
8
7
6
5
4
3
1) LED INDICATOR
2) IR SENSOR
3) STAND BY
4) SOURCE (TV/AV)
5) MENU
6) CH-
7) CH+
8) VOL-
10) AC POWER CORD
11) VGA
13) HDMI 1
14) HDMI 2
15) USB
16) YPbPr
17) AV 1
18) SMART CARD SLOT
12) VGA AUDIO IN
19) AV 2
21) ANT IN
20) IF IN
12
15
16
17
18
20
19
21
13
14
HDMI 2
HDMI 1
VGA
VGA
AUDIO IN
USB Ypbpr
SMART CARD SLOT
AV 2
ANT IN
AV 1
I
F
I
N
11
IN
B) connecting your Unit:- (Optional)
9) VOL+
2) Above sketch and connectivity are just for representation actual product may look
different as per model selection.
22
AV OUT
22) AV OUT
10
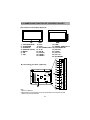
4.1 NAMES AND FUNCTION OF CONTROLS ON SET

3
1 2
1) LED INDICATOR
2) IR SENSOR
3) STAND BY
4) SOURCE (TV/AV)
5) MENU
6) CH-
7) CH+
8) VOL-
9) VOL+
10) AC POWER CORD
11) IF IN
12) RF IN
14) HDMI 1
13) VGA IN
A) Front Panel Control/Keys (Optional)
1 2
9
8
7
6
5
4
3
16) USB
17) SMART CARD SLOT
18) VGA AUDIO IN
19) AV OUT
20) YPbPr
21) AV 2 IN
22) AV 1 IN
8
15) HDMI 2
Note :
1) Point 10 is Optional.
VGA IN
IF IN
AV 1 IN
VGA
AUDIO IN
13
RF IN
YPbPr
AV 2 IN
20
21
USB
HDMI 2
HDMI 1
12
11
B) connecting your Unit:- (Optional)
2) Above sketch and connectivity are just for representation actual product may look
different as per model selection.
19
16
15
14
17
18
AV OUT
22
23
ETHERNET
23) ETHERNET
10
4.2 NAMES AND FUNCTION OF CONTROLS ON SET

9
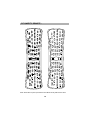
NOTE : Above Sketch is just for representation. Actual Remote set may differ than this sketch.
ABC
1 2
3
DEF
TUV
8
9
WXYZ
7
PQRS
0
MNO
JKL
GHI
6
5
SHIFT
LANGUAGE
SOURCE
FAVOURITE
ACTIVE
RADIO
VOD
MOSAIC
MUTE
SWAP
POWER
EXIT
BACK
DTH
ATV
HELP
DTV MENU
ATV MENU
S-LINK
SLEEP
STOP
REPEAT
ANGLE
P S
DTH
VOD
3D
4
d2h
OK
ACTIVE
RADIO VOD
NET CONNECT
P
S
ATV
VOD
STOP
REPEAT
1
ABC
2
DEF
3
GHI
4
JKL
5
MNO
6
PQRS
7
TUV
8
WXYZ
9
0
SHIFT
S-LINK
d2h
ATV
HELP
DTV
MENU
INFO
ANGLE
A
3D
MOSAIC
SOURCE

10
NOTE : Above Sketch is just for representation. Actual Remote set may differ than this sketch.
RF QWERTY REMOTE :
ESC
F1
Web
F2
Pr Sn
F3
F4
F5
Tab
1
2
3
4
5
6
Q
W E R T
Caps
Lock
A
S
D
F
G
Shift
Z
X
C
V
B
Ctrl
Alt
Space
Y
U
I
O
P
H
J
K
L
N
M
Space
Page up
Page down
7
&
8
9
0
=
[
Enter
F6
Vol-
F11
Vol+
F11
F10
F9
F8
F7

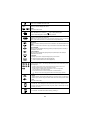
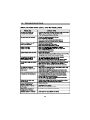
POWER
Turns TV into STANDBY ON / OFF mode.
DTV MENU
This key is used to display the analog menu.
MUTE
Turns sound OFF or ON
SOURCE
Press SOURCE key on remote or key on front panel keypad
A source OSD will appear to select a source press OK.
MENU
ATV MENU
This key is used to display DTH menu.
BACK
Toggles between current & last viewed channel in TV & DTH source. In USB mode
use this key to exit from images, thumbnail mode and come back to previous folder.
EXIT
Exit the menu system
Language key is used to change the language only in DTH source.
LANGUAGE
11
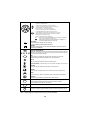
CH + / CH - (INFO) (ANGLE)
Navigate Up / Down through the valid channel.Info key is used to display current
playback information(image,audio,video) Angle key used to rotate angle of image
Next key is used to select next track for play in multimedia / CEC Enabled HDMI Source.
NEXT
Prev key is used to select the previous track in multimedia / CEC Enabled HDMI Source.
PREVIOUS
To increase / decrease the volume level by pressing +/-.
Note- Same key works as home key for CEC (consumer electronics control ) for operating
Menu of CEC instrument which is connected to each other by HDMI source.
currently on screen.
FR key is used for backward the playing track by the speed of(x2,x4.x8,x16,x32) in
FAST REVERSE
multimedia / CEC source.
FF key is used for forward the playing track by the speed of(x2,x4,x8,x16,x32) in
FAST FORWARD
multimedia / CEC source.
DIRECT DIGIT NUMBER SELECTION Keys ( 0 to 9 )
Selects program number 1 - 200 directly in RF mode and 100 - 999 in DTH mode by using
- To select 1 digit program number press desired program number & wait for few
seconds selected program number will appears on screen
- To select 2 digit or 3 digit program number press 1st, 2nd, or 3rd digit within
2 sec. after pressing 1 & 2 digit respectively.
- To enter password to lock or unlock channel and to set New Password.
direct digit keys.
- This key is used for keeping space between texts while typing (optional).
- Used as special character for internet(optional).
*
# - Used as special character for internet(optional).

ACTIVE
RADIO
VOD
MOSAIC
3D
12
Note : Depending up on remote some key may not be available.
DTH INFO/GUIDE - Press this key for current channel information in DTH source.
- Press this key to play or pause track/item in USB source.
To freeze image press this key on image.
PICTURE
Presetted picture settings can be selected
SOUND
(VIVID,HI-BRIGHT,USER,CINEMA,SPORTS)
Presetted sound settings can be selected(STANDARD/ STRATA (Optional),
Navigates vertically up/down through the Menu/Sub menu.
- Used to set Program name
- Used to sorting purpose in Program edit menu
- To enter into displayed Menu / Sub menu parameters.
- Select submenu from displayed menu
- Increase / Decrease the value of selected items
- Select characters in program name and time in time menu
- Adjust setting of selected item and set feature to ON/OFF .
- Adjust Channel number in tuning
OK
- Used to enter selected MENU items and Channel List. (Optional)
- Select Up/Down Text page in USB mode
- Select Prev/Next text file in USB mode
- To Navigate BBCL channel list only in DTH source.
- Used to View channel list in DTH source.
Red,Green,Yellow,Blue keys are the favourite keys used for selecting favourite for
four users. Use this key to set and clear a channel from favourite list.Use this key
HELP
to set/cleara channel from favourite
Red
Green
Yellow
Blue
3D
S-LINK
SLEEP
Slave link is to access the AV device menu when TV set is in HDMI source.
This key is used to toggle between previous Source and DTH source
Sleep (Depending on Model) (Optional)
Sets sleep timer. Maximum time can be set 240 mintues in steps
of 10,20,30,60,90,120,180,240 ,off minutes.
d2h
ATV
ACTIVE
RADIO
VOD
MOSAIC
Press this key for Active Services Menu in DTH Source.
Press this key for Radio Channel of Active Services in DTH Source.
Press this key for Video on Demand of Active Services in DTH Source.
Press this key for Mosaic (PIP) Window in DTH Source.
Key for Favourities.
Key For help desk of Active services in DTH Source.
SPEECH,USER,MUSIC)
Press this key to navigate 3D menu directly. Use this key to select 3D
ON/OFF and other functions available for 3D menu (optional).
S
P
VOD
OK

13
NOTE : Above Sketches are just for representation. Actual Remote set may differ
than these sketches.
· Remote can be used as a keyboard and mouse as well.
· To access the Qwerty remote first you have to connect the dongle of remote provided with the remote.
· The Qwerty Remote keypad works in Net Connect applications which is indicated at
mouse symbol (RF Qwerty remote dongle is inserted in USB port).
· To access the flying cursor press and hold the center key.
· It is possible to vary the parameters of the menu with the qwerty remote by pressing the center key
and moving the remote according to the increase or decrease in parameters.
· In Qwerty remote F1 key works as a red key, F2 key work as a green key, F3 key work as yellow key
and F4 key work as a blue key.
· When battery becomes weak then, continuous LED will glow.
2. Insert - Two batteries (UM-4, AAA, 1.5V) in IR remote and
Three batteries (UM-4, AAA, 1.5V) in Qwerty remote
or equivalent with the correct polarities as indicated by (+) and (-) symbols.
5.1 RF QWERTY REMOTE (OPTIONAL) :

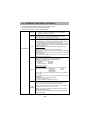
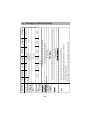
Noise Reduction
by applying temporal and spatial noise reduction
filters to the video data. (Auto/Low/Medium/High/off).
Flesh Tone
Color Temprature
This function reduces the noise in MPEG files
MPEG Noise Reduction
setup
(Normal,warm,Cool)
Back Light(0-10)
Active color 3D
MADI Control
The backlight value can be varied (0-10). This function is used to
vary brightness level of the panel.
This feature improve the contrast level of the picture
PC Adjustment
This feature improve flesh tone (on/off)
Use this option to select and change colour temperature
Cross color
Reduction
Split Screen
This feature avoid the Jittering effect present in
Playing Video. (off/Adaptive/Manual).
This feature avoids the intermixing of two or more
color for enhancing color quality. (off/Adaptive/Manual).
This feature shows the difference in normal TV and
FAROUDJA Video optimized TV.
Active Contrast
This feature used to enhancement of Natural color.
(Low/Medium/High/off).
(Low/Medium/High/off).
(Low/Medium/High/off).
Phase
Manual Clock
H-Position
V-Position
Auto Adjust
Adjust the phase (0-100) and clock (0-100) to remove or
reduce picture noise.If noise appears adjust frequency by clock
for fine adjustments.
If Picture is not ok with auto setting then adjust Horrizontal
position (0-100) , Vertical Position (0-100) manually to
adjust the desired picture setting.
Auto setting allow the PC screen of Tv to self adjust.This
automatically sets the H-Position, V-Position, Phase and Clock.
14
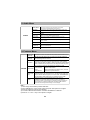
Picture Mode
This function is used to select the presetted picture settings’
(Vivid,Hi-Bright,User,Cinema,Sports)
Contrast(0-100)
These settings are used to adjust the Brightness(0-100), Contrast(0-100)
Saturation(0-100),Sharpness(0-10) values for fine adjustments of the
Advance Picture
The Noise reduction (On / Off) reduce the noise
Video
Brightness(0-100)
Saturation(0-100)
Sharpness(0-10)
Hue(0-100)
Use this option for fine adjustments of picture.
7. Video Menu
NOTE: This is enabled for NTSC Channels only.
Clear All
Select this option to reset all picture settings to Default.
picture.
3D
(OPTIONAL)
3D Mode
This function is used to enable 3D mode ON/OFF/AUTO 2D->3D.
3D Video
Depth
This function is used to control depth of 3D
video.(This function is applicable for
2D to 3D conversion only).
3D Input
Format
Side By Side-When input 3D file(in multimedia/HDMI/
D2H source)is in side/side form then select
“Side By Side” format to view proper 3D picture.
Top Bottom-when input 3D file(in multimedia/HDMI/D2H
source) is in top/bottom form then select
“Top Bottom” format to view proper 3D picture.
Frame Packing-When input 3D file(in HDMI
source only) is frame packed i.e input
through Blue ray DVD players, then select
“Frame Packing” to view proper 3D picture.
This function is used while 3D video/imageis
playing to swap the left / right frames for
pleasant 3d viewing.
3D Swap
MCTi(Optional)
Use this function(Off/Low/medium/high) to control
motion and smoothness in picture.
AUTO 2D->3D can be used to convert normal 2D video
to 3D mode.
Picture Size
Use this function to adjust picture size
of the image/video to MOVIE -
ZOOM,PANORAMA ZOOM / 16:9 (only for HDMI,D2H,Component),
SUPER ZOOM,SMART ZOOM,THEATRE ZOOM,NORMAL / Full (only VGA,
multimedia) ,4:3.

FEATURES
TV is in Normal State When this is off, to Save the power consumed by Tv select power
Health Care View suitably adjusts the backlight based on the
This function is used for on/off the demo shop Which shows the features of TV.
Demo Shop
With the help of this feature User get to know that whether problem is
Self Diagnosis
Ecovision
BMI
World clock
9. Features Menu
Mode
Sets mode to auto and manual.
Hour and min
DST
Sets the hour and min
Sets the DST(Day light Saving Time ) to on/off
City and time
Select the city and sets time
Health Care
Select this option to calculate the BMI (Body mass Index) of
Note :
2) Use Left/Right keys on the remote change the option and up/down to navigate.
3) Press OK remote to enter into the submenu.
5) Press Ch +/- or Vol +/- key on front panel to navigate
4) For Return Back and Exit in Menu use Back & Exit Button on Remote.
1) Timer will get reset if mains powered ON / OFF.
View
distance between the viewer and the TV set. By pressing right arrow
key on remote value changes by 2,4,6,8,10 meter. This will eliminate
the Eye fatigue while watching the TV and takes care of health.
individual. on remote then press Ok button on remote. According to
the values entered in gender,Height in centimeters & weight in kilogram by
using number key in Height & Weight after calculation of BMI it tells the
status as Under Weight, Normal Weight and Over Weight.
consumed by TV select power saving modes Power Saving Low, Power Saving Mid,
Power saving High, Audio Only Mode, In Audio Only mode Only Audio is ON and
Picture is off. Press any Key except Vol+/- & mute keys to Exit audio only mode,
Vol+/- & mute Key will perform the operation even in Audio only mode.
present with TV set or External device which is connected to TV set.Video
(Optional)
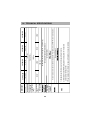
8. Audio Menu
Audio Mode
This function is used to select the preset sound modes
(User,Speech,Standard/Strata(optional), Music,)
Equalizer
The Equalizer 100Hz,200Hz, 300Hz,400Hz,900Hz,1.5KHz, 3KHz,
Loudness
The loudness function is used to on/off the Loudness level of
Speaker
Balance
User can select the left/right speaker intensity by changing
balance. For proper Balancing keep level at 0.
AUDIO
6KHz,9kHz,12kHz can be changed by the user
This function is used for automatic adjustment of volume
level (On/Off)
This feature delivers an impressive surround sound experience
AV Out
The AV out volume can be controlled by selecting AV out
fixed or variable.
AV OUT Volume
Level
Auto Volume
Clear All
Select this option to reset all Audio settings to Default.
Omni Surround
When AV out kept as Variable then this function is used to vary
the AV out level 0-100 .
-50 to +50
with only 2 speaker (on/off)
15
(Optional)
(Optional)
and Audio diagnosis can be done.

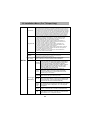
10. Installation Menu (For TV Input Only)
Smart Connect /
INSTALL
Select this function to start searching all the available channels.
Fine Tuning
Select this option for Fine tunning the channel at which either
Picture or Sound is not clear even after channel installation.
Favourite
Manual
Select this function for Manual Searching the channels, select
channel number in program start-on for which user wants manual
Start search-press OK to start manual tunning.
Search
Program edit
Auto search
HDMI setup
This is HDMI-CEC feature operating only in HDMI source
if CEC compliant device like Home theater or DVD player
is connected to TV in HDMI mode Below are the Control
in Smart Connect Mode. (This Feature is Optional)
Press Left/Right navigation of remote to Switch on/off the
Smart Connect feature. if made ON, then the TV will
Switch to HDMI source from current source, when a
connected CEC device is made ON.
Smart
Connect
Device
Control
Auto
Device off
Dynamic
TV ON
Device
Device
Search
Device
List
Control
Key
Press Ok key of remote to check the no of CEC devices
This will show no. of CEC devices.
Connected to TV in a separate window
Press OK to search the CEC compliant Devices connected
with TV .it will show the no of CEC connected devices.
If ON ,then if makes TV set off,then the connected
the help of your TV Remote
CEC devices also go to stand by mode.
Press left/Right Navigation keys for ON/OFF of this feature.
Press left/Right Navigation keys for ON/OFF of this feature.
Press left/Right Navigation keys for ON/OFF of
this feature. When it is in ON condition this enable
to control the behaviour of the playback device with
When it is in ON Condition TV acts in Synchronisation with
the Playback Device. If TV set is made ON, then all connected
This feature allow the component to interrogate and control
the Operation Such as Play,Pause, e.t.c of a Play back
Component.
Favourite channels group can be selected with (Red,Green,Yellow,Blue) keys on
remote navigate to a channel to be included in favorite list press a color key,
the color box same as key pressed appear in front of channel and the channel is
included in list to remove the channel from favourite list press same key again
Exit menu and press same color key, the favorite OSD appear with selected
channels to change the favorite channel keep pressing color key, channel will be
changed. Four favorite groups can be created with four color keys and
same channel can be selected in multiple favorites (Favorite feature is optional).
User can edit the programs by Skip,Swap,Insert,Copy,Delete operation.
2.To Swap a channel with other program location, Press digit 2 on
remote and navigate to list for location to place this channel. Then
press ok to fix the location for this channel.
5.To Delete, Navigate to a channel which you want to delete then
press 5 ,the channel will be deleted.
1.To skip any program, press digit key 1 on that channel, then the
channel will be marked in the list. When come out of menu and
CEC devices also become ON Automatically.
3.To Insert a channel at other program location, Press digit 3 on
remote and navigate to list for location to place this channel. Then
press ok to insert the location for this channel.
4.To Copy a channel at other program location, Press digit 4 on remote
and navigate to list for location to place this channel. Then press ok
to copy the channel at that location.
navigate channels, then the channel will not appear.
16

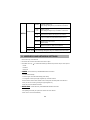
INSTALL
S/W version
This will display the firmware version and the build date.
Screen saver
USER LOCK
This feature enable to handle the overall Locking
of Source Channel e.t.c.
Lock
Switch
Front
Panel
Source
Lock
Change
Password
This feature allow to lock a particular source like as TV,AV
Component,HDMI,VGA,D2H,Multimedia,Net Connect.
With the help of this feature User can change the
Press left/Right Navigation keys for ON/OFF of this feature.
This feature allow to Lock the front panel key which is
Present on TV set.
Password for Lock function.
Press left/Right Navigation keys for ON/OFF of this feature.
Lock
Press left/Right Navigation keys for ON/OFF the Screen Saver.
Channel
Lock
This feature allow to Lock the particular Channel as per
User Need.Use Green color key for Lock / Unlock.
Clear all
Select this option to reset all Lock feature.
Default (0000)
17
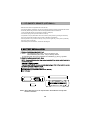
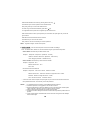
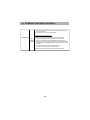
11. WIRELESS AND NETWORK SETTINGS
1. Press source key on the Remote.
2. Scroll down the source list and select “Net Connect” option.
> Wired
> Wireless
> Data card
4. WIRED: Press Yellow Key to Enable/Disable Wired Connection.
· Connected automatically.
· If it does not get connected automatically press OK key.
· In configuration window press right navigation key and select manual.
· Enter IP address, subnet mask, default router, Primary DNS, Secondary DNS of the device to
which you want to connect by pressing the right navigation key.
· Press OK to save the edited Information.
5. WIRELESS : Press Yellow Key to Enable/Disable Wireless Connection
· Press OK key.
· After pressing the OK key two options are visible `Auto’ and `Manual’.
· Select `Auto’ to connect automatically.
3. Press Blue Color key " " to select Network settings. Network setup window will open with 3 options
Page is loading ...
Page is loading ...
Page is loading ...
Page is loading ...
Page is loading ...
Page is loading ...
Page is loading ...
Page is loading ...
Page is loading ...
Page is loading ...
Page is loading ...
Page is loading ...
Page is loading ...
Page is loading ...
Page is loading ...
-
 1
1
-
 2
2
-
 3
3
-
 4
4
-
 5
5
-
 6
6
-
 7
7
-
 8
8
-
 9
9
-
 10
10
-
 11
11
-
 12
12
-
 13
13
-
 14
14
-
 15
15
-
 16
16
-
 17
17
-
 18
18
-
 19
19
-
 20
20
-
 21
21
-
 22
22
-
 23
23
-
 24
24
-
 25
25
-
 26
26
-
 27
27
-
 28
28
-
 29
29
-
 30
30
-
 31
31
-
 32
32
-
 33
33
-
 34
34
-
 35
35


