Page is loading ...

Special Edition Includes:
Dr. Ellington Darden’s
Six Week Fast Fat Loss –
Body Leanness Program
The Bowflex Xtreme
®
Home Gym
Assembly Instructions
& Owner
’s Manual
Written By: Tom Purvis RPT, RTS
Registered Physical Therapist
and founder of the
Resistance Training
Specialist Program
PN 11471 Rev E (7/2006)

Introduction
Congratulations!
Congratulations on your commitment to improving
your health and fitness! With the Bowflex Xtreme
®
home gym, you have everything you need to exceed
all of your physical fitness, strength and health
expectations!
The Bowflex Xtreme
®
home gym’s exceptional
resistance and quality is unmatched by any other
single piece of home fitness equipment available.
You will not believe the amazing results your body
will get with the Bowflex Xtreme
®
home gym!
In this Owner’s Manual you’ll find a variety
of exercises and leanness-enhancing workout
programs. For optimum safety and enjoyment of
your
Bowflex Xtreme
®
home gym, it’s important
that you read the instructions carefully before
performing any exercise for the first time.
With all of the fitness choices available today,
finding the best workout equipment for your needs
can be confusing. Everyone at Nautilus, Inc. would
like to congratulate you and thank you for selecting
the Bowflex Xtreme
®
home gym.
The Bowflex Xtreme
®
home gym is the best home
fitness product available, and you
’re just about to
prove it to yourself.
Before You Assemble
Please take the time to read all assembly
instructions before attempting to assemble your
Bowflex Xtreme
®
home gym. Select where you are
going to locate your machine carefully. The best
place for your Bowflex Xtreme
®
home gym is on a
hard, level surface. For best results, assemble your
Bowflex Xtreme
®
home gym in the location where
you intend to use it. Allow a workout area of at least
8'4" x 6'6" (2.6 m x 2.0 m) of free space for
safe operation of the Bowflex Xtreme
®
home gym.
Basic Assembly Principles
Here are a few basic tips that will make your
assembly of the Bowflex Xtreme
®
home gym quick
and easy. By using these principles, you can simplify
each process and save yourself extra time and effort.
1. To make the assembly process go faster,
gather the pieces you need for each step and
thoroughly read the assembly instructions for
that step prior to starting assembly for the step.
2. When tightening a locknut on a bolt, use a
combination wrench to grip the locknut and
ensure that it is fastened securely.
3. When attaching two pieces, gently lift and look
through the bolt holes to help guide the bolt
through the holes.
4. As a general rule, and for all bolts and nuts on
your Bowflex Xtreme
®
home gym, turn bolts
or nuts toward the right to tighten and left to
loosen. Or you can remember the mnemonic:
“Righty tighty, lefty loosey.”
Tools You Will Need:
• 7/16" Combination Wrench
• 9/16" Combination Wrench
• Adjustable Wrench
• Socket Wrench Set
• Phillips Screw Driver
• Flat Blade Screw Driver
• Rubber Mallet
• Utility Knife
• Scissors
IMPORTANT: LEAVE ALL CABLES WRAPPED AND BAGGED UNTIL YOUR
BOWFLEX XTREME
®
HOME GYM IS FULLY ASSEMBLED.

1
Optional Leg Extension Attachment
If you ordered the optional
Leg Extension Attachment,
you will receive the additional
parts shown here.
Parts Reference Guide
®


2 (5/16" x 2 1/2")
2 (3/8" x 3")
2 (3/8" x 1")
(in separate bag
with washers)
4 (5/16" x 3/4")
20 (3/8" x 3/4")
2 Threaded Studs
(1/2" x 9 1/2")
(shown shorter
than actual size)
1 (3/8" x 5")
4 (1/2")
1 (3/8")
2 Cap Screws (1/4" x 1/2")
3 Self Threading Screws (#10 x 1")
Assembly Hardware: (1:1 Scale)
Button Head Screws:
Button Head Screw
Top View
Flat Washers:
Flat Washer
Side View
26 (3/8")
6 (5/16
")
3 (1/4
")
4 (1/2")
Top View
Top View
Side View
Nylock Nuts:

4
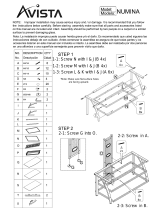
Assembly Guide
Step 1 Base Frame Assembly
Parts:
• Base Frame • Right Frame Rail
• Left Frame Rail • Rear Cross Member
Hardware:
• 6 Button Head Screws ( 3/8" X 3/4")
• 6 Flat Washers (3/8")
Tool: 7/32" Allen Wrench
(or Hex Wrench)
1-1 Lay all parts on floor as
shown.
1-2 Insert Frame Rail
connectors into the
Base Frame and
Rear Cross Member.
Secure with screws
and washers as shown.
Do not tighten screws
at this time.
Step 2 Lower Lat Tower Assembly
Parts:
• Lower Lat Tower Frame
• Rod Box with Power Rod
®
Unit
Hardware:
• 3 Self Threading Screws (#10 X 1")
• 3 Flat Washers (1/4
")
Tool: Phillips Screw Driver
2-1 Lay parts on floor as shown.
Firmly slide Rod Box into Lower
Lat Tower Frame.
2-2 Fasten the Rod Box to the
Lower Lat Tower Frame with
screws and washers as shown.
Tighten screws until snug.
Self Threading
Screws
Flat Washers
Rod Box w/ Rods
Lower Lat Tower Frame
Rear Cross
Member
Right Frame Rail
Button Head
Screws
Flat
Washers
Flat Washers
Base Frame
Button Head Screws
Left Frame Rail
Button Head Screws
Flat Washers

5
Assembly Guide
Step 3 Install Lower Lat Tower Assembly
Parts:
• Lower Lat Tower Assembly
• Base Frame Assembly
Hardware:
• 2 Button Head Screws (3/8" X 3/4")
• 2 Flat Washers (3/8
")
Tool: 7/32” Hex Wrench
3-1 Align the Lower Lat Tower Assembly over
the Base Frame. Push the bottom of the Lower
Lat Tower onto the connector of the Rear Cross
Member as shown.
3-2 Secure Lower Lat Tower Assembly
using screws and washers as shown.
Do not tighten screws at this time.
Step 4 Install Seat Support Rail
Parts:
• Seat Support Rail
• Base Frame Assembly
Hardware:
• 2 Button Head Screws (3/8" X 3/4")
• 2 Flat Washers (3/8")
Tool: 7/32" Hex Wrench
4-1 Slide the bottom of the Seat Support
Rail onto the Base Frame connector
as shown.
4-2 Slide the top of the Seat Support
Rail onto the Lower Lat Tower
Assembly connector as shown.
Secure using screws and washers
as shown.
Do not tighten screws at this time.
Base Frame
Assembly
Button
Head
Screw
Flat
Washer
Button
Head
Screw
Flat
Washer
Base Frame/
Lower Lat Tower
Assembly
Seat Support Rail
Flat
Washer
Button
Head
Screw
Button
Head
Screw
Flat
Washer
Lower Lat Tower
Assembly

6
Assembly Guide
Step 6 Install Pulley
Arms
Parts:
• Right Pulley Arm
• Left Pulley Arm
• Main Assembly
Hardware:
• 4 Washers (3/8")
• 4 Button Head Screws
(3/8" X 3/4")
Tools: 7/32" Hex Wrench
6-1 Slide Left and Right Pulley Arms
onto the connectors on the base
frame as shown.
6-2 Secure Pulley Arms to Base Frame
using screws and washers as shown.
Do not tighten screws
at this time.
Step 5 Install Squat Pulley Frame
Parts:
• Squat Pulley Frame Assembly
• Main Assembly
Hardware:
• 1 Button Head Screw (3/8" X 5")
• 1 Nylock Nut (3/8
")
• 2 Button Head Screws (3/8
" X 1")
• 4 Washers (3/8
")
Tools: 7/32" Hex Wrench & Adjustable
or Socket Wrench
5-1 Place the Squat Pulley Frame behind the Seat
Support Rail and align the top screw holes.
Secure using a 3/8" X 5" screw, washer and
nut in the top hole as shown.
5-2 Install screws and washers into the bottom
holes of the Squat Pulley Frame as shown.
Button
Head
Screw
Flat
Washers
Nylock
Nut
Squat Pulley
Frame
Flat
Washers
Button Head
Screws
Base Frame &
Lower Lat Tower
Assembly
Flat Washers
Button Head
Screw
Button
Head
Screw
Right Pulley Arm
Left Pulley Arm
Button Head
Screws
Washers

7
Assembly Guide
Step 7 Install
Slider Pulleys
Parts:
• 2 Slider Pulleys with Cable Assembly
• Main Assembly
Hardware:
• 2 Cap Screws (1/4" X 1/2")
Tools: Phillips Screw Driver
7-1 Install a Slider Pulley onto each Pulley
Arm as shown. Choose any of the four
holes to secure.
7-2 Install a cap screw into the underside
of each Pulley Arm, as shown.
Cap
Screw
Slider Pulley w/
Cable Assembly
Cap
Screw
Step 8 Secure Pulley Arms
Hardware:
• 2 Threaded Studs (1/2" X 11")
• 4 Nylock Nuts (1/2")
• 4 Washers (1/2")
Tool: Rubber Mallet
8-1 Align the two holes in the
Pulley Arms with those in the
Lower Lat Tower Assembly and
secure using threaded studs,
washers and nuts as shown.
Flat Washers
Threaded
Studs
Nylock Nuts
Nylock Nuts
Flat Washers
Slider Pulley w/
Cable Assembly

8
Step 10 Optional Leg Extension Assembly
Parts:
• Leg Extension Backbone
• 2 Chrome Tubes
• 4 Foam Rollers
• 4 End Caps
Tool:
Rubber Mallet
10-1
Insert Chrome Tubes through
th
e upper hole and one of
th
e lower holes in the Leg
Extension. (Select hole for
your
comfort level.)
10-2 Slide Foam Rollers onto the
Chrome Tubes and secure
with
end caps. A rubber
mallet may be needed to
secure th
e end caps.
NOTE: The Leg Extension may be adjusted
during workou
t to best suit your height
an
d personal preferences.
Assembly Guide
Step 9 Seat Assembly
Parts:
• Seat Backbone
• Seat Bottom
Hardware:
• 4 Button Head Screws (5/16" X 3/4")
• 4 Washers (5/16")
Tool:
3/16" Hex Wrench
9-1
Install the Seat Backbone to the
underside
of the Seat Pad using
screws and washers as shown.
If you did not purchase the Optional Leg Extension,
skip steps 10 and 11 and proceed to Step 12
.
Button He
ad
Screws
Flat
Washers
Se
at Backbone
Seat Bott
om
Leg Extension
Backbone
End Caps
Foam Roll
e
rs
Chrome Tubes
9
Assembly Guide
Step 11 Install Optional
Leg Exte
nsion Assembly
Parts:
• Leg Extension Assembly
•
Lock Knob
11-1
Insert Leg Extension
Backbone
into open end of
Seat Backbone as
shown.
11-2
Align one hole of the Leg
Extension with the hole
in
the Seat Backbone
to fit your
height and secure with the
Lock Knob as
shown.
Lock Knob
Step 12 Install Seat Assembly
Parts:
• Seat Assembly
•
Main Assembly
12-1
Align the top two hooks on
the Seat Backbone
with one
of the lower pairs of pins on
the Seat Support Rail
.
12-2
Tip seat front up and slide
hooks onto pins. Rotate seat
down and back to use.
Note:
Use lower pins until the seat
back is installed. Reverse
pr
ocedure to remove seat.
Seat
Backbone
Le
g
Extension
Backbone
Seat
Backbone
Seat Support
Rail

10
Upper Lat Tower Assembly
Parts:
• Upper Lat Tower
•
Lat Cross Bar
Hardware:
• 2 Button Head Screws (3/8" X 2 1/2")
•
2 Washers (3/8")
Tool:
7/32" Hex Wrench
14-1 Align the two holes on the Lat Cross Bar with
those on the Upper Lat Tower as shown.
14-2 Secure using washers and screws as shown.
Step 13 Install Seat Back Pad
Note: The back of the Seat Back Pad has two
pairs of hol
es. Select the appropriate
set based on your height.
Parts:
• Seat Back Pad
•
Main Assembly
Hardware:
• 2 Button Head Screws (5/16" X 2 1/2")
•
2 Washers (5/16")
Tool:
3/16" Hex Wrench
13-1
Position Seat Back Pad against the
Seat Support Rail and align the
screw holes for your
height with
those on the Seat Support Rail
.
13-2
Secure Seat Back Pad to the Seat
Support Rail using screws and
washers as
shown.
Seat Back Pad
Flat
Washer
s
Button
Head
Screws
Button Head
Screws
Flat
Washers
Lat Cross Ba
r
Uppe
r Lat Tower
Hex Nuts
Step 14:
(3/8” X 3”)

11
Assembly Guide
Step 15 Install Upper Lat Tower Assembly
Parts:
• Upper Lat Tower Assembly
• Main Assembly
Hardware (1:1):
• 6 Button Head Screws (3/8" X 3/4")
• 6 Washers (3/8")
Tool:
7/32" Hex Wrench
15-1 Position the Upper Lat Tower Assembly
over th
e Lower Lat Tower Assembly.
15-2
Slide the Upper Lat Tower onto the
Lower Lat Tower and secure with screws
an
d washers as shown.
Rods not shown
for clarit
y
Upper Lat Tower
Button Head
Screws
Flat
Washer
s
Flat
Washer
s
Button Head
Screws
Lower Lat Tower
TIGHTEN HARDWARE
Carefully go over the entire Bowfle
x
Xtreme
™
home gym and tighten all
hardware befo
re using.

12
Assembly Guide
Step 16 Connect Cables
16-1 Connect and route cables through pulleys
to confirm that cables can move freely.
Page 18 of the owner’s manual shows
pulley routing for individual exercises.
CONGRATULATIONS!
You have successfully completed assembly of your
Bowflex Xtreme
®
home gym! Please inspect your machine to ensure that all fasteners are
tight and everything is properly assembled. Review all warnings affixed to
machine.
12

Special Edition Includes:
Dr. Ellington Darden’s
Six Week Fast Fat Loss –
Body Leanness Program
The Bowflex Xtreme
®
Home Gym
Owner’s Manual
Written By: Tom Purvis RPT, RTS
Registered Physical Therapist
and founder of the
Resistance Training
Specialist Program
PN 11471 Rev E (7/2006)

14
Important Safety Precautions
• Always read and follow the Warning and Safety
labels attached to your Bowflex Xtreme
®
home gym.
Do not remove these labels. If you need replacement
labels, please call a
Bowflex
®
Representative at
(800) 605-3369.
• Read the owner
’s manual and follow it carefully
before using the machine.
• Parents and others in charge of children should be
aware of their responsibility, because the natural
play instinct of children can lead to situations for
which the training equipment is not intended.
• Never allow children to use the Bowflex Xtreme
®
home gym unsupervised. To do so could result in
injury. If children are allowed to use the equipment,
their mental and physical development should be
taken into account. They should be instructed on
the correct use of the equipment.
• This equipment is under no circumstances suitable
as a children
’s toy.
• Inspect your machine for any worn or loose
components prior to use. Tighten or replace any
worn or loose components prior to use. Pay close
attention to cables or belts and their connections.
• Never use dumbbells or other weight equipment
to incrementally increase the weight resistance.
Use only the Power Rod
®
unit that came with your
Bowflex Xtreme
®
home gym.
• Set up and use your Bowflex Xtreme
®
home gym on
a hard, level surface.
• Do not wear any loose or dangling clothing or
jewelry while using the Bowflex Xtreme
®
home gym.
Stand clear of all moving components.
• Before beginning any exercise program consult
your physician or health care professional. Only he
or she can determine the exercise program that is
appropriate for your particular age and condition.
If you experience any light-headedness, dizziness,
or shortness of breath while exercising, stop the
exercise and consult your physician.
• This machine is meant for individual consumer use
only, and is not meant for use by institutions.
• Maximum user weight for the Bowflex Xtreme
®
home gym is 300 pounds
(136 kg). For your safety,
do not use or allow others to use the Bowflex
Xtreme
®
home gym if they weigh in excess of 300
pounds (136 kg).
• Allow a workout area of at least 7' x 6" (2.1 m x 1.8
m) of free space for safe operation of the
Bowflex
Xtreme
®
home gym.
• Keep your body weight centered on the machine,
seat, or base frame platform while exercising.
• When using the Bowflex Xtreme
®
home gym for
standing leg exercises, always grasp the Lat Tower
on your machine for stability.
• Keep out of the path of the Power Rod
®
unit when
exercising and make certain that observers also
stand clear of the Bowflex Xtreme
®
home gym when
the Power Rod
®
unit is in use.
• Never move or adjust the seat while sitting on it.
Never stand on the seat.
• When hooking up Power Rod
®
caps, do not stand
directly over the top of the rods. Stand off to the
side while attaching rods.
• Never attempt to exercise with more resistance than
you are physically able to handle.
• Keep cables and Power Rod
®
unit bound with the
rod binding strap when not in use.
• Before exercising, make sure the cable pulley system
is properly secured, properly attached, and in
perfect working condition.
• All exercises in this manual are based on the
calibrated resistance and capacity levels of the
Bowflex Xtreme
®
home gym. Exercises not
in this manual are not recommended by the
manufacturer.

15
Assembly Guide . . . . . . . . . . . . . . . . . . . . . . . . . . . . . . . . 1-12
Important Safety Precautions . . . . . . . . . . . . . . . . . . . . . . . 14
Get To Know Machine . . . . . . . . . . . . . . . . . . . . . . . . . . . . 16
How to Use Your Machine . . . . . . . . . . . . . . . . . . . . . . . 17-19
Define Your Goals . . . . . . . . . . . . . . . . . . . . . . . . . . . . . . 20-22
Working Out . . . . . . . . . . . . . . . . . . . . . . . . . . . . . . . . . . . . .23
The Workouts:
The 20 Minute Better Body Workout . . . . . . . . . . . . . . . . . 23
Advanced General Conditioning . . . . . . . . . . . . . . . . . . . . .23
20 Minute Upper / Lower Body . . . . . . . . . . . . . . . . . . . . . 24
Body Building . . . . . . . . . . . . . . . . . . . . . . . . . . . . . . . . . . . .25
Circuit Training Anaerobic / Cardiovascular . . . . . . . . . . 26
True Aerobic Circuit Training . . . . . . . . . . . . . . . . . . . . . . .27
Strength Training . . . . . . . . . . . . . . . . . . . . . . . . . . . . . . . . .28
Chest Exercises:
Bench Press . . . . . . . . . . . . . . . . . . . . . . . . . . . . . . . . . . . . . .29
Chest Fly . . . . . . . . . . . . . . . . . . . . . . . . . . . . . . . . . . . . . . . . .29
Decline Bench Press . . . . . . . . . . . . . . . . . . . . . . . . . . . . . . .30
Incline Bench Press . . . . . . . . . . . . . . . . . . . . . . . . . . . . . . . .30
Shoulder Exercises:
Reverse Fly . . . . . . . . . . . . . . . . . . . . . . . . . . . . . . . . . . . . . . . 31
Crossover Reverse Fly . . . . . . . . . . . . . . . . . . . . . . . . . . . . . . 31
Crossover Rear Deltoid Rows . . . . . . . . . . . . . . . . . . . . . . . . 32
Crossover High Rear Deltoid Rows . . . . . . . . . . . . . . . . . . .32
Lateral Shoulder Raise . . . . . . . . . . . . . . . . . . . . . . . . . . . . .33
Forearm Lateral Shoulder Raise . . . . . . . . . . . . . . . . . . . . .33
Front Shoulder Raise . . . . . . . . . . . . . . . . . . . . . . . . . . . . . .34
Seated Shoulder Press . . . . . . . . . . . . . . . . . . . . . . . . . . . . .34
Shoulder Rotator Cuff (internal) . . . . . . . . . . . . . . . . . . . .35
Shoulder Rotator Cuff (external) . . . . . . . . . . . . . . . . . . . .35
Shoulder Extension . . . . . . . . . . . . . . . . . . . . . . . . . . . . . . . .36
Shoulder Shrug . . . . . . . . . . . . . . . . . . . . . . . . . . . . . . . . . . .36
Scapular Protraction . . . . . . . . . . . . . . . . . . . . . . . . . . . . . . .37
Scapular Depression . . . . . . . . . . . . . . . . . . . . . . . . . . . . . . . 37
Scapular Retraction . . . . . . . . . . . . . . . . . . . . . . . . . . . . . . .38
Back Exercises:
Standing Shoulder Pullover w/ Bent Lat Bar . . . . . . . . . .39
Standing Shoulder Pullover w/ Hand Grips . . . . . . . . . . .39
Narrow Pulldowns w/ Bent Lat Bar . . . . . . . . . . . . . . . . . .40
Narrow Pulldowns w/ Hand Grips . . . . . . . . . . . . . . . . . . .40
Bent Over Row . . . . . . . . . . . . . . . . . . . . . . . . . . . . . . . . . . . .41
Crossover Bent Over Row . . . . . . . . . . . . . . . . . . . . . . . . . . .41
Seated Lat Rows . . . . . . . . . . . . . . . . . . . . . . . . . . . . . . . . . . .42
Crossover Seated Lat Rows . . . . . . . . . . . . . . . . . . . . . . . . . .42
Standing Low Back Extension . . . . . . . . . . . . . . . . . . . . . . .43
Reverse Grip Pulldowns . . . . . . . . . . . . . . . . . . . . . . . . . . . . 43
Crossover Wide Pulldowns w/ Hand Grips . . . . . . . . . . . .44
Crossover Narrow Pulldowns w/ Hand Grips . . . . . . . . . .44
Seated Lat Pulldowns . . . . . . . . . . . . . . . . . . . . . . . . . . . . . .45
Seated Wide Lat Pulldowns . . . . . . . . . . . . . . . . . . . . . . . . .45
Arm Exercises:
Triceps Pushdown w/ Hand Grips . . . . . . . . . . . . . . . . . . .46
Triceps Hammer Pushdown . . . . . . . . . . . . . . . . . . . . . . . . .46
Triceps Pushdown w/ Bent Lat Bar . . . . . . . . . . . . . . . . . . 47
Triceps Extension . . . . . . . . . . . . . . . . . . . . . . . . . . . . . . . . .47
Hammer Triceps Extension . . . . . . . . . . . . . . . . . . . . . . . . .48
Cross Triceps Extension . . . . . . . . . . . . . . . . . . . . . . . . . . . .48
Triceps Kickback . . . . . . . . . . . . . . . . . . . . . . . . . . . . . . . . .49
Hammer Triceps Kickback . . . . . . . . . . . . . . . . . . . . . . . . . .49
Resisted Dip . . . . . . . . . . . . . . . . . . . . . . . . . . . . . . . . . . . . . .50
Biceps Curl . . . . . . . . . . . . . . . . . . . . . . . . . . . . . . . . . . . . . . .50
Concentration Biceps Curl . . . . . . . . . . . . . . . . . . . . . . . . . . 51
Reverse Curl . . . . . . . . . . . . . . . . . . . . . . . . . . . . . . . . . . . . . . 51
Barbell Biceps Curl . . . . . . . . . . . . . . . . . . . . . . . . . . . . . . . . 52
Reverse Barbell Biceps Curl . . . . . . . . . . . . . . . . . . . . . . . . . 52
Seated Biceps Curl . . . . . . . . . . . . . . . . . . . . . . . . . . . . . . . . 53
Seated Biceps Hammer Curl . . . . . . . . . . . . . . . . . . . . . . . . 53
Wrist Extension . . . . . . . . . . . . . . . . . . . . . . . . . . . . . . . . . . .54
Wrist Curl . . . . . . . . . . . . . . . . . . . . . . . . . . . . . . . . . . . . . . . .54
Abdominal Exercises:
Trunk Rotation . . . . . . . . . . . . . . . . . . . . . . . . . . . . . . . . . . . 55
Seated (resisted) Oblique Abdominal Crunch . . . . . . . . .55
Seated (resisted) Abdominal Crunch . . . . . . . . . . . . . . . . .56
Leg Exercises:
Leg Extension . . . . . . . . . . . . . . . . . . . . . . . . . . . . . . . . . . . . 57
Squat . . . . . . . . . . . . . . . . . . . . . . . . . . . . . . . . . . . . . . . . . . . . 57
Standing Hip Extension (knee bent) . . . . . . . . . . . . . . . . .58
Standing Hip Extension (knee extended) . . . . . . . . . . . . .58
Leg Kickback . . . . . . . . . . . . . . . . . . . . . . . . . . . . . . . . . . . . .59
Hip Flexion . . . . . . . . . . . . . . . . . . . . . . . . . . . . . . . . . . . . . .59
Dead Lift . . . . . . . . . . . . . . . . . . . . . . . . . . . . . . . . . . . . . . . .60
Stiff Leg Dead Lift . . . . . . . . . . . . . . . . . . . . . . . . . . . . . . . .
60
Standing Hip Adduction . . . . . . . . . . . . . . . . . . . . . . . . . . . 61
Standing Hip Abduction . . . . . . . . . . . . . . . . . . . . . . . . . . . 61
Calf Raise . . . . . . . . . . . . . . . . . . . . . . . . . . . . . . . . . . . . . . . . 62
Fast Fat Loss Now!
By Ellington Darden, Ph.D . . . . . . . . . . . . . . . . . . . . . . . 63-81
Exercise Log . . . . . . . . . . . . . . . . . . . . . . . . . . . . . . . . . . . .
82
Muscle Chart . . . . . . . . . . . . . . . . . . . . . . . . . . . . . . . . . . .
83
Bowflex Xtreme
®
Home Gym 6-Week
Satisfaction Guarantee . . . . . . . . . . . . . . . . . . . . . . . . . . . 84
Bowflex Xtreme
®
Home Gym Warranty Card . . . . . . . . . 85
Warranty Information . . . . . . . . . . . . . . . . . . . . . . . . . . . .
87
Table of Contents

16
Get to Know Your Bowflex Xtreme
®
Home Gym
Power Rod
®
Unit
Rod Hook
Upper Lat
Tower
Seat Back
Pad
Seat
Base Frame
Platform
Rod Caps
Cable
Hand Grip
Rod Box
Lower Pulley/ Squat
Station
Center Cross Bar
Leg Attachment
50” Bent Lat
Bar
Cable Storage
Pulley

17
Power Rod
®
Resistance
Power Rod
®
resistance rods are made from a special
composite material. Your rods are sheathed with a
protective black rubber coating. Each rod is marked
with its weight rating on the Rod Cap.
Adjusting and
Understanding
the Resistance
The standard Bowflex
Xtreme
®
home gym
comes with 210 pounds
of resistance (one pair
of 5 lb. (2.25 kg) rods,
two pairs of 10 lb. (4.5
kg) rods, one pair of
30 lb. (13.5 kg) rods,
and one pair of 50 lb.
(22.5 kg) rods.
If you upgraded to a 310 (140 kg) or 410 pound (186
kg) capacity you will have an additional one or two
pair of 50 lb. (22.5 kg) rods, respectively.
Hooking the Power Rod
®
Unit to the
Cables
You may use one rod or
several rods in combination,
to create your desired
resistance level.
To hook multiple rods up
to one cable, bend the
closest rod toward the cable
and place the cable hook
through that rod cap. You
can then hook up the next
closest rod through the same
cable hook.
Hooking up the closest
rod first prevents rods from
crossing over the top of
one another.
When You Are Not Using Your
Bowflex Xtreme
®
Home Gym
Disconnect the cables from the Power Rod
®
unit
when your are not using
your Bowflex Xtreme
®
home gym. Use the rod
binding strap included
with your machine to
bind all the rods together
at the top. You can also
place your cables and grips
through the strap to keep
them out of the way.
Safety
When hooking the Power
Rod
®
caps to the cable
hooks, do not stand
directly over the tops of
the rods. Stand off to one
side when connecting and
disconnecting the Power
Rod
®
unit from the cables.
To Order Additional 50 lb. (22.5 kg)
Power Rod
®
Sets
Please Call 1-800-269-3539
How to Use Your Machine

18
The Bowflex Xtreme
®
Home Gym
Pulley Positions
With the versatility to perform over 65 different
exercises, the Bowflex Xtreme
®
home gym easily
transitions from one exercise to another. Below is a
guide to the five different pulley positions you will
use to optimally perform your workout routine.
Maintenance and Care of Your Bowflex
Xtreme
®
Home Gym
Inspect your machine for any worn or loose
components prior to use. Tighten or replace any
worn or loose components prior to use. Pay close
attention to cables or belts and their connections.
Clean the bench with a non-abrasive
household cleaner after each use. This will
keep it looking new. Do not use automotive
cleaner, which can make the bench too “slick.”
Review all warning notices. The safety and
integrity designed into a machine can only be
maintained when the equipment is regularly
examined for damage and repaired. It is the sole
responsibility of the owner to ensure that regular
maintenance is performed. Worn or damaged
components shall be replaced immediately or
the equipment removed from service until the
repair is made. Only manufacturer supplied
components shall be used to maintain/repair
the equipment.
If you have any questions regarding your
Bowflex Xtreme
®
home gym, please contact our
Customer Service Department at 1-800-605-3369
or by mail to: Customer Service, Nautilus, Inc.
World Headquarters, 16400 SE Nautilus Drive,
Vancouver, WA 98683.
How to Use Your Machine
Position One:
Standard Position – most
common. Active pulleys are
on center cross bar.
Position Two:
Lat Pulldown Position. Active
pulleys are on lat tower.
Position Three (optional):
Leg Extension Position. Active
pulleys are on the squat pulley
frame.
Position Four:
Squat position. Active pulleys
are on squat pulley frame and on
center cross bar.
Position Six:
Rowing position. Active pulleys
are on squat pulley frame.
/