

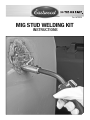
The Eastwood MIG Stud Welding Kit transforms your MIG welder into a Stud Welder which can be
used to repair and remove dents from sheet metal.
WARNINGS
•
DO NOT insert pins with bare hands as the nozzle will get very hot and will cause a burn.
• Follow all safety precautions in your Welder’s Instruction Manual.
• Wear appropriate safety equipment: Welding Helmet (Min Shade #11), Gloves, Long Sleeve
Shirt and Pants, etc.
• Do not touch pin, nozzle, or welding wire while in use.
• Do not use on, near, or around fuel tanks.
• Be aware of your surroundings.
• Notify anyone in your area before using.
SPECIFICATIONS
The following items are included with your Eastwood MIG Stud Welding Kit:
• Stud Welding Nozzle
• Slide Hammer
• 100 2mm Pins
• Replacement Slide Hammer Knurled Locking Cam
SET UP
To utilize your Eastwood MIG Stud Welder Kit, you will need a MIG welder with a minimum of 100 Amp
output that utilizes a Tweco style nozzle
NOTE: This was designed for Tweco Style torches but may work on other styles.
NOTE: All of the following steps MUST be completed with the welder turned off and unplugged.
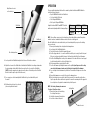
1. Loosen the set screws on the body of the Stud Nozzle and slide it over your gas nozzle.
2. Tighten the set screws once the Stud Nozzle has been put in place but keep in mind that it may
need to be adjusted when getting started for optimum results.
3mm Set Screw
Tweco
Style
Torch

3. Insert a pin into the Stud Nozzle and place the torch on a fl at surface as shown.
4. Adjust the set screw in the Stud Holder so that when the Stud Nozzle is resting as shown above
the pin is making contact with the fl at surface as well as the set screw in the Stud Nozzle.
(NOTE: If desired a magnet can be wiped across the surface of the holder portion of the Stud
Nozzle to allow the pins to stay in the Nozzle easier.)
5. Use a scrap piece of metal and adjust the Stud Nozzle to get a solid weld of the pin to
the metal.
6. Weld bead does not have to be centered,
just securely attached to metal.
OPERATION
There are multiple adjustments that need to be made to optimize the Eastwood MIG Stud Nozzle
before it will operate properly:
• Depth of MIG Gas Nozzle into the Stud Nozzle
• Set Screw Depth of Pin Holder
• Volt Setting on MIG Welder
• Wire Speed Setting on MIG Welder
Using the Eastwood MIG135 and MIG175 the stud
welder worked optimally with the following settings:
NOTE: These settings can vary on electrical input, specifi c welding situation, ambient temperature,
material cleanliness, and material thickness and are offered as a starting point.
Once the Stud Nozzle has been installed onto your torch and adjusted for proper use, the welding
process can begin:
1. Remove paint and any other coatings from the damaged area.
2. Insert pin into the Stud Welding Nozzle.
3. Place the fl at surface of the Nozzle against the panel.
4. Hold the trigger down for ~2 seconds or until the head of the pin is securely fused to the panel.
If the pin is not properly welded to the panel, it will easily be pulled off by the slide hammer.
5. Hold the Stud Welding Nozzle on the pin for a minimum of 3 seconds after the arc has stopped
to allow the weld puddle to cool before lifting the torch.
6. Weld as many studs as required to pull the dent.
7. Use the slide hammer by sliding the hammer over the pin. Roll your fi nger over the locking
cam on the slide hammer to make sure that the pin is being held by the hammer.
8. Use a solid pull on the slide hammer to pull the dent. Some dents will require more force than
others.
9. Repeat slide hammer process on all of the pins in the damaged area.
10. Once the dent has been successfully ‘pulled’, the pins need to be removed from the surface.
Snip the pins with cutters and then use a grinder to remove the remaining stud. It is suggested
to use a fl ap disc on the grinder to minimize heat put into the panel.
NOTE: The Locking Cam may become worn.
To replace, follow these steps:
1. Remove the 2mm set screw holding
the Locking Cam in place.
2. Install the replacement Locking Cam.
3. Insert set screw back into place.
Welder MIG135 MIG175
Arc Volts
I
D
Wire Speed
64
Stud Holder
Pin contacting surface
Adjust 2mm set screw
so it contacts pin
Locking Cam
2mm set screw
Stud Nozzle

APPLICATION
Stud welding is a method used for removing dents in sheet metal its advantages really stand out
when using on panels where it is not possible to get to the backside where a hammer and dolly will
not work. As with many other repair tasks it will take some practice so it is recommended to test and
hone in your skills on scrap metal or parts from a junk yard before using on your project. To remove a
dent you can follow the following basic steps:
1. Identify where the dent is located on the panel.
2. Use either a grinder with a fl ap disc or a DA Sander with 40 Grit paper to remove all of the
paint. If there are deep areas which a disc cannot get into, use a wire brush on an angle grinder
or drill.
3. Once all of the paint is removed locate the lowest spots of the dent and start by adding pins to
these locations.
4. Expand out and add more pins to the areas that are not as deep. These shallow areas will
require less pins be welded.
5. Allow the metal to cool to keep from pulling the pins off the panel.
6. Slide the pin holder of the slide hammer over the pin and move your fi nger over the locking cam
to make sure the pin is locked onto the hammer.
7. Pull back on the slide of the hammer with a quick motion to pull the metal back. It may help to
tap the metal around the pin with a body hammer to relax it and allow for the metal to move
easier. When choosing which pins to pull you should start at the outside of the dent and work
towards the center. Ideally the dent should be repaired enough so that the maximum amount of
fi ller used should be 1/16” or less.
8. If the dent is still not removed enough, go back and add more pins and pull the dent more.
9. Once the dent has been repaired, the pins can be cut off near the heads and ground down us-
ing a DA Sander or Flap Disc on a Grinder. Do not allow the metal to get to hot when grinding or
it could warp the panel.
10. Properly clean the surface and apply body fi ller as necessary followed by primer and a top coat.
TROUBLESHOOTING
• When using the slide hammer the pin pulls off the panel.
°
If the pin is being pulled off the panel, it is not completely fused. Make adjustments to the
welder and/or the position of the Stud Weld Nozzle.
°
Make sure the panel is free of dirt, grease, paint, wax, etc.
• The slide hammer slips off the pin when operating.
°
The knurled cam on the slide hammer may be worn out or clogged with copper from the
pins. Either clean out the knurling or replace the knurled cam.
• When lifting the torch off the piece after the welding, the pin lifts up with it.
°
Allow the weld puddle to cool before lifting the torch off the pin.
• An excessive weld bead needs to be formed to get the pin to fuse to the panel.
°
Adjust the Stud Weld Nozzle so that the wire is in direct contact with the head of the pin.
ACCESSORIES
For accessories and replacement parts, visit Eastwood.com >> KEYWORD: 13928
-
 1
1
-
 2
2
-
 3
3
-
 4
4


Ask a question and I''ll find the answer in the document
Finding information in a document is now easier with AI
Related papers
-
 Eastwood ARC200i Inverter Stick Welder Operating instructions
-
 Eastwood 200 Amp Multi-Process Welder and 60 Amp Versa-Cut Plasma Cutter plus Welding Cart Operating instructions
-
 Eastwood MIG 135 Assembly & Operating Instructions
-
 Eastwood Versa Cut 20 Amp Plasma Cutter Operating instructions
-
 Eastwood 12012 Operating instructions
-
 Eastwood 175 Amp MIG Welder Operating instructions
-
 Eastwood MIG Welder 135 And Versa Cut Plasma Cutter 40 Operating instructions
-
 Eastwood MP250i Instructions Manual
-
 Eastwood MIG 250 Welder Operating instructions
-
 Eastwood MIG 135 Assembly And Operating Instructions Manual


Other documents
-
Acura TL 1995-1998 Body Repair Manual
-
Campbell Hausfeld Welder WG4000 User manual
-
Miller Multimatic 215 Owner's manual
-
-
Lincoln Electric POWER MIG 350MP Operating instructions
-
ESAB ESAB Fabricator® 252i 3-IN-1 Multi Process Welding Systems User manual
-
Vulcan Item 63617 Owner's manual
-
Vulcan 63616 Owner's manual
-
-