Page is loading ...

ATOMIC FULL CALENDAR CLOCK WITH LARGE 3.25"
DIGITS, INDOOR TEMPERATURE & HUMIDITY
USER MANUAL
MODEL CL030067 SERIES


TABLE OF CONTENTS
UNIT APPEARANCE ..................................................................................................3
WHAT IS A RADIO-CONTROLLED CLOCK?........................................................4
ENVIRONMENTAL EFFECT ON RECEPTION ......................................................4
FEATURES ....................................................................................................................4
GETTING STARTED ...................................................................................................5
BATTERY INSTALLATION .........................................................................................5
Low Battery Indication ...................................................................................5
INSTALLATION ............................................................................................................5
TIME AND ALARM SETTING ..................................................................................5
Radio-Controlled Clock ..................................................................................5
Time Zones and Daylight Saving Time Settings .................................... 6
Manual Setting ..................................................................................................6
Alarm and Snooze Functions .......................................................................7
TEMPERATURE ...........................................................................................................7
HUMIDITY .................................................................................................................... 7
TROUBLESHOOTING ................................................................................................ 7
HOW TO CARE FOR YOUR CLOCK........................................................................7
SPECIFICATIONS ........................................................................................................ 8
DISPOSAL OF PRODUCT AND USED BATTERIES ............................................ 8
WARRANTY .................................................................................................................8

3
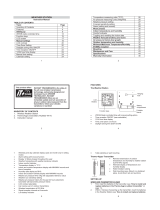
UNIT APPEARANCE
A1: Time display
A2: Day of week
A3: Temperature
A4: Radio-control icon
A5: Humidity
A6: Date
B1: MODE/SET button
B2: ▲/TIME ZONE button
B3: ▼/ button
B4: ALARM ON/OFF button
B5: RESET button
B6: SNOOZE button
B7: Daily alarm slide switch
C1: Wall mount hole
C2: Battery compartment
C3: Stand
A1
B1
B2
B4
B5
B6
B7
B3
A2
A3
A4
A5
C1
C2
C3
A6

4
WHAT IS A RADIO-CONTROLLED CLOCK?
A radio-controlled clock synchronizes with radio signals from an atomic clock,
giving the most accurate timekeeping available. Time signals transmitted by
the National Institute of Standards and Technology (NIST) are regulated by
three atomic clocks and deviate less than one second over 3,000 years. The
NIST broadcasts the time signals (WWVB, 60 kHz) continuously from Fort
Collins, Colorado. The signals can reach a distance of 3,220 km (2,000 miles)
from the transmission point. Your radio-controlled clock will receive the signal
in any place that an AM signal can be received. However, the signal cannot be
picked up in metal or concrete structures unless the clock is positioned near
a window. In addition, some environmental conditions (see below) may aect
the reception.
For more information, please see the WWVB WEB page of NIST at:
http://www.boulder.nist.gov/timefreq/
ENVIRONMENTAL EFFECT ON RECEPTION
Like all wireless devices, the receiving ability may be aected by, but not
limited to, the following conditions:
• Long transmitting distance.
• Close proximity of mountains and valleys.
• Close proximity of tall buildings.
• Close proximity of railways, high voltage cables, etc.
• Close proximity of freeways, airports, etc.
• Close proximity of construction sites.
• Being inside concrete buildings.
• Close proximity of electrical appliances.
• Bad weather.
• Being inside moving vehicles.
• Close proximity of metal structures.
FEATURES
• Radio-controlled time (RC-WWVB)
• 12/24-hour time display selectable
• Daily Alarm/Snooze functions
• Day of week and month in three languages user selectable
(English, French and Spanish)
• Measures °C/°F user selectable

5
GETTING STARTED
Thank you for selecting a Marathon clock. To ensure the proper functioning of
the unit, please follow the instructions contained in this manual.
BEFORE SET-UP, PLEASE DO THE FOLLOWING:
1. Let the clock reach room temperature.
2. Remove the protective lm from the clock.
3. Insert batteries and wait 10 minutes.
BATTERY INSTALLATION
Main Unit
1. Open the main unit battery compartment cover (C2).
2. Insert 4 x AA size batteries observing polarity (+ and – marks).
3. Replace the main unit battery compartment cover (C2).
Do not mix old and new batteries.
Do not mix alkaline, standard (carbon-zinc) and rechargeable
(nickel-cadmium) batteries.
Replace only with the same or equivalent type of batteries.
Please refer to the battery marks inside the compartment for the correct
polarity (+ and -).
Danger of explosion is possible if batteries are incorrectly replaced.
Do not touch any buttons or settings on the main unit once you have installed
the batteries. The remote temperature and time signal will be received
automatically after the batteries are inserted.
Low Battery Indication
The low battery icon will appear on the display (above the date) to
indicate a low battery status. The batteries should be replaced.
Note: The clock loses its time information when the batteries are removed.
INSTALLATION
Main Unit
The clock can be placed on a at surface using the built-in stand (C2) or
mounted on a wall using the wall mount hole (C1) located at the back of the
clock. To mount the clock on a wall, drive a screw that extends about 1/8 inch
from the wall and slide the wall mount hole over this screw to secure it in
place. This clock receives a radio wave signal much like a TV or radio. Be sure
to place it near a window or other locations with good reception.
TIME AND ALARM SETTING
Radio-Controlled Clock
After the batteries are inserted, the clock automatically starts to scan for the
WWVB time signal. The radio-control icon will ash on the display. As long
as the batteries are supplying power to the clock, it will receive the time signal
and adjust the time automatically. No manual adjustment is required after the
unit is turned on.

6
It is recommended to leave the clock near a window overnight to search for
the time signal as better transmission of the time signal takes place at night.
The clock automatically scans for the time signal every day at 02:00 am and
makes any required adjustment to the time setting. The ashing radio-control
icon indicates that the signal is being received. If the time signal is received
successfully, the icon will stop ashing and the display will be solid. If the
reception fails, the scanning will stop and the icon will disappear from the
display.
Important: Do not use any buttons while a signal receiving operation is in progress.
ashes, indicating receiving signal.
appears, indicating signal received successfully.
disappears, indicating signal reception failed.
The clock can be set to scan the time signal manually by holding the button
(B3) for three seconds. Each reception takes about ve minutes. To stop
scanning, press and hold the button (B3) for three seconds.
Time Zones and Daylight Saving Time Settings
The time zone must be selected by the user. Set the RCC function to ON in
setting mode, then hold the ▲ button to select the time zone you are in.
There are seven time zones available: Atlantic (AT), Eastern (E), Central (C),
Mountain (M), Pacic (P), Alaska (AK), and Hawaii (H). The icon will be visible
on the display to indicate Daylight Saving Time Mode.
Manual Setting
1. In time display mode, press and hold the MODE/SET button (B1) for three
seconds to enter the Clock/Calendar setting mode.
2. Press the ▲ or ▼ button to adjust the setting and press the MODE/SET
button (B1) to conrm each setting. (By pressing and holding the ▲ or ▼ button,
the process could be accelerated and the desired value reached faster.)
3. The setting sequence is as follows: 12/24-hour, RCC on/o, Time Zone,
Weekday language, Hour, Minute, Second, Year, Month, Date, DST ON/OFF,
Temperature Unit, Alarm sound duration.
4. For day of week and month, there are three languages available for
selection: English, French and Spanish.
Note: All setting modes will automatically exit after 15 seconds if no buttons are pressed.
Alarm sound duration: two options are available, “1 minute” and “2 minutes”.
Seconds can only be adjusted to 0.
If the area can receive the RC-WWVB signal, when both the RCC function and
the DST function are ON, will be visible on the display to indicate daylight
saving time mode.
Alarm and Snooze Functions
1. Press the MODE/SET button (B1) to view the alarm time; ALARM TIME
ashes on the display.
2. When viewing the alarm time, hold the MODE/SET button (B1) for three
seconds to enter the alarm time setting mode.
3. Press the ▲ or ▼ button to adjust the alarm time.

7
4. Press the MODE/SET button (B1) to conrm the setting.
5. Press the ALARM ON/OFF (B4) button to activate or deactivate the alarm. If the
alarm is on, the alarm icon appears on the display.
6. Slide the alarm switch (B7) to select the alarm to be active from Monday to
Friday or on every day of the week.
7. Press the SNOOZE button (B6) when the alarm sounds. The alarm will
pause for approximately ve minutes, then it sound again. The icon
ashes on the display during the snooze time. This process can be
repeated seven times.
8. Press any button, except the SNOOZE button (B6), to stop the snooze
function. Otherwise, depending on the setting of the alarm sound duration,
the alarm will be heard for 2 minutes or 1 minute, then it will stop automatically.
TEMPERATURE
Once powered up, the temperature will appear on the clock display. If the
temperature is out of the measurable range, LL.L (beyond the minimum
temperature) or HH.H (beyond the maximum temperature) will be shown
on the display. Press and hold the MODE/SET button (B1) to select the
temperature unit, either Celsius or Fahrenheit.
HUMIDITY
Once powered up, the humidity will appear on the clock display. If the
humidity is lower than 20%, will be shown on the display. If the value is
higher than 99%, then will be displayed.
TROUBLESHOOTING
1. Use a pin to press the RESET button (B5) if the unit does not work properly.
2. Press the RESET button (B5) when the clock is displaying the incorrect time,
even when the radio-control icon is visible on the display. This may happen
when the external noise is strong enough to interfere with the time signal.
Setting sequence: 12/24-hour, RCC on/o, Time zone, Weekday, Language, Hour,
Minute, Second, Year, Month, Date, DST ON/OFF, Temperature Unit, Alarm sound
duration.
HOW TO CARE FOR YOUR CLOCK
1. Avoid placing the clock near interference sources/metal frames, such as
computer or TV sets.
2. Do not expose the clock to direct sunlight, heavy heat, cold, high humidity
or wet areas.
3. Avoid exposing your clock to extreme temperatures, water or severe shock.
4. Never clean the device using abrasive or corrosive materials or products.
Abrasive cleaning agents may scratch the plastic parts and corrode the
electronic circuits.
5. Avoid contact with any corrosive materials, such as perfume, alcohol or
cleaning agents.
6. Do not subject the clock to excessive force, shock, dust, temperature or
humidity as this will damage it.
7. Do not tamper with any of the internal components of this clock. This will
void the warranty and may cause damage to the components.

8
SPECIFICATIONS
Temperature Operation Range
Clock: 0 °C to 40 °C /32 °F to 104 °F
Indoor measurable range: -10 °C to 50 °C / 14 °F to 122 °F
Humidity Range
Indoor measurable range: 20% to 99%
Temperature Checking Interval
Every 32 seconds
Power Source (alkaline batteries recommended)
Clock: 4 x AA batteries, 1.5 V batteries
Battery life: Approximately 12 months
Dimensions (Height x Width x Depth)
Clock: 8.1 in H x 9.75 in W x 1 in D
(206 mm H x 248 mm W x 25 mm D)
DISPOSAL OF PRODUCT AND USED BATTERIES
Please refer to your local regulations for proper disposal procedures.
WARRANTY
Marathon Watch Company warrants this item to be free from defects in
material and workmanship under normal use in accordance with care and
usage instructions for 2 years from date of purchase from an authorized
retailer. This warranty excludes damage from misuse, abuse or any irregular
application. Return the item to us properly packaged accompanied with the
original bill of sale. Please contact Customer Service at 1-800-822-4329 to
obtain the shipping address. If we conrm a defect, we will replace it with the
same item or one of similar value and return it to you at no charge.

Marathon Watch Company Ltd.
www.MarathonWatch.com
Customer Service: 1-800-822-4329
Designed in Canada
Made in China
/