Marathon CL030055 Series User manual
- Category
- Alarm clocks
- Type
- User manual
This manual is also suitable for

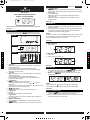
SECTION 1
MAIN FEATURES
The following buttons (except and
RESET buttons) are
functional only when the clock is powered with the DC adaptor.
1. button
• Press this button to turn off the LED display or decrease the
display’s brightness.
• In time setting mode and alarm time setting mode,
press this button to decrease the value. Press and hold to
decrease the value rapidly.
2. button
• Press this button to turn on the LED display or increase the
display’s brightness.
• In time setting mode and alarm time setting mode,
press this button to increase the value. Press and hold to
increase the value rapidly.
3. button)
• Press this button to view the alarm time.
• Press and hold this button, then press or to set the
alarm time.
• When the alarm sounds, press this button to turn off the current
alarm and turn on the snooze function.
4. slide switch
• Slide this switch to turn off or on the alarm function.
5. 2 USB ports
6. DC jack
• Connect the DC adaptor to power the clock.
7.
RESET button
• In case of a malfunction, press this button with a metal pin to
reset all values.
8. Battery compartment
• Accommodates 3 AAA batteries as a backup power source.
9. button
• This button adds or subtracts one hour from the current time.
LED CLOCK
WITH USB CHARGING STATION
MODEL CL030055 SERIES
1
10. button
• In normal time mode, press and hold this button to enter time
setting mode. Release the button to save the time and exit time
setting mode.
11.
12 / 24 slide switch
• Slide this switch to the “12” position to display the time in
12-hour format.
• Slide this switch to the “24” position to display the time in
24-hour format.
SECTION 2
POWERING ON
1. The clock must be powered by the DC adaptor. The 3 AAA
batteries are used only as a backup power source for the time
and alarm settings.
2. After powering on or resetting the clock, all LED segments will
be shown for 2 seconds. Then the clock will revert back to
normal time mode and display the time.
NOTE:
If nothing is visible on the LED display, please make sure the clock
is connected to an electrical outlet using the DC adaptor. Then,
press the
RESET button with a metal pin.
SECTION 3
DISPLAY SYMBOLS
NORMAL TIME MODE
1. Normal time
ALARM TIME MODE
1. Alarm time
2. Alarm mode icon / Alarm on
SECTION 4
TIME SETTING
1. In normal time mode, press and hold the button until
the digits flash. While holding the button, press the
button or the button to set the desired value.
2. Release the button to save the time and exit time
setting mode.
NOTE:
Press and hold the button to increase the value rapidly.
Press and hold the button to decrease the value rapidly.
SECTION 5
DAYLIGHT SAVING TIME
1. Press the button to activate the daylight saving time
function. One hour will be added to the current time.
2. Press the button again to deactivate this function. One hour will
be subtracted from the current time.
Please read this instruction manual before using your new clock.
SECTION 6
SETTING THE ALARM
1. In normal time mode, press and hold the button until the
“AL” icon flashes. While holding the button, press the
button or the button to set the desired value.
2. Release the button to save the alarm time and exit the
alarm time setting mode.
NOTE:
Press and hold the button to increase the value rapidly.
Press and hold the button to decrease the value rapidly.
SECTION 7
ALARM AND SNOOZE FUNCTIONS
Slide the switch to the “ON” position to turn on the alarm
function. The alarm icon “AL” will be displayed.
When the alarm is set to “ON”, the alarm will sound at the set time.
The alarm will stop automatically after one minute if no buttons are
pressed. It will sound again at the same time the following day.
To stop the alarm:
1. Press the button to stop the alarm and enter the snooze
mode. The alarm icon “AL” will flash continuously. The alarm will
sound again after 5 minutes. The snooze function can be used
continuously for 24 hours.
2. Slide the switch to the “OFF” position to turn off the
alarm function.
SECTION 8
LED BRIGHTNESS
This LED clock has 3 levels of brightness: OFF, LOW, and HIGH.
• In normal time mode, press the button to increase the
level of brightness.
• In normal time mode, press the button to decrease the
level of brightness.
NOTE:
The LED display will automatically turn on 5 minutes before the set
alarm time even if the user turns off the display.
SECTION 9
USB CHARGING PORTS
The USB charging ports located at the front of the clock are
compatible with various devices, including mobile phones, tablets,
and notebooks.
1. When both USB ports are used, low voltage devices (5 V, 1 A)
can be charged.
2. When one USB port is used, a higher voltage device (5 V, 2.1 A)
can be charged.
NOTE:
The clock must be connected to a power source using the DC
adaptor in order to use the USB charging ports.
SECTION 10
IMPORTANT
• This clock is intended for indoor use only.
• Do not subject the clock to excessive force or shock.
• Do not expose the clock to extreme temperatures, direct
sunlight, dust, or moisture.
• Do not immerse the clock in water.
• Avoid contact with corrosive materials.
• Do not dispose of the clock in a fire, as it may explode.
• The clock should be placed near an easily accessible
electrical outlet.
• Do not open the inner back case of this clock or tamper with any
of its components.
• Please dispose of this clock and any used batteries in an
ecologically safe manner.
SECTION 11
FCC DISCLAIMER
This device complies with part 15 of the FCC rules. Operation is
subject to the following two conditions: (1) this device may not cause
harmful interference, and (2) this device must accept any
interference received, including interference that may cause
undesired operation.
Modifications not expressly approved by this company could void
the user’s authority to operate the equipment.
This equipment has been tested and found to comply with the limits
for a Class B digital device, pursuant to Part 15 of the FCC Rules.
These limits are designed to provide reasonable protection against
harmful interference in a residential installation. This equipment
generates , uses, and can radiate radio frequency energy and, if not
installed and used in accordance with the instructions, may cause
harmful interference to radio communications.
However, there is no guarantee that interference will not occur in a
particular installation. If this equipment does cause harmful
interference to radio or television reception, which can be
determined by turning the equipment off and on, the user is
encouraged to try to correct the interference using one or more of
the following measures:
• Re-orient or relocate the receiving antenna.
• Increase the separation between the equipment and
the receiver;
• Connect the equipment to an outlet on a circuit different from
that to which the receiver is connected.
• Consult the dealer or an experienced radio/TV technician
for help.
SECTION 12
SPECIFICATIONS
Main power: 5 V / 2.5 A DC Adaptor
Backup power: 3 AAA batteries
(Batteries used alone will not
power the USB charging ports.)
Operating temperature range: -5 °C to 50 °C (23 °F to 122 °F)
SECTION 13
WARRANTY
Marathon Watch Company warrants this item to be free from defects
in material and workmanship under normal use in accordance with
care and usage instructions for 2 years from date of purchase from
an authorized retailer. This warranty excludes damage from misuse,
abuse or any irregular application. Return the item to us properly
packaged accompanied with the original bill of sale. Please contact
Customer Service at 1-800-822-4329 to obtain the shipping
address. If we confirm a defect, we will replace it with the same item
or one of similar value and return it to you at no charge.
Marathon Watch Company Ltd.
www.MarathonWatch.com
Customer Service: 1-800-822-4329
MANUAL ENGLISH
TOP VIEW
FRONT VIEW
BACK VIEW
Normal time mode Time setting mode
C
M
Y
CM
MY
CY
CMY
K
CL030055_Manual_EN.pdf 1 2018-07-03 10:13 AM

SECTION 1
MAIN FEATURES
The following buttons (except and
RESET buttons) are
functional only when the clock is powered with the DC adaptor.
1. button
• Press this button to turn off the LED display or decrease the
display’s brightness.
• In time setting mode and alarm time setting mode,
press this button to decrease the value. Press and hold to
decrease the value rapidly.
2. button
• Press this button to turn on the LED display or increase the
display’s brightness.
• In time setting mode and alarm time setting mode,
press this button to increase the value. Press and hold to
increase the value rapidly.
3. button)
• Press this button to view the alarm time.
• Press and hold this button, then press or to set the
alarm time.
• When the alarm sounds, press this button to turn off the current
alarm and turn on the snooze function.
4. slide switch
• Slide this switch to turn off or on the alarm function.
5. 2 USB ports
6. DC jack
• Connect the DC adaptor to power the clock.
7.
RESET button
• In case of a malfunction, press this button with a metal pin to
reset all values.
8. Battery compartment
• Accommodates 3 AAA batteries as a backup power source.
9. button
• This button adds or subtracts one hour from the current time.
2
Designed in Canada / Conçu au Canada
Made in China / Fabriqué en Chine
10. button
• In normal time mode, press and hold this button to enter time
setting mode. Release the button to save the time and exit time
setting mode.
11.
12 / 24 slide switch
• Slide this switch to the “12” position to display the time in
12-hour format.
• Slide this switch to the “24” position to display the time in
24-hour format.
SECTION 2
POWERING ON
1. The clock must be powered by the DC adaptor. The 3 AAA
batteries are used only as a backup power source for the time
and alarm settings.
2. After powering on or resetting the clock, all LED segments will
be shown for 2 seconds. Then the clock will revert back to
normal time mode and display the time.
NOTE:
If nothing is visible on the LED display, please make sure the clock
is connected to an electrical outlet using the DC adaptor. Then,
press the
RESET button with a metal pin.
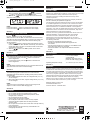
SECTION 3
DISPLAY SYMBOLS
NORMAL TIME MODE
1. Normal time
ALARM TIME MODE
1. Alarm time
2. Alarm mode icon / Alarm on
SECTION 4
TIME SETTING
1. In normal time mode, press and hold the button until
the digits flash. While holding the button, press the
button or the button to set the desired value.
2. Release the button to save the time and exit time
setting mode.
NOTE:
Press and hold the button to increase the value rapidly.
Press and hold the button to decrease the value rapidly.
SECTION 5
DAYLIGHT SAVING TIME
1. Press the button to activate the daylight saving time
function. One hour will be added to the current time.
2. Press the button again to deactivate this function. One hour will
be subtracted from the current time.
SECTION 6
SETTING THE ALARM
1. In normal time mode, press and hold the button until the
“AL” icon flashes. While holding the button, press the
button or the button to set the desired value.
2. Release the button to save the alarm time and exit the
alarm time setting mode.
NOTE:
Press and hold the button to increase the value rapidly.
Press and hold the button to decrease the value rapidly.
SECTION 7
ALARM AND SNOOZE FUNCTIONS
Slide the switch to the “ON” position to turn on the alarm
function. The alarm icon “AL” will be displayed.
When the alarm is set to “ON”, the alarm will sound at the set time.
The alarm will stop automatically after one minute if no buttons are
pressed. It will sound again at the same time the following day.
To stop the alarm:
1. Press the button to stop the alarm and enter the snooze
mode. The alarm icon “AL” will flash continuously. The alarm will
sound again after 5 minutes. The snooze function can be used
continuously for 24 hours.
2. Slide the switch to the “OFF” position to turn off the
alarm function.
SECTION 8
LED BRIGHTNESS
This LED clock has 3 levels of brightness: OFF, LOW, and HIGH.
• In normal time mode, press the button to increase the
level of brightness.
• In normal time mode, press the button to decrease the
level of brightness.
NOTE:
The LED display will automatically turn on 5 minutes before the set
alarm time even if the user turns off the display.
SECTION 9
USB CHARGING PORTS
The USB charging ports located at the front of the clock are
compatible with various devices, including mobile phones, tablets,
and notebooks.
1. When both USB ports are used, low voltage devices (5 V, 1 A)
can be charged.
2. When one USB port is used, a higher voltage device (5 V, 2.1 A)
can be charged.
NOTE:
The clock must be connected to a power source using the DC
adaptor in order to use the USB charging ports.
SECTION 10
IMPORTANT
• This clock is intended for indoor use only.
• Do not subject the clock to excessive force or shock.
• Do not expose the clock to extreme temperatures, direct
sunlight, dust, or moisture.
• Do not immerse the clock in water.
• Avoid contact with corrosive materials.
• Do not dispose of the clock in a fire, as it may explode.
• The clock should be placed near an easily accessible
electrical outlet.
• Do not open the inner back case of this clock or tamper with any
of its components.
• Please dispose of this clock and any used batteries in an
ecologically safe manner.
Alarm time mode Alarm time setting
SECTION 11
FCC DISCLAIMER
This device complies with part 15 of the FCC rules. Operation is
subject to the following two conditions: (1) this device may not cause
harmful interference, and (2) this device must accept any
interference received, including interference that may cause
undesired operation.
Modifications not expressly approved by this company could void
the user’s authority to operate the equipment.
This equipment has been tested and found to comply with the limits
for a Class B digital device, pursuant to Part 15 of the FCC Rules.
These limits are designed to provide reasonable protection against
harmful interference in a residential installation. This equipment
generates , uses, and can radiate radio frequency energy and, if not
installed and used in accordance with the instructions, may cause
harmful interference to radio communications.
However, there is no guarantee that interference will not occur in a
particular installation. If this equipment does cause harmful
interference to radio or television reception, which can be
determined by turning the equipment off and on, the user is
encouraged to try to correct the interference using one or more of
the following measures:
• Re-orient or relocate the receiving antenna.
• Increase the separation between the equipment and
the receiver;
• Connect the equipment to an outlet on a circuit different from
that to which the receiver is connected.
• Consult the dealer or an experienced radio/TV technician
for help.
SECTION 12
SPECIFICATIONS
Main power: 5 V / 2.5 A DC Adaptor
Backup power: 3 AAA batteries
(Batteries used alone will not
power the USB charging ports.)
Operating temperature range: -5 °C to 50 °C (23 °F to 122 °F)
SECTION 13
WARRANTY
Marathon Watch Company warrants this item to be free from defects
in material and workmanship under normal use in accordance with
care and usage instructions for 2 years from date of purchase from
an authorized retailer. This warranty excludes damage from misuse,
abuse or any irregular application. Return the item to us properly
packaged accompanied with the original bill of sale. Please contact
Customer Service at 1-800-822-4329 to obtain the shipping
address. If we confirm a defect, we will replace it with the same item
or one of similar value and return it to you at no charge.
Marathon Watch Company Ltd.
www.MarathonWatch.com
Customer Service: 1-800-822-4329
MANUAL ENGLISH
C
M
Y
CM
MY
CY
CMY
K
CL030055_Manual_EN.pdf 2 2018-07-03 10:13 AM
-
 1
1
-
 2
2


Marathon CL030055 Series User manual
- Category
- Alarm clocks
- Type
- User manual
- This manual is also suitable for
Ask a question and I''ll find the answer in the document
Finding information in a document is now easier with AI


