Grundfos CONTROL MPC Installation And Operating Instructions Manual

Type
Installation And Operating Instructions Manual
Control MPC
Installation and operating instructions
GRUNDFOS INSTRUCTIONS
English (GB)
2
English (GB) Installation and operating instructions
Original installation and operating instructions
CONTENTS
Page
1. Symbols used in this document
2. Product introduction
Fig. 1 Control MPC
Grundfos Control MPC is used for control and monitoring of
booster systems and circulation systems.
Control MPC consists of a control cabinet with a built-in controller,
the CU 352.
The control cabinet contains all necessary components such as
main switch, contactors, IO modules and cabling.
In systems with external frequency converters, the frequency
converters can be installed in the cabinet.
The control cabinet is for wall or floor mounting.
1. Symbols used in this document
2
2. Product introduction
2
3. Applications
3
3.1 Pumps
3
3.2 Control variant
3
4. Identification
3
4.1 Nameplate
3
4.2 Software label
4
4.3 Type key
5
5. Overview of control variants
6
6. Installation
8
6.1 Mechanical installation
8
6.2 Electrical installation
8
6.3 Startup
8
7. Control panel
8
7.1 Display
9
7.2 Buttons and indicator lights
9
8. Functions
10
8.1 Tree of functions
10
8.2 Overview
12
8.3 Description of functions
14
8.4 Status (1)
14
8.5 Operation (2)
18
8.6 Alarm (3)
24
8.7 Settings (4)
26
8.8 Data communication
60
9. Measuring parameters
62
9.1 Transmitter types
62
9.2 Parameter list
62
10. Fault finding
63
11. Maintenance
64
11.1 CU 352
64
12. Shutdown
64
13. Technical data
64
13.1 Temperature
64
13.2 Relative humidity
64
14. Electrical data
64
15. Further product documentation
64
16. Disposal
64
Warning
Prior to installation, read these installation and
operating instructions. Installation and operation
must comply with local regulations and accepted
codes of good practice.
Warning
If these safety instructions are not observed, it may
result in personal injury.
Warning
If these instructions are not observed, it may lead to
electric shock with consequent risk of serious
personal injury or death.
Caution
If these safety instructions are not observed, it may
result in malfunction or damage to the equipment.
Note
Notes or instructions that make the job easier and
ensure safe operation.
TM05 3232 1012 - TM05 3233 1012
English (GB)
3
3. Applications
Control MPC is used for control and monitoring of pumps in these
applications:
booster systems
circulation systems for heating, cooling and air-conditioning.
3.1 Pumps
Control MPC is designed for systems with these pumps:
CR(E), CRI(E), CRN(E), CRIE
NB(E), NBG(E)
NK(E), NKG(E)
•TP
TPE Series 1000
TPE Series 2000
•HS
•SP
MAGNA, UPE Series 2000.
3.2 Control variant
Control MPC is divided into four groups based on control variant:
See also section 5. Overview of control variants.
The Control MPC includes software for pressure boosting,
heating and cooling.
4. Identification
4.1 Nameplate
The nameplate is fitted on the base frame.
Fig. 2 Nameplate
Note
The main pumps of the system must be of the same
type and size.
Control
variant
Description
-E
Two to six pumps with integrated frequency
converter (0.37 - 22 kW).
-EC
Two to six pumps connected to a Grundfos CUE
frequency converter - one per pump.
Series 2000
Two to six MAGNA, UPE or TPE Series 2000
pumps
-F
Two to six pumps connected to a Grundfos CUE
frequency converter. The speed-controlled
operation alternates between the pumps.
-S Two to six mains-operated pumps
TM03 9956 4707
Pos. Description
1 Type designation
2 Model
3 Serial number
4 Supply voltage
5 Rated current [A]
6 Maximum ambient temperature [°C]
7 Number of mains-operated pumps
8 Power [kW] of mains-operated pumps
9 Rated voltage [V] of mains-operated pumps
10 Number of pumps with frequency converter
11 Power [kW] of pumps with frequency converter
12 Rated voltage [V] of pumps with frequency converter
13 Number of pilot pumps
14 Power [kW] of pilot pumps
15 Rated voltage [V] of pilot pumps
16 Order number
17-22 Options
23 Enclosure class
24 Weight [kg]
25 CE mark
26 Country of origin
Type:
Model:
Serial No.:
Order No.:
Options:
IP
Weight: kg
Made in
96778609
1
2
3
4
78 9
16
17
23
24
26
25
Mains supply:
I
n
: A T
AMB.
:
o
C
PU
n
No. kW V
Fixed speed pumps:
E-pumps:
Pilot Pump:
10
11 12
18
20 21
19
22
13 14
15
5
6
English (GB)
4
4.2 Software label
The software label is placed on the back of the CU 352 controller.
Fig. 3 Software label
* Applies only to booster systems.
** Applies only to CR, CRI, CRE and CRIE pumps.
TM03 1742 3105
Pos. Description
1 Control MPC - GSC file number
2 Control MPC options - GSC file numbers
3 Hydro MPC - GSC file number *
4 Hydro MPC options - GSC file numbers *
5 Pump data - GSC file numbers **
Note
A GSC (Grundfos Standard Configuration) file is a
configuration data file.
1. Control MPC 3. Hydro MPC
5. Pump data
96586126
4. H-MPC options2. C-MPC options
CONFIGURATION STEPS - PLEASE FOLLOW THE NUMBERS
1
2
3
4 5
English (GB)
5
4.3 Type key
Example Control MPC -E 2 x 4 E 3 x 380-415 V, 50/60 Hz, PE
Type range
Control variants
E: Pumps with integrated frequency converter (0.37 - 22 kW)
EC: Pumps connected to a Grundfos CUE frequency converter - one per pump
F: Pumps connected to one Grundfos CUE frequency converter
S: Mains-operated pumps (start/stop)
Number of pumps with frequency converter
Power [kW] of pumps with frequency converter
Starting method of pumps with frequency converter
E: Electronic soft starter (pumps with integrated frequency converter)
ESS: Electronic soft starter (pumps connected to a Grundfos CUE frequency converter)
Number of mains-operated pumps
Power [kW] of mains-operated pumps
Starting method of mains-operated pumps
DOL: Direct-on-line starting
SD: Star-delta starting
Supply voltage, frequency
English (GB)
6
5. Overview of control variants
The examples below are based on booster systems.
Systems with speed-controlled
pumps
Systems with pumps connected to
one CUE frequency converter
Systems with mains-operated pumps
Control MPC-E/-EC Control MPC-F Control MPC-S
E: Control MPC with three E-pumps.
EC: Control MPC with three pumps,
each connected to a Grundfos CUE
frequency converter.
Control MPC with three pumps
connected to one Grundfos CUE
frequency converter. The speed-
controlled operation alternates between
the pumps.
Control MPC with three mains-operated
pumps.
TM03 0993 0905
TM03 1265 1505
TM03 0999 0905
One E-pump in operation.
One pump connected to a Grundfos
CUE frequency converter in operation.
One mains-operated pump in operation.
TM00 7995 2296
TM00 7995 2296
TM03 9204 3607
Three E-pumps in operation.
One pump connected to a Grundfos
CUE frequency converter and two
mains-operated pumps in operation.
Three mains-operated pumps in
operation.
TM00 7996 2296
TM00 7998 2296
TM03 9203 3607
Control MPC-E/EC maintains a constant
pressure through continuous adjustment
of the speed of the pumps.
The system performance is adjusted to
the demand through cutting in/out the
required number of pumps and through
parallel control of the pumps in operation.
Pump changeover is automatic and
depends on load, operating hours and
fault.
All pumps in operation run at the same
speed.
The number of pumps in operation also
depends on the energy consumption of
the pumps. If only one pump is required,
two pumps will be running at a lower
speed if this results in a lower energy
consumption. This requires that the
differential pressure of the pump is
measured and pump curve data are
available for the controller.
Control MPC-F maintains a constant
pressure through continuous adjustment
of the speed of the pump connected to
the Grundfos CUE frequency converter.
The speed-controlled operation alternates
between the pumps.
A pump connected to the Grundfos CUE
frequency converter always starts first. If
the pressure cannot be maintained by the
pump, one or two mains-operated pumps
will be cut in.
Pump changeover is automatic and
depends on load, operating hours and
fault.
Control MPC-S maintains an almost
constant pressure through cutting in/out
the required number of pumps.
The operating range of the pumps will lie
between H
set
and H
stop
(cut-out pressure).
Pump changeover is automatic and
depends on load, operating hours and
fault.
PT
PT
PT
Q
H
H
set
Q
H
H
set
Q
H
H
stop
H
set
Q
H
H
set
Q
H
H
set
H
stop
H
set
English (GB)
7
The example below is based on a circulation system.
Control MPC Series 2000
Control MPC with three E-pumps.
TM04 0213 5107
One E-pump in operation.
TM04 0211 5107
Three E-pumps in operation.
TM04 0212 5107
Control MPC Series 2000 maintains a
constant pressure through adjustment of
the speed of the pumps connected.
The performance is adjusted to the
demand through cutting in/out the required
number of pumps and through parallel
control of the pumps in operation.
Pump changeover is automatic and
depends on load, operating hours and
fault.
All pumps in operation run at the same
speed.
The number of pumps in operation is also
depending on the energy consumption of
the pumps. If only one pump is required,
two pumps will be running at a lower speed
if this results in a lower energy
consumption. This requires that the
differential pressure of the pump is
measured and pump curve data are
available for the controller.
Q
H
H
set
Q
H
H
set
English (GB)
8
6. Installation
Before installation, check that the system is as ordered, and that
no visible parts have been damaged.
6.1 Mechanical installation
The MPC must be installed in a well-ventilated room to ensure
sufficient cooling of the control cabinet.
Install the pumps according to the installation and operating
instructions supplied with the pumps.
6.2 Electrical installation
The electrical installation of the system must comply with
enclosure class IP54.
Make sure that the system is suitable for the power supply to
which it is connected.
Make sure that the wire cross-section corresponds to the
specifications in the wiring diagram.
6.3 Startup
1. Switch on the power supply.
2. Wait for the first display to appear.
3. The first time the CU 352 is switched on, a start-up wizard will
guide the user through the basic settings.
4. Follow the instructions in each display.
5. When the wizard is completed, check that all pumps are set to
"Auto" in menu "Status".
6. Go to menu "Operation".
7. Select operating mode "Normal" and press [ok].
8. The system is now ready for operation.
7. Control panel
The control panel in the front cover of the control cabinet features
a display, a number of buttons and two indicator lights.
The control panel enables manual setting and monitoring of the
performance of the system.
Fig. 4 Control panel
Caution
The MPC is not designed for outdoor installation and
must not be exposed to direct sunlight.
Warning
The electrical installation should be carried out by an
authorised person in accordance with local
regulations and the relevant wiring diagram.
Note
Grundfos can supply hydraulic data for CR, CRI,
CRE and CRIE pumps where GSC files can be
downloaded to the CU 352. Electrical data of power
must be entered manually.
All other pump types require manual entering of both
hydraulic and electrical pump data.
See section 8.7.39 Pump curve data (4.3.19).
TM05 3043 0812
Pos. Description
1 Display
2 Arrow to the right
3Help
4Up
5Down
6Plus
7 Minus
8Back
9Home
10 OK
11 Indicator light, operation (green)
12 Indicator light, fault (red)
13 Brightness
1
11
10
9
8
7
6
4
5
3
2
1213
CU 352
English (GB)
9
7.1 Display
Fig. 5 Display design
7.1.1 Menu line
The menu line (A) is illustrated in fig. 5.
The display has four main menus:
7.1.2 Top line
The top line (B) is illustrated in fig. 5. It shows the following:
the display number and title (left side)
the selected menu (left side)
the symbol in case of alarm (right side)
the symbol in case of warning (right side)
the symbol if the service language has been selected
(right side).
7.1.3 Graphical illustration
The graphical illustration (D) may show a status, an indication or
other elements, depending on the position in the menu structure.
The illustration may show the entire system or part of it as well as
various settings.
7.1.4 Scroll bar
If the list of illustration elements exceeds the display, the symbols
and will appear in the scroll bar to the right. Move up and
down in lists with these symbols.
7.1.5 Bottom line
The bottom line (C) shows the date and time.
7.2 Buttons and indicator lights
The buttons (pos. 2 to 10 in fig. 4) on the CU 352 are active when
they are lit.
7.2.1 Arrow to the right (pos. 2)
Press [>] to go to the next menu in the menu structure. If you
press [>] when menu "Settings" is highlighted, you will go to menu
"Status".
7.2.2 Help (pos. 3)
When this symbol is lit, a help text applying to the display will
appear if you press the button.
Close the text with .
7.2.3 Up and down (pos. 4 and 5)
Move up and down in lists with [ ] and [ ].
You can select a text with [ok] when it is in a box.
If a text is marked and you press [ ], the text above will be
marked. If you press [ ], the text below will be marked.
If you press [ ] in the last line in the list, the first line will be
marked.
If you press [ ] in the first line in the list, the last line will be
marked.
7.2.4 Plus and minus (pos. 6 and 7)
Increase and reduce a value with [+] and [-]. Save with [ok].
7.2.5 Back (pos. 8)
Press to go one display back in the menu.
If you have changed a value and press , the new value will not
be saved. See also section 7.2.7 OK (pos. 10).
If you press [ok] before pressing , the new value will be saved.
See also section 7.2.7 OK (pos. 10).
7.2.6 Home (pos. 9)
Press to return to menu "Status".
7.2.7 OK (pos. 10)
Use the button as an enter button.
The button is also used to start the setting of a value. If you have
changed a value, you must press [ok] to save the change.
7.2.8 Indicator lights (pos. 11 and 12)
The control panel incorporates a green and red indicator light.
The green indicator light will be on when the system is in
operation and flash when the system has been set to stop.
The red indicator light will be on if there is an alarm or a warning.
The fault can be identified from the alarm list.
7.2.9 Brightness (pos. 13)
You can change the brightness in the display with this button:
1. Press .
2. Adjust the brightness with [+] and [-].
7.2.10 Back light
If no button is touched for 15 minutes, the back light of the display
will be dimmed, and the first display in menu "Status" will appear.
Press any button to re-activate the back light.
Status Indication of system status
Operation Change of operating parameters such as setpoint
Alarm Alarm log for fault finding
Settings Change of settings (password option)
A
B
D
C
English (GB)
10
8. Functions
8.1 Tree of functions
The functions depend on system configuration.
Key to the four menus
1. Status 2. Operation 3. Alarm
Continued on page 11
1. Status 2. Operation 3. Alarm status
3.1 Actual alarms 2.1 Further settings
3.1 Actual alarms
3.1.1 Actual alarms 2.1.1 System operating mode
3.2 Alarm log
1.2 System 2.1.2 Control mode
3.3 Service contact information
1.2.1 Operating mode 2.1.3 Alternative setpoints
1.2.2 Setpoint 2.1.4 Individual pump control
1.2.3 Setpoint influence 2.1.4.1 Pump 1 - 6
1.2.4 Measured values 2.1.4.7 Pilot pump
1.2.5 Analog inputs 2.1.4.8 Backup pump
1.2.6 Log graph
1.2.7 Battery status
1.3 Pump 1
1.4 Pump 2
1.5 Pump 3
1.6 Pump 4
1.7 Pump 5
1.8 Pump 6
1.9 Pilot pump
1.10 Backup pump
Status
This menu shows alarms, status of the system and a graph of logged data.
Note: No settings can be made in this menu.
Operation
In this menu, you can set the basic parameters, such as setpoint, operating mode, control mode and individual pump control.
Alarm
This menu gives an overview of alarms and warnings.
You can reset alarms and warnings in this menu.
Settings
In this menu, you can set various functions:
Primary controller
PI controller, Alternative setpoints, External setpoint influence, Primary sensor, Clock program, Proportional pressure, S-system
configuration, Setpoint ramp.
Pump cascade control
Min. time between start/stop, Max. number of starts/hour, Number of standby pumps, Forced pump changeover, Pump test run, Pump
stop attempt, Pump start and stop speed, Min. performance, Compensation for pump start-up time.
Secondary functions
Stop function, Soft pressure build-up, Digital inputs, Analog inputs, Digital outputs *, Analog outputs, Emergency run, Min., max. and
user-defined duty, Pump curve data, Control source, Fixed inlet pressure, Flow estimation, Reduced operation.
Monitoring functions
Dry-running protection, Min. pressure, Max. pressure, External fault, Limit 1 exceeded, Limit 2 exceeded, Pumps outside duty range,
Pressure relief, Log values, Fault, primary sensor.
Functions, CU 352
Display language, Units, Date and time, Password, Ethernet, GENIbus number Software status.
* If an IO 351 is installed.
English (GB)
11
Continued from page 10
4. Settings
4.1 Primary controller
4.1.1 PI controller
4.1.2 Alternative setpoints
4.1.2.1 Alternative setpoints 2 - 7
4.1.3 External setpoint influence
4.1.3.1 Input value to be influenced by
4.1.3.2 Setting of influence function
4.1.4 Primary sensor
4.1.6 Clock program
4.1.7 Proportional pressure
4.1.8 S-system configuration
4.1.9 Setpoint ramp
4.2 Pump cascade control
4.2.1
Min. time between start/stop
Max. number of starts/hour
4.2.3 Standby pumps
4.2.4 Forced pump changeover
4.2.5 Pump test run
4.2.7 Pump stop attempt
4.2.8 Pump start and stop speed
4.2.9 Min. performance
4.2.10 Compensation for pump start-up time
4.3 Secondary functions
4.3.1 Stop function
4.3.1.1 Stop parameters
4.3.3 Soft pressure build-up
4.3.5 Emergency run
4.3.7 Digital inputs
Function, DI1 (CU 352) - DI3, [10, 12, 14]
Function, DI1 (IO 351-41) - DI9, [10 - 46]
Function, DI1 (IO 351-42) - DI9, [10 - 46]
4.3.8 Analog inputs
Setting, AI1 (CU 352), [51] - AI3, [51, 54, 57]
Function, AI1 (CU 352) - AI3 [51, 54, 57]
Setting, AI1 (IO 351-41), [57] - AI2 [57, 60]
Function, AI1 (IO 351-41) - AI2 [57, 60]
Setting, AI1 (IO 351-42), [57] - AI2 [57, 60]
Function, AI1 (IO 351-42) - A2 [57, 60]
4.3.9 Digital outputs
DO1 (CU 352), [71] is signalling - DO2 [71, 74]
DO1 (IO 351-41), [77] is signalling - DO7 [77 - 88]
DO1 (IO 351-42), [77] is signalling - DO7 [77 - 88]
4.3.10 Analog outputs
AO1 (IO 351-41) [18] - AO3 [18, 22, 26]
AO1 (IO 351-42) [18] - AO3 [18, 22, 26]
4.3.14 Min., max. and user-defined duty
4.3.14. Min. duty
4.3.14. Max. duty
4.3.14. Set user-defined duty
4.3.19 Pump curve data
4.3.23 Flow estimation
4.3.20 Control source
4.3.22 Fixed inlet pressure
4.3.23 Flow estimation
4.3.24 Reduced operation
4.4 Monitoring functions
4.4.1 Dry-running protection
4.4.1.1 Pressure/level switch
4.4.1.2 Measurement, inlet pressure
4.4.1.3 Measurement, tank level
4.4.2 Min. pressure
4.4.3 Max. pressure
4.4.4 External fault
4.4.5 Limit 1 exceeded
4.4.6 Limit 2 exceeded
4.4.7 Pumps outside duty range
4.4.8 Pressure relief
4.4.9 Log values
4.4.10 Fault, primary sensor
4.5 Functions, CU 352
Change language to the service language
Run wizard again
4.5.1 Display language
4.5.2 Units
4.5.2.1 Pressure
4.5.2.2 Differential pressure
4.5.2.3 Head
4.5.2.4 Level 4.5.2.8 Temperature 4.5.3 Date and time
4.5.2.5 Flow rate 4.5.2.9 Power 4.5.4 Password
4.5.2.6 Volume 4.5.2.10 Energy 4.5.5 Ethernet
4.5.2.7 Specific 4.5.6 GENIbus number
4.5.9 Software status
English (GB)
12
8.2 Overview
Section Display and display number See page
8.4 Status (1) 14
8.4.1 Actual alarms (3.1) 14
8.4.2 System (1.2) 15
8.4.3 Operating mode (1.2.1) 15
8.4.4 Setpoint (1.2.2) 15
8.4.5 Setpoint influence (1.2.3) 16
8.4.6 Measured values (1.2.4) 16
8.4.7 Analog inputs (1.2.5) 16
8.4.8 Log graph (1.2.6) 16
8.4.9 Battery status (1.2.7) 17
8.4.10 Pump 1 - 6, Pilot pump, Backup pump (1.3 - 1.10) 17
8.5 Operation (2) 18
8.5.1 Operation (2) 18
8.5.2 System operating mode (2.1.1) 18
8.5.3 Control mode (2.1.2) 19
8.5.4 Alternative setpoints (2.1.3) 21
8.5.5 Individual pump control (2.1.4) 21
8.5.6 Pump 1 - 6 (2.1.4.1 - 2.1.4.6) 22
8.5.7 Operation, pilot pump (2.1.4.7) 22
8.5.8 Operation, backup pump (2.1.4.8) 23
8.6 Alarm (3) 24
8.6.1 Alarm status (3) 24
8.6.2 Actual alarms (3.1) 25
8.6.3 Alarm log (3.2) 25
8.6.4 Service contact information (3.3) 25
8.7 Settings (4) 26
8.7.1 Primary controller (4.1) 26
8.7.2 PI controller (4.1.1) 27
8.7.3 Alternative setpoints (4.1.2) 28
8.7.4 Alternative setpoints 2 - 7 (4.1.2.1 - 4.1.2.7) 28
8.7.5 External setpoint influence (4.1.3) 29
8.7.6 Setting of influence function (4.1.3.2) 30
8.7.7 Primary sensor (4.1.4) 30
8.7.8 Clock program (4.1.6) 31
8.7.9 Proportional pressure (4.1.7) 32
8.7.10 S-system configuration (4.1.8) 32
8.7.11 Setpoint ramp (4.1.9) 33
8.7.12 Pump cascade control (4.2) 33
8.7.13 Min. time between start/stop (4.2.1) 33
8.7.14 Max. number of starts/hour (4.2.1) 33
8.7.15 Standby pumps (4.2.3) 34
8.7.16 Forced pump changeover (4.2.4) 34
8.7.17 Pump test run (4.2.5) 35
8.7.18 Pump stop attempt (4.2.7) 35
8.7.19 Pump start and stop speed (4.2.8) 36
8.7.20 Min. performance (4.2.9) 36
8.7.21 Compensation for pump start-up time (4.2.10) 37
8.7.22 Secondary functions (4.3) 37
8.7.23 Stop function (4.3.1) 37
8.7.24 Soft pressure build-up (4.3.3) 39
8.7.25 Emergency run (4.3.5) 40
8.7.26 Digital inputs (4.3.7) 40
8.7.27 Functions of digital inputs (4.3.7.1) 41
8.7.28 Analog inputs (4.3.8) 41
8.7.29 Analog inputs (4.3.8.1 to 4.3.8.7) 42
8.7.30 Analog inputs and measured value (4.3.8.1.1 - 4.3.8.7.1) 42
English (GB)
13
8.7.31 Digital outputs (4.3.9) 43
8.7.32 Function of digital outputs (4.3.9.1 - 4.3.9.16) 43
8.7.33 Analog outputs (4.3.10) 44
8.7.34 Output signal (4.3.10.1 - 4.3.10.3) 44
8.7.35 Min., max. and user-defined duty (4.3.14) 44
8.7.36 Min. duty (4.3.14.1) 45
8.7.37 Max. duty (4.3.14.2) 45
8.7.38 User-defined duty (4.3.14.3) 46
8.7.39 Pump curve data (4.3.19) 46
8.7.40 Control source (4.3.20) 47
8.7.41 Fixed inlet pressure (4.3.22) 48
8.7.42 Flow estimation (4.3.23) 48
8.7.43 Reduced operation (4.3.24) 49
8.7.44 Monitoring functions (4.4) 49
8.7.45 Dry-running protection (4.4.1) 50
8.7.46 Pressure/level switch (4.4.1.1) 50
8.7.47 Measurement, inlet pressure (4.4.1.2) 51
8.7.48 Measurement, tank level (4.4.1.3) 51
8.7.49 Min. pressure (4.4.2) 52
8.7.50 Max. pressure (4.4.3) 52
8.7.51 External fault (4.4.4) 53
8.7.52 Limit 1 exceeded (4.4.5 - 4.4.6) 53
8.7.53 Pumps outside duty range (4.4.7) 54
8.7.54 Pressure relief (4.4.8) 54
8.7.55 Log values (4.4.9) 55
8.7.56 Fault, primary sensor (4.4.10) 55
8.7.57 Functions, CU 352 (4.5) 56
8.7.58 Display language (4.5.1) 56
8.7.59 Units (4.5.2) 57
8.7.60 Date and time (4.5.3) 58
8.7.61 Password (4.5.4) 58
8.7.62 Ethernet (4.5.5) 59
8.7.63 GENIbus number (4.5.6) 59
8.7.64 Software status (4.5.9)
59
Section Display and display number See page
English (GB)
14
8.3 Description of functions
The description of functions is based on the four main menus of
the CU 352 control unit:
•Status
Operation
•Alarm
•Settings.
The functions apply to all control variants unless otherwise
stated.
8.4 Status (1)
The first status display is shown below. This display is shown
when the power is switched on, and it appears if the buttons of
the control panel remain untouched for 15 minutes.
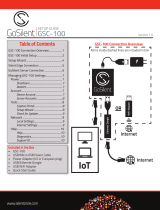
Fig. 6 Status
Description
No settings can be made in this menu.
The actual value (process value, PV) of the control parameter,
usually the discharge pressure, is shown in the upper right corner
(G) together with the selected setpoint (SP) (H).
The upper half of the display (A) shows a graphic illustration of
the pump system. The selected measuring parameters are shown
with sensor symbol and actual value.
In MPC-E systems where the differential pressure across the
pumps and pump curve data are known, the display shows the
estimated flow rate when the flow rate and speed of the pumps
are within a range where it is possible to estimate the flow rate.
: Indicates that the flow rate is an estimated value.
In the middle of the display, an information field (I) will be shown if
any of the following events occurs:
Limited operation due to standby pump
Proportional-pressure influence active
External setpoint influence active
Alternative setpoint active
Low flow boost active
Pressure relief active
Clock program active
Remote-controlled via Ethernet
Remote-controlled via GENI (RS-485)
Limited due to reduced operation
Stopped due to low flow.
The lower display half (B) shows the following:
the most recent active alarm, if any, and the fault cause with
the fault code in brackets
system status with actual operating mode and control source
pump status with actual operating mode.
If the fault is related to one of the pumps, the symbols or
will also be shown in front of the status line (D) of the pump in
question. At the same time, the pump status indicator (E) will
change colour to either yellow or red as described in the table
below. The symbol or will be shown to the right in the top
line of the display (F). As long as a fault is present, this symbol
will be shown in the top line of all displays.
To open a menu line, select the line with [ ] or [ ] and press
[ok].
The display makes it possible to open status displays showing the
following:
actual alarms
system status
status of each pump.
Description of pump status
8.4.1 Actual alarms (3.1)
Fig. 7 Actual alarms
Description
This display shows active unreset alarms and warnings.
For further information, see sections 8.6.2 Actual alarms (3.1)
and 8.6.3 Alarm log (3.2).
Note
The estimated flow rate may differ from a measured
value.
A
B
C
D
E
F
G
H
I
Note
If a fault has occurred, the warning symbol or
alarm symbol will be shown in the line (C)
together with the cause and fault code, for instance
"Overtemperature (64)".
Pump status indicator Description
Rotating, green Pump running.
Permanently green Pump ready (not running).
Rotating, yellow Warning. Pump running.
Permanently yellow Warning. Pump ready (not running).
Permanently red Alarm. Pump stopped.
English (GB)
15
8.4.2 System (1.2)
Fig. 8 System
Description
This display shows the operational state of the system.
It is possible to go to subdisplays showing details.
The display makes it possible to open displays about the
following:
Operating mode
•Setpoint
Setpoint influence
Measured values
Analog inputs
Log graph
Battery status.
8.4.3 Operating mode (1.2.1)
Fig. 9 Operating mode
Description
This display shows the operating mode of the system and from
where it is controlled.
Operating modes
The system has six operating modes:
1. Normal
– The pumps adapt their performance to the requirement.
2. Max.
– The pumps run at a constant high speed. Normally, all
pumps run at maximum speed.
3. User-defined
– The pumps run at a constant speed set by the user. It is
usually is a performance between "Max." and "Min.".
4. Min.
– The pumps run at a constant low speed. Normally, one pump
is running at a speed of 70 %.
5. Stop
– All pumps have been stopped.
6. Emergency run
– The pumps run according to the setting made in display
Emergency run (4.3.5).
The performance required in these operating modes can be set in
menu "Settings":
•Max.
•Min.
User-defined
Emergency run.
See sections 8.7.35 Min., max. and user-defined duty (4.3.14)
and 8.7.25 Emergency run (4.3.5).
The actual operating mode can be controlled from four different
sources:
fault
external signal
CU 352
•bus.
Control source
The system can be set to remote control via an external bus
(option). In this case, you must set a setpoint and an operating
mode via the bus.
In menu "Settings", you can select whether the CU 352 or the
external bus is to be the control source.
The status of this setting is shown in display "Operating mode".
8.4.4 Setpoint (1.2.2)
Fig. 10 Setpoint
Description
This display shows the selected setpoint and whether it comes
from the CU 352 or an external bus.
The display also shows all seven possible setpoints from the
CU 352 (for closed- and open-loop control). At the same time, the
selected setpoint is shown.
As it is a status display, no settings can be made.
Setpoints can be changed in menu "Operation" or "Settings". See
section 8.7.3 Alternative setpoints (4.1.2).
English (GB)
16
8.4.5 Setpoint influence (1.2.3)
Fig. 11 Setpoint influence
Description
The selected setpoint can be influenced by parameters. The
parameters are shown as percentage from 0 to 100 % or as a
pressure measured in bar. They can only reduce the setpoint, as
the influence in percentage divided with 100 is multiplied with the
selected setpoint:
Actual setpoint (SP) =
selected setpoint x influence (1) x influence (2) x ...
The display shows the parameters influencing the selected
setpoint and the percentage or value of influence.
Some of the possible parameters can be set in display External
setpoint influence (4.1.3). The parameter "Low flow boost" is set
as a start/stop band as a percentage of the setpoint set in display
Stop function (4.3.1). The parameter is set as a percentage in
display Proportional pressure (4.1.7).
Finally, the resulting actual setpoint (SP) is shown.
8.4.6 Measured values (1.2.4)
Fig. 12 Measured values
Description
This display gives a general status of all measured and calculated
parameters. In MPC-E systems with a flowmeter, the specific
energy is shown as an average value and actual value (mean
value over the last minute). The average value is based on the
accumulated flow shown as total volume. The total volume and
specific energy average can be reset in this display.
8.4.7 Analog inputs (1.2.5)
Fig. 13 Analog inputs
Description
This display shows an overview of the analog inputs and the
measured values of each input. See sections 8.7.28 Analog
inputs (4.3.8), 8.7.29 Analog inputs (4.3.8.1 to 4.3.8.7) and
8.7.30 Analog inputs and measured value (4.3.8.1.1 - 4.3.8.7.1).
8.4.8 Log graph (1.2.6)
Fig. 14 Log graph
Description
This display can show logged data stored in the controller.
Select log values in display Log values (4.4.9). Various values
can be shown, and the time scale can be changed.
Setting via control panel
Status > System > Log graph
1. Set as a percentage:
Zoom begins at
Zoom ends at
2. Select values to be shown.
Note
The lines "Power consumption" and "Energy
consumption " are only shown in MPC-E/-EC
systems.
English (GB)
17
8.4.9 Battery status (1.2.7)
Fig. 15 Battery status
Description
Here you can see the status of the backup battery, if installed.
8.4.10 Pump 1 - 6, Pilot pump, Backup pump (1.3 - 1.10)
Fig. 16 Pump 1
Description
This display shows the operational state of the individual pumps.
The pumps can have different operating modes:
•Auto
– Together with the other pumps in automatic operation, the
pump is controlled by the PI controller which ensures that
the system delivers the required performance.
Manual
– The pump is not controlled by the PI controller. In manual
operation, the pump has one of the following operating
modes:
•Max.
– The pump runs at a set maximum speed. (This operating
mode can only be selected for variable-speed pumps.)
•Normal
– The pump runs at a set speed.
•Min.
– The pump runs at a set minimum speed. (This operating
mode can only be selected for variable-speed pumps.)
•Stop
– The pump has been forced to stop.
Besides information about the operating mode, it is possible to
read various parameters in the status display, such as these:
actual operating mode
control source
speed (only 0 or 100 % are shown for mains-operated pumps)
power (only MPC-E/-EC)
energy consumption (only MPC-E/-EC)
operating hours.
Note
The displays for backup and pilot pump are only
shown if such pumps are installed.
English (GB)
18
8.5 Operation (2)
In this menu, you can set the basic parameters, such as setpoint,
operating mode, control mode and individual pump control.
8.5.1 Operation (2)
Fig. 17 Operation
Description
The column shows the setting range. In closed-loop control, it
corresponds to the range of the primary sensor, here 0-16 bar.
In open-loop control, the setting range is 0-100 %.
At the left hand of the column, the selected setpoint 1 (A) is
shown, i.e. the value set in the display. At the right hand of the
column, the actual setpoint (B) is shown, i.e. the setpoint acting
as reference for the PI controller. If no kind of external setpoint
influence has been selected, the two values will be identical. The
measured value (discharge pressure) is shown as the grey part of
the column (C). See sections 8.7.5 External setpoint influence
(4.1.3) and 8.7.6 Setting of influence function (4.1.3.2).
Below the display is a menu line for setting of setpoint 1 and
selection of operating mode, including the operating modes
"Normal" and "Stop". It is possible to select further settings:
system operating mode, control mode, setpoints for closed and
open loop and individual pump control.
Setting range
Setpoint:
Setting via control panel
Setpoint
Operation > Set setpoint 1, open loop / Set setpoint 1, closed
loop.
Set the value.
Operating mode
Operation
Select: Normal / Stop.
Further settings
Operation > Further settings.
Select one of the settings below:
System operating mode
(see section 8.5.2).
Control mode
(see section 8.5.3).
Alternative setpoints
(see section 8.5.4).
Individual pump control
(see section 8.5.6).
Factory setting
The setpoint is a value suitable for the system in question. The
factory setting may have been changed in the start-up menu.
8.5.2 System operating mode (2.1.1)
Fig. 18 System operating mode
Description
The system can be set to six different operating modes. "Normal"
is the typical setting. See section 8.4.3 Operating mode (1.2.1).
The performance of these operating modes can be set in this
menu:
•Max.
•Min.
User-defined
Emergency.
Setting range
•Normal
•Max.
•Min.
User-defined
•Stop
Emergency.
Setting via control panel
Operation > Further settings > System operating mode >
Operating mode.
Select the desired line at the bottom of the display to set the
performance for min., max., user-defined duty or emergency run.
See sections 8.7.35 Min., max. and user-defined duty (4.3.14)
and 8.7.25 Emergency run (4.3.5).
Factory setting
Normal.
Closed-loop control: Measuring range of the primary sensor
Open-loop control: 0-100 %
A
C
B
English (GB)
19
8.5.3 Control mode (2.1.2)
Fig. 19 Control mode
Description
There are two control modes, namely closed and open loop.
Closed loop
The typical control mode is closed loop where the built-in PI
controller ensures that the system reaches and maintains the
selected setpoint. The performance is based on the setpoint set
for closed loop. See figures 20 and 21.
Fig. 20 Booster system controlled by built-in PI controller
(closed loop)
Fig. 21 Regulation curve for closed loop
Setting via control panel
Operation > Further settings > Control mode > Closed loop.
Set the setpoint. See sections 8.5.4 and 8.5.1.
Open loop
In open-loop control, the pumps run at a fixed speed.
The pump speed is calculated from the performance set by the
user (0-100 %). The pump performance in percentage is
proportional with the flow rate.
Open-loop control is usually used when the system is controlled
by an external controller which controls the performance via an
external signal. The external controller could for instance be a
building management system connected to the MPC system. In
such cases the MPC is like an actuator. See figures 22 and 23.
Fig. 22 Booster system with external controller (open loop)
Fig. 23 Regulation curve for open loop
Fig. 24 Regulation curve for MPC-E system in open loop
TM03 2231 3905TM03 2390 4105
P [bar]
Time [sec]
Setpoint
TM03 2232 3905
TM03 2391 3607TM03 9977 4807
0
5
Input [%] from
external controller
Flow rate [m
3
/h]
10050 70.75
25
50
75
100
86.6
Flow rate [m
3
/h]
Input [%] from
external controller
Pump 1
Pump 4
Pump 3
Flow rate
Pump 2
English (GB)
20
Fig. 25 Regulation curve for MPC-F system in open loop
Fig. 26 Regulation curve for MPC-S system in open loop
Setting range
These settings must be made in connection with open loop:
Open loop
Set setpoint 1, open loop
External setpoint influence
•Normal.
Setting via control panel
Proceed as follows to set an external control source to control the
system:
Operation > Further settings > Control mode.
Select: Open loop.
Select: Stop
1. x 2.
2. Set to 100 %: Set setpoint 1, open loop.
3. Settings > Primary controller > External setpoint influence >
Go to setting of analog input.
4. Select analog input and range.
5. Select:
Measured input value.
Display 4.3.8.1.1 appears.
Select: 0-100 % signal.
6. .
7. Set the minimum and maximum sensor value.
8. x 2.
9. Select:
Input value to be influenced by
0-100 % signal.
10. .
11. Select: Set the influence function.
(See also section 8.7.6.)
12. Set the number of points.
13. Set: External input value. (Point 1.)
14. Set as a percentage: Reduce setpoint to. (Point 1.)
15. Repeat steps 13 and 14 for all selected points.
16. .
17. Set as seconds: Filter time.
18. Select: Enabled.
19. x 2.
20. Select:
Operation
•Normal.
The booster system can now be controlled by an external
controller.
Factory setting
Closed-loop control.
TM03 9975 4807TM03 9974 4807
10050 70.75
25
50
75
100
86.6
Input [%] from
external controller
Flow rate [m
3
/h]
Pump 1
Pump 2
Pump 3
Flow rate
Pump 4
10050 70.75
25
50
75
100
86.6
Flow rate [m
3
/h]
Input [%] from
external controller
Pump 1
Pump 4
Pump 3
Flow rate
Pump 2
  • Page 1 1
  • Page 2 2
  • Page 3 3
  • Page 4 4
  • Page 5 5
  • Page 6 6
  • Page 7 7
  • Page 8 8
  • Page 9 9
  • Page 10 10
  • Page 11 11
  • Page 12 12
  • Page 13 13
  • Page 14 14
  • Page 15 15
  • Page 16 16
  • Page 17 17
  • Page 18 18
  • Page 19 19
  • Page 20 20
  • Page 21 21
  • Page 22 22
  • Page 23 23
  • Page 24 24
  • Page 25 25
  • Page 26 26
  • Page 27 27
  • Page 28 28
  • Page 29 29
  • Page 30 30
  • Page 31 31
  • Page 32 32
  • Page 33 33
  • Page 34 34
  • Page 35 35
  • Page 36 36
  • Page 37 37
  • Page 38 38
  • Page 39 39
  • Page 40 40
  • Page 41 41
  • Page 42 42
  • Page 43 43
  • Page 44 44
  • Page 45 45
  • Page 46 46
  • Page 47 47
  • Page 48 48
  • Page 49 49
  • Page 50 50
  • Page 51 51
  • Page 52 52
  • Page 53 53
  • Page 54 54
  • Page 55 55
  • Page 56 56
  • Page 57 57
  • Page 58 58
  • Page 59 59
  • Page 60 60
  • Page 61 61
  • Page 62 62
  • Page 63 63
  • Page 64 64
  • Page 65 65
  • Page 66 66
  • Page 67 67
  • Page 68 68

Grundfos CONTROL MPC Installation And Operating Instructions Manual

Type
Installation And Operating Instructions Manual

Ask a question and I''ll find the answer in the document

Finding information in a document is now easier with AI