Enregistreur IC
ICD-TX800
Mode d’emploi
GB
FR
© 2017 Sony Corporation Printed in China
ICD-TX800 4-699-321-42(2)
Consultation du Guide d’aide
Ce Mode d'emploi présente des instructions relatives au
fonctionnement général de l’enregistreur IC.
Le Guide d’aide est un manuel en ligne.
Reportez-vous au Guide d’aide pour de plus amples
informations, le fonctionnement et les solutions possibles
en cas de problèmes.
http://rd1.sony.net/help/icd/t80/h_uc/
Vérification des éléments fournis
• Enregistreur IC (1)
• Télécommande* (1)
• Écouteurs stéréo (1)
• Câble pour casque dédié (1)
• Câble USB (1)
• Étui (1)
• Mode d'emploi (cette feuille)
• Carte de garantie
• Logiciel, Sound Organizer 2 (fichier d'installation
enregistré en mémoire intégrée pour pouvoir l'installer
sur l'ordinateur.)
* Une pile bouton au lithium est déjà installée.
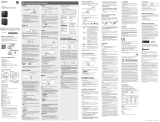
Éléments et commandes
Enregistreur IC Télécommande
Votre enregistreur IC est muni
d’une pince à l’arrière.
Vous pouvez l'accrocher
quelque part, à l'ourlet d'une
poche par exemple.
Microphones intégrés
Indicateur de fonctionnement
Écran
Indicateur Bluetooth*¹
Protection du connecteur USB
Connecteur USB/casque (sous la protection du
connecteur USB)
Touche STOP
Commutateur HOLD•POWER*²
Touche REC (enregistrement)
Touche /DPC (Digital Pitch Control)
Antenne intégrée*³
Touche STOP
Indicateur de fonctionnement
Commutateur HOLD
Touche (révision/retour rapide)
Touche
BACK/ HOME*⁴
Touche (lecture/entrée)*⁵
Touche REC (enregistrement)
Touche (calage/avance rapide)
Touche OPTION
Touche /
A-B (Répétition A-B)
Touche VOL –/+ (volume –/+)*⁵
Touche T-MARK (repère de piste)
Touche RESET*⁶
Orifice de la dragonne (dragonne non fournie avec
l'enregistreur IC)
Compartiment de la pile*⁷
*¹ La couleur de l'indicateur change ou l'indicateur clignote pour
indiquer l'état de la fonction Bluetooth ou du jumelage Bluetooth
(enregistrement d'appareils).
*² Faites glisser le commutateur HOLD•POWER sur «POWER» de
manière prolongée pendant au moins huit secondes pour redémarrer
l'enregistreur IC. Avant le redémarrage de l'enregistreur IC, assurez-
vous que l'indicateur de fonctionnement n'est pas allumé. Pour plus
d'informations, reportez-vous au Guide d'aide.
*³ Lors de l'utilisation de la télécommande, n'obstruez pas l'antenne
intégrée, avec une main par exemple, pour ne pas perturber la
connexion sans fil avec l'enregistreur IC.
*⁴ Appuyez sur cette touche une fois pour afficher l'écran précédent.
Appuyez de manière prolongée sur cette touche pour afficher l'écran
HOME.
*⁵ Un repère tactile se trouve sur la touche (lecture/entrée) et en
regard du «+» de la touche VOL –/+ (volume –/+).
*⁶ Appuyez sur cette touche lorsque la télécommande ne semble pas
fonctionner.
*⁷ Une pile bouton au lithium est déjà installée.
¼ L'enregistreur IC n'est pas doté de haut-parleurs intégrés.
Essai de votre nouvel enregistreur IC
Charge
Chargez l’enregistreur IC.
Branchez le câble USB au connecteur USB/casque sous
la protection du connecteur USB et à un port USB d'un
ordinateur en cours de fonctionnement. La charge
commence.
Lorsque la batterie est complètement chargée,
l’indicateur d’autonomie indique «
».
Débranchez l’enregistreur IC.
Assurez-vous que le message «Accessing» ne s'affiche
plus à l'écran. Reportez-vous ensuite au Guide d'aide
pour déconnecter correctement l'enregistreur IC.
Mise sous tension
Enregistreur IC
Faites glisser de manière prolongée le commutateur
HOLD•POWER de l'enregistreur IC vers «POWER» jusqu’à ce
que l'écran apparaisse.
Pour mettre l'appareil hors tension, faites glisser le
commutateur HOLD•POWER vers «POWER» de manière
prolongée jusqu'à ce que «Power Off» s'affiche à l'écran.
Télécommande
Indicateur de
fonctionnement
Faites glisser le commutateur HOLD hors de la position «HOLD».
Pour allumer la télécommande, appuyez sur l'une de ses
touches. Lorsque l'indicateur de fonctionnement de la
télécommande s'arrête de clignoter, les fonctions de la
télécommande sont disponibles.
La télécommande n'est pas équipée d'une touche de mise
hors/sous tension.
Elle s'éteint automatiquement lorsque l'une des situations
ci-dessous se produit :
• Si la connexion sans fil n'est pas établie avec l'enregistreur
IC et que la télécommande reste inactive pendant environ
cinq minutes.
• Si la connexion sans fil est établie avec l'enregistreur IC et que
– l'enregistreur IC est éteint ;
– la télécommande reste inactive pendant environ deux
heures.
Pour utiliser la télécommande après sa mise hors tension,
suivez la procédure ci-dessus pour l'allumer, puis appuyez de
nouveau sur la touche de la télécommande de votre choix.
Prévention contre les opérations involontaires (HOLD)
L'enregistreur IC et la télécommande sont tous deux équipés
d'un commutateur pour bloquer les fonctions.
Faites glisser le commutateur HOLD•POWER de l'enregistreur IC
ou le commutateur HOLD de la télécommande vers «HOLD».
Enregistreur IC Télécommande
¼ Pour quitter l'état Hold de l'enregistreur IC ou de la
télécommande, faites glisser le commutateur HOLD•POWER
vers le centre ou le commutateur HOLD hors de la position
«HOLD», respectivement.
Paramètres initiaux
Sélection
(
//
/
)
Entrée
Écran (enregistreur IC)
Touches à utiliser (télécommande)
À la première mise sous tension de l'enregistreur IC, le
message «Configure Initial Settings» s'affiche à l'écran.
Utilisez la télécommande pour effectuer la configuration
initiale : la sélection de la langue d'affichage, le réglage de
l'horloge, l'activation ou la désactivation du bip, par exemple.
Faites glisser le commutateur HOLD de la
télécommande hors de la position «HOLD» pour
sortir du mode HOLD.
Retirez l'étiquette jaune à l'arrière de la télécommande à
la première utilisation de cette dernière.
Lorsque l'écran «Configure Initial Settings» s'affiche,
appuyez sur une des touches de la télécommande.
Si l'indicateur de fonctionnement de la télécommande
clignote, patientez jusqu'à ce qu'il s'arrête de clignoter
avant de passer à la prochaine étape.
Appuyez sur pour commencer la configuration
initiale.
Sélectionnez la langue affichée.
Vous pouvez choisir entre les langues suivantes :
English* (Anglais), Español (Espagnol), Français
* Paramètre par défaut
Réglez l’année, le mois, le jour, l’heure et les minutes
en cours.
¼ Pour revenir au paramètre de configuration précédent,
appuyez sur BACK/HOME.
Sélectionnez «Next».
Sélectionnez «Yes» ou «No» pour activer ou
désactiver le bip.
Une fois la configuration initiale terminée, un message
indiquant la fin de la configuration s'affiche puis le menu
HOME s'affiche.
Remarques
• Vous pouvez entendre le bip uniquement avec les écouteurs
raccordés à l'enregistreur IC.
• Vous pouvez modifier n'importe quel paramètre initial
ultérieurement. Pour plus d'informations, reportez-vous au
Guide d'aide.
Utilisation du menu HOME
Vous pouvez utiliser le menu HOME pour effectuer de
nombreuses opérations, notamment la recherche et la
lecture d'un fichier enregistré, ainsi que la modification des
paramètres de votre enregistreur IC.
Sélection
(
/
)
Entrée
BACK/HOME
Écran (enregistreur IC)
Touches à utiliser (télécommande)
¼ Pour utiliser le menu HOME, vous devez utiliser la
télécommande.
Appuyez de manière prolongée sur BACK/HOME.
Le menu HOME s'affiche à l'écran de l'enregistreur IC.
Les éléments du menu HOME sont alignés selon l'ordre
suivant.
Recorded
Files
Record SettingsREC
Remote
Back
to XX*
Music
Sélectionnez la fonction voulue parmi les
suivantes:
Music
Permet de sélectionner et lire un des
fichiers importés d'un ordinateur.
Pour rechercher un fichier musical,
sélectionnez «All Songs», «Albums»,
«Artists» ou «Folders».
Lors de l'importation de fichiers,
assurez-vous de les importer dans le
dossier MUSIC.
Recorded
Files
Permet de sélectionner et lire un
des fichiers enregistrés avec votre
enregistreur IC.
Pour rechercher un fichier enregistré,
sélectionnez «Latest Recording»,
«Search by REC Date», «Search by REC
Scene» ou «Folders».
Record
Permet d'afficher l'écran de mise en
veille de l'enregistrement, puis de
commencer l'enregistrement.
REC Remote
Permet d'afficher l'écran du menu
REC Remote qui utilise la fonction
Bluetooth.
En outre, vous pouvez activer ou
désactiver la fonction Bluetooth
ou effectuer l'enregistrement des
appareils (jumelage) avec REC Remote.
Settings
Permet d'afficher l'écran du menu
Settings et de modifier plusieurs
réglages de l'enregistreur IC.
Back to XX*
Permet de revenir à l'écran affiché
avant l'écran du menu HOME.
* La fonction en cours d'utilisation s'affiche dans «XX».
¼ Appuyez sur STOP pour revenir à l'écran affiché avant le
menu HOME.
Utilisation du menu OPTION
Vous pouvez utiliser le menu OPTION pour exécuter de
nombreuses fonctions, notamment la modification des
paramètres de l'enregistreur IC.
Les options disponibles varient selon la situation.
Entrée
OPTION
Sélection
(
/)
Écran (enregistreur IC)
Touches à utiliser (télécommande)
¼ Pour utiliser le menu OPTION, vous devez utiliser la
télécommande.
Sélectionnez la fonction voulue dans le menu
HOME, puis appuyez sur OPTION.
Sélectionnez l'option de menu pour laquelle vous
voulez modifier le paramètre.
Sélectionnez l'option de paramètre voulue.
Copie de fichiers de l'enregistreur
IC vers un ordinateur
Vous pouvez copier des fichiers et des dossiers de
l'enregistreur IC vers un ordinateur à des fins de stockage.
Suivez les instructions de la section «Charge»
pour connecter votre enregistreur IC à un
ordinateur.
Faites glisser et déposez les fichiers ou dossiers à
copier de «IC RECORDER» vers le disque local de
l'ordinateur.
Débranchez l'enregistreur IC de l'ordinateur.
Installation de Sound Organizer 2
Installez Sound Organizer dans l'ordinateur.
Sound Organizer permet l'échange de fichiers entre
l'enregistreur IC et l'ordinateur.
Les fichiers musicaux importés d'un CD ou autre support,
ainsi que les fichiers MP3 et autres fichiers audio importés
d'un ordinateur peuvent également être lus et transférés
dans l'enregistreur IC.
Remarques
• Sound Organizer n’est compatible qu’avec les ordinateurs
Windows. Il n’est pas compatible avec les Mac.
• Cet enregistreur IC n'est compatible qu'avec Sound Organizer 2.
• Si vous formatez la mémoire interne, toutes les données qui y
sont stockées seront supprimées. (Le logiciel Sound Organizer
sera également supprimé.)
¼
• Lorsque vous installez Sound Organizer, connectez-vous avec
un compte ayant des droits d’administrateur.
• Le processus d'installation varie selon la version de Windows.
L'exemple ci-dessous utilise Windows 7.
Suivez les instructions de la section «Charge» pour
connecter votre enregistreur IC à un ordinateur.
Assurez-vous que l'enregistreur IC est
correctement détecté par l'ordinateur.
«Connecting» s'affiche sur l'écran de l'enregistreur IC
lorsqu'il est connecté à l'ordinateur.
Choisissez le menu [Démarrer], cliquez sur
[Ordinateur], puis double-cliquez sur [IC
RECORDER] - [FOR WINDOWS].
Double-cliquez sur [SoundOrganizer_V2001] (ou
[SoundOrganizer_V2001.exe]).
Suivez les instructions affichées à l'écran de l'ordinateur.
Assurez-vous d'accepter les dispositions du contrat
de licence, sélectionnez [I accept the terms in the
license agreement], puis cliquez sur [Next].
Lorsque l'écran [Setup Type] s'affiche, sélectionnez
[Standard] ou [Custom], puis cliquez sur [Next].
Suivez les instructions affichées et configurez les
paramètres d'installation lorsque vous sélectionnez
[Custom].
Lorsque l'écran [Ready to Install the Program]
s'affiche, cliquez sur [Install].
L'installation commence.
Lorsque l'écran [Sound Organizer has been
installed successfully.] s'affiche, cochez la case
[Launch Sound Organizer Now], puis cliquez sur
[Finish].
Remarque
Vous devez redémarrer l'ordinateur après l'installation de
Sound Organizer.
Remplacement de la pile de la
télécommande
Lorsque l'indicateur de la télécommande s'allume en rouge,
la charge de la pile est épuisée. Suivez les instructions ci-
dessous pour remplacer la pile. Assurez-vous d'utiliser une
pile bouton au lithium, référence CR2032.
Enregistrement
Touches à utiliser (enregistreur IC)
Microphones intégrés
STOP
REC
Indicateur de
fonctionnement
¼
• Pour commencer l'enregistrement, vous pouvez vous servir soit
de l'enregistreur IC soit de la télécommande.
• Avant le début de l'enregistrement, assurez-vous que l'état
HOLD est désactivé.
• Vous pouvez sélectionner une scène d'enregistrement pour
chaque situation en sélectionnant «Scene Select» dans le menu
OPTION avec la télécommande.
Orientez l'enregistreur IC de manière à ce que ses
microphones intégrés soient dirigés vers la source
d'enregistrement.
Appuyez sur REC.
Assurez-vous que l'indicateur de fonctionnement de
l'enregistreur IC s'allume en rouge, ce qui indique que
l'enregistrement a commencé.
Appuyez sur STOP pour arrêter l’enregistrement.
L'enregistrement s'arrête et «Saving...» s'affiche à l'écran.
Écoute
L'enregistreur IC n'est pas doté d'un haut-parleur intégré.
Pour écouter l'audio, vous devez raccorder les écouteurs
stéréo (fournis) à l'enregistreur IC avec le câble pour casque
dédié (fourni). Pour les opérations de lecture, utilisez la
télécommande.
Préparation à l'écoute
Raccordez le câble pour casque dédié aux écouteurs stéréo et
au connecteur USB/casque de l'enregistreur IC.
Pour commencer la lecture
Sélection
(
//
/
)
Entrée
STOP
BACK/HOME
VOL –/+ button
Écran (enregistreur IC)
Touches à utiliser (télécommande)
Tout en regardant l'écran de l'enregistreur IC, faites
fonctionner la télécommande pour sélectionner
« Recorded Files» dans le menu HOME.
Sélectionnez «Latest Recording,» «Search by REC
Date,» «Search by REC Scene» ou «Folders».
Sélectionnez le fichier voulu.
La lecture commence.
Appuyez sur VOL + ou VOL - pour régler le volume.
Appuyez sur STOP pour arrêter l’enregistrement.
¼ Après l'arrêt de l'enregistrement, vous pouvez appuyer sur
pour lire le fichier que vous venez d'enregistrer.
Ajout d'un repère de piste
Vous pouvez ajouter un repère de piste à l'endroit où vous
voulez diviser un fichier ultérieurement ou pour le rechercher
pendant la lecture. Chaque fichier peut compter jusqu'à 98
repères de piste.
Vous pouvez également ajouter des repères de piste pendant
l'enregistrement.
Suppression
Entrée
OPTION
Sélection
(
//
/
)
Écran (enregistreur IC)
Touches à utiliser (télécommande)
¼ Pour supprimer un fichier, vous devez utiliser la télécommande.
Remarque
Une fois qu'un fichier a été supprimé, il est impossible de le récupérer.
Tout en regardant l'écran de l'enregistreur IC, utilisez
la télécommande pour sélectionner le fichier à
supprimer de la liste des fichiers enregistrés ou lire
le fichier à supprimer.
Sélectionnez «Delete a File» dans le menu OPTION.
«Delete?» s'affiche et le fichier en question est lu pour
confirmation.
Sélectionnez «Yes».
«Please Wait» s'affiche jusqu'a ce que le fichier
sélectionné est supprimé.
Retournez la télécommande.
Poussez de manière prolongée la languette ()
vers la rainure (), glissez un ongle dans la
rainure (), puis tirez le compartiment de la pile.
Retirez la pile.
Installez une pile neuve en s'assurant que le côté
de la polarité + est dirigé vers le haut.
Remettez le compartiment de la pile en place dans
la télécommande.
Appuyez sur la touche RESET à l'arrière de la
télécommande.
Appuyez sur une des touches de la télécommande
(l'indicateur de fonctionnement de la
télécommande clignote rapidement d'une manière
séquentielle (bleu et rouge)) pour la mettre sous
tension, puis allumez l'enregistreur IC.
Lorsque l'indicateur de fonctionnement de la
télécommande s'arrête de clignoter, les fonctions de la
télécommande sont disponibles.
Précautions
Alimentation
• Enregistreur IC
3,7 V CC : batterie intégrée rechargeable au lithium-ion
5,0 V CC : lorsque chargée avec USB
Consommation électrique nominale : 500 mA
• Télécommande
3 V CC : CR2032 (pile bouton au lithium)
Sécurité
Ne faites pas fonctionner l’appareil en conduisant une
voiture, une bicyclette ou tout autre véhicule motorisé.
Manipulation
• Ne laissez pas l’appareil à proximité d’une source de
chaleur ou dans un endroit exposé au rayonnement
direct du soleil, à une poussière excessive ou à des chocs
mécaniques.
• Si des éléments solides ou liquides venaient à pénétrer
à l’intérieur de l’appareil, retirez la pile ou la batterie et
faites-le vérifier par un technicien qualifié avant de le
remettre en service.
• Lorsque vous utilisez votre enregistreur IC, veillez
à suivre les précautions décrites ci-dessous afin
d’éviter de déformer le boîtier ou de provoquer un
dysfonctionnement de l’enregistreur IC.
– Ne vous asseyez pas après avoir placé l’enregistreur IC
dans votre poche arrière.
– Ne placez pas votre enregistreur IC dans un sac après
avoir enroulé le cordon du casque/des écouteurs autour
et ne soumettez pas le sac à des chocs violents.
• Veillez à ne pas renverser d’eau sur l’appareil. L’unité n’est
pas étanche.
Soyez particulièrement prudent(e) dans les situations
suivantes :
– Lorsque vous vous rendez dans la salle de bain, etc.,
alors que l’appareil se trouve dans votre poche.
Si vous vous baissez, l’appareil risque de tomber dans
l’eau et d’être mouillé.
– Lorsque vous utilisez l’appareil dans un environnement
dans lequel il est exposé à la pluie, à la neige ou à
l’humidité.
– Lorsque vous transpirez. Si vous touchez l’appareil
alors que vos mains sont mouillées ou si vous placez ce
dernier dans la poche d’un vêtement couvert de sueur, il
risque d’être mouillé.
• Vous risquez de subir des lésions auditives si vous utilisez
cet appareil à un volume élevé.
• Pour des raisons de sécurité, n’utilisez pas cet appareil en
voiture ou à vélo.
• N'utilisez pas cette unité dans un endroit où l'incapacité
d'entendre les bruits avoisinants risque d'être dangereuse.
• Vous risquez d’avoir mal aux oreilles si vous utilisez le
casque alors que l’air ambiant est très sec. Cela n’est
pas lié à un dysfonctionnement des écouteurs mais à
l’accumulation d’électricité statique dans votre corps.
Vous pouvez diminuer cette électricité statique en portant
des vêtements non synthétiques évitant son apparition.
Bruits
• Des bruits parasites peuvent se faire entendre si l’appareil
est placé à proximité d’une source d’alimentation secteur,
d’une lampe fluorescente ou d’un téléphone mobile
durant l’enregistrement ou la lecture.
• Il se peut que des bruits parasites soient enregistrés
si quelque chose comme votre doigt par exemple,
touche ou frotte accidentellement l’appareil pendant
l’enregistrement.
Entretien
Pour nettoyer l’extérieur, utilisez un chiffon doux
légèrement imprégné d’eau. Utilisez ensuite un chiffon
doux sec pour essuyer l’extérieur. N’utilisez pas d’alcool,
d’essence ou de diluant.
Si vous avez des questions ou des problèmes concernant
cet appareil, consultez votre revendeur Sony.
Remarques sur la fonction Bluetooth
• La technologie sans fil Bluetooth permet une connexion
à une portée d'environ 10 m (33 pi). Toutefois, la portée
réelle peut varier selon les obstructions (personnes,
métaux, murs, etc.) ou l'état du signal.
• Puisque les appareils Bluetooth et sans fil LAN
(IEEE802.11b/g) utilisent la même fréquence (2,4 GHz),
des interférences de signaux risquent de se produire,
ralentissant la vitesse de communication, entraînant
l'apparition de bruits ou perturbant la connexion, si les
communications Bluetooth sont effectuées à proximité
d'un appareil LAN sans fil. Dans ce cas, observez les
mesures ci-dessous.
– Effectuez les communications Bluetooth à au moins 10
m (33 pi) de l'appareil LAN sans fil lors de la connexion
de l'enregistreur IC et de l'appareil Bluetooth.
– Rapprochez le plus possible l'enregistreur IC et l'appareil
Bluetooth.
– Mettez l'appareil LAN sans fil hors tension lors de
communications Bluetooth de moins de 10 m (33 pi).
• Les ondes radiophoniques émises d'un appareil Bluetooth
peuvent perturber le fonctionnement d'équipements
tel que les appareils médicaux électroniques. Éteignez
l'enregistreur IC et les autres appareils Bluetooth dans les
endroits ci-dessous où leur mise sous tension pourrait
être dangereuse.
– Dans des hôpitaux ; les zones à sièges réservés dans les
trains et avions ; dans des stations-service où l'émanation
des gaz inflammables est possible ; à proximité de portes
automatiques ou d'avertisseur d'incendie.
• Si l'indicateur de fonctionnement de la télécommande
continue de clignoter et que la télécommande semble
ne pas fonctionner, le problème pourrait se corriger
en enregistrant de nouveau l'enregistreur IC et la
télécommande.
Pour plus d'informations sur l'enregistrement d'appareils,
reportez-vous au Guide d'aide.
AVERTISSEMENT
• N'exposez pas les piles (pack de piles ou piles installées) à
de fortes chaleurs (rayons du soleil, feu, etc.) pendant une
période prolongée.
• Ne démontez pas, n'ouvrez pas ou ne broyez pas les piles
ou batteries secondaires.
• N'exposez pas les piles ou batteries à la chaleur ou une
flamme nue. Évitez le stockage dans un endroit exposé
aux rayons du soleil.
• En cas de fuite, ne laissez pas le liquide entrer en contact
avec la peau et les yeux. Dans le cas contraire, lavez la
surface en question avec beaucoup d'eau et consultez un
médecin.
• Les piles ou batteries secondaires doivent être chargées
avant utilisation. Reportez-vous toujours aux instructions
du fabricant ou du manuel de l'appareil pour les
instructions de charge correctes.
• Après un stockage prolongé, il est nécessaire de charger
et de décharger les piles ou les batteries plusieurs fois afin
d'obtenir les meilleures performances possible.
Remarques sur les fonctions
• Lorsque la fonction d'une touche de la télécommande ne
fonctionne pas, vérifiez si :
– l'enregistreur IC est allumé ;
Par défaut, il s'éteint automatiquement en cas
d'inactivité de plus de 30 minutes.
– la télécommande ne se trouve plus en mode HOLD.
– la connexion sans fil avec l'enregistreur IC est en cours.
L'indicateur de fonctionnement de la télécommande
clignote lorsque la connexion sans fil a été établie.
• Vous pouvez vérifier l'indicateur de fonctionnement qui
indique l'état de la télécommande.
Indication de l'indicateur
de fonctionnement
État de la télécommande
Clignote deux fois en bleu*.
Allumée.
S'allume en bleu pendant
deux secondes.
Éteinte.
Clignote quatre fois en
bleu*.
La réinitialisation de
la télécommande est
terminée.
S'allume en rouge.
Arrêtée en raison d'une
charge faible de la pile.
Clignote du bleu au rouge
d'une manière séquentielle.
La procédure
d'enregistrement des
appareils est en cours.
Clignote deux fois en bleu*
de façon répétée.
L'établissement de la
connexion sans fil est en
cours.
Clignote une fois en bleu*.
La connexion sans fil est
établie et les fonctions des
touches sont disponibles.
* Lorsque la charge de la pile est épuisée, l'indicateur de fonctionnement
de la télécommande s'allume en rouge.
Fonctionnement avec un
smartphone (REC Remote)
Sélection
(
//
/
)
Entrée
Écran (enregistreur IC)
Touches à utiliser (télécommande)
À l'aide de la fonction BLUETOOTH® de votre enregistreur
IC, vous pouvez commander ce dernier (enregistrement,
modification des paramètres d'enregistrement, etc.) à l'aide
d'un smartphone.
Pour utiliser l'enregistreur IC avec un
smartphone
Vous devez installer l'application REC Remote sur le
smartphone et effectuer le jumelage entre le smartphone et
l'enregistreur IC.
Le jumelage signifie que chaque appareil Bluetooth enregistre
la première fois les informations sur l'autre appareil afin
d'établir une connexion sans fil.
Pour effectuer un jumelage avec l'enregistreur IC à l'aide de
REC Remote, vous devez utiliser la dernière version de REC
Remote. Si REC Remote est déjà installé sur votre smartphone,
assurez-vous que vous utilisez la dernière version.
Recherchez dans Google Play ou App Store
l'application REC Remote, puis installez-la sur le
smartphone.
Sur l'enregistreur IC, sélectionnez «REC Remote»
- «Add Device (Pairing)» du menu HOME avec la
télécommande, puis suivez les instructions affichées
pour activer la fonction Bluetooth.
Sur le smartphone, démarrez l'application
REC Remote, puis sélectionnez «ICD-TX800»
(votre enregistreur IC) sur la liste des dispositifs
disponibles.
Pour de plus amples informations, reportez-vous
à l'aide de l'application REC Remote et au manuel
fourni avec le smartphone.
Vous pouvez à présent utiliser le smartphone pour
commander l'enregistreur IC.
Remarque
Les informations sur l'enregistrement des appareils (jumelage)
sont effacées dans les cas suivants. Vous devrez effectuer un
nouveau jumelage de ces appareils.
- Les paramètres de l'enregistreur IC ou du smartphone (ou des
deux) ont été réinitialisés à leurs valeurs par défaut, à cause
d'une initialisation par exemple.
- Les informations sur l'enregistrement des appareils (jumelage)
ont été supprimées, pendant une réparation par exemple.
Activation et désactivation de la fonction
Bluetooth de l'enregistreur IC
Sélectionnez «REC Remote» - «Bluetooth ON/OFF»
dans le menu HOME.
Sélectionnez «ON» pour activer la fonction
Bluetooth. Sélectionnez «OFF» pour désactiver la
fonction Bluetooth.
¼ La désactivation de la fonction Bluetooth économise la charge
de la pile.
• Mettez au rebut d'une manière adéquate.
• N'avalez pas une pile ou une batterie sous peine de
risques de brulures causées par les produits chimiques
qu'elle contient. La télécommande fournie avec ce produit
est dotée d'une pile bouton. Si vous avalez celle-ci, vous
risquez en moins de deux heures de brûler gravement vos
organes, voire de mourir.
Conservez les batteries et les piles neuves et usagées hors
de portée des enfants. Si le compartiment de la pile ne se
ferme pas complètement, arrêtez d'utiliser le produit et
rangez-le hors de portée des enfants.
Si vous pensez avoir avalé une pile (ou qu'elle se trouve
dans un organe), consultez immédiatement un médecin.
ATTENTION
Risque d'explosion si la pile est remplacée d'une manière
incorrecte.
Remplacez la pile par une pile de même type.
Risque d’explosion en cas de remplacement de la pile par
un type incorrect.
Mettez les piles usagées au rebut conformément aux
instructions.
Pour l’enregistreur IC :
Les connaissances scientifiques dont nous disposons
n’ont mis en évidence aucun problème de santé associé
à l’usage des appareils sans fil à faible puissance. Nous
ne sommes cependant pas en mesure de prouver que
ces appareils sans fil à faible puissance sont entièrement
sans danger. Les appareils sans fil à faible puissance
émettent une énergie fréquence radioélectrique (RF) très
faible dans le spectre des micro-ondes lorsqu’ils sont
utilisés. Alors qu’une dose élevée de RF peut avoir des
effets sur la santé (en chauffant les tissus), l’exposition
à de faibles RF qui ne produisent pas de chaleur n’a pas
de mauvais effets connus sur la santé. De nombreuses
études ont été menées sur les expositions aux RF faibles
et n’ont découvert aucun effet biologique. Certaines
études ont suggéré qu’il pouvait y avoir certains effets
biologiques, mais ces résultats n’ont pas été confirmés par
des recherches supplémentaires. Le modèle a été testé et
jugé conforme aux limites d’exposition aux rayonnements
énoncées pour un environnement non contrôlé et respecte
les règles les radioélectriques (RF) de la FCC lignes
directrices d'exposition et d’exposition aux fréquences
radioélectriques (RF) CNR-102 de l’IC.
Pour la télécommande :
Cet équipement est conforme aux limites d’exposition
aux rayonnements énoncées pour un environnement non
contrôlé et respecte les règles les radioélectriques (RF)
de la FCC lignes directrices d’exposition et d’exposition
aux fréquences radioélectriques (RF) CNR-102 de l’IC.
Cet é quipement émet une énergie RF très faible qui est
considérée comme conforme sans évaluation du débit
d’absorption sp écifique (DAS).
Pour les utilisateurs au Canada
Le présent appareil est conforme aux CNR d’Industrie
Canada applicables aux appareils radio exempts de licence.
L’exploitation est autorisée aux deux conditions suivantes:
(1) l’appareil ne doit pas produire de brouillage;
(2) l’utilisateur de l’appareil doit accepter tout brouillage
radioélectrique subi, même si le brouillage est susceptible
d’en compromettre le fonctionnement.
Écouter pour la vie
En choisissant un matériel audio de haute qualité tel que
l’appareil que vous venez d’acheter, préparezvous à vivre
une nouvelle expérience musicale. Maintenant, il est temps
de voir comment vous pouvez décupler le plaisir offert par
votre matériel. Le fabricant, la CEA® (Consumer Electronics
Association) et l’ASHA (American Speech-Language-Hearing
Association) souhaitent que vous profitiez pleinement de
votre matériel en réglant un niveau d’écoute salutaire ;
c’est-à-dire un niveau sonore d’une clarté exceptionnelle
sans avoir à augmenter le volume et sans distorsion et,
plus important encore, qui limite le risque de traumatismes
auditifs.
Le son peut être trompeur. Avec le temps, le niveau de votre
confort d’écoute («comfort level») s’adapte à des volumes
sonores plus élevés. Par conséquent, un niveau sonore qui
vous semble «normal» peut s’avérer puissant et néfaste
pour vos capacités auditives. Préservez-les en réglant votre
appareil sur un niveau salutaire AVANT que ce ne soit votre
audition qui s’adapte.
POUR ÉTABLIR UN NIVEAU SALUTAIRE :
• Réglez le volume sur le niveau minimum qui conserve
à la fois un niveau d’écoute confortable et la clarté du
son. Toute exposition prolongée à un son quel qu’il soit
de plus de 85 décibels peut entraîner une perte auditive
progressive.
• Une fois que vous avez établi un niveau sonore qui offre
une écoute confortable, claire et sans distorsion, réglez la
molette et conservez ce réglage.
• Vérifiez si votre lecteur de musique est doté d’un limiteur
de volume qui vous permet de régler un niveau d’écoute
salutaire en établissant un niveau de volume maximum
sur votre lecteur. C’est une excellente solution pour les
parents afin d’assurer que leurs enfants écoutent à un
niveau salutaire.
• Limitez le temps d’écoute en instaurant des temps de
récupération («quiet breaks») pour préserver votre
capacité auditive.
VEILLEZ À RESPECTER LES DIRECTIVES SUIVANTES
LORSQUE VOUS PORTEZ UN CASQUE OU DES ÉCOUTEURS :
• Évitez de régler le volume à un niveau qui vous empêche
d’entendre les sons environnants.
• N’utilisez ni casque ni écouteurs lorsque vous conduisez
un véhicule motorisé, vous risqueriez de provoquer un
accident. En outre, cela est interdit par la loi dans de
nombreux pays.
Utilisé de façon raisonnable, votre nouvel équipement
sonore vous procurera des années de plaisir. Les pertes
d’audition entraînées par les sons forts étant souvent
détectées trop tard, le fabricant, la CEA et l’ASHA vous
recommandent d’éviter toute exposition prolongée au bruit
excessif. À titre information, la liste suivante répertorie les
niveaux de son afin que vous puissiez mieux préserver vos
capacités auditives.
EXEMPLES DE NIVEAUX DE DÉCIBELS :
30 Murmure
40 Pièce tranquille
50 Pluie moyenne
60 Conversation normale
70 Circulation dense, aspirateur
80 Réveil-matin
L’EXPOSITION CONSTANTE À CES BRUITS PEUT ÊTRE
DANGEREUSE :
90 Tondeuse, motocyclette
100 Scie à chaîne
110 Concert rock
120 Décollage d’un avion réacté
130 Marteau pneumatique
140 Pétards à mèche
Cette information a été fournie grâce à l’aimable
autorisation de l’ASHA (American Speech-Language-
Hearing Association), l’association nationale
professionnelle, scientifique et d’accréditation de plus de
135000 audiologistes, orthophonistes et scientifiques de la
parole, du langage et de l’ audition.
Pour obtenir plus d’informations sur la protection contre
la perte auditive causée par le bruit, appelez le centre
d’intervention de l’ASHA au 800-638-8255, du lundi au
vendredi, entre 8H30 et 17H00. Pour trouver un audiologiste
dans votre secteur, rendez-vous sur le site www.asha.org/
findpro. Les parents peuvent trouver des informations
utiles sur le site www.listentoyourbuds.org, une campagne
d’éducation publique primée de l’ASHA commanditée en
partie par la CEA, pour préserver les capacités auditives de
leurs enfants et les sensibiliser à l’écoute salutaire.
Un conseil de sécurité de la CEA (Consumer Electronics
Association), 1919 South Eads Street, Arlington, VA 22202
et de l’ASHA (American Speech-Language-Hearing
Association), 2200 Research Boulevard, Rockville, MD
20850.
L'écran s'éteint
automatiquement.
La fonction «Screen Off Timer» de votre enregistreur IC
est réglée sur «30sec» par défaut pour économiser la
charge de la batterie. Si vous laissez l'enregistreur IC et
la télécommande inactifs pendant plus de 30 secondes,
l'écran s'éteint, mais vous pouvez quand même utiliser
les touches. Pour rallumer l'écran, appuyez sur BACK/
HOME ou faites glisser le commutateur HOLD•POWER
de l'enregistreur IC vers «HOLD», puis remettez-le à sa
position d'origine (au milieu).
¼ Vous pouvez laisser l'écran éteint ou modifier le paramètre
par défaut pour choisir un autre intervalle de temps.
Appuyez d'une manière prolongée sur BACK/HOME,
sélectionnez «
Settings» - «Common Settings» -
«Screen Off Timer», puis «No Auto Screen Off», «15sec»,
«30sec», «1min», «3min» ou «5min».
Caractéristiques techniques
Capacité (capacité disponible à l'utilisateur*¹*²)
16 Go (environ 12,80 Go = 13 743 895 347 octets)
Durée maximale d'enregistrement*³ (mémoire interne)
La durée maximale d'enregistrement de tous les dossiers est la
suivante.
LPCM 44.1 kHz/16 bit (STEREO) 21 heures et 35 minutes
MP3 192 kbps (STEREO) 159 heures
MP3 128 kbps (STEREO)
238 heures
MP3 48 kbps (MONO) 636 heures
Autonomie de la batterie
• Enregistreur IC (batterie intégrée rechargeable au lithium-ion)
REC Mode
Enregistrement
Lecture avec le
casque
Enregistrement
avec REC
Remote
LPCM
44.1kHz/16bit
Environ
12heures
Environ
10heures
Environ
6heures
MP3 192 kbps
Environ
15heures
Environ
12heures
Environ
6heures
MP3 128 kbps
Environ
15heures
Environ
12heures
Environ
6heures
MP3 48 kbps
Environ
15heures
Environ
12heures
Environ
6heures
• Télécommande (pile bouton au lithium) environ 1 an*⁴
Dimensions (l/h/p) (parties saillantes et commandes non
comprises)
• Enregistreur IC
Environ 1,50 po (38,0 mm) x 1,50 po (38,0 mm) x 0,54 po (13,7 mm)
• Télécommande
Environ 1,50 po (38,0 mm) x 1,50 po (38,0 mm) x 0,43 po (10,8 mm)
Poids
• Enregistreur IC
Environ 0,78 once (22 g)
• Télécommande
Environ 0,53 once (15 g) (y compris une pile bouton au lithium)
Température/Taux d'humidité
Température de
fonctionnement
41 °F - 95 °F (5°C - 35°C)
Taux d'humidité de
fonctionnement
25% - 75%
Température de stockage 14 °F - 113 °F (-10°C - +45°C)
Taux d'humidité de stockage 25% - 75%
*¹ Une petite partie de la mémoire intégrée est réservée à la gestion des
fichiers et n’est donc pas disponible pour le stockage.
*² Lorsque la mémoire intégrée est formatée à l’aide de l’enregistreur IC)
*³ Paramètres par défaut pour les scènes d’enregistrement
*⁴ L'autonomie de la pile/batterie est indiquée à but de référence
uniquement. Elle varie également en fonction de critères tels que les
conditions d'utilisation et les températures ambiantes.
Spécification Bluetooth
• Système de communication : spécification Bluetooth,
version 4.0
• Portée de communication maximale : environ 10 m (33 pi)*
• Bande de fréquences : bande de 2,4 GHz (2,4000 GHz -
2,4835 GHz)
* La portée dépend de l'environnement de communication.
Marques commerciales et
licences
• Microsoft, Windows et Windows Media marques
commerciales ou des marques déposées de Microsoft
Corporation aux États-Unis et/ou dans d’autres pays ou
régions.
• Technologie d’encodage audio MPEG Layer-3 et brevets
sous licence de Fraunhofer IIS et Thomson.
• Google Play et Android sont des marques commerciales
de Google LLC.
• Apple, le logo Apple, iPhone et Mac sont des marques
commerciales d'Apple Inc., déposées aux États-Unis et
dans d'autres pays.
AppStore est une marque de service d'AppleInc.
• L'utilisation du badge Made for Apple signifie qu'un
accessoire a été conçu pour être raccordé spécifiquement
au produit ou aux produits Apple identifiés dans le
badge, et a été certifié par le constructeur pour satisfaire
les normes de performance d'Apple. Apple n'est pas
responsable du fonctionnement de cet appareil ni de sa
conformité avec les consignes et normes de sécurité.
• Modèles iPhone compatibles
iPhone7, iPhone7Plus, iPhoneSE, iPhone6s,
iPhone6sPlus, iPhone6, iPhone6Plus, iPhone5s,
iPhone5c, iPhone5
• La marque et les logos BLUETOOTH® sont des marques
déposées détenues par Bluetooth SIG, Inc. et sont utilisés
sous licence par Sony Corporation. Les autres marques
commerciales et marques déposées sont des marques
commerciales ou des marques déposées de leurs
propriétaires respectifs.
Les autres marques commerciales et marques déposées
apparaissant dans le présent document sont des marques
commerciales ou déposées de leurs propriétaires
respectifs. En outre, «™» et «®» ne sont pas mentionnés
systématiquement dans ce guide.
This product is protected by certain intellectual property
rights of Microsoft Corporation. Use or distribution of such
technology outside of this product is prohibited without
a license from Microsoft or an authorized Microsoft
subsidiary.
Le «Sound Organizer 2» utilise des modules logiciels
indiqués ci-dessous :
Windows Media Format Runtime
Remarques sur la Licence
Cet enregistreur IC est doté de logiciels qui sont utilisés sur
la base de contrats de licence avec les propriétaires de ces
logiciels.
À la demande des détenteurs des droits d’auteur de ces
applications logicielles, nous sommes dans l’obligation de
vous communiquer les informations suivantes.
Veuillez lire les sections suivantes.
Les licences (en anglais) sont enregistrées dans la mémoire
intégrée de votre enregistreur IC.
Stockage de masse entre l’enregistreur IC et un ordinateur
pour lire les licences dans le dossier «LICENSE».
À propos des logiciels sous licence GNU GPL/LGPL
Les logiciels susceptibles d’être couverts par la GNU
General Public License (ci-après désignée par «GPL») ou la
GNU Lesser General Public License (ci-après désignée par
«LGPL») sont inclus dans l’enregistreur IC.
Cette notice vous informe que vous avez un droit d’accès,
de modification et de redistribution du code source pour
ces programmes logiciels conformément aux conditions de
la licence GPL/LGPL fournie.
Vous trouverez le code source sur Internet. Utilisez l’URL
suivante pour le télécharger.
http://www.sony.net/Products/Linux/
Nous préférerions que vous ne nous contactiez pas à
propos du contenu du code source.
Les licences (en anglais) sont enregistrées dans la mémoire
intégrée de votre enregistreur IC. Établissez une connexion
Stockage de masse entre l’enregistreur IC et un ordinateur
pour lire les licences dans le dossier «LICENSE».