Toro 53cm Super Bagger Lawn Mower User manual
- Category
- Lawnmowers
- Type
- User manual

FormNo.3419-100RevD
53cmSuperBaggerLawnMower
20899
SuperBagger-Rasenmäher(53cm)
20899
TondeuseSuperBaggerde53cm
20899
SuperBaggergazonmaaiervan53cm
20899
www.T oro.com.
*3419-100*D

FormNo.3418-989RevD
53cmSuperBaggerLawnMower
ModelNo.20899—SerialNo.401000000andUp
Operator'sManual
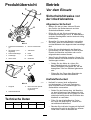
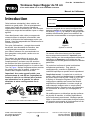
Introduction
Thisrotary-blade,walk-behindlawnmowerisintended
tobeusedbyresidentialhomeowners.Itisdesigned
primarilyforcuttinggrassonwell-maintainedlawns
onresidentialproperties.Itisnotdesignedforcutting
brushorforagriculturaluses.
Readthisinformationcarefullytolearnhowtooperate
andmaintainyourproductproperlyandtoavoid
injuryandproductdamage.Youareresponsiblefor
operatingtheproductproperlyandsafely.
Visitwww.Toro.comformoreinformation,including
safetytips,trainingmaterials,accessoryinformation,
helpndingadealer,ortoregisteryourproduct.
Wheneveryouneedservice,genuineToroparts,or
additionalinformation,contactanAuthorizedService
DealerorToroCustomerServiceandhavethemodel
andserialnumbersofyourproductready.Figure1
identiesthelocationofthemodelandserialnumbers
ontheproduct.Writethenumbersinthespace
provided.
Important:Withyourmobiledevice,youcan
scantheQRcodeontheserialnumberdecal(if
equipped)toaccesswarranty,parts,andother
productinformation
g226629
Figure1
1.Modelandserialnumberlocation
ModelNo.
SerialNo.
Thismanualidentiespotentialhazardsandhas
safetymessagesidentiedbythesafety-alertsymbol
(Figure2),whichsignalsahazardthatmaycause
seriousinjuryordeathifyoudonotfollowthe
recommendedprecautions.
g000502
Figure2
Safety-alertsymbol
Thismanualuses2wordstohighlightinformation.
Importantcallsattentiontospecialmechanical
informationandNoteemphasizesgeneralinformation
worthyofspecialattention.
ThisproductcomplieswithallrelevantEuropean
directives.Fordetails,seetheseparate
product-specicDeclarationofConformity(DOC)
sheet.
GrossorNetTorque:Thegrossornettorque
ofthisenginewaslaboratoryratedbytheengine
manufacturerinaccordancewiththeSocietyof
AutomotiveEngineers(SAE)J1940orJ2723.As
conguredtomeetsafety,emission,andoperating
requirements,theactualenginetorqueonthisclass
ofmowerwillbesignicantlylower.Pleasereferto
theenginemanufacturer’sinformationincludedwith
themachine.
Donottamperwithordisablesafetydevicesonthe
machine,andchecktheirproperoperationregularly.
Donotattempttoadjustortamperwiththeengine
speedcontrol;doingsomaycreateanunsafe
operatingcondition,resultinginpersonalinjury.
©2020—TheToro®Company
8111LyndaleAvenueSouth
Bloomington,MN55420
Registeratwww.T oro.com.
OriginalInstructions(EN)
PrintedinMexico
AllRightsReserved
*3418-989*D

Contents
Introduction...............................................................1
Safety.......................................................................2
GeneralSafety...................................................2
SafetyandInstructionalDecals..........................3
Setup........................................................................4
1UnfoldingtheHandle.......................................4
2InstallingtheRecoil-StarterRopeinthe
RopeGuide.....................................................4
3FillingtheEnginewithOil.................................5
4InstallingtheMulchPlugortheGrass
Bag.................................................................5
5AssemblingtheGrassBag...............................7
ProductOverview.....................................................8
Specications....................................................8
Operation..................................................................8
BeforeOperation...................................................8
BeforeOperationSafety.....................................8
FillingtheFuelT ank............................................9
CheckingtheEngine-OilLevel............................9
AdjustingtheUpperHandleHeight...................10
AdjustingtheCuttingHeight.............................10
DuringOperation.................................................10
DuringOperationSafety...................................10
StartingtheEngine............................................11
UsingtheSelf-PropelDrive...............................12
ShuttingOfftheEngine.....................................12
MulchingtheClippings......................................12
BaggingtheClippings.......................................13
Side-DischargingtheClippings.........................14
OperatingTips.................................................15
AfterOperation....................................................15
AfterOperationSafety......................................15
CleaningundertheMachine.............................15
FoldingtheHandle...........................................16
Maintenance...........................................................17
RecommendedMaintenanceSchedule(s)...........17
MaintenanceSafety..........................................17
PreparingforMaintenance...............................17
ServicingtheAirFilter.......................................18
ChangingtheEngineOil...................................18
LubricatingtheUpperHandle...........................19
AdjustingtheSelf-PropelDrive.........................19
ReplacingtheBlade..........................................20
Storage...................................................................22
PreparingtheMachineforStorage...................22
RemovingtheMachinefromStorage................22
Safety
Thismachinehasbeendesignedinaccordancewith
ENISO5395:2013.
GeneralSafety
Thisproductiscapableofamputatinghandsand
feetandofthrowingobjects.Alwaysfollowallsafety
instructionstoavoidseriouspersonalinjury.
Usingthisproductforpurposesotherthanitsintended
usecouldprovedangeroustoyouandbystanders.
•Read,understand,andfollowtheinstructions
andwarningsinthisOperator’sManualandon
themachineandattachmentsbeforestartingthe
engine.
•Donotputyourhandsorfeetnearmovingpartsof
orunderthemachine.Keepclearofanydischarge
opening.
•Donotoperatethemachinewithoutallguards
andothersafetyprotectivedevicesinplaceand
workingonthemachine.
•Keepbystandersandchildrenasafedistance
awayfromthemachine.Donotallowchildrento
operatethemachine.Allowonlypeoplewhoare
responsible,trained,familiarwiththeinstructions,
andphysicallycapabletooperatethemachine.
•Stopthemachine,shutofftheengine,andwaitfor
allmovingpartstostopbeforeservicing,fueling,
oruncloggingthemachine.
Improperlyusingormaintainingthismachinecan
resultininjury.Toreducethepotentialforinjury,
complywiththesesafetyinstructionsandalwayspay
attentiontothesafety-alertsymbol,whichmeans
Caution,Warning,orDanger—personalsafety
instruction.Failuretocomplywiththeseinstructions
mayresultinpersonalinjuryordeath.
Youcanndadditionalsafetyinformationwhere
neededthroughoutthismanual.
2

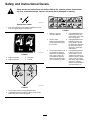
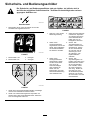
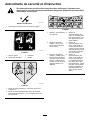
SafetyandInstructionalDecals
Safetydecalsandinstructionsareeasilyvisibletotheoperatorandarelocatednear
anyareaofpotentialdanger.Replaceanydecalthatisdamagedormissing.
decaloemmarkt
Manufacturer'sMark
1.Thismarkindicatesthatthebladeisidentiedasapart
fromtheoriginalmachinemanufacturer.
decal110-9457
110-9457
1.EngineswitchOff
3.Unlocked
2.EngineswitchOn
4.Locked
decal112-8760
112-8760
1.Thrownobjecthazard—keepbystandersaway.
2.Cutting/dismembermenthazardofhandorfoot,mower
blade—stayawayfrommovingparts.
decal114-2820
114-2820
1.Warning—readthe
Operator'sManual.
4.Cutting/dismemberment
hazardofhandorfoot,
mowerblade—stayaway
frommovingparts.
2.Thrownobject
hazard—keepbystanders
asafedistanceawayfrom
themachine.
5.Cutting/dismemberment
hazardofhandorfoot,
mowerblade—remove
theignitionkeyandread
theinstructionsbefore
servicingorperforming
maintenance.
3.Thrownobjecthazard—do
notoperatethemachine
withouttherear-discharge
plugorbaginplace;do
notoperatethemachine
withouttheside-discharge
coverordeectorinplace.
6.Cutting/dismemberment
hazardofhandorfoot,
mowerblade—donot
operatethemachineup
anddownslopes;operate
itsidetosideonslopes;
shutofftheenginebefore
leavingtheoperating
position;andlookbehind
youwhenbackingup.
3

decal121-2370
121–2370
1.Handleinraisedposition3.Footpedallocation
2.Handleinloweredposition
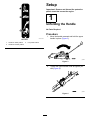
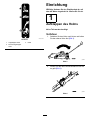
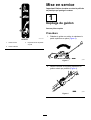
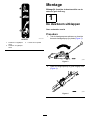
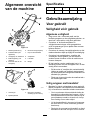
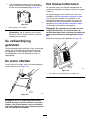
Setup
Important:Removeanddiscardtheprotective
plasticsheetthatcoverstheengine.
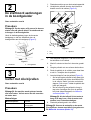
1
UnfoldingtheHandle
NoPartsRequired
Procedure
1.Movethehandlerearwardandholdtheupper
handleinplace(Figure3).
g010260
Figure3
2.Tightentheupperhandleknobastightasyou
can(Figure4).
g020803
Figure4
4

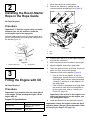
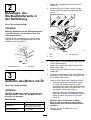
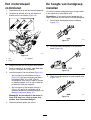
2
InstallingtheRecoil-Starter
RopeintheRopeGuide
NoPartsRequired
Procedure
Important:Tostarttheenginesafelyandeasily
wheneveryouusethemachine,installthe
recoil-starterropeintheropeguide.
Holdtheblade-controlbartotheupperhandleand
pulltherecoil-starterropethroughtheropeguideon
thehandle(Figure5).
g003251
Figure5
1.Recoil-starterrope2.Ropeguide
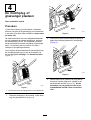
3
FillingtheEnginewithOil
NoPartsRequired
Procedure
Important:Yourmachinedoesnotcomewithoil
intheengine.Beforestartingtheengine,llthe
enginewithoil.
EngineOilSpecications
Engineoilcapacity
0.55L(18.6oz)
OilviscositySAE30orSAE10W-30
detergentoil
APIserviceclassicationSJorhigher
1.Movethemachinetoalevelsurface.
2.Removethedipstickbyrotatingthecap
counterclockwiseandpullingitout(Figure6).
g232743
Figure6
1.Full3.Add
2.High
3.Carefullypourabout3/4oftheenginecapacity
ofoilintotheoil-lltube.
4.Wait3minutesfortheoiltosettleintheengine.
5.Wipethedipstickcleanwithacleancloth.
6.Insertthedipstickintotheoil-lltube,butdonot
screwitin,thenremovethedipstick.
7.Readtheoillevelonthedipstick(Figure6).
•Iftheoillevelonthedipstickistoolow,
carefullypourasmallamountofoilintothe
oil-lltube,wait3minutes,andrepeatsteps
5through7untiltheoilonthedipstickisat
thecorrectlevel.
•Iftheoillevelonthedipstickistoohigh,drain
theexcessoiluntiltheoilonthedipstickis
atthecorrectlevel;refertoChangingthe
EngineOil(page18).
Important:Iftheoillevelintheengineistoo
lowortoohighandyouruntheengine,you
maydamagetheengine.
8.Installthedipstickintotheoil-lltubesecurely.
Important:Changetheengineoilaftertherst5
operatinghours;changeityearlythereafter.Refer
toChangingtheEngineOil(page18).
5

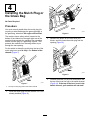
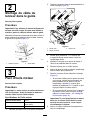
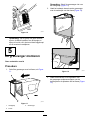
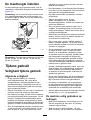
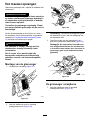
4
InstallingtheMulchPlugor
theGrassBag
NoPartsRequired
Procedure
Youmustcorrectlyinstalleitherthemulchplug(for
recyclingorside-dischargingthegrassclippings)or
thegrassbag;otherwise,theenginewillnotstart.
Themachinehasasafetyswitch(locatedatthe
bottomofthechannelontheupperrightrearofthe
machine)thatpreventsthemachinefromoperating
withoutamulchplugoragrassbaginplace.This
preventsthemachinefromthrowingdebrisatyou
throughtherearopening.
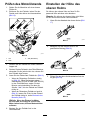
Fortheswitchtodetectthemulchplug,thetopofthe
mulchpluglevermustliefullyinthebottomofthe
channel(Figure7).
g005324
Figure7
1.Thetopofmulchplugleverintheswitchchannel
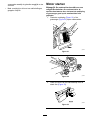
1.Insertthemulchplugintothemachineifitisnot
alreadyinstalled(Figure8).
g005308
Figure8
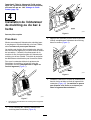
2.Squeezethebuttonontheleverwithyour
thumb,andfullyinsertthemulchplugintothe
opening(Figure9).
g005309
Figure9
3.Releasethebuttonontheleverandensurethat
thetopoftheleverliesfullyintheswitchchannel
(Figure10).Ifthetopoftheleverisnotinthe
switchchannel,yourmachinewillnotstart!
6

g005310
Figure10
Note:Iftheleverdoesnotlatchproperly,
disconnectthewirefromthesparkplugand
checkforandremoveanydebrisbuildupinthe
tunnel.
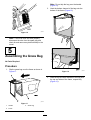
5
AssemblingtheGrassBag
NoPartsRequired
Procedure
1.Slipthegrassbagovertheframeasshownin
Figure11.
g027156
Figure11
1.Handle
3.Grassbag
2.Frame
Note:Donotslipthebagoverthehandle
(Figure11).
2.Hookthebottomchannelofthebagontothe
bottomoftheframe(Figure12).
g027157
Figure12
3.Hookthetopandsidechannelsofthebagonto
thetopandsidesoftheframe,respectively
(Figure12).
7

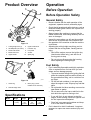
ProductOverview
g012244
Figure13
1.Cutting-heightlever(4)
6.Upper-handleknob
2.Oilll/dipstick(notshown)
7.Fuel-tankcap
3.Recoil-starthandle8.Footpedal
4.Blade-controlbar
9.Airlter
5.Upperhandle
10.Sparkplug
g005325
Figure14
1.Grassbag3.Mulchplug(comes
installedonthemachine)
2.Side-dischargechute
Specications
ModelWeightLengthWidthHeight
2089934kg
(75lb)
159cm
(63
inches)
56cm
(22
inches)
110cm
(43
inches)
Operation
BeforeOperation
BeforeOperationSafety
GeneralSafety
•Becomefamiliarwiththesafeoperationofthe
equipment,operatorcontrols,andsafetysigns.
•Checkthatallguardsandsafetydevices,suchas
deectorsand/orgrasscatcher,areinplaceand
workingproperly.
•Alwaysinspectthemachinetoensurethatthe
blades,bladebolts,andcuttingassemblyarenot
wornordamaged.
•Inspecttheareawhereyouwillusethemachine,
andremoveallobjectsthatcouldinterferewith
theoperationofthemachineorthatthemachine
couldthrow.
•Adjustingthecuttingheightmaybringyouinto
contactwiththemovingblade,causingserious
injury.
–Shutofftheengine,removetheignitionkey
(electric-startmodelonly),andwaitforall
movingpartstostop.
–Donotputyourngersunderthehousing
whenadjustingthecuttingheight.
FuelSafety
•Fuelisextremelyammableandhighlyexplosive.
Areorexplosionfromfuelcanburnyouand
othersandcandamageproperty.
–Topreventastaticchargefromignitingthefuel,
placethecontainerand/ormachinedirectlyon
thegroundbeforelling,notinavehicleoron
anobject.
–Fillthefueltankoutdoors,inanopenarea,
whentheengineiscold.Wipeupanyfuelthat
spills.
–Donothandlefuelwhensmokingoraroundan
openameorsparks.
–Donotremovethefuelcaporaddfueltothe
tankwhiletheengineisrunningorhot.
–Ifyouspillfuel,donotattempttostartthe
engine.Avoidcreatingasourceofignitionuntil
thefuelvaporshavedissipated.
–Storefuelinanapprovedcontainerandkeep
itoutofthereachofchildren.
•Fuelisharmfulorfatalifswallowed.Long-term
exposuretovaporscancauseseriousinjuryand
illness.
8

–Avoidprolongedbreathingofvapors.
–Keepyourhandsandfaceawayfromthe
nozzleandthefuel-tankopening.
–Keepfuelawayfromyoureyesandskin.
FillingtheFuelTank
•Forbestresults,useonlyclean,fresh,unleaded
gasolinewithanoctaneratingof87orhigher
((R+M)/2ratingmethod).
•Oxygenatedfuelwithupto10%ethanolor15%
MTBEbyvolumeisacceptable.
•Donotuseethanolblendsofgasoline,such
asE15orE85,withmorethan10%ethanolby
volume.Performanceproblemsand/orengine
damagemayresult,whichmaynotbecovered
underwarranty.
•Donotusegasolinecontainingmethanol.
•Donotstorefueleitherinthefueltankorinfuel
containersoverthewinterunlessfuelstabilizer
hasbeenaddedtothefuel.
•Donotaddoiltogasoline.
Fillthefueltankwithfreshunleadedregulargasoline
fromamajorname-brandservicestation(Figure15).
Important:Toreducestartingproblems,add
fuelstabilizertothegasolineallseason.Mixthe
stabilizerwithgasolinelessthan30daysold.
Refertoyourengineowner’smanualforadditional
information.
g230458
Figure15
CheckingtheEngine-Oil
Level
1.Movethemachinetoalevelsurface.
2.Removethedipstickbyrotatingthecap
counterclockwiseandpullingitout(Figure16).
g232743
Figure16
1.Full3.Add
2.High
3.Wipethedipstickcleanwithacleancloth.
4.Insertthedipstickintotheoil-lltube,butdonot
screwitin,thenremovethedipstick.
5.Readtheoillevelonthedipstick(Figure16).
•Iftheoillevelonthedipstickistoolow
(Figure16),carefullypourasmallamount
ofSAE30orSAE10W-30detergentoilinto
theoil-lltube,wait3minutes,andrepeat
steps3through5untiltheoilonthedipstick
isatthecorrectlevel.
•Iftheoillevelonthedipstickistoohigh
(Figure16),draintheexcessoiluntiltheoil
onthedipstickisatthecorrectlevel;referto
ChangingtheEngineOil(page18).
Important:Iftheoillevelintheengineistoo
lowortoohighandyouruntheengine,you
maydamagetheengine.
6.Installthedipstickintotheoil-lltubesecurely.
9

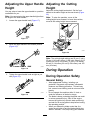
AdjustingtheUpperHandle
Height
Youmayraiseorlowertheupperhandletoaposition
comfortableforyou.
Note:Youcannotraisetheupperhandlehigherthan
theangleofthelowerhandle.
1.Loosentheupper-handleknob(Figure17).
g010334
Figure17
2.Movetheupperhandletothedesiredposition
(Figure18).
g010265
Figure18
3.Tightentheupperhandleknobastightasyou
can(Figure19).
g010352
Figure19
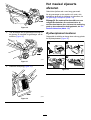
AdjustingtheCutting
Height
Adjustthecuttingheightasdesired.Setthefront
wheelstothesameheightastherearwheels(Figure
20).
Note:Toraisethemachine,moveallthe
cutting-heightleversforward;tolowerthemachine,
moveallthecutting-heightleversrearward.
g010264
Figure20
Note:Thecutting-heightsettingsare25mm(1inch);
35mm(1-3/8inch);44mm(1-3/4inch);54mm(2-1/8
inches);64mm(2-1/2inches);73mm(2-7/8inches);
83mm(3-1/4inches);92mm(3-5/8inches);and102
mm(4inches).
DuringOperation
DuringOperationSafety
GeneralSafety
•Wearappropriateclothing,includingeye
protection;longpants;slip-resistant,substantial
footwear;andhearingprotection.Tiebacklong
hair,securelooseclothing,anddonotwearloose
jewelry.
•Donotoperatethemachinewhileill,tired,or
undertheinuenceofalcoholordrugs.
•Thebladeissharp;contactingthebladecanresult
inseriouspersonalinjury.Shutofftheengine,
removetheignitionkey(electric-startmodelonly),
andwaitforallmovingpartstostopbeforeleaving
theoperatingposition.
•Whenyoureleasetheblade-controlbar,the
engineshouldshutoffandthebladeshouldstop
within3seconds.Ifnot,stopusingyourmachine
10

immediatelyandcontactanAuthorizedService
Dealer.
•Keepbystanders,especiallysmallchildren,outof
theoperatingarea.Stopthemachineifanyone
entersthearea.
•Alwayslookdownandbehindyoubeforemoving
themachineinreverse.
•Operatethemachineonlyingoodvisibilityand
appropriateweatherconditions.Donotoperate
themachinewhenthereistheriskoflighting.
•Wetgrassorleavescancauseseriousinjuryif
youslipandcontacttheblade.Avoidmowingin
wetconditions.
•Useextremecarewhenapproachingblind
corners,shrubs,trees,orotherobjectsthatmay
blockyourview.
•Watchforholes,ruts,bumps,rocks,orother
hiddenobjects.Uneventerraincouldcausethe
machinetooverturnorcauseyoutoloseyour
balanceorfooting.
•Ifthemachinestrikesanobjectorstartstovibrate,
immediatelyshutofftheengine,removethekey
(ifequipped),waitforallmovingpartstostop,and
disconnectthewirefromthesparkplugbefore
examiningthemachinefordamage.Makeall
necessaryrepairsbeforeresumingoperation.
•Beforeleavingtheoperatingposition,shutoff
theengine,removetheignitionkey(electric-start
modelonly),andwaitforallmovingpartstostop.
•Iftheenginehasbeenrunningthemuferwillbe
hotandcanseverelyburnyou.Keepawayfrom
thehotmufer.
•Checkthegrasscatchercomponentsand
thedischargechutefrequentlyforanywear
ordeteriorationandreplacethemwiththe
manufacturer'srecommendedpartswhen
necessary.
•Useaccessoriesandattachmentsapprovedby
ExmarkMfg.Co.,Inc.only.
SlopeSafety
•Mowacrossthefaceofslopes;neverupand
down.Useextremecautionwhenchanging
directiononslopes.
•Donotmowonexcessivelysteepslopes.Poor
footingcouldcauseaslip-and-fallaccident.
•Mowwithcautionneardrop-offs,ditches,or
embankments.
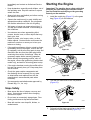
StartingtheEngine
Important:Themachinehasasafetyswitchthat
preventsyoufromstartingthemachineunless
yourstinstallthemulchplugorthegrassbag
securelyonthemachine.
1.Installthemulchplug(Figure21)orthegrass
bag(Figure22)onthemachine.
g005309
Figure21
g010266
Figure22
2.TurnthefuelvalvelevertotheONposition
(Figure23).
g002896
Figure23
3.Pullandholdtheblade-controlbartothehandle
andpulltherecoil-starthandle(Figure24).
11

g010335
Figure24
1.Blade-controlbar
Note:Ifthemachinestilldoesnotstart,contact
anAuthorizedServiceDealer.
UsingtheSelf-PropelDrive
Tooperatetheself-propeldrive,simplywalkwithyour
handsontheupperhandleandyourelbowsatyour
sides,andthemachinewillautomaticallykeeppace
withyou.
ShuttingOfftheEngine
Toshutofftheengine,releasetheblade-controlbar
(Figure25).
g010348
Figure25
Important:Whenyoureleasetheblade-control
bar,theengineshouldshutoffandtheblade
shouldstopwithin3seconds.Iftheydonot,stop
usingyourmachineimmediatelyandcontactan
AuthorizedServiceDealer.
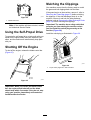
MulchingtheClippings
Yourmachinecomesfromthefactoryreadytomulch
thegrassandleafclippingsbackintothelawn.
Ifthegrassbagisonthemachine,removeit;referto
RemovingtheGrassBag(page13)beforemulching
theclippings.Iftheside-dischargechuteisonthe
machine,removeitandlocktheside-discharge
deector;refertoRemovingtheSide-DischargeChute
(page15)beforemulchingtheclippings.
Important:Themachinehasasafetyswitchthat
preventsyoufromstartingthemachineunless
yourstinstallthemulchplugsecurelyonthe
machine(Figure26).
InstallthemulchplugasillustratedinFigure26.
g005324
Figure26
1.Topofmulchplugleverinswitchchannel
12

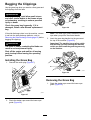
BaggingtheClippings
Usethegrassbagwhenyouwanttocollectgrassand
leafclippingsfromthelawn.
WARNING
Aworngrassbagcouldallowsmallstones
andothersimilardebristobethrownatyou
orbystanders,resultinginseriouspersonal
injuryordeath.
Checkthegrassbagfrequently.Ifitis
damaged,installanewExmarkreplacement
bag.
Iftheside-dischargechuteisonthemachine,remove
itandlocktheside-dischargedeector;referto
RemovingtheSide-DischargeChute(page15)before
baggingtheclippings.
WARNING
Thebladeissharp;contactingthebladecan
resultinseriouspersonalinjury.
Shutofftheengineandwaitforallmoving
partstostopbeforeleavingtheoperating
position.
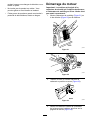
InstallingtheGrassBag
1.Removethemulchplug(Figure27).
g005309
Figure27
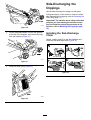
2.Routethestarterropearoundthelower-rope
guide(Figure28).
g010267
Figure28
Note:Thelowerropeguidereleasesthestarter
ropewhenyoupulltherecoil-starthandle.
3.Insertthegrass-baghandleintothegroovesat
thetopofthemachine(Figure29).
Important:Themachinehasasafetyswitch
thatpreventsyoufromstartingthemachine
unlessyourstinstallthegrassbagsecurely
onthemachine.
g010268
Figure29
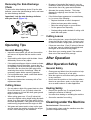
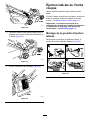
RemovingtheGrassBag
1.Routethestarterropearoundthelower-rope
guide(Figure30).
13

g010269
Figure30
2.Liftthegrass-baghandleoutfromthegrooves
atthetopofthemachine,andremovethebag
fromthemachine(Figure31).
g010270
Figure31
3.Insertthemulchplug(Figure32).
g005309
Figure32
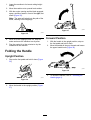
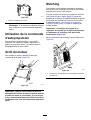
Side-Dischargingthe
Clippings
Usethesidedischargeforcuttingverytallgrass.
Ifthegrassbagisonthemachine,removeitbefore
side-dischargingtheclippings;refertoRemovingthe
GrassBag(page13).
Important:Themachinehasasafetyswitchthat
preventsyoufromstartingthemachineunless
yourstinstallthemulchplugsecurelyonthe
machine;refertoMulchingtheClippings(page
12).
InstallingtheSide-Discharge
Chute
Unlock,unlatch,andliftupthesidedeectorand
installtheside-dischargechute(Figure33).
g236532
Figure33
14

RemovingtheSide-Discharge
Chute
Toremovetheside-dischargechute,liftuptheside
deector,removetheside-dischargechute,andlower
theside-dischargedeector.
Important:Locktheside-dischargedeector
afteryoucloseit(Figure34).
g231921
Figure34
OperatingTips
GeneralMowingTips
•Inspecttheareawhereyouwillusethemachine
andremoveallobjectsthatthemachinecould
throw.
•Avoidstrikingsolidobjectswiththeblade.Never
deliberatelymowoveranyobject.
•Ifthemachinestrikesanobjectorstartstovibrate,
immediatelyshutofftheengine,removethekey
(ifequipped),waitforallmovingpartstostop,and
disconnectthewirefromthesparkplugbefore
examiningthemachinefordamage.Makeall
necessaryrepairsbeforeresumingoperation.
•Forbestperformance,installanewbladebefore
thecuttingseasonbegins.
•ReplacethebladewhennecessarywithaT oro
replacementblade.
CuttingGrass
•Cutonlyaboutathirdofthegrassbladeatatime.
Donotcutbelow51mm(2inches)unlessthe
grassissparseoritislatefallwhengrassgrowth
beginstoslowdown.
•Whencuttinggrassover15cm(6inches)tall,
mowatthehighestcuttingheightsettingandwalk
slower;thenmowagainatalowersettingforthe
bestlawnappearance.Ifthegrassistoolong,the
machinemayplugandcausetheenginetostall.
•Wetgrassandleavestendtoclumpontheyard
andcancausethemachinetoplugortheengine
tostall.Avoidmowinginwetconditions.
•Beawareofapotentialrehazardinverydry
conditions,followalllocalrewarnings,andkeep
themachinefreeofdrygrassandleafdebris.
•Alternatethemowingdirection.Thishelps
dispersetheclippingsoverthelawnforeven
fertilization.
•Ifthenishedlawnappearanceisunsatisfactory,
try1ormoreofthefollowing:
–Replacethebladeorhaveitsharpened.
–Walkataslowerpacewhilemowing.
–Raisethecuttingheightonyourmachine.
–Cutthegrassmorefrequently.
–Overlapcuttingswathsinsteadofcuttingafull
swathwitheachpass.
CuttingLeaves
•Aftercuttingthelawn,ensurethathalfofthelawn
showsthroughthecutleafcover.Youmayneed
tomakemorethanasinglepassovertheleaves.
•Iftherearemorethan13cm(5inches)ofleaves
onthelawn,mowatahighercuttingheightand
thenagainatthedesiredcuttingheight.
•Slowdownyourmowingspeedifthemachine
doesnotcuttheleavesnelyenough.
AfterOperation
AfterOperationSafety
GeneralSafety
•Cleangrassanddebrisfromthemachinetohelp
preventres.Cleanupoilorfuelspills.
•Allowtheenginetocoolbeforestoringthemachine
inanyenclosure.
•Neverstorethemachineorfuelcontainerwhere
thereisanopename,spark,orpilotlight,such
asonawaterheateroronotherappliances.
HaulingSafety
•Removetheignitionkey(ifequipped)before
loadingthemachineforhauling.
•Usecarewhenloadingorunloadingthemachine.
•Securethemachinefromrolling.
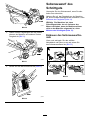
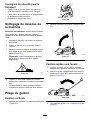
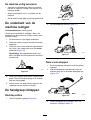
CleaningundertheMachine
ServiceInterval:Aftereachuse
Forbestresults,cleanunderthemachinesoonafter
youhavecompletedmowing.
15

1.Lowerthemachinetoitslowestcutting-height
setting.
2.Movethemachineontoapavedlevelsurface.
3.Withtheenginerunningandthebladeengaged,
sprayastreamofwaterinfrontoftheright,rear
wheel(Figure35).
Note:Thewaterwillsplashintothepathofthe
blade,cleaningouttheclippings.
g002600
Figure35
4.Whennomoreclippingscomeout,stopthe
waterandmovethemachinetoadryarea.
5.Runtheengineforafewminutestodrythe
undersideofthemachine.
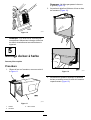
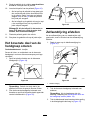
FoldingtheHandle
UprightPosition
1.Steponthefootpedalandholditdown(Figure
36).
g002773
Figure36
2.Movethehandletotheuprightposition(Figure
37).
g020809
Figure37
ForwardPosition
1.Withthehandleintheuprightposition,stepon
thefootpedalandholditdown.
2.Movethehandleallthewayforwardandloosen
theupperhandleknob(Figure38).
g010273
Figure38
3.Tounfoldthehandle,referto1Unfoldingthe
Handle(page4).
16

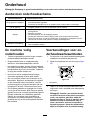
Maintenance
Important:Refertoyourengineowner’smanualforadditionalmaintenanceprocedures.
RecommendedMaintenanceSchedule(s)
MaintenanceService
Interval
MaintenanceProcedure
Beforeeachuseordaily
•Ensurethattheengineshutsoffwithin3secondsafterreleasingtheblade-control
bar.
•Checktheairlterfordirtanddamageandcleanorreplaceitifnecessary.
Aftereachuse
•Cleangrassclippingsanddirtfromunderthemachine.
Yearly
•Cleanorreplacetheairlter(morefrequentlyindustyoperatingconditions).
•Changetheengineoil.
•Lubricatetheupperhandle.
•Replacethebladeorhaveitsharpened(morefrequentlyiftheedgedullsquickly).
•Cleantheenginebyremovingdirtanddebrisfromitstopandsides;cleanitmore
frequentlyindustyoperatingconditions.
Yearlyorbeforestorage
•Emptythefueltankbeforerepairsasdirectedandbeforeyearlystorage.
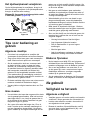
MaintenanceSafety
•Disconnectthespark-plugwirefromthesparkplug
beforeperforminganymaintenanceprocedure.
•Wearglovesandeyeprotectionwhenservicing
themachine.
•Thebladeissharp;contactingthebladecanresult
inseriouspersonalinjury.Weargloveswhen
servicingtheblade.Donotrepairoralterthe
blade(s).
•Nevertamperwithsafetydevices.Checktheir
properoperationregularly.
•Tippingthemachinemaycausethefueltoleak.
Fuelisammableandexplosive,andcancause
personalinjury.Runtheenginedryorremovethe
fuelwithahandpump;neversiphonthefuel.
•Toensureoptimumperformanceandcontinued
safetycerticationofthemachine,useonly
genuineExmarkreplacementpartsand
accessories.Replacementpartsandaccessories
madebyothermanufacturerscouldbedangerous,
andsuchusecouldvoidtheproductwarranty.
PreparingforMaintenance
1.Shutofftheengineandwaitforallmovingparts
tostop.
2.Disconnectthespark-plugwirefromthespark
plug(Figure39).
g002901
Figure39
1.Spark-plugwire
3.Afterperformingthemaintenanceprocedure(s),
connectthespark-plugwiretothesparkplug.
Important:Beforetippingthemachineto
changetheoilorreplacetheblade,allowthe
fueltanktorundrythroughnormalusage.If
youmusttipthemachinepriortorunning
outoffuel,useahandfuelpumptoremove
thefuel.Alwaystipthemachineontoits
side,withthedipstickdown.
17

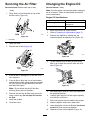
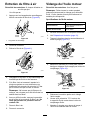
ServicingtheAirFilter
ServiceInterval:Beforeeachuseordaily
Yearly
1.Pressdownonthelatchtabsontopofthe
air-ltercover(Figure40).
g002902
Figure40
1.Latchtabs
2.Openthecover.
3.Removetheairlter(Figure41).
g002903
Figure41
4.Iftheairlterisdamagedoriswetwithoilor
fuel,replaceit.
5.Iftheairlterisdirty,tapitonahardsurface
severaltimesorblowcompressedairlessthan
207kPa(30psi)throughthesideofthelter
thatfacestheengine.
Note:Donotbrushthedirtoffthelter;
brushingforcesdirtintothebers.
6.Removedirtfromtheair-lterbodyandcover
usingamoistrag.Donotwipedirtintothe
airduct.
7.Installtheairlter.
8.Closethecover.
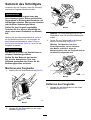
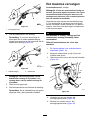
ChangingtheEngineOil
ServiceInterval:Yearly
Note:Runtheengineafewminutesbeforechanging
theoiltowarmit.Warmoilowsbetterandcarries
morecontaminants.
EngineOilSpecications
Engineoilcapacity
0.55L(18.6oz)
OilviscositySAE30orSAE10W-30
detergentoil
APIserviceclassicationSJorhigher
1.Movethemachinetoalevelsurface.
2.RefertoPreparingforMaintenance(page17).
3.Removethedipstickbyrotatingthecap
counterclockwiseandpullingitout(Figure42).
g010271
Figure42
4.Tipthemachineontoitsside(sothattheair
lterisup)todraintheusedoilfromtheoil-ll
tube(Figure42).
g010272
Figure43
5.Afterdrainingtheusedoil,returnthemachineto
theoperatingposition.
6.Carefullypourabout3/4oftheenginecapacity
ofoilintotheoil-lltube.
7.Wait3minutesfortheoiltosettleintheengine.
8.Wipethedipstickcleanwithacleancloth.
9.Insertthedipstickintotheoil-lltube,butdonot
screwitin,thenremovethedipstick.
10.Readtheoillevelonthedipstick(Figure16).
18

•Iftheoillevelonthedipstickistoolow,
carefullypourasmallamountofoilintothe
oil-lltube,wait3minutes,andrepeatsteps
8through10untiltheoillevelonthedipstick
iscorrect.
•Iftheoillevelonthedipstickistoohigh,
draintheexcessoiluntiltheoillevelonthe
dipstickiscorrect.
Important:Iftheoillevelintheengineistoo
lowortoohighandyouruntheengine,you
maydamagetheengine.
11.Installthedipstickintotheoil-lltubesecurely.
12.Recycletheusedoilproperly.
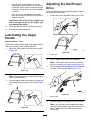
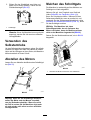
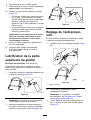
LubricatingtheUpper
Handle
ServiceInterval:Yearly
Lubricatetheleftandrightsidesoftheupperhandle
withalow-viscositysiliconespraylubricant.
1.Spraytheouterplasticendoftheinnerhandle
(Figure44).
g010349
Figure44
Note:Usethestrawthatcomeswiththespray
cantodirectthespray.
2.Pushtheupperhandlefullydownandspraythe
innerplasticsurfaceoftheouterhandle(Figure
45).
g010350
Figure45
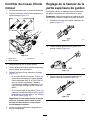
AdjustingtheSelf-Propel
Drive
Ifyourmachinedoesnotself-propelproperly,adjust
theself-propel-drivecable.
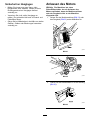
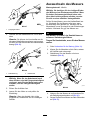
1.Loosenthenutonthecablemount(Figure46).
g010351
Figure46
1.Cablemount
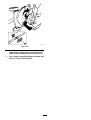
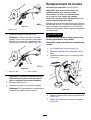
2.Pulltheupperhandlebackfullyrearward.
Note:Ifthehandledoesnotmovesmoothly,
refertoLubricatingtheUpperHandle(page19).
3.Pullthecablejacketdownwarduntilyouremove
theslackintheexposedcable(Figure47).
g007744
Figure47
1.Exposedcable
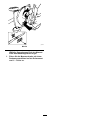
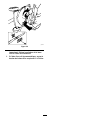
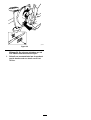
4.Pushthecablejacketupward3mm(1/8inch).
Note:Youcanplacearuleragainsttheupper
sideoftheblackcablemountandmeasurehow
fartheupperendofthecablejacketmoves
(Figure48).
19
Page is loading ...
Page is loading ...
Page is loading ...
Page is loading ...
Page is loading ...
Page is loading ...
Page is loading ...
Page is loading ...
Page is loading ...
Page is loading ...
Page is loading ...
Page is loading ...
Page is loading ...
Page is loading ...
Page is loading ...
Page is loading ...
Page is loading ...
Page is loading ...
Page is loading ...
Page is loading ...
Page is loading ...
Page is loading ...
Page is loading ...
Page is loading ...
Page is loading ...
Page is loading ...
Page is loading ...
Page is loading ...
Page is loading ...
Page is loading ...
Page is loading ...
Page is loading ...
Page is loading ...
Page is loading ...
Page is loading ...
Page is loading ...
Page is loading ...
Page is loading ...
Page is loading ...
Page is loading ...
Page is loading ...
Page is loading ...
Page is loading ...
Page is loading ...
Page is loading ...
Page is loading ...
Page is loading ...
Page is loading ...
Page is loading ...
Page is loading ...
Page is loading ...
Page is loading ...
Page is loading ...
Page is loading ...
Page is loading ...
Page is loading ...
Page is loading ...
Page is loading ...
Page is loading ...
Page is loading ...
Page is loading ...
Page is loading ...
Page is loading ...
Page is loading ...
Page is loading ...
Page is loading ...
Page is loading ...
Page is loading ...
Page is loading ...
Page is loading ...
Page is loading ...
Page is loading ...
Page is loading ...
Page is loading ...
Page is loading ...
Page is loading ...
-
 1
1
-
 2
2
-
 3
3
-
 4
4
-
 5
5
-
 6
6
-
 7
7
-
 8
8
-
 9
9
-
 10
10
-
 11
11
-
 12
12
-
 13
13
-
 14
14
-
 15
15
-
 16
16
-
 17
17
-
 18
18
-
 19
19
-
 20
20
-
 21
21
-
 22
22
-
 23
23
-
 24
24
-
 25
25
-
 26
26
-
 27
27
-
 28
28
-
 29
29
-
 30
30
-
 31
31
-
 32
32
-
 33
33
-
 34
34
-
 35
35
-
 36
36
-
 37
37
-
 38
38
-
 39
39
-
 40
40
-
 41
41
-
 42
42
-
 43
43
-
 44
44
-
 45
45
-
 46
46
-
 47
47
-
 48
48
-
 49
49
-
 50
50
-
 51
51
-
 52
52
-
 53
53
-
 54
54
-
 55
55
-
 56
56
-
 57
57
-
 58
58
-
 59
59
-
 60
60
-
 61
61
-
 62
62
-
 63
63
-
 64
64
-
 65
65
-
 66
66
-
 67
67
-
 68
68
-
 69
69
-
 70
70
-
 71
71
-
 72
72
-
 73
73
-
 74
74
-
 75
75
-
 76
76
-
 77
77
-
 78
78
-
 79
79
-
 80
80
-
 81
81
-
 82
82
-
 83
83
-
 84
84
-
 85
85
-
 86
86
-
 87
87
-
 88
88
-
 89
89
-
 90
90
-
 91
91
-
 92
92
-
 93
93
-
 94
94
-
 95
95
-
 96
96


Toro 53cm Super Bagger Lawn Mower User manual
- Category
- Lawnmowers
- Type
- User manual
Ask a question and I''ll find the answer in the document
Finding information in a document is now easier with AI
in other languages
Related papers
-
Toro 53cm Recycler Lawn Mower User manual
-
Toro 53cm Super Bagger Lawn Mower User manual
-
Toro 48cm Super Recycler Lawn Mower User manual
-
Toro Super Recycler Lawn Mower User manual
-
-
-
Toro 21in Heavy-Duty Recycler/Rear Bagger Lawn Mower User manual
-
-
-
Other documents
-
Toto 20899 User manual
-
Lawn-Boy Insight 10683 User manual
-
Hayter Mowers 111-2842 Rev B User manual
-
Craftsman 247388250 User manual
-
YARDMAX YG1550 Operating instructions
-
 Exmark exmark 30" User manual
-
 Exmark Quest QST22BE482 User manual
-
-
-
MTD 12A-B2AQ799 Owner's manual

