Domo DO7293S Owner's manual

Category
Robotic vacuum cleaners
Type
Owner's manual
PRODUCT OF
DO7293S
Handleiding Robotstofzuiger
Mode d’emploi Aspirateur robot
Gebrauchsanleitung Staubsauger Roboter
Instruction booklet Robot vacuum cleaner
Manual de instrucciones Robot aspirador
Istruzioni per l’uso Aspirapolvere robot
Návod k použití Robotickývysavač
Návod na použitie Robtickývysávač
Lees aandachtig alle instructies - bewaar deze handleiding voor latere raadpleging.
Lisez attentivement les instructions - gardez le mode d’emploi pour utilisation ultérieur.
Lesen Sie genau die Anweisungen - bewahren Sie die Gebrauchsanleitung für spätere
heranziehung.
Read all instructions carefully - save this instruction manual for future reference.
Lea detenidamente todas las instrucciones - Conserve este manual para futura referencia.
Leggere con attenzione le istruzioni - conservarle per future consultazioni
Před použitím si důkladně přečtěte tento manuál - manuál si uschovejte i pro případ
budoucího nahlédnutí.
Pred použitím si dôkladne prečítajte tento manuál - manuál si uschovajte aj pre prípad
budúceho nahliadnutie.
NL Nederlands 3
FR Français 13
DE Deutsch 23
EN English 33
ES Espagnol 43
IT Italiano 53
CZ Čeština 63
SK Slovenčina 72
5
DO7293S
www.domo-elektro.be
NL
1 2 3
4 5 6
7
4
Product Components
Main Body and Accessories
Item
Description
Quantity
1
Main Body(with standard Dust Bin)
1
2
Charging Station
1
3
Adapter
1
4
Remote Control (battery not included)
1
5
Side Brushes*2 and spare brushes*2
4
6
HEPA Filter(Standard Dust Bin *1, present *1)
2
7
Cleaning Brush
1
8
User Manual
1
1
2
3
4
5
6
7
8
4
Item
Description
Quantity
1
Main Body(with standard Dust Bin)
1
2
Charging Station
1
3
Adapter
1
4
Remote Control (battery not included)
1
5
Side Brushes*2 and spare brushes*2
4
6
HEPA Filter(Standard Dust Bin *1, present *1)
2
7
Cleaning Brush
1
8
User Manual
1
1
2
3
4
5
7
8
4
Product Components
Main Body and Accessories
Item
Description
Quantity
1
Main Body(with standard Dust Bin)
1
2
Charging Station
1
3
Adapter
1
4
Remote Control (battery not included)
1
5
Side Brushes*2 and spare brushes*2
4
6
HEPA Filter(Standard Dust Bin *1, present *1)
2
7
Cleaning Brush
1
8
User Manual
1
1
2
3
4
5
6
7
8
4
Product Components
Main Body and Accessories
Item
Description
Quantity
1
Main Body(with standard Dust Bin)
1
2
Charging Station
1
3
Adapter
1
4
Remote Control (battery not included)
1
5
Side Brushes*2 and spare brushes*2
4
6
HEPA Filter(Standard Dust Bin *1, present *1)
2
7
Cleaning Brush
1
8
User Manual
1
1
2
3
4
5
6
7
8
17
18
19
4
Product Components
Main Body and Accessories
Item
Description
Quantity
1
Main Body(with standard Dust Bin)
1
2
Charging Station
1
3
Adapter
1
4
Remote Control (battery not included)
1
5
Side Brushes*2 and spare brushes*2
4
6
HEPA Filter(Standard Dust Bin *1, present *1)
2
7
Cleaning Brush
1
8
User Manual
1
1
2
3
4
5
6
7
8
20
21
22
· Verwijder grote of scherpe voorwerpen van de vloer vooraleer de vloer te stofzuigen om mogelijke
schade te voorkomen.
· Zuig geen brandende of rokende voorwerpen op, zoals sigaretten, lucifers of hete assen.
· Gebruik de stofzuiger niet zonder reservoir en/of lter.
ONDERDELEN
1. Apparaat
2. Laadstation
3. Afstandsbediening
4. Adapter
5. Stoorstel
6. Zijborstel
7. Stolter HEPA
Apparaat
Bovenkant:
8. Bumper
9. Touchscreenknoppen: aan/uit - home - plan
Onderkant:
10. Aan-uitschakelaar
11. DC ingang
12. Zijborstels
13. Batterij compartiment
14. Contact voor laden batterij
15. Stofopvangbakje
16. Roterende vloerborstel
Stofopvangbakje
17. HEPA lter houder
18. HEPA lter
19. Knop voor het openen van het stofopvangbakje
Laadstation
20. Indicatielampje
21. DC ingang
22. Contact voor laden batterij
Robot Vacuum Cleaner
Model: BL500A
User Manual
Read this booklet thoroughly before using and save it for future reference
8
9
12
13
14
10
11
15
16
6
DO7293S
NL
VOOR HET EERSTE GEBRUIK
· Plaats twee AAA-batterijen in de afstandsbediening.
· Stel de klok in. Zie “Gebruik / Gebruik zonder afstandsbediening / Plan: klok”.
· Laad de robotstofzuiger gedurende 5 uur op voor het eerste gebruik. Zie “Gebruik / Opladen”.
· Plaats de zijborstels op de stofzuiger. Duw ze vast tot je een klik hoort. Op de borstel en het toestel
staat de L (links) en R (rechts), zorg ervoor dat deze overeenkomen.
INSTALLATIE VAN LAADSTATION
1. Plaats het laadstation op een vlakke, harde ondergrond
bv. tegels, parket, kortharig stevig tapijt, tegen een muur
of kast,…
2. Zorg ervoor dat aan de linker- en rechterkant van het
laadstation min. 1 m vrije ruimte is. Voor het laadstation
moet er minstens een vrije ruimte zijn van 2 m (Fig. 1).
Als dit niet het geval is, is het mogelijk dat de stofzuiger,
wanneer hij gaat opladen, het laadstation niet kan vinden.
3. Neem de adapter, steek de stekker in het stopcontact en
steek de DC ingang in het laadstation (Fig. 2).
BELANGRIJK: zorg er steeds voor dat er geen kabels voor of
naast het laadstation liggen, deze zouden kunnen geklemd
raken tussen de wielen of borstels van de stofzuiger.
GEBRUIK
Zet het toestel aan met de aan-uitschakelaar aan de zijkant van het toestel voor gebruik of laden.
STANDBY/SLAAPSTAND/UIT
Standby
Het toestel is in standby-modus wanneer de aan-uitschakelaar aan staat en het toestel in rust is, klaar om
onmiddellijk gebruikt te worden.
Slaapstand
Als het toestel in slaapstand is, moet je het eerst activeren voor je het toestel in werking kan stellen.
Dit doe je door op de aan/uit touchscreenknop op het toestel te duwen of met de ON/OFF knop op de
afstandsbediening.
Het toestel gaat automatisch in slaapstand na 15 minuten in standby-modus. Je kan de slaapstand ook
zelf inschakelen door de aan/uit touchscreenknop op het toestel 3 seconden in te houden.
Uit
Je kan het toestel volledig uitschakelen door in de standby-modus de aan-uitschakelaar aan de zijkant van
het toestel op uit te zetten.
Het toestel schakelt zelf uit na 15 minuten in slaapstand, indien er geen timer ingesteld is.
10
Product Operation
Battery Charging
1. Charging Station Placement
A. Place charging station against the wall,
and remove obstacles about 1m on either
sides and 2m in front of the station. Please
remove obstacles as show in the right figure.
B. If robot is power off, switch on the robot first before charging.
2. Charge t he robot in e ither way as shown below:
A. Plug on e end of the adapter into the robot and the other end into the power sock et as shown
in Fig a.
B. Press the “HOME” button on the remote control or robot to operate the robot looking for the
charging docking automatically as shown in Fig b.
Fig a Fig b
Note:
a. When robot is in charging, the LED panel will gradually show “1111” from left to right.
b. When charging is over, the LED panel will show “FULL”.
c. In standby status, the robot will when the battery level is
low.
d. In working status, the robot will look f or the charging dock automatically when the battery
level is low.
In Order to Extend Battery’s Life
a. Please charge the robot for up to 5 hours during the first charging.
b. Charge the robot as soon as possible when battery capacity is low.
c. The robot will return to the charging dock automatically when cleaning is finished or battery
capacity is low.
d. When you do not use the robot for some time, please fully charge the battery first, then
switch off the robot an d keep it in a cool but dry place.
e. If the robot has been put aside over 3 months, please charge the robot for 5 hours first
before using it for cleaning.
show
Fig. 1
10
Product Operation
Battery Charging
1. Charging Station Placement
A. Place charging station against the wall,
and remove obsta cles about 1m on either
sides and 2m in front of the station. Please
remove obstacles as show in the right figure.
B. If robot is power off, switch on the robot first before charging.
2. Charge the robot in either way as shown below:
A. Plug one end of the adapter into the robot and the other end into the power socket as shown
in Fig a.
B. Press the “HOME” button on the remote control or robot to operate the robot looking for the
charging docking automatically as shown in Fig b.
Fig a Fig b
Note:
a. When robot is in charging, the LED panel will gradually show “1111” from left to right.
b. When charging is over, the LED panel will show “FULL”.
c. In standby status, the robot will when the battery level is
low.
d. In working status, the robot will look for the charging dock automatically when the battery
level is low.
In Order to E xtend Battery’s Life
a. Please charge the robot for up to 5 ho urs during the first charging.
b. Charge the robot as soon as possible when battery capacity is low.
c. The robot will return to the charging dock automatically when cleaning is finished or battery
capacity is low.
d. When you do not use the robot for some time, please fully charge the battery first, then
switch off the robot and keep it in a cool but dry place.
e. If the robot has been put aside over 3 months, please charge the robot for 5 hours first
before using it for cleaning.
show
Fig. 2
10
DO7293S
NL
Opladen zonder oplaadstation
Neem de adapter, steek de stekker in het stopcontact en steek
de DC ingang in het toestel.
· Tijdens het laden:
· Display toont knipperende 1111: het toestel is aan het
laden
· Display toont FULL: het toestel is volledig opgeladen
· Display toont Erro: de aan-uitschakelaar moet aan
staan om op te laden
REINIGING EN ONDERHOUD
REINIGING STOFOPVANGBAKJE EN FILTER
Reinig het stofopvangbakje en de lter na ieder gebruik op volgende wijze:
16
Product Maintenance
Cleaning Side Brushes
Clean the side brush when it become dirty and replace it if it’s damaged. The maximum life span of
the side brush is 12 months.
Note: Before replacing side brushes, check and ensure that the L/R mark on the side brush match
with the L/R mark on the bottom base of the robot.
Cleaning Dust Bin and Filters
Empty and clean the dust bin after each usage following the steps as show in the figures below:
A. Hold the bottom of dust bin, and press down on the button using your
thumb to take out of the dust bin.
B. Take out dust bin.
C. After press down button
and o
pen dust bin upper cover
D. Open dust bin cover and take out the
primary filter and HEPA filter.
E. Empty the dust bin.
F. Wash the dust bin and primary filter under tap water,
clean the HEPA filter with brush, avoid washing it under
water.
G. Assemble primary filter and HEPA filter again into
dust bin.
1
2
3
4
5
6
1. Druk op de knop voor het openen van het stofopvangbakje. Neem het stofopvangbakje uit het
toestel.
2. Open het opvangbakje met de knop voor het openen.
3. Verwijder de HEPA lter, inclusief houder, uit het stofopvangbakje.
4. Ledig het stofopvangbakje boven de afvalemmer.
5. Spoel het stofopvangbakje en de lterhouder onder stromend water. Laat deze drogen vooraleer ze
terug te plaatsen. Maak de HEPA lter schoon met het stoorsteltje.
· Als de HEPA lter vuil is, na ongeveer 30 dagen gebruik, kan je deze ook schoonmaken onder
stromend water. Laat deze drogen vooraleer hem terug te plaatsen.
10
Product Operation
Battery Chargi n g
1. Ch arging Station Placement
A. Place charging station against the wall,
and remove obstacles about 1m on either
sides and 2m in front of the stat ion. Please
remove obstacles as show in the right figure.
B. If robot is power off, switch on the robot first bef ore c harging.
2. Charge the robot in either way as shown below:
A. Plug one end of the adapter into the robot and the other end into the power socket as shown
in Fig a.
B. Press the “HOME button on the remote control or robot to operate the robot looking for the
charging docking automatically as shown in Fig b.
Fig a Fig b
Note:
a. When robot is in charging, the LED panel will gradually show “1111” from left to right.
b. When charging is over, the LED panel will show “FULL”.
c. In standby status, the robot will when the battery le ve l is
low.
d. In working status, the robot will look for the charging dock automatically when the battery
level is low.
In O rd er to Extend Battery’s Life
a. Please charge the robot for up to 5 hours during the first charging.
b. Charge the robot as soon as possible when battery capacity is low.
c. The robot will return to the charging dock automatically when cleaning is finished or battery
capacity is low.
d. When you do not use the robot for some time, please fully charge the battery first, then
switch off the robot and keep it in a cool but dry place.
e. If the robot has been put aside over 3 months, please charge the robot for 5 hours first
before using it for cleaning.
show
15
DO7293S
www.domo-elektro.be
FR
· N’utilisez pas l’aspirateur sans sac et/ou sans ltre.
· CONSERVEZ CES INSTRUCTIONS.
PARTIES
1. Appareil
2. Station de charge
3. Télécommande
4. Adaptateur
5. Brosse nettoyante
6. Brosse latérale
7. Filtre HEPA
Appareil
Partie supérieure:
8. Pare-chocs
9. Touches marche/arrêt -
home - plan sur l’écran tactile
Partie inférieure:
10. Interrupteur allumé/éteint
11. Entrée DC
12. Brosse latérale
13. Compartiment de la batterie
14. Contact pour le chargement de la batterie
15. Réservoir à poussière
16. Brosse pour sols rotative
Réservoir à poussière
17. Support pour ltre HEPA
18. Filtre HEPA
19. Bouton pour ouvrir le réservoir à poussière
Station de charge
20. Témoin lumineux
21. Entrée DC
22. Contact pour le chargement de la batterie
1 2 3
4 5 6
7
4
Product Components
Main Body and Accessories
Item
Description
Quantity
1
Main Body(with standard Dust Bin)
1
2
Charging Station
1
3
Adapter
1
4
Remote Control (battery not included)
1
5
Side Brushes*2 and spare brushes*2
4
6
HEPA Filter(Standard Dust Bin *1, present *1)
2
7
Cleaning Brush
1
8
User Manual
1
1
2
3
4
5
6
7
8
4
Product Components
Main Body and Accessories
Item
Description
Quantity
1
Main Body(with standard Dust Bin)
1
2
Charging Station
1
3
Adapter
1
4
Remote Control (battery not included)
1
5
Side Brushes*2 and spare brushes*2
4
6
HEPA Filter(Standard Dust Bin *1, present *1)
2
7
Cleaning Brush
1
8
User Manual
1
1
2
3
4
5
6
7
8
17
18
19
4
Product Components
Main Body and Accessories
Item
Description
Quantity
1
Main Body(with standard Dust Bin)
1
2
Charging Station
1
3
Adapter
1
4
Remote Control (battery not included)
1
5
Side Brushes*2 and spare brushes*2
4
6
HEPA Filter(Standard Dust Bin *1, present *1)
2
7
Cleaning Brush
1
8
User Manual
1
1
2
3
4
5
6
7
8
20
21
22
Robot Vacuum Cleaner
Model: BL500A
User Manual
Read this booklet thoroughly before using and save it for future reference
8
9
12
13
14
10
11
15
16
16
DO7293S
FR
AVANT LA PREMIÈRE UTILISATION
· Insérez deux piles AAA dans la télécommande.
· Réglez l’horloge (voir « Utilisation/ Utilisation sans télécommande/Plan: horloge »).
· Avant la première utilisation, chargez l’aspirateur robot pendant 5 heures. (voir « Utilisation/
Chargement »).
· Installez les brosses latérales sur l’aspirateur. Appuyez jusqu’à la perception d’un déclic. Assurez-vous
que le L (gauche) et le R (droite) de la brosse et de l’appareil soient bien placés en regard.
INSTALLATION DE LA STATION DE CHARGE
1. Placez la station de charge sur une surface plane et dure,
par exemple un carrelage, un parquet ou un tapis à poils
courts, ou encore contre un mur ou une armoire.
2. Assurez-vous de laisser un espace libre d’au moins 1 m
à gauche et à droite de la station de charge. Prévoyez
également un espace libre de 2 m devant la station
de charge (Fig. 1). À défaut, il se peut que l’aspirateur
ne retrouve pas la station de charge lorsqu’il doit se
recharger.
3. Prenez l’adaptateur, branchez la che secteur dans une
prise de courant, et raccordez la che DC à la station de
charge (Fig. 2).
IMPORTANT : ne laissez jamais de câbles devant ou à côté de la
station de charge ; ceux-ci pourraient se coincer dans les roues
ou les brosses de l’aspirateur.
UTILISATION
Pour utiliser ou charger l’appareil, allumez-le à l’aide du bouton marche/arrêt situé sur le côté.
VEILLE/VEILLE PROLONGÉE/ARRÊT
Veille
Lappareil est en mode veille lorsqu’il est au repos et que le bouton marche/arrêt est allumé. Il est donc
prêt à être utilisé immédiatement.
Veille prolongée
Lorsque l’appareil est en veille prolongée, vous devez l’activer avant de l’utiliser. Pour ce faire, appuyez sur
la touche marche/arrêt située sur l’écran tactile ou sur le bouton ON/OFF de la télécommande.
Lappareil passe automatiquement en mode veille prolongée après 15 minutes en mode veille. Vous
pouvez également activer le mode veille prolongée en maintenant la touche marche/arrêt de l’écran
tactile enfoncée pendant 3 secondes.
Arrêt
Pour éteindre complètement l’appareil en mode veille, appuyez sur le bouton marche/arrêt situé sur le
côté.
En mode veille prolongée, l’appareil s’éteint automatiquement après 15 minutes, sauf si vous avez
programmé la minuterie.
10
Product Operation
Battery Charging
1. Charging Station Placement
A. Place charging station against the wall,
and remove obstacles about 1m on either
sides and 2m in front of the station. Please
remove obstacles as show in the right figure.
B. If robot is power off, switch on the robot first before charging.
2. Charge t he robot in e ither way as shown below:
A. Plug on e end of the adapter into the robot and the other end into the power sock et as shown
in Fig a.
B. Press the “HOME” button on the remote control or robot to operate the robot looking for the
charging docking automatically as shown in Fig b.
Fig a Fig b
Note:
a. When robot is in charging, the LED panel will gradually show “1111” from left to right.
b. When charging is over, the LED panel will show “FULL”.
c. In standby status, the robot will when the battery level is
low.
d. In working status, the robot will look f or the charging dock automatically when the battery
level is low.
In Order to Extend Battery’s Life
a. Please charge the robot for up to 5 hours during the first charging.
b. Charge the robot as soon as possible when battery capacity is low.
c. The robot will return to the charging dock automatically when cleaning is finished or battery
capacity is low.
d. When you do not use the robot for some time, please fully charge the battery first, then
switch off the robot an d keep it in a cool but dry place.
e. If the robot has been put aside over 3 months, please charge the robot for 5 hours first
before using it for cleaning.
show
Fig. 1
10
Product Operation
Battery Charging
1. Charging Station Placement
A. Place charging station against the wall,
and remove obsta cles about 1m on either
sides and 2m in front of the station. Please
remove obstacles as show in the right figure.
B. If robot is power off, switch on the robot first before charging.
2. Charge the robot in either way as shown below:
A. Plug one end of the adapter into the robot and the other end into the power socket as shown
in Fig a.
B. Press the “HOME” button on the remote control or robot to operate the robot looking for the
charging docking automatically as shown in Fig b.
Fig a Fig b
Note:
a. When robot is in charging, the LED panel will gradually show “1111” from left to right.
b. When charging is over, the LED panel will show “FULL”.
c. In standby status, the robot will when the battery level is
low.
d. In working status, the robot will look for the charging dock automatically when the battery
level is low.
In Order to E xtend Battery’s Life
a. Please charge the robot for up to 5 ho urs during the first charging.
b. Charge the robot as soon as possible when battery capacity is low.
c. The robot will return to the charging dock automatically when cleaning is finished or battery
capacity is low.
d. When you do not use the robot for some time, please fully charge the battery first, then
switch off the robot and keep it in a cool but dry place.
e. If the robot has been put aside over 3 months, please charge the robot for 5 hours first
before using it for cleaning.
show
Fig. 2
20
DO7293S
FR
Chargement sans la station de chargement
· Prenez l’adaptateur, branchez la che secteur dans une
prise de courant, et raccordez la che DC à l’appareil.
· Durant le chargement :
· Lécran ache 1111 clignotant : l’appareil est en charge
· Lécran ache FULL : l’appareil est complètement
chargé
· Lécran ache Erro : le bouton marche/arrêt doit être
en position marche pour charger
NETTOYAGE ET ENTRETIEN
NETTOYAGE DU COLLECTEUR DE POUSSIERE ET DU FILTRE
Nettoyez le collecteur de poussière et le ltre après chaque utilisation selon la procédure suivante :
16
Product Maintenance
Cleaning Side Brushes
Clean the side brush when it become dirty and replace it if it’s damaged. The maximum life span of
the side brush is 12 months.
Note: Before replacing side brushes, check and ensure that the L/R mark on the side brush match
with the L/R mark on the bottom base of the robot.
Cleaning Dust Bin and Filters
Empty and clean the dust bin after each usage following the steps as show in the figures below:
A. Hold the bottom of dust bin, and press down on the button using your
thumb to take out of the dust bin.
B. Take out dust bin.
C. After press down button
and o
pen dust bin upper cover
D. Open dust bin cover and take out the
primary filter and HEPA filter.
E. Empty the dust bin.
F. Wash the dust bin and primary filter under tap water,
clean the HEPA filter with brush, avoid washing it under
water.
G. Assemble primary filter and HEPA filter again into
dust bin.
1
2
3
4
5
6
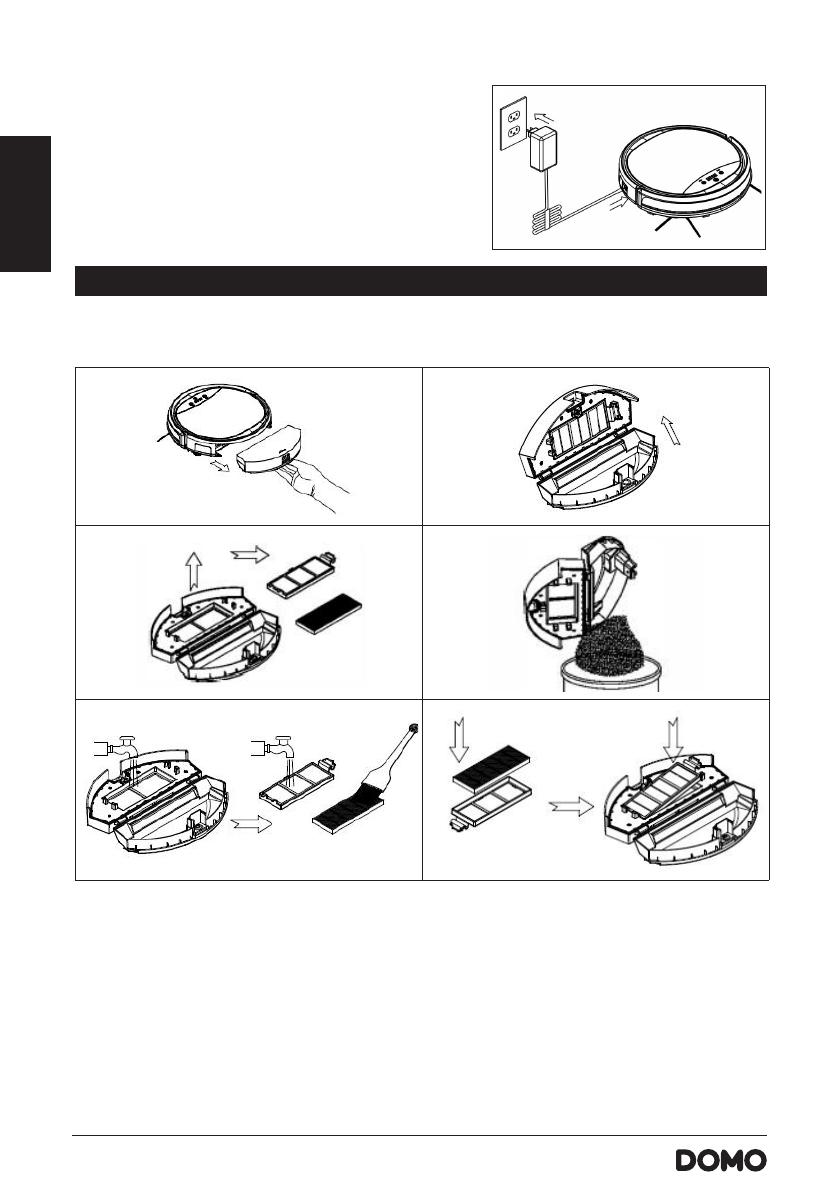
1. Appuyez sur le bouton d’ouverture pour ouvrir le collecteur de poussière. Enlevez ce dernier de
l’appareil.
2. Ouvrez le collecteur en appuyant sur le bouton d’ouverture.
3. Retirez le ltre HEPA, ainsi que son support, hors du collecteur de poussière.
4. Videz le collecteur au-dessus de la poubelle.
5. Rincez le collecteur de poussière et le porte-ltre sous l’eau courante. Laissez-les sécher avant de les
remettre en place. Nettoyez le ltre HEPA à l’aide d’une petite brosse à poussière.
· Quand le ltre HEPA est sale, après environ 30 jours d’utilisation, vous pouvez également le
passer sous l’eau courante. Laissez-le sécher avant de le remettre en place.
· Après de multiples utilisations, le ltre HEPA doit être remplacé. La durée maximale d’utilisation
du ltre est d’environ 6 mois.
10
Product Operation
Battery Chargi n g
1. Ch arging Station Placement
A. Place charging station against the wall,
and remove obstacles about 1m on either
sides and 2m in front of the stat ion. Please
remove obstacles as show in the right figure.
B. If robot is power off, switch on the robot first bef ore c harging.
2. Charge the robot in either way as shown below:
A. Plug one end of the adapter into the robot and the other end into the power socket as shown
in Fig a.
B. Press the “HOME button on the remote control or robot to operate the robot looking for the
charging docking automatically as shown in Fig b.
Fig a Fig b
Note:
a. When robot is in charging, the LED panel will gradually show “1111” from left to right.
b. When charging is over, the LED panel will show “FULL”.
c. In standby status, the robot will when the battery le ve l is
low.
d. In working status, the robot will look for the charging dock automatically when the battery
level is low.
In O rd er to Extend Battery’s Life
a. Please charge the robot for up to 5 hours during the first charging.
b. Charge the robot as soon as possible when battery capacity is low.
c. The robot will return to the charging dock automatically when cleaning is finished or battery
capacity is low.
d. When you do not use the robot for some time, please fully charge the battery first, then
switch off the robot and keep it in a cool but dry place.
e. If the robot has been put aside over 3 months, please charge the robot for 5 hours first
before using it for cleaning.
show
25
DO7293S
www.domo-elektro.be
DE
dass das Gerät beschädigt werden könnte.
· Saugen Sie keine brennenden oder rauchenden Gegenstände, wie z.B. Zigarettenkippen, Streichhölzer
oder heisse Asche, mit dem Gerät auf.
· Benutzen Sie den Staubsauger nicht ohne Staubsaugerbeutel oder Filter.
· Bewahren Sie diese Instruktionen gut auf.
TEILE
1. Gerät
2. Ladestation
3. Fernbedienung
4. Adapter
5. Staubbürste
6. Seitenbürste
7. HEPA-Filter
Gerät
Oberseite:
8. Dämpfer
9. Touchscreen-Taste:
Ein/Aus - Home - Plan
Unterseite:
10. Ein-/Ausschalter
11. DC-Eingang
12. Seitenbürste
13. Batteriefach
14. Anschluss für das Laden des Akkus
15. Staubsammelbehälter
16. Rotierende Bürsten
Staubsammelbehälter
17. HEPA-Filter-Halterung
18. HEPA-Filter
19. Knopf zum Önen des Staubsammelbehälters
Ladestation
20. Kontrollleuchte
21. DC-Eingang
22. Anschluss für das Laden des Akkus
1 2 3
4 5 6
7
4
Product Components
Main Body and Accessories
Item
Description
Quantity
1
Main Body(with standard Dust Bin)
1
2
Charging Station
1
3
Adapter
1
4
Remote Control (battery not included)
1
5
Side Brushes*2 and spare brushes*2
4
6
HEPA Filter(Standard Dust Bin *1, present *1)
2
7
Cleaning Brush
1
8
User Manual
1
1
2
3
4
5
6
7
8
4
Item
Description
Quantity
1
Main Body(with standard Dust Bin)
1
2
Charging Station
1
3
Adapter
1
4
Remote Control (battery not included)
1
5
Side Brushes*2 and spare brushes*2
4
6
HEPA Filter(Standard Dust Bin *1, present *1)
2
7
Cleaning Brush
1
8
User Manual
1
1
2
3
4
5
7
8
4
Product Components
Main Body and Accessories
Item
Description
Quantity
1
Main Body(with standard Dust Bin)
1
2
Charging Station
1
3
Adapter
1
4
Remote Control (battery not included)
1
5
Side Brushes*2 and spare brushes*2
4
6
HEPA Filter(Standard Dust Bin *1, present *1)
2
7
Cleaning Brush
1
8
User Manual
1
1
2
3
4
5
6
7
8
4
Product Components
Main Body and Accessories
Item
Description
Quantity
1
Main Body(with standard Dust Bin)
1
2
Charging Station
1
3
Adapter
1
4
Remote Control (battery not included)
1
5
Side Brushes*2 and spare brushes*2
4
6
HEPA Filter(Standard Dust Bin *1, present *1)
2
7
Cleaning Brush
1
8
User Manual
1
1
2
3
4
5
6
7
8
17
18
19
4
Product Components
Main Body and Accessories
Item
Description
Quantity
1
Main Body(with standard Dust Bin)
1
2
Charging Station
1
3
Adapter
1
4
Remote Control (battery not included)
1
5
Side Brushes*2 and spare brushes*2
4
6
HEPA Filter(Standard Dust Bin *1, present *1)
2
7
Cleaning Brush
1
8
User Manual
1
1
2
3
4
5
6
7
8
20
21
22
Robot Vacuum Cleaner
Model: BL500A
User Manual
Read this booklet thoroughly before using and save it for future reference
8
9
12
13
14
10
11
15
16
26
DO7293S
DE
VOR DER ERSTEN INBETRIEBNAHME
· Legen Sie zwei AAA-Batterien in die Fernbedienung ein.
· Stellen Sie die Uhrzeit ein (siehe „Gebrauch/Benutzung ohne Fernbedienung/Plan: Uhr“)
· Laden Sie den Saugroboter vor der ersten Verwendung 5 Stunden lang auf. (siehe „Gebrauch/
Auaden“)
· Stecken Sie die Seitenbürsten auf den Staubsauger. Drücken Sie sie herunter, bis Sie ein Klickgeräusch
hören. Bürste und Gerät sind mit einem L (links) und R (rechts) versehen. Stecken Sie die jeweilige
Bürste auf die zugehörige Staubsaugerseite.
INSTALLATION DER LADESTATION
1. Installieren Sie die Ladestation auf einem geraden,
harten Untergrund, z. B. auf Fliesen, Parkett, einem
kurzhaarigen, robusten Teppich an einer Wand oder einem
Schrank usw.
2. Sorgen Sie dafür, dass an der linken und rechten Seite
der Ladestation min. 1 m Freiraum verfügbar sind. Vor
der Ladestation muss mindestens ein Freiraum von 2 m
(Abb. 1) vorhanden sein. Ist dies nicht der Fall, ndet der
Staubsauger die Ladestation möglicherweise nicht, wenn
er sich auaden will.
3. Nehmen Sie den Adapter, stecken Sie den Stecker in die
Steckdose und stecken Sie den Gleichstrom-Stecker in die
Ladestation (Abb. 2).
WICHTIG: Sorgen Sie stets dafür, dass keine Kabel vor oder neben der Ladestation liegen, da sie zwischen
den Rädern oder Bürsten des Staubsaugers eingeklemmt werden könnten.
GEBRAUCH
Schalten Sie das Gerät vor der Verwendung oder dem Auaden über den Ein-/Ausschalter an der Seite des
Geräts ein.
STANDBY/ENERGIESPARMODUS/AUS
Standby
Das Gerät ist im Standby-Modus, wenn der Ein-/Ausschalter eingeschaltet ist und sich das Gerät im
Ruhezustand bendet, aber sofort einsatzbereit ist.
Energiesparmodus
Wenn sich das Gerät im Energiesparmodus bendet, müssen Sie es zunächst aktivieren, bevor Sie es in
Betrieb nehmen können. Dies tun Sie, indem Sie die Ein-Aus-Touchscreen-Taste drücken bzw. mit der
ON/OFF-Taste auf der Fernbedienung.
Das Gerät wird nach 15 Minuten im Standby-Modus automatisch in den Energiesparmodus versetzt..
Sie können den Energiesparmodus auch selbst aktivieren, indem Sie die Ein-Aus-Touchscreen-Taste 3
Sekunden lang gedrückt halten.
10
Product Operation
Battery Charging
1. Charging Station Placement
A. Place charging station against the wall,
and remove obstacles about 1m on either
sides and 2m in front of the station. Please
remove obstacles as show in the right figure.
B. If robot is power off, switch on the robot first before charging.
2. Charge t he robot in e ither way as shown below:
A. Plug on e end of the adapter into the robot and the other end into the power sock et as shown
in Fig a.
B. Press the “HOME” button on the remote control or robot to operate the robot looking for the
charging docking automatically as shown in Fig b.
Fig a Fig b
Note:
a. When robot is in charging, the LED panel will gradually show “1111” from left to right.
b. When charging is over, the LED panel will show “FULL”.
c. In standby status, the robot will when the battery level is
low.
d. In working status, the robot will look f or the charging dock automatically when the battery
level is low.
In Order to Extend Battery’s Life
a. Please charge the robot for up to 5 hours during the first charging.
b. Charge the robot as soon as possible when battery capacity is low.
c. The robot will return to the charging dock automatically when cleaning is finished or battery
capacity is low.
d. When you do not use the robot for some time, please fully charge the battery first, then
switch off the robot an d keep it in a cool but dry place.
e. If the robot has been put aside over 3 months, please charge the robot for 5 hours first
before using it for cleaning.
show
Fig. 1
10
Product Operation
Battery Charging
1. Charging Station Placement
A. Place charging station against the wall,
and remove obsta cles about 1m on either
sides and 2m in front of the station. Please
remove obstacles as show in the right figure.
B. If robot is power off, switch on the robot first before charging.
2. Charge the robot in either way as shown below:
A. Plug one end of the adapter into the robot and the other end into the power socket as shown
in Fig a.
B. Press the “HOME” button on the remote control or robot to operate the robot looking for the
charging docking automatically as shown in Fig b.
Fig a Fig b
Note:
a. When robot is in charging, the LED panel will gradually show “1111” from left to right.
b. When charging is over, the LED panel will show “FULL”.
c. In standby status, the robot will when the battery level is
low.
d. In working status, the robot will look for the charging dock automatically when the battery
level is low.
In Order to E xtend Battery’s Life
a. Please charge the robot for up to 5 ho urs during the first charging.
b. Charge the robot as soon as possible when battery capacity is low.
c. The robot will return to the charging dock automatically when cleaning is finished or battery
capacity is low.
d. When you do not use the robot for some time, please fully charge the battery first, then
switch off the robot and keep it in a cool but dry place.
e. If the robot has been put aside over 3 months, please charge the robot for 5 hours first
before using it for cleaning.
show
Fig. 2
30
DO7293S
DE
AUFLADEN
Schalten Sie die Ein-/Aus-Taste zum Auaden ein.

· Wenn die Batterie des Staubsaugers während des Staubsaugens leer ist, sucht das Gerät automatisch
die Ladestation zum Auaden.
· Wenn der Staubsauger im Standby-Modus ist und die Batterie leer ist, erscheint auf dem Display [ I I ].
Laden Sie das Gerät dann auf.
· Sie können das Gerät auf Wunsch auch früher auaden, indem Sie auf der Fernbedienung die HOME-
Taste betätigen.
· Während des Ladevorgangs:
· Auf dem Display blinkt 1111: Das Gerät wird geladen.
· Auf dem Display erscheint FULL: Das Gerät ist vollständig aufgeladen.
· Auf dem Display erscheint Erro: Die Ein-/Aus-Taste muss zum Auaden eingeschaltet sein.

Nehmen Sie den Adapter, stecken Sie den Stecker in die
Steckdose und stecken Sie den DC-Eingang in das Gerät.
· Während des Auadens:
· Auf dem Display blinkt 1111: Das Gerät wird geladen.
· Auf dem Display erscheint FULL: Das Gerät ist
vollständig aufgeladen.
· Auf dem Display erscheint Erro: Die Ein-/Aus-Taste
muss zum Auaden eingeschaltet sein.
REINIGUNG UND WARTUNG
REINIGUNG DES STAUBBEHÄLTERS UND DES FILTERS
Reinigen Sie den Staubbehälter und den Filter nach jedem Gebrauch folgendermaßen:
16
Product Maintenance
Cleaning Side Brushes
Clean the side brush when it become dirty and replace it if it’s damaged. The maximum life span of
the side brush is 12 months.
Note: Before replacing side brushes, check and ensure that the L/R mark on the side brush match
with the L/R mark on the bottom base of the robot.
Cleaning Dust Bin and Filters
Empty and clean the dust bin after each usage following the steps as show in the figures below:
A. Hold the bottom of dust bin, and press down on the button using your
thumb to take out of the dust bin.
B. Take out dust bin.
C. After press down button
and o
pen dust bin upper cover
D. Open dust bin cover and take out the
primary filter and HEPA filter.
E. Empty the dust bin.
F. Wash the dust bin and primary filter under tap water,
clean the HEPA filter with brush, avoid washing it under
water.
G. Assemble primary filter and HEPA filter again into
dust bin.
1
2
3
4
10
Product Operation
Battery Chargi n g
1. Ch arging Station Placement
A. Place charging station against the wall,
and remove obstacles about 1m on either
sides and 2m in front of the stat ion. Please
remove obstacles as show in the right figure.
B. If robot is power off, switch on the robot first bef ore c harging.
2. Charge the robot in either way as shown below:
A. Plug one end of the adapter into the robot and the other end into the power socket as shown
in Fig a.
B. Press the “HOME button on the remote control or robot to operate the robot looking for the
charging docking automatically as shown in Fig b.
Fig a Fig b
Note:
a. When robot is in charging, the LED panel will gradually show “1111” from left to right.
b. When charging is over, the LED panel will show “FULL”.
c. In standby status, the robot will when the battery le ve l is
low.
d. In working status, the robot will look for the charging dock automatically when the battery
level is low.
In O rd er to Extend Battery’s Life
a. Please charge the robot for up to 5 hours during the first charging.
b. Charge the robot as soon as possible when battery capacity is low.
c. The robot will return to the charging dock automatically when cleaning is finished or battery
capacity is low.
d. When you do not use the robot for some time, please fully charge the battery first, then
switch off the robot and keep it in a cool but dry place.
e. If the robot has been put aside over 3 months, please charge the robot for 5 hours first
before using it for cleaning.
show
31
DO7293S
www.domo-elektro.be
DE
16
Product Maintenance
Cleaning Side Brushes
Clean the side brush when it become dirty and replace it if it’s damaged. The maximum life span of
the side brush is 12 months.
Note: Before replacing side brushes, check and ensure that the L/R mark on the side brush match
with the L/R mark on the bottom base of the robot.
Cleaning Dust Bin and Filters
Empty and clean the dust bin after each usage following the steps as show in the figures below:
A. Hold the bottom of dust bin, and press down on the button using your
thumb to take out of the dust bin.
B. Take out dust bin.
C. After press down button
and o
pen dust bin upper cover
D. Open dust bin cover and take out the
primary filter and HEPA filter.
E. Empty the dust bin.
F. Wash the dust bin and primary filter under tap water,
clean the HEPA filter with brush, avoid washing it under
water.
G. Assemble primary filter and HEPA filter again into
dust bin.
5
6
1. Drücken Sie auf die Taste zum Önen des Staubbehälters. Nehmen Sie den Staubbehälter aus dem
Gerät.
2. Önen Sie den Staubbehälter mit der Taste zum Önen.
3. Entnehmen Sie den HEPA-Filter, einschließlich Halterung, aus dem Staubbehälter.
4. Leeren Sie den Staubbehälter über dem Abfalleimer.
5. Spülen Sie den Staubbehälter und die Filterhalterung unter ießendem Wasser. Lassen Sie diese
trocknen, bevor Sie sie wieder einsetzen. Reinigen Sie den HEPA-Filter mit der Staubbürste.
· Wenn der HEPA-Filter verschmutzt ist, nach ca. 30 Tagen Gebrauch, kann dieser auch unter
ießendem Wasser gereinigt werden. Lassen Sie ihn trocknen, bevor Sie ihn wieder einsetzen.
· Nach häugem Gebrauch muss der HEPA-Filter ersetzt werden. Die maximale Haltbarkeit eines
Filters ist ca. 6 Monate.
6. Setzen Sie den HEPA-Filter mit der Halterung wieder im Staubbehälter ein. Drehen Sie zu diesem
Zweck den Schieber zuerst zur Seite..
REINIGUNG DES GERÄTS
· Reinigen Sie die Seitenbürsten, Räder, Sensoren und Anschlüsse für das Auaden des Akkus mit einem
weichen Tuch.
· Nach häuger Benutzung müssen die Seitenbürsten ersetzt werden. Die maximale Lebensdauer der
Bürsten beträgt etwa 12 Monate. Bürste und Gerät sind mit einem L (links) und R (rechts) versehen.
Stecken Sie die jeweilige Bürste auf die zugehörige Staubsaugerseite.
· Tauchen Sie das Gerät auf keinen Fall in Wasser ein.
· Die Sensoren dürfen nicht nass werden.
REINIGUNG DER ROTIERENDEN BÜRSTEN
Önen Sie die Klappe der Bürsten. Wischen Sie die Klappe mit einem weichen Tuch ab. Entfernen Sie die
rotierenden Bürsten. Spülen Sie die Bürsten unter ießendem Wasser. Lassen Sie sie trocknen, bevor Sie
sie wieder einsetzen.
LAGERUNG
Wenn Sie das Gerät längere Zeit nicht nutzen:
· Entfernen Sie die Batterien aus der Fernbedienung.
· Laden Sie die Batterie vollständig auf, schalten Sie die Ein-/Aus-Taste aus und bewahren Sie das Gerät
an einem trockenen Ort.
Wurde das Gerät 3 Monate oder länger nicht verwendet, laden Sie die Batterie erst 5 Stunden lang auf.
33
DO7293S
www.domo-elektro.be
EN
WARRANTY
Dear client ,
All of our products are always submitted to a strict quality control before they are sold to you.
Should you nevertheless experience problems with your device, we sincerely regret this.
In that case, we kindly request you to contact our customer service.
Our sta will gladly assist you.
+32 14 21 71 91 [email protected]
Monday – Thursday: 8.30 – 12.00 and 13.00 – 17.00
Friday: 8.30 – 12.00 and 13.00 – 16.30
This appliance has a two year warranty period. During this period the manufacturer is responsible for
any failures that are the direct result of construction failure. When these failures occur the appliance will
be repaired or replaced if necessary. The warranty will not be valid when the damage to the appliance is
caused by wrong use, not following the instructions or repairs executed by a third party. The guarantee is
issued with the original till receipt. All parts, which are subject to wear, are excluded from the warranty.
If your device breaks down within the 2-year warranty period, you can return the device together with
your receipt to the shop where you purchased it.
The guarantee on accessories and components that are liable to wear-and-tear is only 6 months.
The guarantee and responsibility of the supplier and manufacturer lapse automatically in the following
cases:
· If the instructions in this manual have not been followed.
· In case of incorrect connection, e.g., electrical voltage that is too high.
· In case of incorrect, rough or abnormal use.
· In case of insucient or incorrect maintenance.
· In case of repairs or alterations to the device by the consumer or non-authorised third parties.
· If the customer used parts or accessories that are not recommended or provided by the supplier /
manufacturer.
SAFETY INSTRUCTIONS
When using electrical appliances, basic safety precautions should always be taken, including the
following:
· Read all instructions carefully. Keep this manual for future reference.
· Make sure all packaging materials and promotional stickers have been removed before using the
appliance for the rst time. Make sure children cannot play with the packaging materials.
· This appliance is intended to be used in household and similar applications such as:
· sta kitchen areas in shops, oces and other working environments;
· farm houses;
· by clients in hotels, motels and other residential type environments;
· bed and breakfast type environments.
· Children should be supervised to ensure that they do not play with the appliance.
· This appliance can be used by children aged from 16 years and above and persons with reduced
physical, sensory or mental capabilities or lack of experience and knowledge if they have been given
34
DO7293S
EN
supervision or instruction concerning use of the appliance in a safe way and understand the hazards
involved. Children shall not play with the appliance. Cleaning and user maintenance shall not be made
by children unless they are older than 16 and supervised.
· Keep the appliance and its cord out of reach of children younger than 16 years.
· Before use, check if the voltage stated on the appliance corresponds with the voltage of the power net
at your home.
· Always connect the appliance to an earthed socket.
· Do not let the cord hang on a hot surface or on the edge of a table or counter top.
· Never use the appliance when the cord or plug is damaged, after malfunction or when the appliance
itself is damaged. In that case, take the appliance to the nearest qualied service center for check-up
and repair.
· Close supervision is necessary when the appliance is used near or by children.
· The use of accessories that are not recommended or sold by the manufacturer can cause re, electrical
shock or injuries.
· Do not leave a working appliance unattended.
· Never place this appliance near a gas stove or electrical stove or in a place where it may come into
contact with a warm appliance.
· Do not use the appliance outdoors.
· Only use the appliance for its intended use.
· Always use the appliance on a steady, dry and level surface.
· Only use the appliance for domestic use. The manufacturer can not be held responsible for accidents
that result from improper use of the appliance or not following the instructions described in this
manual.
· All repairs should be carried out by the manufacturer or its aftersales service.
· Never immerse the appliance, the cord or the plug in water or any other liquid.
· Make sure that children do not touch the cord or appliance.
· Keep the cord away from sharp edges and hot parts or other heat sources.
· Before use, remove all packaging materials and any promotional stickers.
· To prevent the risk of electrocution, do not use the vacuum cleaner outdoors or on wet surfaces.
· Only use the vacuum cleaner as described in this instruction booklet.
· Do not pull the cord. Do not use the cord as a handle. Do not jam the cord between a door or do not
pull it around corners or sharp edges. Do not run the vacuum cleaner over the cord. Keep the cord
away from hot surfaces.
· Do not touch the plug or the vacuum cleaner when you have wet hands.
· Do not put any objects in the openings of the vacuum cleaner. Do not use the appliance when an
opening is blocked.
· Keep hair, loose clothing, ngers and other body parts away from openings of the vacuum cleaner and
from moving parts.
· Never use the vacuum cleaner to pick up any combustible or inammable liquids like gasoline, or do
not use the appliance in places where such substances might be present.
· Remove large and sharp objects from the oor before vacuuming it to prevent possible damage.
· Do not pick up any burning or smoking objects, like cigarettes, matches or hot ashes.
· Do not use the vacuum cleaner without dust bag and/or lter.
· Save these instructions
35
DO7293S
www.domo-elektro.be
EN
PARTS
1. Appliance
2. Charging station
3. Remote control
4. Adapter
5. Cleaning brush
6. Side brushes
7. HEPA lter
Appliance
Top:
8. Bumper
9. Touch screen button on/o - home - plan
Bottom:
10. On/O switch
11. DC input
12. Side brushes
13. Battery compartment
14. Contact for charging battery
15. Dust bin
16. Rotating oor brush
Dust bin
17. HEPA lter holder
18. HEPA lter
19. Button for opening the dust bin
Charging station
20. Indicator light
21. DC input
22. Contact for charging battery
1 2 3
4 5 6
7
4
Product Components
Main Body and Accessories
Item
Description
Quantity
1
Main Body(with standard Dust Bin)
1
2
Charging Station
1
3
Adapter
1
4
Remote Control (battery not included)
1
5
Side Brushes*2 and spare brushes*2
4
6
HEPA Filter(Standard Dust Bin *1, present *1)
2
7
Cleaning Brush
1
8
User Manual
1
1
2
3
4
5
6
7
8
4
Product Components
Main Body and Accessories
Item
Description
Quantity
1
Main Body(with standard Dust Bin)
1
2
Charging Station
1
3
Adapter
1
4
Remote Control (battery not included)
1
5
Side Brushes*2 and spare brushes*2
4
6
HEPA Filter(Standard Dust Bin *1, present *1)
2
7
Cleaning Brush
1
8
User Manual
1
1
2
3
4
5
6
7
8
17
18
19
4
Product Components
Main Body and Accessories
Item
Description
Quantity
1
Main Body(with standard Dust Bin)
1
2
Charging Station
1
3
Adapter
1
4
Remote Control (battery not included)
1
5
Side Brushes*2 and spare brushes*2
4
6
HEPA Filter(Standard Dust Bin *1, present *1)
2
7
Cleaning Brush
1
8
User Manual
1
1
2
3
4
5
6
7
8
20
21
22
Robot Vacuum Cleaner
Model: BL500A
User Manual
Read this booklet thoroughly before using and save it for future reference
8
9
12
13
14
10
11
15
16
36
DO7293S
EN
BEFORE THE FIRST USE
· Put two AAA batteries in the remote control.
· Set the time (see “use/use without remote control/plan: clock”).
· Prior to initial use, charge the robot vacuum cleaner for 5 hours (see “use/charging”).
· Place the signed brushes on the vacuum cleaner. Press on them until you hear a click. The brushes and
the machine are marked with L (left) and R (right); make sure they match.
INSTALLING THE CHARGING STATION
1. Place the charging station on a smooth hard surface, e.g.
tiles, parquet, short-haired sturdy carpet, against a wall or
cupboard.
2. Make sure that there is an area of at least 1 m free on the
left and right sides of the charging station. In front of the
charging station, there must be a free area of 2 m (Fig. 1).
If this is not the case, it is possible that the vacuum cleaner
cannot nd the charger when it must charge.
3. Take the adapter, put the plug in the outlet and put the DC
plug into the charging station (Fig. 2).
IMPORTANT: always make sure that no cables are in front of or
next to the charging station; these could get caught between
the wheels or brushes of the vacuum cleaner.
USE
Turn the machine on with the on switch on the side of the appliance prior to use or charging.
STANDBY/SLEEP MODE/OFF
Standby
The machine is in standby mode when the on switch is on and the machine is in idle state, ready to be
used immediately.
Sleep mode
When the machine is in sleep mode, you must rst activate it before you can start the machine. This is
done by pressing the on/o touchscreen button on the machine or with the ON/OFF button on the remote
control.
The machine automatically goes into sleep mode after being in standby mode for 15 minutes. You can also
turn on the mode yourself by pressing and holding the on/o touchscreen button on the machine for 3
seconds.

You can turn o the machine completely by switching o the on switch on the side of the device while in
standby mode.
The machine turns itself o after being in sleep mode for 15 minutes if no timer has been set.
10
Product Operation
Battery Charging
1. Charging Station Placement
A. Place charging station against the wall,
and remove obstacles about 1m on either
sides and 2m in front of the station. Please
remove obstacles as show in the right figure.
B. If robot is power off, switch on the robot first before charging.
2. Charge t he robot in e ither way as shown below:
A. Plug on e end of the adapter into the robot and the other end into the power sock et as shown
in Fig a.
B. Press the “HOME” button on the remote control or robot to operate the robot looking for the
charging docking automatically as shown in Fig b.
Fig a Fig b
Note:
a. When robot is in charging, the LED panel will gradually show “1111” from left to right.
b. When charging is over, the LED panel will show “FULL”.
c. In standby status, the robot will when the battery level is
low.
d. In working status, the robot will look f or the charging dock automatically when the battery
level is low.
In Order to Extend Battery’s Life
a. Please charge the robot for up to 5 hours during the first charging.
b. Charge the robot as soon as possible when battery capacity is low.
c. The robot will return to the charging dock automatically when cleaning is finished or battery
capacity is low.
d. When you do not use the robot for some time, please fully charge the battery first, then
switch off the robot an d keep it in a cool but dry place.
e. If the robot has been put aside over 3 months, please charge the robot for 5 hours first
before using it for cleaning.
show
Fig. 1
10
Product Operation
Battery Charging
1. Charging Station Placement
A. Place charging station against the wall,
and remove obsta cles about 1m on either
sides and 2m in front of the station. Please
remove obstacles as show in the right figure.
B. If robot is power off, switch on the robot first before charging.
2. Charge the robot in either way as shown below:
A. Plug one end of the adapter into the robot and the other end into the power socket as shown
in Fig a.
B. Press the “HOME” button on the remote control or robot to operate the robot looking for the
charging docking automatically as shown in Fig b.
Fig a Fig b
Note:
a. When robot is in charging, the LED panel will gradually show “1111” from left to right.
b. When charging is over, the LED panel will show “FULL”.
c. In standby status, the robot will when the battery level is
low.
d. In working status, the robot will look for the charging dock automatically when the battery
level is low.
In Order to E xtend Battery’s Life
a. Please charge the robot for up to 5 ho urs during the first charging.
b. Charge the robot as soon as possible when battery capacity is low.
c. The robot will return to the charging dock automatically when cleaning is finished or battery
capacity is low.
d. When you do not use the robot for some time, please fully charge the battery first, then
switch off the robot and keep it in a cool but dry place.
e. If the robot has been put aside over 3 months, please charge the robot for 5 hours first
before using it for cleaning.
show
Fig. 2
37
DO7293S
www.domo-elektro.be
EN
USE WITHOUT REMOTE CONTROL
· Press on the on/o touchscreen button for automatic cleaning. The vacuum cleaner will plot its own
path to vacuum the entire area, taking walls, obstacles and stairs into account.
· When the machine is nished vacuuming, it will automatically return to the charging station. If no
charging station is installed, the vacuum cleaner enters standby mode.
· It is also possible to allow the machine itself to stop cleaning. To do so, touch the on/o touchscreen
button. Turn the device o with the on switch on the side of the machine.
HOME: return to the charging station for re-charging
· If you wish to charge the vacuum cleaner during use, press the HOME button. The vacuum cleaner will
now automatically look for the charging station.
· PLEASE NOTE: it is possible that the vacuum cleaner cannot nd the charging station because there
are too many obstacles around the charging station. Make sure that the free area around the charging
station is as large as possible.
· If the battery is empty, the vacuum cleaner will automatically return to the charging station.
PLAN: clock
· Press the plan button to set the clock.
· The hours on the display begin to ash. Set the hours by pressing the home button. Press the power
button to conrm.
· The minutes on the display begin to ash. Set the minutes by pressing the home button. Press the
power button to conrm.
· The home button’s indicator light goes out and the plan button’s light ashes. After 10 seconds, both
indicator lights turn on again and your settings are saved.
· Pressing the plan button during setup will return the device to standby mode and your settings will be
cancelled.
PLAN: timer
Switching on the timer
Use this button to let the robot vacuum cleaner vacuum automatically; you choose the daily starting time.
For example, if you set the timer to 9:35, the robot will start vacuuming every day at 9:35.
First, set the clock as described above.
· Press and hold the plan button for 5 seconds and then release.
· The hours on the display begin to ash. Set the hours by pressing the home button. Press the power
button to conrm.
· The minutes on the display begin to ash. Set the minutes by pressing the home button. Press the
power button to conrm.
· You’ll hear a sound as conrmation. The timer is now set.
· Pressing the plan button during setup will return the device to standby mode and your settings will be
cancelled.
Turning o the timer
If you want to disable the programmed timer, proceed as follows:
· Press and hold the plan button for 5 seconds and then release.
· Set the timer to 00:00 as previously described.
· You’ll hear a sound as conrmation. The timer is now switched o. The robot will no longer vacuum
automatically.
38
DO7293S
EN
USE WITH REMOTE CONTROL
Important: when adjusting settings with the remote control, you must aim it at the machine.
Do not use the remote control near the charging station as it may interfere with the signal and aect its
operation.
If you will not be using the remote control for a long period of time,
remove the batteries.
1. HOME: return to the charging station for re-charging
2. ON/OFF: on-o button
3. MODE: select cleaning programme
4. MAX: maximum suction power
5. Arrows
1. 
· Press on the on-o button for automatic cleaning. The vacuum
cleaner will plot its own path to vacuum the entire area, taking walls, obstacles and stairs into account.
2. HOME: return to the charging station for re-charging
· If you wish to charge the vacuum cleaner during use, press the HOME button. The vacuum cleaner will
now automatically look for the charging station.
· PLEASE NOTE: it is possible that the vacuum cleaner cannot nd the charging station because there
are too many obstacles around the charging station. Make sure that the free area around the charging
station is as large as possible.
· If the battery is empty, the vacuum cleaner will automatically return to the charging station.
3. MODE: select cleaning programme
While vacuuming, you can select from 4 dierent cleaning programs. First, use the ON/OFF button to
start the vacuum cleaner in automatic cleaning mode. Press the MODE button.
Make sure the remote control is aimed at the machine. If the mode has been changed, you will hear a
short signal.
The mode selected can be read on the display:
· MODE 1: spiral
The vacuum cleaner will move in a spiral formation.
· MODE 2: automatic
The vacuum cleaner will plot its own path to vacuum the entire area, taking walls, obstacles and
stairs into account.
8
Product Components
Remote Control
1. ON/OFF
2. Direction buttons
3. Max: robot chang e to powerful cleaning mode.
(Only works when robo t in standby status)
4. Auto charging
5. Cleaning Mode
Note:
A. Install two AAA type batteries into the remote control before use.
B. Remove the batteries if the remote will be left unused for a long period.
C. If you use the remote near the c harging station, the robot may not recognize the command
and may not work.
Docking Middle Cover
Charging Socket
5
4
3
Charging Poles
2
Charging Statio n
Docking Top Cover
1
1
2
3
4
5
39
DO7293S
www.domo-elektro.be
EN
· MODE 3: corners
The vacuum cleaner will go along the walls and clean the corners as well.
· MODE 4: Zigzag
The vacuum cleaner will make a zigzag movement to vacuum the area. The vacuum cleaner will
automatically apply this function if a large open area without obstacles is detected.
4. MAX: maximum suction power
Press the MAX button to vacuum at the maximum suction power. The vacuum cleaner will start cleaning
automatically, the movement speed is slow, but the suction power is maximum for thorough cleaning.
5. Arrows
Use the arrows on the remote control to move the robot vacuum cleaner to determine the starting
position.

· The robot vacuum cleaner is equipped with an anti-fall detection. The machine will detect stairs or
drops, preventing it from falling.
· Nevertheless, it is recommended that you exercise caution and restricted the vacuum cleaner from the
area with stairs.
CHARGING
Turn on the power switch for charging.
Charging on the charging station
· When the vacuum cleaner’s battery dies while vacuuming, it will automatically search for the charging
station to charge back up.
· When the vacuum cleaner is in standby mode and the battery is exhausted, [ I I ] appears on the
display. Allow the device to charge.
· It is also possible to send the machine to recharge by pressing the HOME button on the remote
control.
· While charging:
· Display shows ashing ‘1111’: vacuum is charging
· Display shows ‘FULL’: device is fully charged
· Display shows ‘Erro’: the power switch must be on to charge
40
DO7293S
EN
Charging without a charging station
Plug the adapter into the contact and insert the DC input into
the vacuum.
· While charging:
· Display shows ashing ‘1111’: vacuum is charging
· Display shows ‘FULL’: device is fully charged
· Display shows ‘Erro’: the power switch must be on to
charge
CLEANING AND MAINTENANCE
CLEANING OUT THE CANISTER AND FILTER
Clean the canister and the lter after each use in the following manner:
16
Product Maintenance
Cleaning Side Brushes
Clean the side brush when it become dirty and replace it if it’s damaged. The maximum life span of
the side brush is 12 months.
Note: Before replacing side brushes, check and ensure that the L/R mark on the side brush match
with the L/R mark on the bottom base of the robot.
Cleaning Dust Bin and Filters
Empty and clean the dust bin after each usage following the steps as show in the figures below:
A. Hold the bottom of dust bin, and press down on the button using your
thumb to take out of the dust bin.
B. Take out dust bin.
C. After press down button
and o
pen dust bin upper cover
D. Open dust bin cover and take out the
primary filter and HEPA filter.
E. Empty the dust bin.
F. Wash the dust bin and primary filter under tap water,
clean the HEPA filter with brush, avoid washing it under
water.
G. Assemble primary filter and HEPA filter again into
dust bin.
1
2
3
4
5
6
1. Press the button that opens the canister. Remove the canister from the vacuum.
2. Press the open button to open the canister.
3. Remove the HEPA lter, including the holder, from the canister.
4. Empty the canister into the waste bin.
5. Rinse the canister and lter holder under running water. Let them dry before putting them back in
place. Clean the HEPA lter with the dust brush.
· If the HEPA lter is dirty, after about 30 days of use, you can also clean it under running water. Let
it dry before putting it back in place.
· The HEPA lter must be replaced after frequent use. The maximum service life of the lter is
approximately 6 months.
10
Product Operation
Battery Chargi n g
1. Ch arging Station Placement
A. Place charging station against the wall,
and remove obstacles about 1m on either
sides and 2m in front of the stat ion. Please
remove obstacles as show in the right figure.
B. If robot is power off, switch on the robot first bef ore c harging.
2. Charge the robot in either way as shown below:
A. Plug one end of the adapter into the robot and the other end into the power socket as shown
in Fig a.
B. Press the “HOME button on the remote control or robot to operate the robot looking for the
charging docking automatically as shown in Fig b.
Fig a Fig b
Note:
a. When robot is in charging, the LED panel will gradually show “1111” from left to right.
b. When charging is over, the LED panel will show “FULL”.
c. In standby status, the robot will when the battery le ve l is
low.
d. In working status, the robot will look for the charging dock automatically when the battery
level is low.
In O rd er to Extend Battery’s Life
a. Please charge the robot for up to 5 hours during the first charging.
b. Charge the robot as soon as possible when battery capacity is low.
c. The robot will return to the charging dock automatically when cleaning is finished or battery
capacity is low.
d. When you do not use the robot for some time, please fully charge the battery first, then
switch off the robot and keep it in a cool but dry place.
e. If the robot has been put aside over 3 months, please charge the robot for 5 hours first
before using it for cleaning.
show
  • Page 1 1
  • Page 2 2
  • Page 3 3
  • Page 4 4
  • Page 5 5
  • Page 6 6
  • Page 7 7
  • Page 8 8
  • Page 9 9
  • Page 10 10
  • Page 11 11
  • Page 12 12
  • Page 13 13
  • Page 14 14
  • Page 15 15
  • Page 16 16
  • Page 17 17
  • Page 18 18
  • Page 19 19
  • Page 20 20
  • Page 21 21
  • Page 22 22
  • Page 23 23
  • Page 24 24
  • Page 25 25
  • Page 26 26
  • Page 27 27
  • Page 28 28
  • Page 29 29
  • Page 30 30
  • Page 31 31
  • Page 32 32
  • Page 33 33
  • Page 34 34
  • Page 35 35
  • Page 36 36
  • Page 37 37
  • Page 38 38
  • Page 39 39
  • Page 40 40
  • Page 41 41
  • Page 42 42
  • Page 43 43
  • Page 44 44
  • Page 45 45
  • Page 46 46
  • Page 47 47
  • Page 48 48
  • Page 49 49
  • Page 50 50
  • Page 51 51
  • Page 52 52
  • Page 53 53
  • Page 54 54
  • Page 55 55
  • Page 56 56
  • Page 57 57
  • Page 58 58
  • Page 59 59
  • Page 60 60
  • Page 61 61
  • Page 62 62
  • Page 63 63
  • Page 64 64
  • Page 65 65
  • Page 66 66
  • Page 67 67
  • Page 68 68
  • Page 69 69
  • Page 70 70
  • Page 71 71
  • Page 72 72
  • Page 73 73
  • Page 74 74
  • Page 75 75
  • Page 76 76
  • Page 77 77
  • Page 78 78
  • Page 79 79
  • Page 80 80
  • Page 81 81
  • Page 82 82

Domo DO7293S Owner's manual

Category
Robotic vacuum cleaners
Type
Owner's manual

Ask a question and I''ll find the answer in the document

Finding information in a document is now easier with AI