Page is loading ...

8415 North Clinton Drive - Fort Wayne, IN 46825 - 800.480.0415 - www. accutemp.net
MP4008-0910
EVOLUTION STEAMER OWNERS MANUAL
IMPORTANT WARRANTY INFORMATION:
For product warranty activation, the Product Registration Form must be submitted to
AccuTemp Products, Inc. after installation of the appliance.
Product Registration Form
EVOLUTION STEAMER
OWNERS MANUAL

MP4008-0910
EVOLUTION STEAMER OWNERS MANUAL
i
TABLE OF CONTENTS
i
DOCUMENT HISTORY
i
SAFETY WARNINGS
1-2
INSTALLATION
3-7
OPERATION
8-13
CLEANING
14-15
SERVICE AND TROUBLESHOOTING
16-18
WARRANTY
19
Current revision: 0409 Prior revision :Initial Release
Date: Date: 5/8/09
Change
Initial release: 5/8/09
Current revision: 0910 Prior revision :Initial Release
Date: 10/30/09 Date: 5/8/09
Change
Added connection-less model information
INDEX
Document History

MP4008-0910
EVOLUTION STEAMER OWNERS MANUAL
Page 1
1) When using a stand that is equipped with casters, the floor surface must be level and
flat. Sloped and/or rough floors can result in a “tipping“ situation and could result in
serious injury. Direct contact with steam can result in a severe burn.
2) When accessing the cooking chamber, be sure to always stand back while slowly
opening the door to allow the chamber to vent off steam. Never look or reach into the
cooking chamber before it has completely vented off steam.
3) Never reach into the cooking chamber or handle hot items without wearing proper hot
gloves. Steam coming out of the holes on the right side of the steamer is invisible and
can cause severe burns.
4) Never use wet or damp gloves, as moisture can conduct heat quickly.
!!!
!!
!
SAFETY WARNINGS
1) Be sure all operators read, understand and follow the information contained in this
manual, including caution warnings, operating instructions, and safety instructions.
2) Please use caution when emptying the drip pan. The pan’s contents could cause
severe burns.
3) Keep the floor in front of the equipment clean and dry. If spills occur, clean immediately
to avoid potential injuries.
4) Do not use pressurized water to clean steamer.
5) Use of any replacement parts other than those supplied by AccuTemp Products,
Inc. can cause bodily injury to the operator, damage to the equipment and will
void all warranties.
6) This appliance is extremely heavy. For safe handling, the installer should obtain
help as needed or employ appropriate material handling equipment to remove unit
from it’s packaging and move it into its final location.
DANGER:
1) Only personnel qualified to work with electricity should install this unit. Improper
installation can cause personal injury or damage to the equipment.
2) This appliance must be properly grounded. Failure to properly ground the appliance
could result in electrocution and/or death.

MP4008-0910
EVOLUTION STEAMER OWNERS MANUAL
Page 2
SAFETY WARNINGS
IMPORTANT:
1) Do not manually fill water above the water level mark on the left side of the steamer.
Higher levels will cause hot water to splash out the door or flood the bottom pan with
water.
2) Do not use abrasive materials, such as wire brushes, metal scouring pads or scrapers to
clean the cooking chamber bottom.
3) Only AccuTemp Products, Inc. authorized service personnel must perform service.
4) Service performed by unauthorized personnel will void all warranties.
5) Any in-field modification made without written authorization from AccuTemp will
void the warranty.
!
IMPORTANT SERVICE INFORMAION
An AccuTemp Products, Inc. Technical & Customer Support Technician is
available Monday thru Sunday, 7:00am to 7:00pm EST.
Phone - 800.480.0415 or 260.469.3040
Email - service@accutemp.net
Web site - www.accutemp.net

MP4008-0910
EVOLUTION STEAMER OWNERS MANUAL
Page 3
BUILDING CODES and STANDARDS
The steamer must be installed in accordance with the following building codes:
International Plumbing Code 2003, ICC or Uniform Plumbing Code 2003, IAMPO.
USA: National Electric Code, ANSI/NFPA-70, state and local codes. Canada:
Canadian Electric Code, CSA C22.2 and local codes.
UNPACKING
This steamer was inspected before shipment from the factory. The shipping company
accepts full responsibility for safe delivery. Immediately after unpacking, check the steamer
for possible shipping damage. If damage is identified save the packaging material and
contact the shipping carrier immediately.
LOCATION AND PLACEMENT
To insure maximum benefit of your warranty; location, placement and leveling are critical.
The AccuTemp Evolution steamer is designed for installation on either a commercial kitchen
countertop or an AccuTemp steamer stand. Your Evolution steamer is equipped with vents
to allow the proper ventilation of air through the electrical compartments. On E6 models,
the vents are located on the bottom and rear panels. To ensure these vents work properly,
a minimum 4-inch (102 mm) clearance from these vents must be allocated. It is also
recommended that the Evolution not be placed under other wet equipment or locations.
Steam Escapes from the rear of the steamer. Condensation my occur on nearby
surfaces.
LEVELING
The steamer must be installed in a level condition. An out-of-level condition may cause
improper operation and possible damage. Damage caused by improper leveling is not
covered by warranty. Use a spirit level, resting on the top steamer cabinet surface, to
ensure it is level front-to-back and left-to-right.
COUNTER TOP INSTALLATION
Set the steamer on a hard level surface that can support the weight of the steamer. Install
the four rubber feet tips provided with your steamer onto the foot adjuster of each of the
steamer legs as shown in Fig 1. This will keep the steamer from sliding on the counter-top
under normal use. Once the rubber foot tips have been installed, rotate the foot adjusters
up or down as needed to level the steamer.
Fig 1
INSTALLATION

MP4008-0910
EVOLUTION STEAMER OWNERS MANUAL
Page 4
SINGLE STEAMER STAND INSTALLATION
The AccuTemp SNH10 single stand is equipped with adjustable height feet and the model
SNH11 single stand is equipped with non-adjustable height casters. Both can be used with a
single E6 model Evolution steamer. Before mounting a steamer on the SNH11 stand, engage
the two front locking casters, pressing on the “ON” handle of the brake mechanism. To
mount the steamer, carefully lift and place it on the horizontal mounting brackets
ensuring that the (4) mounting holes on the underside of the Evolution are lined up with
mounting holes of the brackets. Then, using a
7
/
16
” wrench, fasten one pair of the
1
/
4
” -20
hex bolt and
1
/
4
” split lock washer through the underside of each stand bracket mounting
hole into the Evolution and tighten securely. With the SNH10 stand, level the steamer by
adjusting the feet found at the ends of each stand leg, either up or down as needed.
WARNING
When using a stand that is equipped with casters, the floor surface must be level
and flat. Failure to do so can result in a “tipping” hazard that could result in
serious injury.
!
DOUBLE STEAMER STAND INSTALLATION
The AccuTemp SNH20 double stand is equipped with adjustable height feet and the
AccuTemp SNH21 double stand is equipped with non-adjustable height casters. Both
stands can accommodate two E6 model Evolutions. Before mounting a steamer on the
SNH21 stand, engage the brakes on the two front locking casters, pressing on the “ON”
handle of the brake mechanism. Always mount the first EVOLUTION on the bottom of the
stand. To mount the bottom steamer, carefully lift and place it on the horizontal mounting
brackets, ensuring that the (4) mounting holes on the underside of the Evolution are lined
up with the mounting holes on the brackets. Then, using a 7/16” wrench, fasten one pair
of the 1/4"-20 hex bolts and 1/4" split lock washers through the underside of each stand
bracket mounting hole into the Evolution and tighten securely. Once the bottom steamer
has been installed, carefully lift and place the top Evolution steamer on the horizontal
mounting brackets, ensuring that the (4) mounting holes on the underside of the Evolution
are lined up with the mounting holes on the brackets. Then, using a 7/16” wrench, fasten
one pair of the 1/4"-20 hex bolts and 1/4" split lock washers through the underside of
each stand bracket mounting hole and tighten securely. With the SNH20 stand, level the
steamers by adjusting the feet found at the ends of each stand leg, either up or down as
needed.
INSTALLATION

MP4008-0910
EVOLUTION STEAMER OWNERS MANUAL
Page 5
INSTALLATION
CONNECTIONLESS MODELS
This model must be manually filled. A full-size steam table pan or a 1/1 gastronome pan with
a minimum depth of 4” must be installed in the rails underneath the steamer (See Fig. 2)
Failure to install this pan during normal operation can cause damage. It is essential when
draining not to spill or open the drain without this installed. Warranty doesn’t cover any failure
due to this pan not being installed. This pan is not supplied with the steamer and is the
owners responsibility.
WATER LINE CONNECTION - CONNECTED MODELS
The Installer/Owner is responsible for the water connection of this appliance. This appliance is
to be installed to comply with all applicable federal, state, or local plumbing codes. The
National Sanitation Foundation (NSF) requires installation of a check-valve (or other approved
anti-backflow / anti-siphon device) (not provided) in all supply lines in accordance with and as
required by local, state, and national health, sanitation, and plumbing codes.
Fig. 2
CONNECTED MODELS
This model requires a water line connection and a drain connection. These parts are not
supplied with the steamer and are the owners responsibility.
Water Line Connection
Connected Models Only
Fig. 3
Full Size Steam Table Pan
4” Deep
This pan is an optional accessory and must
be supplied by the customer

MP4008-0910
EVOLUTION STEAMER OWNERS MANUAL
Page 6
Check local codes to determine exactly what type of anti-backflow/anti-siphon device
is necessary to meet local requirements.
Design the water supply line so the unit can be moved for service. Install a manual
water shutoff valve between the water supply line and the steamer supply line.
The Garden Hose Thread (GHT) connector used must be NSF rated for food grade
service.
Do not apply pipe thread sealant to GHT connections.
Install a manual water shut-off valve (Main Water Shutoff Valve) (not provided)
between the cold water supply line and the appliance.
must be less than 180 °F.
A NSF rated reinforced rubber or braided stainless steel appliance hose rated for the
temperature and pressure of the water supply with a 3/4” garden hose type
connection is required.
The hose must not be sharply bent, kinked or twisted.
If the steamer is close to a wall, use a right angle fitting to prevent kinking the hose
Flush the water supply line before connecting the line to the appliance.
Connect the water supply line to the steamer.
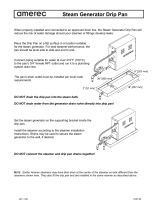
DRAIN LINE CONNECTION –CONNECTED MODELS ONLY
Floor Drain
The steamer should be located close to but not over a floor drain. Connect a ¾” reinforced
rubber hose rated for 212° F or higher to the drain fitting underneath the steamer with a hose
clamp. Run the hose to the drain. DO NOT directly plumb the steamer to the drain, Leave a
one-inch air gap between the hose and the drain as shown in Fig 4.
WATERLINE CONNECTION - CONNECTED MODELS
Fig. 4
INSTALLATION

MP4008-0910
EVOLUTION STEAMER OWNERS MANUAL
Page 7
Optional Drain Connection
Run the hose to a funnel fitting leaving a one-inch gap between the hose and the top of the
funnel as shown in Fig 5. The drain hose must slope toward the floor drain or funnel.
INSTALLATION
HOOD VENTILATION
Some local building codes may require the steamer to be located under an exhaust hood.
Please check local building code requirements before completing installation of the steamer.
Fig. 5

MP4008-0910
EVOLUTION STEAMER OWNERS MANUAL
Page 8
INTRODUCTION
The AccuTemp Evolution steamer uses the time-proven method of cooking with steam. Once
the cooking time expires, the steamer can be set to the “Hold” mode. In this mode, the
thermostat regulates the internal temperature. At this time, steam is no longer generated and
the cooking chamber is held at the desired temperature at a relative humidity of 100%. This
eliminates food from drying out by suppressing the evaporation of the products’ natural
moisture. As a result, most food products can be held in a ready-to-serve state for several
hours after cooking with no appreciable loss in taste, appearance or consistency.
OPERATION
Operator Display
&
Keypad
Magnetic Door Latch
Warning
Indicators
Drain
Condensate Tray
Connected Models Only
Fig. 6

MP4008-0910
EVOLUTION STEAMER OWNERS MANUAL
Page 9
Pan Rails
Steam Distributor
Steam Distributor
Retaining Knobs
( 4 knobs )
Steam Collector
Fig. 7
OPERATION
Cooking Compartment

MP4008-0910
EVOLUTION STEAMER OWNERS MANUAL
Page 10
On/Off
Fig. 6
High Water Lamp
Timer
Cook or Hold
Operator Display
Pre-Heat mode displayed
Increase Time
Display Temperature
Decrease Time
Low Water
Lamp
Over
Temperature
Lamp
Fig. 8
OPERATION

MP4008-0910
EVOLUTION STEAMER OWNERS MANUAL
Page 11
DAILY PREPARATION FOR USE - CONNECTED MODELS
Preparing the Evolution Connected model for use each day requires very little
time and effort. Simply verify that the steamer is clean, the water line to the
steamer is turned on and the drain valve is in the closed position. Close the door
and push the ON/Off key on the keypad. The steamer will automatically fill and
preheat.
Since the Evolution automatically senses the water level and refills as required.
there is no need to manually fill the steamer.
PREHEATING ( Fig. 9)
1) Depress the On/Off Key to turn on the steamer. The display will indicate PrE
while in Cook Mode and the temperature while in the Hold Mode.
2) Once the steamer is preheated and ready to cook, the display will indicate the
COO (Cook Mode) or HLd (Hold Mode).
3) Depress the DISP TEMP button to display the current cooking temperature.
COOKING ( Fig. 10)
1) Depress the COOK/HOLD button to select the Cook Mode (COO).
2) Open the door and place food into the cooking chamber. Shut the door.
Cooking begins immediately.
3) Timer
—
Depress the TIMER button and depress the ARROW keys
[▲ or ▼] until the desired time is displayed. The timer starts
automatically. At the end of the timed cycle, a beeper will sound.
4) Depress the DISP TEMP button to display the current cooking chamber.
temperature.
HOLDING (Fig. 11)
In “hold” the steamer temperature is set for 180° F from the factory. The hold
temperature can be changed to a single value for temperatures ranging from
150° F to 190° F if required. Contact the Accutemp Technical Service Department for
assistance at 800.480.0415 or 260.469.3040.
Hold can also be used during downtimes to save energy and water while keeping the
steamer preheated.
1) Depress the COOK/HOLD button to select the Hold Mode (HLd).
2) Open the door and place food into the cooking chamber. Shut the door.
3) Food will be held at the preset holding temperature. The factory setting is set
at 180° F.
4) Depress the DISP TEMP button to display the current cooking chamber
temperature.
Fig. 9
Fig. 10
Fig. 11
OPERATION

MP4008-0910
EVOLUTION STEAMER OWNERS MANUAL
Page 12
PREHEATING ( Fig. 11)
1) Depress the On/Off Key to turn on the steamer. The display will indicate PrE.
2) Once the steamer is preheated and ready to cook, the display will indicate COO
(Cook Mode) or HLd (Hold Mode).
3) Depress the DISP TEMP button to display the current cooking chamber
temperature.
COOKING ( Fig. 12)
1) Depress the COOK/HOLD button to select the Cook Mode (COO).
2) Open the door and place food into the cooking chamber. Shut the door. Cooking
begins immediately.
3) Timer
—
Depress the TIMER button and depress the ARROW keys [▲
or ▼] until the desired time is displayed. The timer starts
automatically. At the end of the timed cycle, a beeper will sound.
4) Depress the DISP TEMP button to display the current cooking chamber
temperature.
HOLDING (Fig. 13)
In “Hold” the steamer temperature is set for 180° F from the factory. The hold
temperature can be changed to a single value for temperatures ranging from
150° F to 190° F if required. Contact the AccuTemp Technical Service Department for
assistance at 800.480.0415 or 260.469.3040.
Hold can also be used during downtimes to save energy and water while keeping the
steamer preheated.
1) Depress the COOK/HOLD button to select the Hold Mode (HLd).
2) Open the door and place food into the cooking chamber. Shut the door.
3) Food will be held at the preset holding temperature. The factory default
setting is set at 180° F.
4) Depress the DISP TEMP button to display the current cooking chamber
temperature.
Fig 11
Fig 12
Fig.13
Preparing the Evolution Connectionless model for use each day requires very little
time and effort. Simply verify that the steamer is clean, the drain valve is in the closed
position and the cooking chamber is filled with approximately 2½ gallons of tap water.
Close the door and push the ON/Off key on the keypad. The water level will need to be
monitored and filled as required. Do not use the low water warning lamp as the indicator
to check the water level as this can damage the steamer over time.
DAILY PREPARATION FOR USE - CONNECTIONLESS MODEL
OPERATION

MP4008-0910
EVOLUTION STEAMER OWNERS MANUAL
Page 13
OPERATION - ALL MODELS
PARTIAL LOADS
The Evolution is designed to cook quickly with exceptional pan-to-pan uniformity on
full loads of food. Excellent pan-to-pan uniformity can be achieved with partial loads
if the pans are optimally placed in the steamer. For partial loads using 2½” deep
pans, the top position in the steamer is used first followed by the second pan
placed in third pan position from the top and then the third pan in the fifth pan
position from the top. (See Fig. 14) Placing the pans in these positions will optimize
the cooking time and pan-to-pan uniformity.
CHECKING FOOD WHILE COOKING
To maximize efficiency, while minimizing cooking time, it is always recommended
to allow the product to finish its cook cycle before opening the cooking chamber
door. The door may be opened at any time to check or remove the
product but this should be avoided as it will cause extended cook times for the
products.
Recipes for the Evolution can be found on the web at www.accutemp.net or
contact our corporate chef at 800.210.5907
First Pan
Top Position
Second Pan
Third Pan
Fig. 14

MP4008-0910
EVOLUTION STEAMER OWNERS MANUAL
Page 14
CLEANING - CONNECTED MODELS
Warning: Do not use a water jet or pressure washer to clean the steamer
DAILY CLEANING
1) Turn the steamer off and wait for the steamer to cool.
2) Open the drain valve and allow the cooking compartment to drain completely. Remove
the pan racks, steam collector, overfill sensor and condensate tray for cleaning. Wipe
the inside of the cooking chamber, water sensors, pan rails, steam collector, overfill
sensor, and condensate tray with a clean cloth.
3) Re-install the overfill sensor, steam collector, pan rails and condensate tray. Leave the
door open overnight.
(NOTE: The steamer will not operate without the overfill sensor.)
WEEKLY CLEANING
1) Close the drain valve and add 1 cup (8 ounces or 0.24 liters) of white vinegar to the
cooking compartment. Start the steamer in the Cook Mode. The cooking compartment
will automatically fill with water. After 15 minutes, turn the steamer off and allow the
steamer to cool. Then open the drain valve and allow the water in the cooking chamber
to drain completely.
2) To rinse close the drain valve and start the steamer in the Cook Mode. The cooking
compartment will automatically fill with water. After 15 minutes turn the steamer off and
allow it to cool. Open the drain valve and let it drain completely.
3) Remove the pan rails, steam distributor, steam collector, overfill sensor and condensate
tray for cleaning. Clean the water sensors with a non-metallic cleaning pad.
4) Wipe the inside of the cooking chamber, water sensors, pan rails (Fig. 15), steam
distributor (Fig. 15), steam collector (Fig. 15), overfill sensor (Fig. 15), and condensate
tray with a clean cloth.
5) Install the overfill sensor and the steam collector , resting the steam distributor on top of
the steam collector align the 4 retaining fasteners and hand tighten, then install the pan
rails and the condensate tray. Leave the door open overnight.
6) (NOTE: The steamer will not operate without the overfill sensor)
Steam Distributor
Fig. 15
Over-Fill Sensor
Connected Model Only
Steam Generator
Pan Rail
Steam Distributor
OPERATION

MP4008-0910
EVOLUTION STEAMER OWNERS MANUAL
Page 15
WEEKLY CLEANING
1) Close the drain valve and add 1 cup (8 ounces or 0.24 liters) of white vinegar to the
cooking chamber and fill with approximately 2½ gallons of tap water , shut the door and
turn the steamer on.
2) After 15 minutes, turn the steamer off and allow the steamer to cool. Open the drain
valve and allow the cooking chamber to drain completely.
3) To rinse close the drain valve, fill with approximately 2½ gallons tap water , close the
door and start the steamer Cook Mode. Let it run for 15 minutes, turn the steamer off
and allow the steamer to cool. Open the drain valve and allow the cooking chamber to
drain completely.
4) Remove the pan racks, steam collector and steam distributor for cleaning. Clean the
water sensors with a non-metallic cleaning pad. Wipe the inside of the cooking chamber,
water sensors, pan rails (Fig. 16),steam distributor (Fig. 16), steam collector (Fig. 16).
5) Install the steam collector first, resting the steam distributor on top of the collector align
the 4 retaining fasteners and hand tighten and then install the pan rails. Leave door
open overnight.
DAILY CLEANING
1) Turn the steamer off and wait for the steamer to cool.
2) Open the drain valve and allow the cooking chamber to drain completely. Remove
the pan rails (Fig. 16) and steam collector. Wipe the inside of the cooking chamber,
water sensors, pan rails and steam collector with a clean cloth.
3) Install the steam collector and pan rails. Once the water in the drain pan has
sufficiently cooled empty the drain pan wipe down and replace . Leave the door
open overnight.
CLEANING - CONNECTIONLESS
Fig. 16
Steam Generator
Steam Distributor
Pan Rail
OPERATION

MP4008-0910
EVOLUTION STEAMER OWNERS MANUAL
Page 16
SERVICE and TROUBLESHOOTING
GENERAL SERVICE INFORMATION
Conventional steamers require scheduled maintenance (such as boiler maintenance) at
frequent intervals. The Evolution design doesn’t require this type of scheduled maintenance.
To ensure continued safe and reliable operation of your Evolution, only Factory
Authorized Service Personal should perform any component replacement or major
repair.
IMPORTANT SERVICE INFORMATION
AccuTemp Product, Inc. Technical & Customer Support Technician is
available Monday thru Sunday, 7:00am to 7:00pm EST.
800.480.0415 or 260.469.3040
WARNING
Only an AccuTemp Products, Inc. authorized service personnel must perform
Service. Service performed by unauthorized personnel will void all warranties.
Call AccuTemp Products, Inc. Technical Service Hotline at 800.480.0415 or
260.469.3040 for the nearest service agent.
Both high and low voltages are present inside this equipment, even when turned
off. Remove the equipment from all power sources prior to servicing.
To prevent electrical shock, do not open covers. There are no user serviceable
parts on the inside.

MP4008-0910
EVOLUTION STEAMER OWNERS MANUAL
Page 17
WARNING LIGHTS
LOW WATER
—
The steamer is low on water or the water sensors need to be cleaned.
HIGH WATER (CONNECTED MODELS ONLY)
—
DO NOT OPEN THE DOOR!
There is
too much water in the steamer. Open the drain valve and drain water until this Indicator
lamp goes off.
OVERTEMP
—
The steamer has overheated. It may have run out of water. Carefully open
the door, allowing steam to escape and then check the water level in the bottom of the
steamer If it is nearly empty, check the water supply to make sure it isn’t turned off. Clean the
water level sensor probes (white buttons) located in the front left corner and the wall
immediately around them being careful not to get burned (protective gloves are strongly
recommended). Turn the steamer back on and it should refill. If the steamer has plenty of
water, allow it to cool. This normally takes a few minutes. When the Over Temp light goes
out, restart the steamer.
Food Is Over Cooked
Check that the proper cook time is being used.
Food Is Under Cooked
Make sure you are using adequate time and temperature settings. Extra time may be
required if pans are covered or if product is left in plastic bags or similar packaging.
Make sure the steamer is in the Cook Mode, Push the Display Temperature button to
ensure the steamer is at the boiling point of water taking into account your elevation
above sea level. If it isn’t the steamer maybe in the Hold Mode. Variations in
temperature can also be caused by frozen product just being put in or with the con-
nected model a fresh measure of tap water was activated. These will shortly come up to
temperature as long as the door is closed.
Try using perforated pans as they allow steam to penetrate from all directions,
maximizing heat transfer and giving you the shortest cooking times. Try distributing
the product more evenly within the steamer and or pans, if possible.
For partial loads using 2½ ” pans the top position in the steamer is used first fol-
lowed by the third pan position from the top and then the fifth pan position from the
top. Placing the pans in these positions will optimize the cooking time and pan-to-
pan uniformity.
Make sure the water drain valve on the front of the Evolution is tightly closed.
The steamer may appear to be cooking normally if the valve is slightly open but effi-
ciency may be compromised.
Check the door seal for food debris. Food debris on the face of the door seal or under flap
may cause steamer to appear to be cooking normally but efficiency may be compromised.
Nicks or cuts in the door seal may also cause inefficient cooking.
SERVICE and TROUBLESHOOTING

MP4008-0910
EVOLUTION STEAMER OWNERS MANUAL
Page 18
Steamer won’t come on
Verify that the steamer is plugged in to the proper outlet.
Verify that the breaker is turned on.
If the “High Water” warning light is on open the drain valve and drain the water until the
light goes out.
Verify that the float is in place.
Steamer doesn’t heat
If the operator’s display doesn’t light up, See section“ Steamer won’t come on”.
Verify the steamer door is closed, as the heat won’t turn on if the door is open.
Steam comes out the door
Verify that the door is completely closed and latched.
Wait a minute to see if it stops. After the steamer refills with water it is normal for some
steam to come out the door for a brief amount of time, usually less than one minute.
Steamer Temperature is low
When the steamer automatically refills the fresh water-cools the steamer off for a brief
period of time, but the steamer will reheat quickly.
If these don’t solve your problem contact our Technical Service Department .
Phone - 800.480.0415 or 260.469.3040
Email - service@accutemp.net
Web site - www.accutemp.net
SERVICE and TROUBLESHOOTING
/