
1
Installation & Maintenance Instructions
Primed Trim Boards are made of Radiata Pine and coated with mutliple coats of exterior acrylic latex
primer with Jesso coating. Primed Trim Boards are “multi purpose” appearance grade product that is
constructed using BlueLinx North American standards that include exterior glue and exterior primer.
INSTALLATION
A. PREFACE: Controlling Moisture
Every building structure should be designed and constructed to minimize any possible infiltration of
moisture. Moisture infiltration can be reduced & managed by incorporating construction practices that:
Do not allow moisture to accumulate for extended periods without runoff
Minimize moisture penetration by sealing & flashing
Allow water that has penetrated the exterior envelope to easily drain away from the structure
The use of flashing around wall penetrations, such as around window and door openings, can reduce
moisture, but the performance of any building system depends on how its entire design and construction
addresses local environment and climate conditions, building codes, and product and material limitations.
Design and installation of flashing and sealing systems are the responsibility of the architect, contractor
and installer, not that of the manufacturer of the building materials.
B. BEST PRACTICES:
Primed Trim Boards are manufactured to give years of satisfaction and beauty to your home. The best
service will result from installation according to traditional “best practices” for wood construction.
Besides following the Installation Instructions and Maintenance Instructions (next sections), all installers
of Primed Trim Boards should follow these industry “best practices.”
THE DO NOT LIST:
Do not use for structural support purposes
Do not use trim for siding, decking, railing, fences, planters or trellises
Do not allow to be in contact with the ground
Do not place in direct contact with concrete, masonry, patios, porch
es, and/or roofs
Do not install where water sprinklers can regularly wet
Do not install in a manner to allow water to be entrapped behind Primed Trim Boards
Do not use caulking sealant as a substitute for flashing
Do not install
with moisture content over 18%
Do not paint o
ver wet Primed Trim Boards

2
Do not install directly
over rigid foam insulation.
Do not assume your installation crews know what to do.
THE DO LIST:
Do adhere strictly to Primed Trim Boards installation and maintenance instructions
Do follow the local building code requirements
Do follow the highest building industry construction standards
Do install trim to create easy drainage planes to shed water accumulations
Do be aware of potential sources of moisture penetration, (including condensation), around the
building, and modify the design accordingly
Do re-coat all surfaces exposed by jobsite field cuts during installation
Do paint within 30 days of installation
Do re-paint in accordance with the paint manufactures written label instructions
Do make sure you
r installation crews know how to install Primed Trim Boards properly
Primed Trim Board label is applied to the back o
f the product
Primed pro
duct should be installed with finish( front) face visible
C.
DO NOT USE FOR:
HAND RAILS
TRELLISES
FENCES
PLANTERS
DECKING
STAIRS (EXTERIOR)
PERGOLAS
SIDING
Primed Trim Boards are a nonstructural appearance grade decorative trim product and should not be
used where structural lumber properties are required. The trim is designed to be applied to structural
framing, sheathing and other materials.
D. BEFORE YOU BEGIN

3
STORAGE: Before installation, protect Primed Trim
Boards from exposure to direct sunlight,
water saturation, & dirt. Do not allow it to come in contact with ground. (See below for storage
instructions.)
AVOID
MARRING/SCUFFING: During cutting & handling, avoid marring & scuffing Primed
Trim Boards.
NEVER ABOVE 18%
MOISTURE: Before installation, ensure that the Primed Trim Boards are
dry. Do not install Trim that has a moisture content above 18%. (See below for more on moisture
content.)
PRIME ALL CUTS: After cutting, re-coat all exposed surfaces with 2 coats of high quality interior
and or exterior paint to 3 mils of dry finish. (See pages 6 for priming instructions.)
WINDOW/DOORS INSTALLED CORRECTLY: En
sure window and doors are installed in
accordance with the manufacturer’s instructions and local building code specifications, before
trimming with Primed Trim Boards.
NOT IN CONTACT WITH FOAM:
Ensure that Primed Trim Boards are not installed directly
over rigid foam insulation.
ALWAYS INSTALL MATERIALS ACCORDING TO MANUFACTURER’S
INSTRUCTIONS!
E. STORAGE
STORE IN
ENCLOSED BUILDING: Until installed, Primed Trim Boards need protection from
direct sunlight, water saturation, and dirt. Store the Primed Trim Boards flat and off the ground on
stringers so that moisture is not absorbed through the bottom boards of the stack.
EXTRA PRECAUTIONS IF OUTSIDE: Protect with a waterproof cov
ering elevated in the center so
that water does not pool on the cover. Do not completely seal the bundle, as good air circulation is
required. Ideally, Primed Trim Boards should be stored in an enclosed building such as a garage
prior to use.
F. MOISTURE CONTENT - NEVER ABOVE 18%
Do not install Primed Trim Boards with moisture content higher than 18%, and ensure this by use o
f
a moisture meter to gauge moisture content levels for all installations. Primed Trim Boards are
shipped with an average moisture content of 10% to 12%. Storing material in humid environments or
near concrete or dirt will increase the moisture content. Installing material in unheated or
unconditioned environments during wet winter or summer months will also increase moisture content,
resulting in expansion and potential joint failure. Condition the Trim Board material on the jobsite by
allowing it to adjust to an equilibrium moisture condition.
G. FASTENERS
TYPE
Stainless steel and galvanized nails are recommended. Use No. 304 for general applications and No.
316 for seacoast exposures. Other types of fasteners are not recommended; they can rust and
disintegrate resulting in iron stains and streaks. For best results use “split-less” ring shank stainless
steel siding nails. These nails have thin shanks and blunt points to reduce splitting when fastening.
Near edges and ends, nail holes may need to be pre-drilled to avoid splitting

4
SIZE
Nails must be long enough to go through the underlying materials, such as sheathing and insulation,
and penetrate into at least 1-1/4” of solid wood.
COUNTERSUNK
In some situations, you may choose to intentionally countersink nails. If so, follow the same
procedure to fill the cavity as with overdriven nails.
NAIL WITH CARE
Nails should be driven with care. Heav
y nailing distorts the wood and may cause splitting. Like all
wood products, Primed Trim Boards should be hand nailed. The use of pneumatic fasteners is
discouraged; but, if used, they must employ stainless steel or galvanized nails and a flush nailing
device to ensure that nails are driven snug with the surface. Overdriven nails that are not filled with
exterior putty will do not conform to our specifications.
OVERDRIVEN
Overdriven nails must be remedied immediately. Given the situation, fill overdriven nail holes with
an interior or exterior grade wood sealant depending on application. Sealant must be designed for
filling nail holes. Allow sealant to dry, sand smooth with 100 grit sandpaper and spot prime before
painting. Over time, spackling sealant/putty may need to be replaced or touched up.
H. FASTENING REQUIREMENTS
For fascia app
lication, Primed Trim Boards must be double nailed and fastened at a maximum of 24”
on center. For all other applications, fasten trim 24” apart using a staggered nail pattern or double
nail 16” on center. Double nail joints and do not nail any closer than 2” from the edge of material
without drilling pilot holes.
Stagger nails on either side of trim. For 10” & 12” triple, nail joints and double nail stagger patterns.
Note: Nails must penetrate 1-1/4” into the solid wood framing.
I. BUTT JOINTS
Joints over framing. All joints where two pieces meet end to end must occur over framing. Butt joints
are recommended for both horizontal and vertical trim. In runs of 16’ or less, the ends should lightly
touch. Runs over 16 feet require a gap of 1/8 inch, which should be sealed with exterior caulk. Attach
to the framing members with two nails on each side of the joint. Drill pilot holes first to avoid
splitting.
J. CORNER BOARDS
Create tight joints. Always ensure that fasteners penetrate solid framing members. To create a tight
joint between the two corner boards, increase the nailing frequency along the outer side of the corner
boards. Nail into strapping every 24” and pre-drill and fasten along the edge every 16” by pre-drilling
holes and inserting stainless steel wood screws. Stainless steel trim-head screws will reduce the
possibility of splitting and joint failure. Joints should be glued according to glue manufacturer’s
instructions for primed boards. Use high- quality, exterior polyurethane adhesives specifically
designed for wood and wood substrates. Caulk wherever siding or other material is in contact with the
corner boards.

5
K. CORN
ERS FASCIA & RAKE BOARDS
SECURE PIECES PROPERLY When framing members (rafters, outlookers, etc.) are not located
where Primed Trim Board
pieces join, install 1-1/4” solid blocking first and then nail the Trim to it.
Fasten from the face of one Trim member into the edge of another by pre-drilling pilot holes and
inserting stainless steel wood screws.
L. CLEARANCE
REMEMBER: 8, 2, ¼ Water table or skirt boards and corner boards must be a minimum of 8” to 9”
above the finish grade. Trim that extends down to a roof (dormers, second floors, etc.) and decks
requires a minimum 2” gap to avoid wicking. Flashing is imperative, but maintain a 1/4” gap for a
capillary break.
M. FLASHING AT OPENINGS & HORIZONTAL PROFILES
Proper flashing is imperative. Flashing is an important line of defense against water in wall
assemblies. Use flashing to intercept and direct the flow of water away from the building to designed
drainage paths. Install horizontal flashing extending from the top of all windows and doors and where
there is any change in material or direction. The flashing should tilt downward (~30o) to allow water
to drain away from the wall. Do not caulk where the flashing and Trim or other materials meet. Note
that caulking in lieu of flashing is not acceptable.
N. CAULKING
TYPE: Use exterior grade high-performance acrylic-latex, silicone, acrylic, or urethane caulks and
sealants to seal gaps around windows, doors, corners, and other joints that are exposed to potential
water intrusion.
REQUIRES MAINTENANCE: Caulking is not a permanent solution and as such requires regular
maintenance. If not inspected and maintained, caulking may fail and trap water, creating severe water
problems. Do not rely on it as the only barrier to water penetration. Do not caulk areas that will
prevent water from escaping the wall cavity (e.g., under windows and around flashing).
AVOID 3-SIDED ADHESION. The caulk should only adhere to the two surfaces that create the
opening in the surface plane, not to any rigid substrate behind. For gaps wider than 1/4 inch, insert a
backer rod into gaps where caulk seals are to be made, and then caulk over. In all cases, follow the
caulking manufacturer’s recommendations.
O. DECK & COLUMN WRAPS
When using Primed Trim to face
building materials such as treated lumber, structural beams and
posts, or any framing material, always apply housewrap before installing any finishing material.
Where Primed Trim Boards are used to finish rim joists, protect the top edge from water intrusion by
applying a strip of self-adhesive membrane over the rim joist and Primed Trim Board. It is important
that water not pool between the framing lumber and the decorative Primed Trim Boards.
Incorp
orate an air cavity. Columns wrapped in Primed Trim Boards must be constructed to
incorporate an air cavity between the Primed Trim Boards and the underlying core. Ventilation
and drain holes must be included at the top and bottom to ensure proper airflow and drainage.
P. PRIME ALL CUTS

6
VASCULAR STRUCTURE: At a microscopic level, the grain structure of the wood substrate is like
a stack of drinking straws and can absorb water more than 50 times faster than the other surfaces of a
board. Priming all cuts mitigates water absorption & helps ensure a long lasting project.
PRIME ALL CUTS BEFORE INSTALLATION: This includes cuts that cannot be seen or may not
be directly exposed to weather.
All cuts must be reprimed. Prior to installation, all trim board surfaces exposed by jobsite field cuts
must be reprimed. In wet climates, also treat field cuts with a paintable water repellent preservative
and a latex top coat.
Unprotected cuts of any wood product absorbs water, (even faster on vulnerable end grain). 100%
acrylic-latex primer is acceptable as long as it is able to properly cure according to the primer
manufacturer’s instructions. However, where temperatures drop below 50 degrees Fahrenheit either
during application or within the curing period, use an alkyd oil wood primer to coat all jobsite cuts.
Trim Boards with cuts coated with alkyd oil primer can be installed before drying without
compromising the coating’s effectiveness. Above 50 degrees, a high quality 100% acrylic-latex
primer will suffice to coat exposed end grain if allowed to dry before installation. With either primer,
follow manufacturer’s recommendations.
NOTE: If <35
○
in colder weather (below 35
○
F), follow these steps:
1. Precut the trim and take it into a heated building where the temperature is maintained above
50
○
Fahrenheit.
2. Ensure the trim is dry and then prime the cuts with a 100% acrylic-latex primer.
3. Allow the re-primed trim to dry overnight and then proceed with installation.
Q. PAINTING THE TRIM
Pain
t Primed Trim Boards with two coats of high-quality, 100% acrylic-latex interior/exterior
paint
(depending on application) as soon as possible after installation, preferably within 30 days after
installation, according to industry best practices. The surface must be free of dust, dirt or mildew
before painting. Wash away any foreign material with water and a mild detergent, and allow the
surface to dry before painting. Apply paint according to manufacturer’s specifications and
recommended spread rates and number of coats. Do not use paints with vinyl-based resin
combinations. Brush application of primers and top-coats ensures best coverage and protection.
CAUTION:
Wood dust produced by sawing, sanding, or machining wood and wood products can be hazardous.
• Wood dust is flammable and presents a possible explosion hazard.
• Wood dust may cause respiratory, eye, and skin irritation.
• Wood dust from some tree species may cause dermatitis or allergic response.
• The International Agency for Research on Cancer (IARC) classifies wood dust as a nasal carcinogen
in humans.
• The National Toxicology Program (NTP) classifies wood dust as a human carcinogen.
MAINTENANCE

7
No home is maintenance
-free. Every building is subject to wear and tear from weather conditions and
occupant usage. All building components have a design service life, which may be affected by
environmental conditions and installation and maintenance measures. All building components require
regular inspections and scheduled maintenance to maximize their performance and service life. The
maintenance instructions set out below provide some guidelines for such inspections and maintenance. If
any damage to trim occurs due to the homeowner’s failure to follow proper maintenance procedures, or to
mitigate any damage, including damage caused by water penetration, the damage is excluded.
EXTERIOR PAINT:
Exterior paint is applied primarily to protect the wood substrate. Paint coatings increase the durability of
the Trim and must be checked annually for wear including cracking and peeling. Damage to the paint film
must be corrected immediately. Trim installed on the south and west sides are subject to the most
weathering, and dark or bright colors fade more rapidly on these exposures. Wood siding and trim require
re-coating whenever the surface begins to fade, discolor, or peel. Primed Trim Boards should be
repainted in accordance with the paint manufacturer’s written instructions. Trim should be painted with
the best available acrylic latex coating applied at the manufacturer’s recommended spread rates.
CLEANING:
Remove dirt from the trim with a mild detergent, a gentle brush and a garden hose. Never use a pressure
washer to clean the trim. Excessive water pressure can cause damage to the surface of the wood, and force
water into the wall cavity.
Over time, mildew and moss can grow on a shaded surface on any type of trim. A mild solution of bleach
and water may remove this growth. Wall surfaces should be washed from the bottom upwards; otherwise,
the lower portions of the wall will become excessively stained as they absorb the contaminants washing
down from above.
FLASHING:
Flashing redirects water away from the face of the building and allows water to drain from behind the
exterior wall finish. Flashing is normally installed at junctions of dissimilar materials and above door and
window openings. Flashing may also be installed at each floor level to anticipate movement in the
exterior finish as the building settles. Flashing requires periodic washing to remove grime and re-painting
if corrosion of metal appears. Upon installation, flashing is sloped downwards to the outer edge in order
to drain water. If, with building settlement, flashings begin to slope upward towards the building, repairs
should be made to correct the slope that, ideally, should be 30o.
NAILS:
Rusty nails indicate one of the following:
1. That the wrong nails were used.
2. The protective coating of the nail has broken down.
3. The wood is being subjected to prolonged periods of water.*
*If water is soaking into the wood trim, the moisture source must be eliminated and the trim checked for
water damage. If the trim was installed by counter sinking nails, the sealant used to fill nail holes should
also be checked. If it has fallen out, the holes must be filled with an exterior grade wood putty sealant
designed for filling nail holes. Rust should be scraped & a corrosion resistant coating should be applied to
the nail heads. After it has dried, the holes should be filled.

8
SEALANTS
:
Flexible sealing compounds are referred to as caulking. Caulking is used to seal gaps between dissimilar
materials on the building and to seal gaps or joints in finishes. Buildings normally experience some
settlement/ shrinkage of the building components which, in turn, cause settlement of flashing and
damaged caulking. These areas should be immediately corrected as failure to do so will likely lead to
water ingress into the building envelope. As a building moves during settlement, the caulking experiences
considerable stress. Since caulking helps keep water out of the building envelope, it should be examined
annually before the wet weather arrives. Any cracked, damaged, or loose caulking should be removed and
replaced with high- performance acrylic-latex, silicone, acrylic, or urethane caulks or sealants.
General Site Maintenance:
The building envelope is comprised of components and materials which separate and protect the interior
of the building from adverse climate conditions such as water penetration, or heat and air flow. Exterior
wood trim is only one component of the building envelope, but its optimal performance can depend on the
entire building having been properly maintained. Exterior paint failure or decay in wood trim & siding is
usually caused by water penetration, which may result from improper installation (see instructions above),
or negligent maintenance (e.g., failure to repaint or maintain as described in this section).
WINDOWS
The flashing and caulking used to prevent water from entering behind the window and trim should be
checked annually. Most window designs incorporate a drainage track at the bottom of the window to
collect any water. These tracks have weep holes to the outside to drain this water. These holes must be
kept clean and can be maintained with a short piece of wire or a cotton swab.
The building envelope is comprised of components and materials which separate and protect the interior
of the building from adverse climate conditions such as water penetration, or heat and air flow. Exterior
wood trim is only one component of the building envelope, but its optimal performance can depend on the
entire building having been properly maintained.
DOORS
Interior and exterior paint failure or decay in wood trim & siding is usually caused by water penetration,
which may result from improper installation (see instructions above), or negligent maintenance (e.g.,
failure to repaint or maintain as described in this section).
Exterior doors are exposed to weather conditions and extreme temperature variations from inside to
outside that can harm the door surface and its surrounding components. The flashing and caulking used to
prevent moisture from entering behind door trim should be checked annually.
GUTTERS & DOWNSPOUTS:
Gutters are installed at the roof perimeter to control the runoff of water. Gutters also prevent water from
collecting at the foundation wall where it could seep into the basement or splash onto the wall surface. If
gutters or down pipes are clogged with debris or ice, water damage can occur. Twice a year, check
gutters, roof drains and downspouts for obstructions such as leaves and moss.
ROOF:

9
Trim used around and o
n the roof should be checked to ensure it is not absorbing water due to inadequate
clearances or snow loads. All penetrations through the roof such as skylights, plumbing stacks, vents, etc.,
need to be checked annually and resealed as necessary. Snow melting on the roof and then freezing in
runoff at un-insulated roof eaves can lead to ice damming which, in turn, causes water to back up under
shingles and results in a leak inside. When ice dams occur, the snow and ice should be removed from
eaves and valleys.
SITE DRAINAGE & GRADING:
Water should not be allowed to pool against foundation walls. Site drainage patterns, such as sloping the
soil away from the building, can prevent surface water from pooling against foundation walls. Flowerbeds
should be graded so as not to interfere with drainage. A minimum clearance of 8” to 9” should separate
the ground and the bottom of exterior wall cladding. Never allow soil or gravel to come in contact with
wood materials or finishes of the building. Review and adjust the spray pattern of sprinkler systems
regularly to prevent spray onto walls.
VENTILATION, CONDENSATION & RELATIVE HUMIDITY
The optimum year-round relative humidity level within residences is approximately 50%. Due to seasonal
variations, this level is difficult to maintain without specialized equipment. Building Code standards
require sealing the building against incidental leakage of warm air to the outdoors. Warm air holds
moisture in suspension until contact with cold surfaces causes condensation, which may then lead to mold
or mildew and moisture penetration into adjacent wood. Control of humidity and condensation requires
proper heating and ventilation to exchange warm moist air for dry cool air from the outdoors.
CORNER BOARDS:
Check them to ensure that all joints are tight and waterproofed & that there is no water damage on the
ends where the trim is in proximity to decks, concrete or landscaping.
Exclusions:
a.
Any Primed Trim Board which is installed despite signs of damage, such as glue failure, or
surface or co
ating imperfections which may impact p
erformance
b. Normal weathering, wear & tear, deterioration or deflection
c. Normal shrinkage of materials caused by drying after construction
d. Materials and labor required for a design
change
e. Any damage that is caused by a homeowner or Third Party, including:
i. Negligent or improper installation or maintenance
ii. Damage caused by rodents or other living creatures
iii. Damage from accidental occurrences including fire, explosion, smoke, water escape,
glass breakage, windstorm, hail, lightning, falling trees, aircraft, vehicles, flood,
earthquake, avalanche, landslide, and changes in underground water table
iv. Defects in materials or work from anyone other than BlueLinx Corporation
f. Diminution in the value of the building
g. Landscaping, both hard and soft, including plants, fencing, detached patios, gazebos and similar
structures
h. Damage to trim on non-residential detached structures including sheds, garages, carports,
boathouses or other structure not an integral part of a residence

10
i. Damage or failure caused by excessive warping, cupping, splitting, cracking and shrinkage of the
fascia and trim material ( as defined by industry standards); of the underlying substrate; falling
objects; faulty or improper storage and installation, lack of proper maintenance; accidental
damage; structural defects; fire, lighting, hurricane, tornado, windstorm, earthquake, hail or other
acts of god; harmful chemicals ( including harmful cleaning compounds), surface
deterioration due to air pollution; misuse; abuse; vandalism; mildew accumulation; scratching;
abrading or
misuse/abuse of the prefinished product after application.
j. Extractive bleeding, mildew, efflorescence, and the color appearance ( as these are not
manufacturing defects)
k. Any damage caused by the failure to take reasonable or timely steps to prevent or mitigate
damages
l.
Lab
or to repair or replace the damaged Primed Trim Boards.
m. Costs or expenses for any material associated with the primed fascia and trim products ( building
paper, caulking, etc. or
n. Costs or expenses as
sociated with time delays or construction penalties
Remedy:
SUCH REPLACEMENT OF DEFECTIVE BOARD OR PAINT IS THE EXCLUSIVE. BLUELINX
CORPORATION SHALL NOT, UNDER ANY CIRCUMSTANCES, BE LIABLE
FOR ANY DIRECT, INDIRECT, SPECIAL, INCIDENTAL, CONSEQUENTIAL OR OTHER
DAMAGES DUE TO DEFECT OR FAILURE OF ITS PRODUCTS, OR FAILURE OF ANY
PRODUCTS OF ANY SUPPLIER OF MATERIALS OR EQUIPMENT TO BLUELINX
CORPORATION. AND ITS AFFILIATES GIVE NO WARRANTIES, EXPRESS OR IMPLIED,
INCLUDING ANY IMPLIED WARRANTY OF MERCHANTABILITY OR FITNESS FOR
PARTICULAR PURPOSE, WHICH ARE HEREBY EXPRESSLY DISCLAIMED AND ECLUDED.
The above constitutes an exhaustive statement, BlueLinx Corporation and affiliates for Primed Trim
Boards. No agent or employee of BlueLinx Corporation, its affiliates, distributors or sales agencies are
authorized to make any different statement or than as stated above. Any statement to the contrary is void.
-
 1
1
-
 2
2
-
 3
3
-
 4
4
-
 5
5
-
 6
6
-
 7
7
-
 8
8
-
 9
9
-
 10
10


PrimeLinx 253128 Installation guide
- Type
- Installation guide
Ask a question and I''ll find the answer in the document
Finding information in a document is now easier with AI
Other documents
-
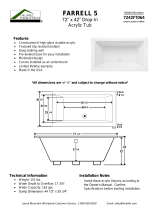 Laurel Mountain 7242FT064 Dimensions Guide
-
GREENWOOD LOA2496MJA-RH User manual
-
 AWP 2500 Operating instructions
-
 L.I.F Industries WSB2868L User manual
-
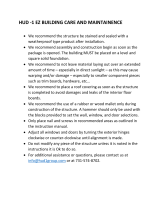
Hud-1 EZ Buildings COTTAGE User manual
-
 EZ Log Structures Betty User guide
-
Outdoor Essentials 402536 User manual
-
La Crosse 705-109 Installation guide
-
Focal Point 10004294 User manual
-
 TruWood 06117 Installation guide


