Garmin GPSMAP 66i Owner's manual

Category
Smartphones
Type
Owner's manual

This manual is also suitable for

GPSMAP
®
66i
Owner’s Manual
© 2019 Garmin Ltd. or its subsidiaries
All rights reserved. Under the copyright laws, this manual may not be copied, in whole or in part, without the written consent of Garmin. Garmin reserves the right to change or improve its
products and to make changes in the content of this manual without obligation to notify any person or organization of such changes or improvements. Go to www.garmin.com for current updates
and supplemental information concerning the use of this product.
Garmin
®
, the Garmin logo, ANT+
®
, Auto Lap
®
, AutoLocate
®
, GPSMAP
®
, inReach
®
, TracBack
®
, VIRB
®
, and Xero
®
are trademarks of Garmin Ltd. or its subsidiaries, registered in the USA and other
countries. chirp
, Connect IQ
, Garmin Connect
, Garmin Explore
, Garmin Express
, MapShare
, and tempe
are trademarks of Garmin Ltd. or its subsidiaries. Powered by Garmin IERCC.
These trademarks may not be used without the express permission of Garmin.
Android
is a trademark of Google Inc. Apple
®
, iPhone
®
, and Mac
®
are trademarks of Apple Inc., registered in the U.S. and other countries. The BLUETOOTH
®
word mark and logos are owned by
the Bluetooth SIG, Inc. and any use of such marks by Garmin is under license. iOS
®
is a registered trademark of Cisco Systems, Inc. used under license by Apple Inc. Iridium
®
is a registered
trademark of Iridium Satellite LLC. microSD
®
and the microSDHC logo are trademarks of SD-3C, LLC. NMEA
®
is a registered trademark of the National Marine Electronics Association. WiFi
®
is a
registered mark of Wi-Fi Alliance Corporation. Windows
®
is a registered trademark of Microsoft Corporation in the United States and other countries. Other trademarks and trade names are those
of their respective owners.
Table of Contents
Getting Started............................................................... 1
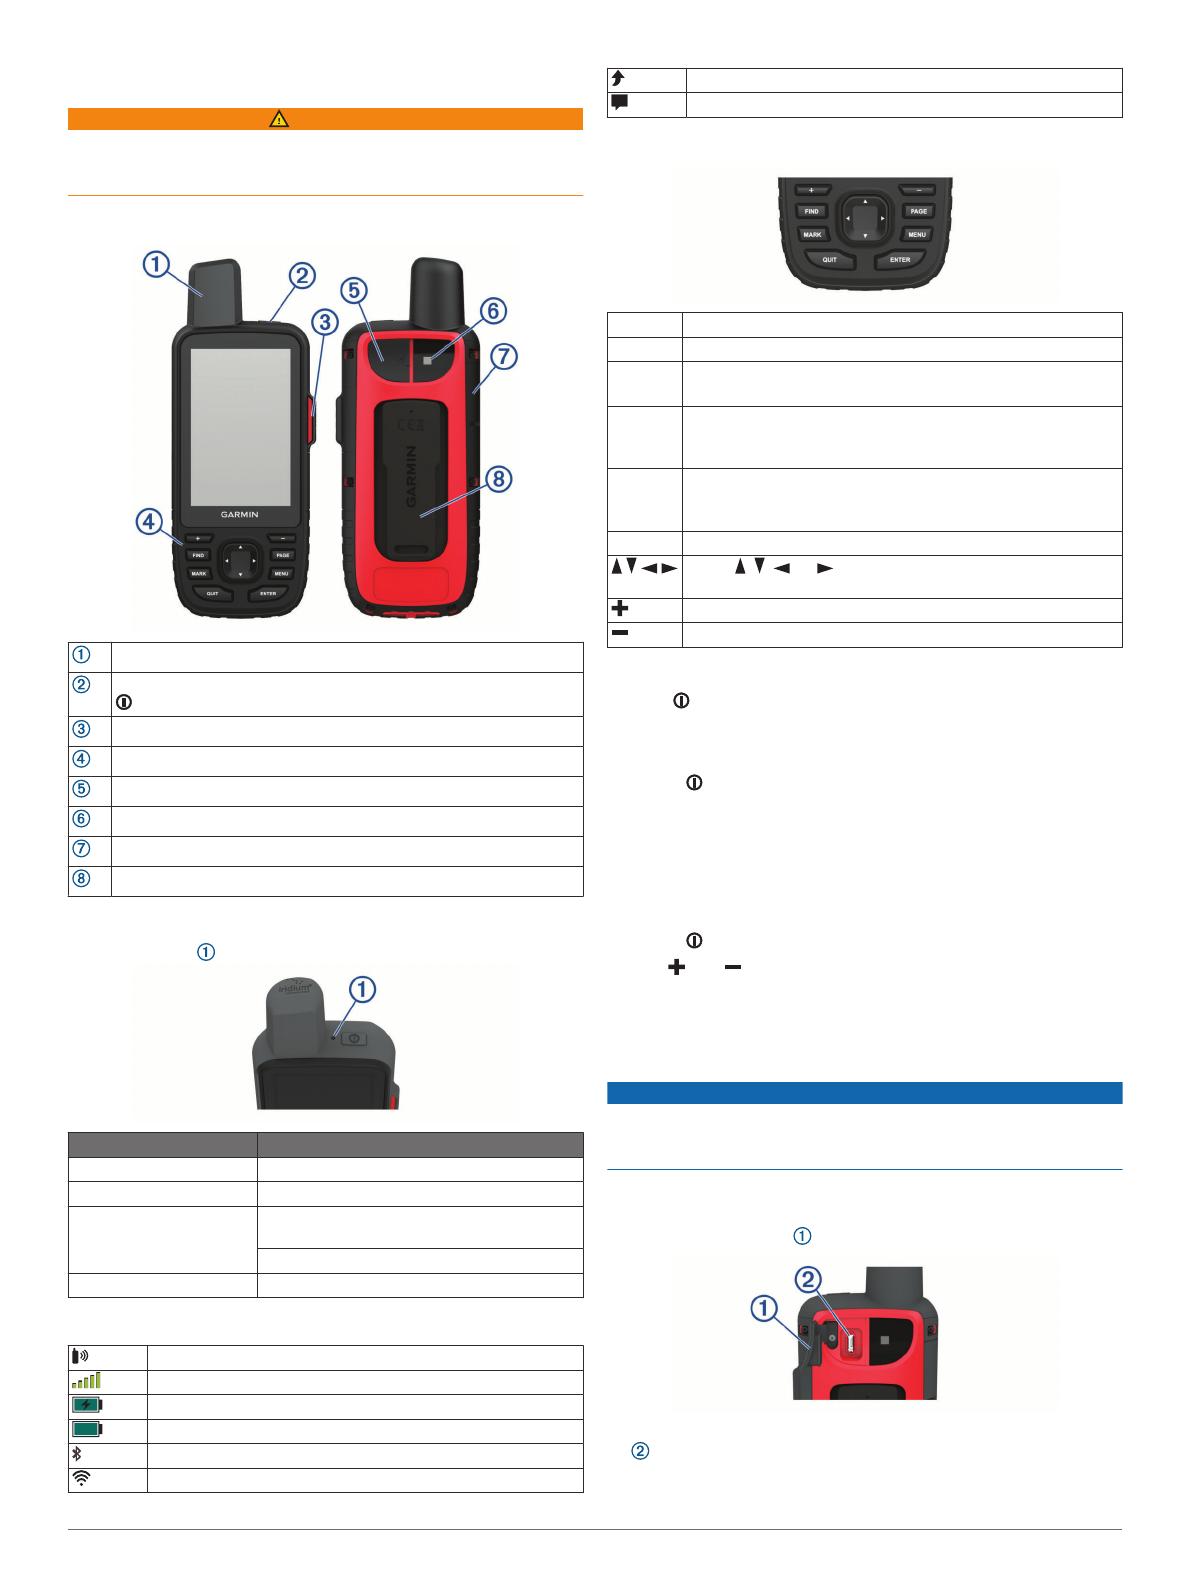
Device Overview......................................................................... 1
Status LED............................................................................. 1
Status Icons........................................................................... 1
Buttons........................................................................................1
Turning On the Device........................................................... 1
Locking the Keys....................................................................1
Turning On the Backlight....................................................... 1
Adjusting the Backlight...........................................................1
Charging the Device................................................................... 1
Saving Energy While Charging the Device................................. 2
Activating the Device.................................................................. 2
Iridium Satellite Network............................................................. 2
inReach Features........................................................... 2
Messages................................................................................... 2
Sending a Preset Message.................................................... 2
Sending a Text Message....................................................... 2
Using Keyboard Shortcuts..................................................... 2
Replying to a Message.......................................................... 2
Checking for Messages......................................................... 2
Viewing Message Details....................................................... 2
Navigating to a Message Location......................................... 2
Including Location Coordinates in a Message....................... 3
Deleting Messages................................................................ 3
Messages Settings.................................................................3
Tracking...................................................................................... 3
Starting Tracking.................................................................... 3
Stopping Tracking.................................................................. 3
Sharing Your MapShare Web Page...................................... 3
inReach Tracking Settings..................................................... 3
SOS............................................................................................ 3
Initiating an SOS Rescue....................................................... 3
Sending a Custom SOS Message......................................... 3
Canceling an SOS Rescue.................................................... 3
Testing the Device.......................................................... 3
Syncing inReach Data.................................................... 3
Contacts.......................................................................... 4
Adding a Contact........................................................................ 4
Editing a Contact........................................................................ 4
Deleting a Contact...................................................................... 4
Using the Main Pages.................................................... 4
Opening the Main Menu............................................................. 4
Map............................................................................................. 4
Changing the Map Orientation............................................... 4
Measuring Distance on the Map............................................ 4
Map Page Settings.................................................................4
Compass.....................................................................................4
Using the Compass................................................................4
Course Pointer....................................................................... 4
Navigating with Sight 'N Go................................................... 5
Compass Settings.................................................................. 5
Trip Computer............................................................................. 5
Trip Computer Settings.......................................................... 5
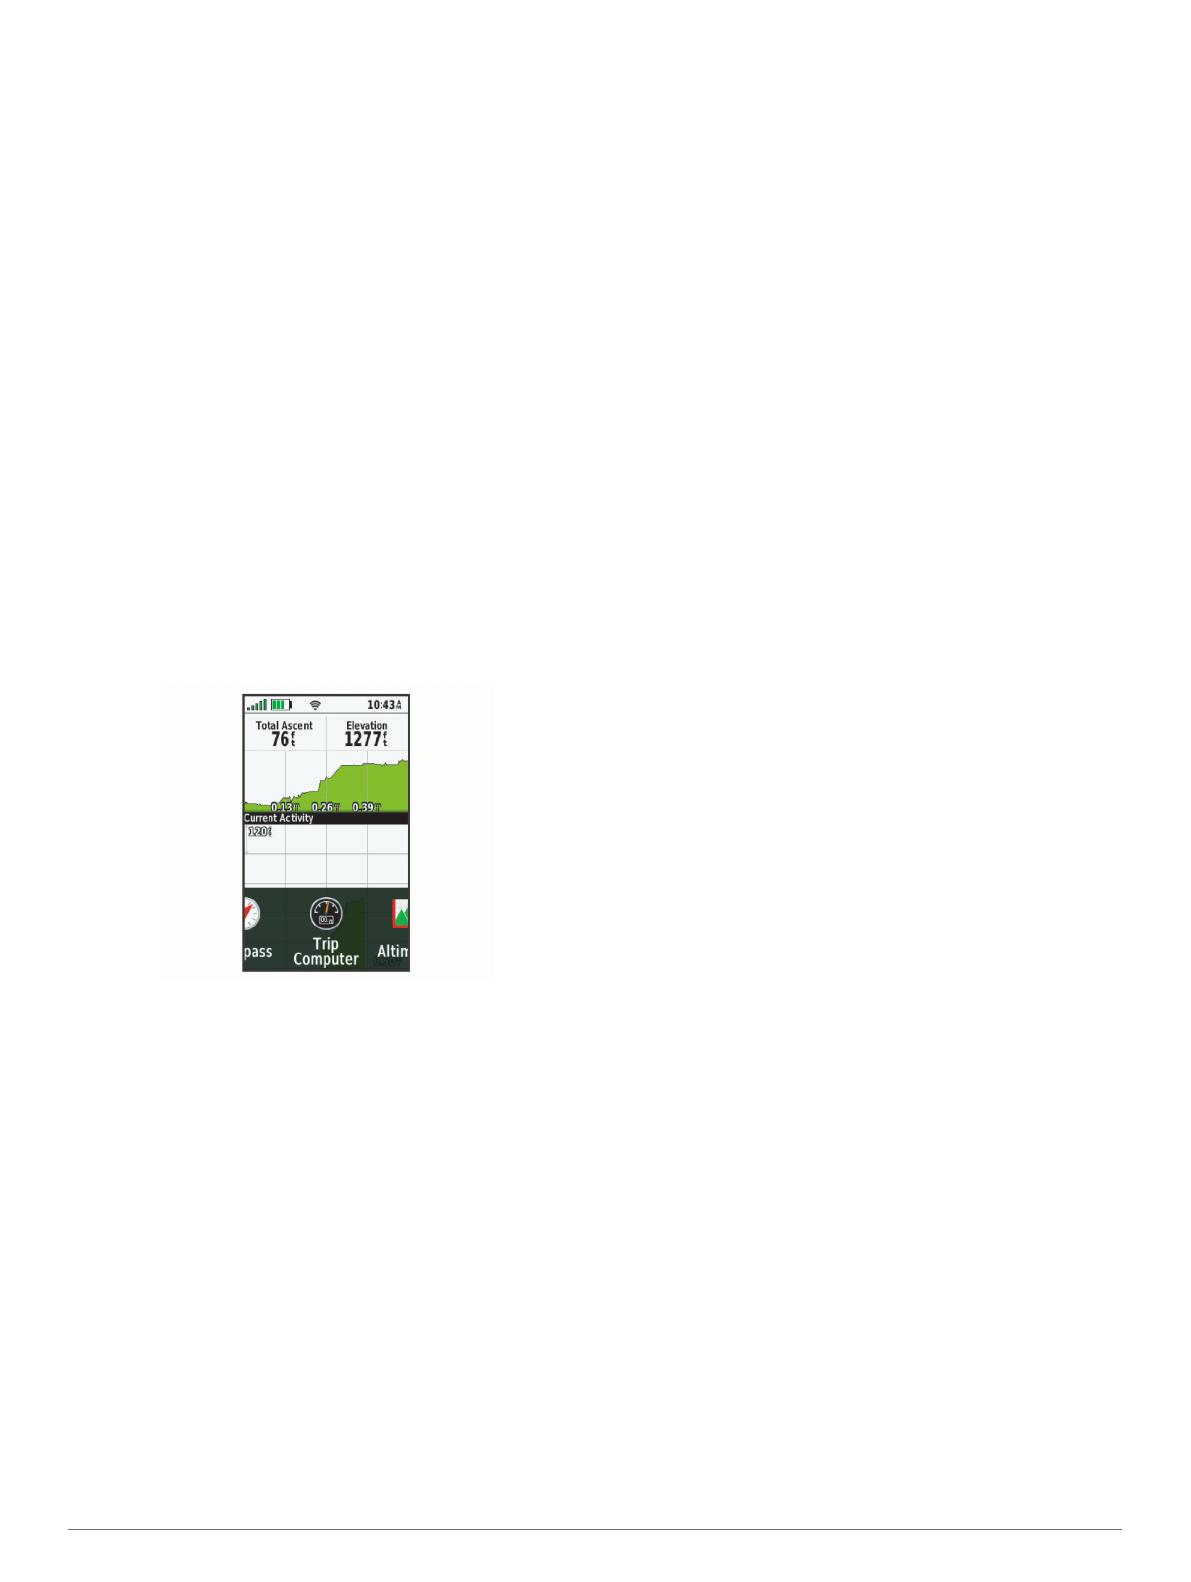
Altimeter......................................................................................5
Altimeter Plot Settings............................................................5
Connected Features....................................................... 6
Connected Feature Requirements............................................. 6
Pairing a Smartphone with Your Device..................................... 6
Phone Notifications..................................................................... 6
Viewing Phone Notifications.................................................. 6
Hiding Notifications................................................................ 6
Managing Notifications...........................................................6
Connecting to a Wireless Network
..............................................6
Connect IQ Features.................................................................. 7
Downloading Connect IQ Features........................................ 7
Downloading Connect IQ Features Using Your Computer.... 7
Viewing Connect IQ Widgets................................................. 7
Garmin Explore........................................................................... 7
Navigation....................................................................... 7
Navigating to a Destination......................................................... 7
Navigating with the Map.........................................................7
Navigating with the Compass................................................ 7
Stopping Navigation............................................................... 7
Waypoints................................................................................... 7
Creating a Waypoint.............................................................. 7
Navigating to a Waypoint....................................................... 7
Editing a Waypoint................................................................. 7
Deleting a Waypoint............................................................... 7
Waypoint Averaging............................................................... 7
Projecting a Waypoint............................................................ 8
Moving a Waypoint on the Map............................................. 8
Finding a Location Near a Waypoint...................................... 8
Setting a Waypoint Proximity Alarm.......................................8
Adding a Waypoint to a Route............................................... 8
Repositioning a Waypoint to Your Current Location.............. 8
Routes........................................................................................ 8
Creating a Route.................................................................... 8
Navigating a Saved Route..................................................... 8
Editing a Route...................................................................... 8
Viewing a Route on the Map.................................................. 8
Viewing the Elevation Plot of a Route.................................... 8
Editing the Name of a Route.................................................. 8
Reversing a Route................................................................. 8
Deleting a Route.................................................................... 8
Recordings..................................................................................8
Recording Settings.................................................................9
Viewing the Current Activity................................................... 9
Navigating Using TracBack®................................................. 9
Stopping the Current Activity................................................. 9
Navigating a Saved Activity................................................... 9
Deleting a Saved Activity....................................................... 9
Reversing an Activity............................................................. 9
Creating a Track from a Saved Activity..................................9
Weather........................................................................... 9
Requesting an inReach Weather Forecast................................. 9
Updating an inReach Weather Forecast.............................. 10
Deleting an inReach Weather Forecast............................... 10
Viewing an Active Weather Forecast........................................ 10
Viewing an Active Weather Map.......................................... 10
Adding an Active Weather Location..................................... 10
Data Use and History................................................... 10
Viewing Plan Details................................................................. 10
Viewing Data Use..................................................................... 10
Main Menu Tools.......................................................... 10
BirdsEye Imagery..................................................................... 11
Downloading BirdsEye Imagery........................................... 11
Geocaches................................................................................11
Registering Your Device at Geocaching.com...................... 11
Downloading Geocaches Using a Computer....................... 11
Geocache Searches............................................................ 12
Filtering the Geocache List.................................................. 12
Viewing Geocache Details................................................... 12
Navigating to a Geocache................................................... 12
Logging the Attempt............................................................. 12
chirp..................................................................................... 12
Removing Live Geocache Data from the Device................. 13
Table of Contents i
Removing Your Device Registration From
Geocaching.com.................................................................. 13
Setting a Proximity Alarm......................................................... 13
Editing or Deleting a Proximity Alarm.................................. 13
Sending and Receiving Data Wirelessly................................... 13
Selecting a Profile..................................................................... 13
Calculating the Size of an Area................................................ 13
Using the VIRB Remote............................................................13
Using the Flashlight.................................................................. 13
Satellite Page............................................................................13
GPS Satellite Settings..........................................................13
Customizing the Device............................................... 13
Customizing the Data Fields..................................................... 13
Setup Menu.............................................................................. 14
System Settings................................................................... 14
Display Settings................................................................... 14
Bluetooth Settings................................................................ 14
WiFi Settings.......................................................................15
Routing Settings...................................................................15
Setting the Device Tones..................................................... 15
Geocaching Settings............................................................ 15
Wireless Sensors................................................................. 15
Fitness Settings................................................................... 15
Marine Settings.................................................................... 15
Menu Settings...................................................................... 15
Position Format Settings...................................................... 16
Changing the Units of Measure........................................... 16
Time Settings....................................................................... 16
Profiles................................................................................. 16
Resetting Data and Settings................................................ 16
Device Information....................................................... 17
Product Updates....................................................................... 17
Setting Up Garmin Express................................................. 17
Getting More Information.......................................................... 17
Battery Information................................................................... 17
Maximizing Battery Life........................................................ 17
Turning On Battery Save Mode........................................... 17
Turning On Expedition Mode............................................... 17
Long-Term Storage.............................................................. 17
Attaching the Carabiner Clip..................................................... 17
Removing the Carabiner Clip............................................... 17
Attaching a Lanyard.................................................................. 17
Device Care.............................................................................. 17
Cleaning the Device............................................................. 17
Data Management.................................................................... 18
File Types............................................................................ 18
Installing a Memory Card..................................................... 18
Connecting the Device to Your Computer........................... 18
Transferring Files to Your Device........................................ 18
Deleting Files....................................................................... 18
Disconnecting the USB Cable..............................................18
Specifications............................................................................18
Viewing E-label Regulatory and Compliance Information........ 18
Appendix....................................................................... 18
Data Fields................................................................................18
Getting More Information.......................................................... 20
Optional Accessories................................................................ 20
tempe................................................................................... 20
Tips for Pairing ANT+ Accessories with Your Garmin
Device.................................................................................. 20
Troubleshooting........................................................................ 20
Restarting the Device...........................................................20
About Heart Rate Zones........................................................... 20
Fitness Goals....................................................................... 20
Heart Rate Zone Calculations.............................................. 21
Index.............................................................................. 22
ii Table of Contents
Getting Started
WARNING
See the Important Safety and Product Information guide in the
product box for product warnings and other important
information.
Device Overview
Internal Iridium
®
and GNSS antenna
Power button
SOS button
Buttons
Micro-USB port (under weather cap)
Flashlight
microSD
®
card slot (under weather cap)
Mounting spine
Status LED
The status LED indicates the device status.
LED Activity Status
Double flashing green You have an unread message.
Flashing green The device is in expedition mode.
Flashing red The device does not have a clear view of the
sky.
The device is below 10% battery power.
Alternating red and green The device is in SOS mode.
Status Icons
ANT+
®
technology status
GPS signal strength
Charging battery
Charging complete
Bluetooth
®
technology status
Wi-fi status
Sending inReach
®
messages
Unread inReach messages
Buttons
FIND Select to open the search menu.
MARK Select to save your current location as a waypoint.
QUIT Select to cancel or return to the previous menu or page.
Select to scroll through the main pages.
ENTER Select to choose options and acknowledge messages.
Select to control the current activity recording (from the Map,
Compass, Altimeter, and Trip Computer pages).
MENU Select to open the options menu for the page that is
currently open.
Select twice to open the main menu (from any page).
PAGE Select to scroll through the main pages.
Select , , , or to select menu options and move the
map cursor.
Select to zoom in on the map.
Select to zoom out on the map.
Turning On the Device
Hold .
Locking the Keys
You can lock the keys to prevent inadvertent key presses.
Select > Lock Keys.
Turning On the Backlight
Select any key to turn on the backlight.
The backlight turns on automatically when alerts and
messages are displayed.
Adjusting the Backlight
1
Select to open the status page.
2
Use and to adjust the brightness.
TIP: You can select NV to reduce the backlight intensity for
compatibility with night vision goggles.
Charging the Device
NOTICE
To prevent corrosion, thoroughly dry the USB port, the weather
cap, and the surrounding area before charging or connecting to
a computer.
NOTE: The device does not charge when it is outside the
approved temperature range (Specifications, page 18).
1
Lift the weather cap .
2
Plug the small end of the power cable into the charging port
on the device.
3
Plug the other end of the power cable into a compatible AC
power adapter.
Getting Started 1
4
Plug the AC power adapter into a standard wall outlet.
5
Charge the device completely.
Saving Energy While Charging the Device
1
Connect your device to an external power source.
2
Hold the power button until the screen turns off.
The device goes into a low power, battery charging mode,
and the battery gauge appears.
3
Charge the device completely.
Activating the Device
Before you can use the inReach features of your GPSMAP 66i
device, you must activate it.
1
Create an account, and select a satellite subscription at
explore.garmin.com.
2
Turn on the device.
NOTE: You must enter the device IMEI number and AUTH
code to complete the online portion of activation before
heading outdoors.
3
Follow the on-screen instructions.
4
From the main menu, select Activate, and go outdoors to an
open area with a clear view of the sky.
5
Wait while the device communicates with the Iridium satellite
network.
NOTE: It may take up to 20 minutes to activate your device.
The device must send and receive several messages, which
takes longer than sending a single message during regular
use.
Iridium Satellite Network
Your device requires a clear view of the sky to transmit
messages and track points over the Iridium satellite network.
Without a clear view of the sky, your device attempts to send the
information until it acquires satellite signals.
TIP: For the best connection with satellites, hold the device with
the antenna pointed toward the sky.
inReach Features
WARNING
Messaging, tracking, and SOS functions require an active
satellite subscription. Always test your device before you use it
outdoors.
Ensure you have a clear view of the sky when using the
messaging, tracking, and SOS functions, because these
features require satellite access to operate properly.
To get the most out of your GPSMAP 66i device, you should
activate it. Activating the device allows you to use inReach
features, including messaging, SOS, tracking, and inReach
Weather.
Messages
Your GPSMAP 66i device sends and receives text messages
using the Iridium satellite network. You can send messages to
an SMS phone number, an email address, or another device
that uses inReach technology. Each message you send includes
your location details where allowed.
Sending a Preset Message
Preset messages are messages that you created at
explore.garmin.com. Preset messages have predefined text and
recipients.
1
From the Messages page, select Send Preset.
2
Choose a preset message, and press ENTER.
3
Press ENTER to send the message.
Sending a Text Message
1
From the Messages page, select New Message.
2
Select an option:
To start with a pre-written message, select Send Quick
Text.
NOTE: You can add and edit quick text messages on the
Garmin Explore
website.
To write a custom message, select Type Message.
3
Choose recipients from your contacts list, or enter a
recipient's contact information.
4
After you have finished your message, select Send
Message.
Using Keyboard Shortcuts
To select the first autocomplete option, select FIND.
To cycle through keyboards, select MARK.
To change character case, select PAGE once, and to turn on
caps lock, select PAGE twice.
To insert a backspace, select .
To insert a space, select .
Replying to a Message
1
From the Messages page, select a conversation.
2
Select Reply.
3
Select an option:
To write a custom message, select Type Message.
To start with a pre-written message, select Send Quick
Text and select a message.
4
When you have finished your message, select Send
Message.
Checking for Messages
When you send a message, your device listens for replies for 10
minutes. The device also checks for new messages every hour.
When you are using the inReach tracking feature, your device
automatically checks for messages at your tracking interval.
NOTE: Your device must be in view of a satellite at the time of
the listen to receive messages.
You can force a check for messages by manually checking for
messages, sending a message, or sending a track point. During
a check, your device connects to satellites and receives
messages waiting to be sent to your device.
From the main menu, select inReach Utilities > Mail Check
> Check Mailbox.
Viewing Message Details
1
Select Messages.
2
Select a conversation.
3
Select a message.
4
Select the information tab.
Navigating to a Message Location
When you receive a message from another device with inReach
technology, the message may include location information. For
these messages, you can navigate to the location from which
the message was sent.
1
Select Messages.
2
Select a conversation with location information.
3
Select the map tab.
4
Select Go.
2 inReach Features
Including Location Coordinates in a Message
If you are sending a message to a recipient who may not have
internet access, you can include your location coordinates in the
message. For example, if your recipient has an older model cell
phone that does not support viewing maps or is outside of a
mobile data coverage area and cannot view a web page.
1
From the Messages page, select New Message > Send
Location.
2
Enter one or more recipients.
3
If necessary, enter a message.
4
Select Send Message.
Deleting Messages
1
From the Messages page, select a conversation.
2
Select MENU > Delete Thread.
Messages Settings
Select Setup > Messages.
Ring Until Read: Sets the device to ring until you read a new
message. This feature is helpful if you are in a noisy
environment.
Notifications: Alerts you to incoming inReach messages.
Tracking
You can use the tracking feature to record track points and
transmit them over the Iridium satellite network at the specified
send interval. Track points appear on the Garmin Explore
website and the MapShare
tracking page.
Starting Tracking
From the main menu, select Tracking > Start Tracking.
NOTE: Starting the Tracking feature also starts the recording
controls.
Stopping Tracking
From the Tracking page, select Stop Tracking.
Sharing Your MapShare Web Page
You can share a link to your MapShare web page with other
people. The system automatically adds text, including link
information, to the end of your message.
1
From the Tracking page, select Send MapShare > Share.
2
Choose recipients from your contacts list, or enter a
recipient's contact information.
3
Select Send Message.
inReach Tracking Settings
Select Setup > Tracking.
Auto Track: Sets the device to start tracking when you turn on
the device.
Moving Interval: Sets the frequency at which the device
records a track point and transmits it over the satellite
network when you are moving. If you are a professional
customer, you can specify the interval when you are
stationary.
SOS
During an emergency, you can use your GPSMAP 66i device to
contact the Garmin
®
International Emergency Response
Coordination Center (IERCC) to request help. Pressing the SOS
button sends a message to the Garmin IERCC, and they notify
the appropriate emergency responders of your situation. You
can communicate with the Garmin IERCC during your
emergency while you wait for help to arrive. You should only use
the SOS function in a real emergency situation.
Initiating an SOS Rescue
NOTE: While in SOS mode, the device cannot be turned off.
1
Lift the protective cap from the SOS button .
2
Hold the SOS button.
3
Wait for the SOS countdown.
The device sends a default message to the emergency
response service with details about your location.
4
Reply to the confirmation message from the emergency
response service.
Your reply lets the emergency response service know that
you are capable of interacting with them during the rescue. If
you do not reply, the emergency response service will still
initiate a rescue.
For the first 10 minutes of your rescue, an updated location is
sent to the emergency response service every minute. To
conserve battery power after the first 10 minutes, an updated
location is sent every 10 minutes when moving, and every 30
minutes when stationary.
Sending a Custom SOS Message
After pressing the SOS button to initiate an SOS rescue, you
can reply with a custom message using the SOS page.
1
From the main menu, select SOS > Reply.
2
Select Type Message to compose a custom SOS message.
3
Select Send Message.
Your reply lets the emergency response service know that you
are capable of interacting with them during the rescue.
Canceling an SOS Rescue
If you no longer need assistance, you can cancel an SOS
rescue after it is sent to the emergency response service.
1
Lift the protective cap, and hold the SOS button.
2
Select Cancel SOS.
3
When prompted to confirm your cancellation request, select
Cancel SOS.
Your device transmits the cancellation request. When you
receive a confirmation message from the emergency
response service, the device returns to normal operation.
Testing the Device
You should test the device outdoors before using it on a trip to
ensure your satellite subscription is active.
From the main menu, select inReach Utilities >
Subscription Test > Test.
Wait while the device sends a test message. When you
receive a confirmation message, your device is ready to use.
Syncing inReach Data
You can sync data from your Garmin Explore account to your
device using the Garmin Explore app. After you make edits to
your data, such as contacts, preset messages, or quick text
messages, you must sync them to your device using the mobile
app.
Testing the Device 3
Open the Garmin Explore app.
Changes made to data such as collections, waypoints,
routes, and tracks update automatically.
You can now sync your data to your GPSMAP 66i device.
Contacts
You can add, delete, and edit contacts on the GPSMAP 66i
device.
Adding a Contact
1
Select Setup > Contacts > New Contact.
2
Select an item to edit.
3
Enter the new information.
Editing a Contact
1
Select Setup > Contacts.
2
Select a contact.
3
Select an item to edit.
4
Enter the new information.
Deleting a Contact
1
Select Setup > Contacts.
2
Select a contact.
3
Select MENU > Delete Contact.
Using the Main Pages
The information needed to operate this device is found on the
main menu, map, compass, and trip computer pages.
1
Select PAGE.
2
Select the active main page.
Opening the Main Menu
The main menu gives you access to tools and setup screens for
waypoints, activities, routes, and more (Main Menu Tools,
page 10, Setup Menu, page 14).
From any page, select MENU twice.
Map
represents your location on the map. As you travel, moves
and displays your path. Depending on your zoom level, waypoint
names and symbols may appear on the map. You can zoom in
on the map to see more detail. When you are navigating to a
destination, your route is marked with a colored line on the map.
Changing the Map Orientation
1
From the map, select MENU.
2
Select Map Setup > Orientation.
3
Select an option:
Select North Up to show north at the top of the page.
Select Track Up to show your current direction of travel at
the top of the page.
Select Automotive Mode to show an automotive
perspective with the direction of travel at the top.
Measuring Distance on the Map
You can measure the distance between multiple locations.
1
From the map, move the cursor to a location.
2
Select MENU > Measure Distance.
3
Select additional locations on the map.
Map Page Settings
From the map, select MENU.
Stop Navigation: Stops navigating the current route.
Map Setup: Enables you to open additional map settings (Map
Settings, page 4).
Measure Distance: Allows you to measure the distance
between multiple locations (Measuring Distance on the Map,
page 4).
Restore Defaults: Restores the map to factory default settings.
Map Settings
From the map, select MENU, and select Map Setup.
Configure Maps: Enables or disables the maps currently
loaded on the device.
Orientation: Adjusts how the map is shown on the page
(Changing the Map Orientation, page 4).
Dashboard: Sets a dashboard to display on the map. Each
dashboard shows different information about your route or
your location.
Guidance Text: Sets when the guidance text is shown on the
map.
Advanced Setup: Enables you to open advanced map settings
(Advanced Map Settings, page 4).
Advanced Map Settings
From the map, select MENU, and select Map Setup >
Advanced Setup.
Auto Zoom: Automatically selects the appropriate zoom level
for optimal use on your map. When Off is selected, you must
zoom in or out manually.
Detail: Selects the amount of detail shown on the map. Showing
more detail may cause the map to redraw more slowly.
Shaded Relief: Shows detail relief on the map (if available) or
turns off shading.
Vehicle: Sets the position icon, which represents your position
on the map. The default icon is a small blue triangle.
Zoom Levels: Adjusts the zoom level at which map items
appear. The map items do not appear when the map zoom
level is higher than the selected level.
Text Size: Selects the text size for map items.
Compass
When navigating, points to your destination, regardless of the
direction you are moving. When points toward the top of the
electronic compass, you are traveling directly toward your
destination. If points any other direction, turn until it points
toward the top of the compass.
Using the Compass
You can use the compass to navigate an active route.
1
Hold the device level.
2
Follow to your destination.
Course Pointer
The course pointer is most useful when you are navigating on
water or where there are no major obstacles in your path. It can
also help you avoid hazards near the course, such as shoals or
submerged rocks.
To enable the course pointer, from the compass, select MENU >
Heading Setup > Go To Line (Pointer) > Course (CDI).
4 Contacts
The course pointer indicates your relationship to the course
line leading to the destination. The course deviation indicator
(CDI) provides the indication of drift (right or left) from the
course. The scale refers to the distance between dots on
the course deviation indicator, which tell you how far off course
you are.
Navigating with Sight 'N Go
You can point the device at an object in the distance, lock in the
direction, and navigate to the object.
1
Select Sight 'N Go.
2
Point the device at an object.
3
Select Lock Direction > Set Course.
4
Navigate using the compass.
Compass Settings
From the compass, select MENU.
Sight 'N Go: Allows you to point the device at an object in the
distance, and navigate using the object as a reference point
(Navigating with Sight 'N Go, page 5).
Stop Navigation: Stops navigating the current route.
Change Dashboard: Changes the theme and information
displayed on the dashboard.
Set Scale: Sets the scale for the distance between the dots on
the course deviation indicator.
Calibrate Compass: Allows you to calibrate the compass if you
experience irregular compass behavior, for example, after
moving long distances or after extreme temperature changes
(Calibrating the Compass, page 5).
Heading Setup: Allows you to customize the compass heading
settings (Heading Settings, page 5).
Change Data Fields: Customizes the compass data fields.
Restore Defaults: Restores the compass to factory default
settings.
Calibrating the Compass
Before you can calibrate the electronic compass, you must be
outdoors, away from objects that influence magnetic fields, such
as cars, buildings, or overhead power lines.
The device has a 3-axis electronic compass. You should
calibrate the compass after moving long distances or
experiencing temperature changes.
1
From the compass, select MENU.
2
Select Calibrate Compass > Start.
3
Follow the on-screen instructions.
Heading Settings
From the compass, select MENU, and select Heading Setup.
Display: Sets the type of directional heading shown on the
compass.
North Reference: Sets the north reference used on the
compass.
Go To Line (Pointer): Sets the behavior of the pointer that
appears on the map. Bearing points in the direction of your
destination. Course shows your relationship to the course line
leading to the destination.
Compass: Automatically switches from an electronic compass
to a GPS compass when you are traveling at a higher rate of
speed for a period of time.
Calibrate Compass: Allows you to calibrate the compass if you
experience irregular compass behavior, for example, after
moving long distances or after extreme temperature changes
(Calibrating the Compass, page 5).
Trip Computer
The trip computer displays your current speed, average speed,
trip odometer, and other helpful statistics. You can customize
the trip computer layout, dashboard, and data fields.
Trip Computer Settings
From the trip computer, select MENU.
Reset: Resets all the trip computer values to zero. For accurate
information, reset the trip information before beginning a trip.
Change Data Fields: Customizes the trip computer data fields.
Change Dashboard: Changes the theme and information
displayed on the dashboard.
NOTE: Your customized settings are remembered by the
dashboard. Your settings are not lost when you change
profiles (Profiles, page 16).
Insert Page: Inserts an additional page of customizable data
fields.
TIP: You can use the arrow keys to scroll through the pages.
Remove Page: Removes an additional page of customizable
data fields.
More Data: Adds additional data fields to the trip computer.
Less Data: Removes data fields from the trip computer.
Restore Defaults: Restores the trip computer to factory default
settings.
Altimeter
By default, the altimeter displays the elevation over the distance
traveled. You can customize altimeter settings (Altimeter
Settings, page 5). You can select any point on the plot to view
details about that point.
Altimeter Plot Settings
From the altimeter, select MENU.
Reset: Resets the altimeter data, including waypoint, track, and
trip data.
Altimeter Setup: Access additional altimeter settings (Altimeter
Settings, page 5).
Adjust Zoom Ranges: Adjusts the zoom ranges shown on the
altimeter page.
Change Data Fields: Allows you to customize the altimeter data
fields.
Restore Defaults: Restores the altimeter to factory default
settings.
Altimeter Settings
From the altimeter, select MENU > Altimeter Setup.
Auto Calibration: Once allows the altimeter to automatically
calibrate one time when you start an activity. Continuous
allows the altimeter to calibrate throughout the duration of
your activity.
Barometer Mode: Variable Elevation allows the barometer to
measure changes in elevation while you are moving. Fixed
Elevation assumes the device is stationary at a fixed
elevation, so the barometric pressure should only change
due to weather.
Pressure Trending: Sets how the device records pressure
data. Save Always records all pressure data, which can be
helpful when you are watching for pressure fronts.
Using the Main Pages 5
Plot Type: Records elevation changes over a period of time or
distance, records barometric pressure over a period of time,
or records ambient pressure changes over a period of time.
Calibrate Altimeter: Allows you to manually calibrate the
barometric altimeter (Calibrating the Barometric Altimeter,
page 6).
Calibrating the Barometric Altimeter
You can manually calibrate the barometric altimeter if you know
the correct elevation or the correct barometric pressure.
1
Go to a location where the elevation or barometric pressure
is known.
2
From the altimeter, select MENU.
3
Select Altimeter Setup > Calibrate Altimeter.
4
Select Method to select the measurement to use in
calibration.
5
Enter the measurement.
6
Select Calibrate.
Connected Features
Connected features are available for your GPSMAP 66 series
device when you connect the device to a wireless network or a
compatible smartphone using Bluetooth technology. Some
features require you to install the Garmin Connect
app or
Garmin Explore app on your smartphone. Go to garmin.com
/apps for more information.
Bluetooth sensors: Allows you to connect Bluetooth
compatible sensors, such as a heart rate monitor using the
Garmin Connect app.
Connect IQ
: Allows you to extend your device features with
widgets, data fields, and apps using the Garmin Connect
app.
EPO Downloads: Allows you to download an extended
prediction orbit file to quickly locate GPS satellites and
reduce the time it takes to get an initial GPS fix using the
Garmin Connect app or when connected to a WiFi
®
network.
BirdsEye imagery: Allows you to download BirdsEye Satellite
Imagery directly to your device when connected to a WiFi
network.
Garmin Explore: The Garmin Explore app syncs and shares
waypoints, tracks, and routes with your device. You can also
download maps to your smartphone for offline access.
Live Geocache Data: Provides paid or subscription-free
services to view live geocache data from
www.geocaching.com using the Garmin Connect app or
when connected to a WiFi network.
Tracking: Allows you to record track points and transmit them
over the Iridium satellite network. You can invite contacts by
sending them an inReach message from the field. This
feature allows your contacts to view your live data on a
MapShare tracking page using your Garmin Explore account.
Phone notifications: Displays phone notifications and
messages on your GPSMAP 66 series device using the
Garmin Connect app.
Software Updates: Allows you to receive updates for your
device software using the Garmin Connect app or when
connected to a WiFi network.
Active Weather: Allows you to view current weather conditions
and weather forecasts using the Garmin Connect app or
when connected to a WiFi network.
Connected Feature Requirements
Some features require a smartphone and a specific app on your
smartphone.
Feature Connected to a Paired
Smartphone with the
Garmin Connect App
Connected to a
WiFi Network
Software updates Yes Yes
EPO downloads Yes Yes
Live geocache data Yes Yes
Weather Yes Yes
Phone notifications Yes
1
No
Connect IQ Yes No
BirdsEye Direct
imagery
No Yes
Pairing a Smartphone with Your Device
1
Bring your compatible smartphone within 10 m (33 ft.) of your
device.
2
From the main menu on your device, select Setup >
Bluetooth.
3
On your compatible smartphone, enable Bluetooth
technology, and open the Garmin Connect app.
4
Follow the on-screen instructions in the Garmin Connect app
to pair your device.
5
Download and open the Garmin Explore app.
6
Log in to the Garmin Explore app using your Garmin Connect
username and password.
7
Select the device option to pair your device with the Garmin
Explore app.
Phone Notifications
Phone notifications require a compatible smartphone to be in
range and paired with the device. When your phone receives
messages, it sends notifications to your device.
Viewing Phone Notifications
Before you can view notifications, you must pair your device with
your compatible smartphone.
1
Select > Notifications.
2
Select a notification.
Hiding Notifications
By default, notifications appear on the device screen when they
are received. You can hide notifications to prevent them from
appearing.
Select Setup > Bluetooth > Notifications > Hide.
Managing Notifications
You can use your compatible smartphone to manage
notifications that appear on your GPSMAP 66i device.
Select an option:
If you are using an iPhone
®
device, go to the iOS
notifications settings to select the items to show on the
device.
If you are using an Android smartphone, from the Garmin
Connect app, select Settings > Smart Notifications.
Connecting to a Wireless Network
1
Select Setup > Wi-Fi.
2
Select the toggle switch to enable WiFi technology, if
necessary.
3
Select Add Network.
4
Select a wireless network from the list and enter the
password, if necessary.
1
The device receives phone notifications from a paired iOS
®
phone directly, and
through the Garmin Connect app on an Android
phone.
6 Connected Features
The device stores the network information and connects
automatically when you return to this location.
Connect IQ Features
You can add Connect IQ features to your device from Garmin
and other providers using the Connect IQ Mobile app. You can
customize your device with data fields, widgets, and apps.
Data Fields: Allow you to download new data fields that present
sensor, activity, and history data in new ways. You can add
Connect IQ data fields to built-in features and pages.
Widgets: Provide information at a glance, including sensor data
and notifications.
Apps: Add interactive features to your device, such as new
outdoor and fitness activity types.
Downloading Connect IQ Features
Before you can download features from the Connect IQ app, you
must pair your GPSMAP 66i device with your smartphone
(Pairing a Smartphone with Your Device, page 6).
1
From the app store on your smartphone, install and open the
Connect IQ app.
2
If necessary, select your device.
3
Select a Connect IQ feature.
4
Follow the on-screen instructions.
Downloading Connect IQ Features Using Your
Computer
1
Connect the device to your computer using a USB cable.
2
Go to apps.garmin.com, and sign in.
3
Select a Connect IQ feature, and download it.
4
Follow the on-screen instructions.
Viewing Connect IQ Widgets
1
Select .
2
Select or to scroll through the widgets.
Garmin Explore
The Garmin Explore website and mobile app allow you to plan
trips and use cloud storage for your waypoints, routes, and
tracks. They offer advanced planning both online and offline,
allowing you to share and sync data with your compatible
Garmin device. You can use the mobile app to download maps
for offline access, and then navigate anywhere without using
your cellular service.
You can download the Garmin Explore app from the app store
on your smartphone, or you can go to explore.garmin.com.
Navigation
Navigating to a Destination
1
Select FIND.
2
Select a category.
3
Select a destination.
4
Select Go.
Your route appears as a magenta line on the map.
5
Navigate using the map (Navigating with the Map, page 7)
or compass (Navigating with the Compass, page 7).
Navigating with the Map
1
Begin navigating to a destination (Navigating to a
Destination, page 7).
2
Select Map.
A blue triangle represents your location on the map. As you
travel, the blue triangle moves and displays your path.
3
Complete one or more actions:
To view different areas of the map, select , , , or .
To zoom in and out of the map, select and .
Navigating with the Compass
When navigating to a destination, points to your destination,
regardless of the direction you are moving.
1
Begin navigating to a destination (Navigating to a
Destination, page 7).
2
Select Compass.
3
Turn until points toward the top of the compass, and
continue moving in that direction to the destination.
Stopping Navigation
Select FIND > Stop Navigation.
Waypoints
Waypoints are locations you record and store in the device.
Waypoints can mark where you are, where you are going, or
where you have been. You can add details about the location,
such as name, elevation, and depth.
You can add a .gpx file that contains waypoints by transferring
the file to the GPX folder (Transferring Files to Your Device,
page 18).
Creating a Waypoint
You can save your current location as a waypoint.
1
Select MARK.
2
If necessary, select a field to make changes to the waypoint.
3
Select Save.
Navigating to a Waypoint
1
Select FIND > Waypoints.
2
Select a waypoint.
3
Select Go.
By default, your route to the waypoint appears as a straight,
colored line on the map.
Editing a Waypoint
1
Select Waypoint Manager.
2
Select a waypoint.
3
Select an item to edit, such as the name.
4
Enter the new information, and select Done.
Deleting a Waypoint
1
Select Waypoint Manager.
2
Select a waypoint.
3
Select MENU > Delete.
Waypoint Averaging
You can refine a waypoint location for more accuracy. When
averaging, the device takes several readings at the same
location and uses the average value to provide more accuracy.
1
Select Waypoint Manager.
2
Select a waypoint.
3
Select MENU > Average Location.
4
Move to the waypoint location.
5
Select Start.
6
Follow the on-screen instructions.
7
When the confidence status bar reaches 100%, select Save.
For best results, collect four to eight samples for the waypoint,
waiting at least 90 minutes between samples.
Navigation 7
Projecting a Waypoint
You can create a new location by projecting the distance and
bearing from a marked location to a new location.
1
Select Waypoint Manager.
2
Select a waypoint.
3
Select MENU > Project Waypoint.
4
Enter the bearing, and select Done.
5
Select a unit of measure.
6
Enter the distance, and select Done.
7
Select Save.
Moving a Waypoint on the Map
1
Select Waypoint Manager.
2
Select a waypoint.
3
Select MENU > Move Waypoint.
4
Select a location on the map.
5
Select Move.
Finding a Location Near a Waypoint
1
Select Waypoint Manager.
2
Select a waypoint.
3
Select MENU > Find Near Here.
4
Select a category.
The list displays locations near the selected waypoint.
Setting a Waypoint Proximity Alarm
You can add a proximity alarm for a waypoint. Proximity alarms
alert you when you are within a specified range of a particular
location.
1
Select Waypoint Manager.
2
Select a waypoint.
3
Select MENU > Set Proximity.
4
Enter the radius.
When you enter an area with a proximity alarm, the device
sounds a tone.
Adding a Waypoint to a Route
1
Select Waypoint Manager.
2
Select a waypoint.
3
Select MENU > Add to Route.
4
Select a route.
Repositioning a Waypoint to Your Current Location
You can change the position of a waypoint. For example, if you
move your vehicle, you can change the location to your current
position.
1
Select Waypoint Manager.
2
Select a waypoint.
3
Select MENU > Reposition Here.
The waypoint location changes to your current location.
Routes
A route is a sequence of waypoints or locations that leads you to
your final destination.
Creating a Route
1
Select Route Planner > Create Route > Select First Point.
2
Select a category.
3
Select the first point in the route.
4
Select Use.
5
Select Select Next Point to add additional points to the
route.
6
Select QUIT to save the route.
Navigating a Saved Route
1
Select FIND > Routes.
2
Select a route.
3
Select Go.
By default, your route appears as a straight, colored line on
the map.
Viewing the Active Route
1
While navigating a route, select Active Route.
2
Select a point in the route to view additional details.
Editing a Route
You can add, remove, or rearrange points on a route.
1
Select Route Planner.
2
Select a route.
3
Select Edit Route.
4
Select a point.
5
Select an option:
To view the point on the map, select Review.
To change the order of the points on the route, select
Move Up or Move Down.
To insert an additional point on the route, select Insert.
The additional point is inserted before the point you are
editing.
To remove the point from the route, select Remove.
6
Select QUIT to save the route.
Viewing a Route on the Map
1
Select Route Planner.
2
Select a route.
3
Select View Map.
Viewing the Elevation Plot of a Route
1
Select Route Planner.
2
Select a route.
3
Select Elevation Plot.
Editing the Name of a Route
You can customize the name of a route to make it distinct.
1
Select Route Planner.
2
Select a route.
3
Select Change Name.
4
Enter the new name.
Reversing a Route
You can switch the start and end points of your route to navigate
the route in reverse.
1
Select Route Planner.
2
Select a route.
3
Select Reverse Route.
Deleting a Route
1
Select Route Planner.
2
Select a route.
3
Select Delete Route.
Recordings
Your device records your path as an activity. Activities contain
information about points along your recorded path, including
time, location, and elevation for each point.
8 Navigation
Recording Settings
Select Setup > Recording.
Record Method: Sets the recording method. The Auto option
records points at a variable rate to create an optimum
representation of your path. You can also record points at
specific time or distance intervals.
Interval: Sets the recording rate. Recording points more
frequently creates a more-detailed path, but fills the recording
log faster.
Auto Pause: Sets the device to stop recording your path when
you are not moving.
Auto Start: Sets the device to start a new recording
automatically when the previous recording ends.
Activity Type: Sets the default activity type for the device.
Advanced Setup: Enables you to open additional recording
settings (Advanced Recording Settings, page 9).
Advanced Recording Settings
Select Setup > Recording > Advanced Setup.
Output Format: Sets the device to save the recording as a FIT
or a GPX/FIT file (File Types, page 18). The FIT option
records your activity with fitness information that is tailored for
the Garmin Connect application and can be used for
navigation. The FIT and GPX option records your activity as
both a traditional track that can be viewed on the map and
used for navigation, and as an activity with fitness
information.
GPX Auto Archive: Sets an automatic archive method to
organize your recordings. Recordings are saved and cleared
automatically.
Trip Recording: Sets a trip recording option.
Recorded Data Reset: Sets a reset option. The Activity and
Trip option resets the recording and trip data when you finish
the active recording. The Prompted option prompts you to
select the data to reset.
Viewing the Current Activity
By default, the device automatically starts recording your path
as an activity when it is turned on and has acquired satellite
signals. You can pause and start recording manually.
1
Select Recording Controls.
2
Select and to view an option:
To control the current activity recording, select .
To view data fields for the activity, select .
To view the current activity on the map, select .
To view the elevation plot for the current activity, select .
Navigating Using TracBack
®
While recording, you can navigate back to the beginning of your
activity. This can be helpful when finding your way back to camp
or the trail head.
1
Select Recording Controls.
2
Select to switch to the map tab.
3
Select TracBack.
The map displays your route with a magenta line, start point,
and end point.
4
Navigate using the map or the compass.
Stopping the Current Activity
1
From the main pages, select ENTER > Stop.
2
Select an option:
To resume recording, select Resume.
To save the activity, select .
To delete the activity and reset the trip computer, select
.
Navigating a Saved Activity
1
Select FIND > Recorded Activities.
2
Select an activity.
3
Select Go.
Deleting a Saved Activity
1
Select Recorded Activities.
2
Select an activity.
3
Select MENU > Delete.
Reversing an Activity
You can switch the start and end points of your activity to
navigate the activity in reverse.
1
Select Recorded Activities.
2
Select an activity.
3
Select MENU > Copy Reversed.
Creating a Track from a Saved Activity
You can create a track from a saved activity. This allows you to
share your track wirelessly with other compatible Garmin
devices.
1
Select Recorded Activities.
2
Select an activity.
3
Select MENU > Save as Track.
Weather
Your GPSMAP 66 device can receive weather information using
two different services. You can receive weather for your current
location.
Active Weather: While your GPSMAP 66i device is connected
to your smartphone or to a WiFi network and has an active
internet connection, it can receive detailed weather
information from the internet. This feature provides a four-day
forecast and live graphical weather maps.
inReach Weather: You can receive weather information through
your inReach subscription. Your device can send an inReach
message to request basic, premium, or marine weather
forecasts. You can receive weather forecasts for your current
location, a waypoint, GPS coordinates, or a location you
choose on the map.
Requesting an inReach Weather Forecast
For the best results, you should ensure your device has a clear
view of the sky when you request an inReach weather forecast.
Your device can send a message to request a basic, premium,
or marine weather forecast using your inReach subscription.
You can receive weather forecasts for your current location, a
waypoint, GPS coordinates, or a location you choose on the
map. Weather forecasts incur data charges or additional
charges on your inReach subscription. For more information
about the different types of forecasts and the associated costs,
go to garmin.com/manuals/inreachweather.
1
Select inReach Weather > New Forecast.
2
If necessary, select Forecast Type, and select a Basic or
Premium weather forecast.
3
If necessary, select Location, and select a location.
By default, the device requests weather for your current
location.
4
If necessary, select Marine to request a marine weather
forecast.
NOTE: For best results, you should only request a marine
forecast for a location away from shore and over a large body
of water. Marine forecasts are not available for land locations
or inland lakes.
Weather 9
5
Select Get Forecast.
The device sends a request for the forecast. It may take several
minutes to receive the weather forecast data.
After the device finishes downloading the data, you can view the
forecast at any time until all the information in the forecast has
expired. You can also update the forecast at any time.
Updating an inReach Weather Forecast
You can update an inReach weather forecast that has expired or
contains outdated information. Updating a forecast incurs the
same data charges or additional charges as requesting a
forecast.
1
Select inReach Weather.
2
Select a location with an outdated weather forecast.
3
Select MENU > Update Forecast.
The device requests an updated forecast. If you update the My
Location forecast, the device requests an updated forecast for
your current location. It may take several minutes to receive the
updated weather forecast data.
Deleting an inReach Weather Forecast
You can delete an expired forecast or a forecast for a location
that you no longer need.
1
Select inReach Weather.
2
Select a weather location.
NOTE: You cannot delete the My Location forecast.
3
Select MENU > Delete.
Viewing an Active Weather Forecast
While your GPSMAP 66 device is connected to your
smartphone or to a WiFi network and has an active internet
connection, it can receive detailed weather information from the
internet.
1
Select Active Weather.
The device automatically downloads a weather forecast for
your current location.
2
Select a day to view an hourly forecast, if available.
3
Select a time interval to view detailed weather information.
Viewing an Active Weather Map
To view an active weather map, your device must be connected
to your smartphone.
While your device is connected to a smartphone or WiFi
network with internet access, you can view a live weather map
showing weather radar, cloud cover, temperature, or wind
conditions.
1
Select Active Weather.
2
Press or to select a weather map tab.
NOTE: Some options may not be available in all areas.
To view a weather radar, select .
To view cloud coverage, select .
To view temperatures, select .
To view wind speeds and directions, select .
The selected data appears on the map. The device may take
a few moments to load the weather map data.
3
Select an option:
To zoom in or out on the map, press or .
To pan up, down, left, or right on the map, press to enter
panning mode, and use the directional pad.
Adding an Active Weather Location
You can add a weather location to view active weather for
waypoints, GPS coordinates, or other locations.
1
While viewing an active weather forecast, select MENU >
Manage Locations > New Location.
2
Select a location.
TIP: The Weather Locations option allows you to quickly
select a location for which you have previously requested an
inReach weather forecast.
3
Select Use.
The device downloads a forecast for the selected location.
Switching the Active Weather Location
You can quickly switch between forecasts for active weather
locations you have previously added.
1
While viewing an active weather forecast, select MENU >
Manage Locations.
2
Select a location from the list.
TIP: The My Location option always downloads a forecast for
your current location.
3
Select Use.
The device downloads the most recent forecast for the
selected location.
Deleting an Active Weather Location
1
While viewing an active weather forecast, select MENU >
Manage Locations.
2
Select a location from the list.
NOTE: You cannot delete the My Location forecast.
3
Select Delete.
Data Use and History
You can view plan details and data use on the GPSMAP 66i
device.
Viewing Plan Details
1
Select inReach Utilities.
2
Select Plan Details.
Viewing Data Use
You can view the number of messages, preset messages, and
track points sent during the current billing cycle. The data use
counter resets automatically at the beginning of each billing
cycle.
1
Select inReach Utilities.
2
Select Plan Usage.
Main Menu Tools
Select MENU twice.
Tracking: Allows you to share and view details about the tracks
you travel.
SOS: Allows you to initiate an SOS rescue.
Messages: Allows you to send a preset or text message using
the Iridium satellite network.
inReach Utilities: Allows you to view details about your
inReach subscription, check mail, and test the device
(inReach Features, page 2).
inReach Weather: Allows you to request basic, premium, or
marine weather forecasts using your inReach subscription
(Requesting an inReach Weather Forecast, page 9).
Recording Controls: Allows you to view details about the
current activity and control the current activity recording
(Viewing the Current Activity, page 9).
10 Data Use and History
Notifications: Alerts you to incoming calls, texts, social network
updates, and more, based on your smartphone notification
settings (Phone Notifications, page 6).
Active Weather: Displays the current temperature, temperature
forecast, weather forecast, weather radar, cloud cover, and
wind conditions (Viewing an Active Weather Forecast,
page 10).
Waypoint Manager: Displays all waypoints saved to the device
(Waypoints, page 7).
Connect IQ: Displays a list of installed Connect IQ apps
(Connect IQ Features, page 7).
BirdsEye Direct: Allows you to download BirdsEye Satellite
Imagery to your device (BirdsEye Imagery, page 11).
Geocaching: Displays a list of downloaded geocaches
(Geocaches, page 11).
Recorded Activities: Displays your current activity and a list of
recorded activities (Recordings, page 8).
Active Route: Displays your active route and upcoming
waypoints (Routes, page 8).
Route Planner: Displays a list of saved routes and allows you to
create new routes (Creating a Route, page 8).
Saved Tracks: Displays a list of saved tracks (Creating a Track
from a Saved Activity, page 9).
Sight 'N Go: Allows you to point the device at an object in the
distance, and navigate using the object as a reference point
(Navigating with Sight 'N Go, page 5).
Proximity Alarms: Allows you to set alerts to sound within
range of particular locations (Setting a Proximity Alarm,
page 13).
Share Wirelessly: Allows you to wirelessly transfer files to
another compatible device (Sending and Receiving Data
Wirelessly, page 13).
Profile Change: Allows you to change the device profile to
customize your settings and data fields for a particular activity
or trip (Selecting a Profile, page 13).
Area Calculation: Allows you to calculate the size of an area
(Calculating the Size of an Area, page 13).
Calendar: Displays a calendar.
Hunt and Fish: Displays the predicted best dates and times for
hunting and fishing at your current location.
Sun and Moon: Displays sunrise and sunset times, along with
the moon phase, based on your GPS position.
Photo Viewer: Displays saved photos.
Waypoint Averaging: Allows you to refine a waypoint location
for more accuracy (Waypoint Averaging, page 7).
Calculator: Displays a calculator.
Alarm Clock: Sets an audible alarm. If you are not currently
using the device, you can set the device to turn on at a
specific time.
VIRB Remote: Provides camera controls when you have a
VIRB
®
device paired with your GPSMAP 66 series device
(Using the VIRB Remote, page 13).
Stopwatch: Allows you to use a timer, mark a lap, and time
laps.
Flashlight: Turns on the flashlight (Using the Flashlight,
page 13).
XERO Locations: Displays laser location information when you
have a Xero
®
bow sight paired with your GPSMAP 66 series
device.
Satellite: Displays your current GPS satellite information
(Satellite Page, page 13).
BirdsEye Imagery
BirdsEye imagery provides downloadable, high-resolution map
imagery, including detailed satellite imagery and raster-based
topographical maps. You can download BirdsEye Satellite
Imagery directly to your device when it is connected to a WiFi
network.
Downloading BirdsEye Imagery
Before you can download BirdsEye imagery directly to your
device, you must connect to a wireless network (Connecting to a
Wireless Network, page 6).
1
Select BirdsEye Direct > Download Imagery.
2
Select an option:
To download BirdsEye imagery files for a specific location
or area, select Location, and select a category.
NOTE: The location defaults to your current location.
To edit the name of the downloaded imagery files, select
Name.
To select an image quality option, select Detail.
To define the size of the area to be shown in the
downloaded imagery files, select Radius, and enter a
distance from the selected location.
An estimated file size appears for the selected image quality
and radius. You should verify your device has enough
available storage space for the imagery file.
3
Select Download.
Geocaches
Geocaching is a treasure hunting activity in which players hide
or search for hidden caches using clues and GPS coordinates.
Registering Your Device at Geocaching.com
You can register your device at www.geocaching.com to search
for a list of nearby geocaches, or to search live information for
millions of geocaches.
1
Connect to a wireless network (Connecting to a Wireless
Network, page 6) or to the Garmin Connect app (Pairing a
Smartphone with Your Device, page 6).
2
Select Setup > Geocaching > Register Device.
An activation code appears.
3
Follow the on-screen instructions.
4
Select Confirm Registration.
Connecting to Geocaching.com
After you register, you can view geocaches from
www.geocaching.com on your device while connected
wirelessly.
Connect to the Garmin Connect app.
Connect to a WiFi network.
Downloading Geocaches Using a Computer
You can load geocaches manually onto your device using a
computer (Transferring Files to Your Device, page 18). You
can place the geocache files into a GPX file and import them
into the GPX folder on the device. With a premium membership
to geocaching.com, you can use the "pocket query" feature to
load a large group of geocaches onto your device as a single
GPX file.
1
Connect the device to your computer using a USB cable.
2
Go to www.geocaching.com.
3
If necessary, create an account.
4
Sign in.
5
Follow the instructions at geocaching.com to find and
download geocaches to your device.
Main Menu Tools 11
Geocache Searches
You can search the geocaches loaded on your device. If you are
connected to www.geocaching.com, you can search live
geocache data and download geocaches.
NOTE: You can download detailed information for more than
three geocaches per day with a premium membership. Go to
www.geocaching.com for more information.
Searching for a Geocache
You can search the geocaches loaded on your device. If you are
connected to geocaching.com, you can search live geocache
data and download geocaches.
NOTE: You can download detailed information for a limited
number of geocaches per day. You can purchase a premium
subscription to download more. Go to www.geocaching.com for
more information.
1
Select Geocaching.
2
Select > MENU.
3
Select an option:
To search the geocaches loaded on your device by name,
select Spell Search, and enter a search term.
To search for geocaches near you or near another
location, select Search Near, and select a location.
If you are connected to www.geocaching.com, the search
results include live geocache data obtained by GC Live
Download.
To search for live geocaches by code, select GC Live
Download > GC Code, and enter the geocache code.
This feature allows you to download a specific geocache
from www.geocaching.com when you know the geocache
code.
4
Select MENU > Filter to filter the search results (optional).
5
Select a geocache.
The geocache details appear. If you selected a live geocache
and you are connected, the device downloads the full
geocache details to the internal storage, if necessary.
Searching for a Geocache on the Map
1
Select Geocaching.
2
Select > Download Geocaches to search for and
download nearby geocaches on the map.
3
Select MENU > Filter to filter the search results (optional).
4
Select a geocache.
The geocache details appear. If you selected a live geocache
and you are connected to www.geocaching.com, the device
downloads the full geocache details to the internal storage.
Filtering the Geocache List
You can filter your geocache list based on certain factors, such
as the level of difficulty.
1
Select Geocaching > MENU > Filter.
2
Select one or more options to filter:
To filter by a geocache category, such as puzzle or event,
select Type.
To filter by the physical size of the geocache container,
select Cache Size.
To filter by Unattempted, Did Not Find, or Found
geocaches, select Status.
To filter by the difficulty level of finding the geocache, or
the difficulty of the terrain, select a level from 1 to 5.
3
Select QUIT to view the filtered geocache list.
Saving a Custom Geocache Filter
You can create and save custom filters for geocaches based on
specific factors.
1
Select Setup > Geocaching > Filter Setup > Create Filter.
2
Select items to filter.
3
Select QUIT.
By default, the new filter is saved automatically as Filter
followed by a number. For example, Filter 2. You can edit the
geocache filter to change the name (Editing a Custom
Geocache Filter, page 12).
Editing a Custom Geocache Filter
1
Select Setup > Geocaching > Filter Setup.
2
Select a filter.
3
Select an item to edit.
Viewing Geocache Details
1
Select Geocaching.
2
Select a geocache.
3
Select MENU > Review Point.
The geocache description and logs appear.
Navigating to a Geocache
1
Select Geocaching.
2
Select a geocache.
3
Select Go.
Using Hints and Clues to find a Geocache
You can use hints or clues, such as a description or coordinates,
to help you find a geocache.
1
While navigating to a geocache, select MENU > Geocache.
2
Select an option:
To view details about the geocache, select Description.
To view a clue about a geocache location, select Hint.
To view latitude and longitude for a geocache, select
Coordinates.
To view feedback about the geocache from previous
searchers, select Logs.
To turn chirp
searching on, select chirp™.
Logging the Attempt
After you have attempted to find a geocache, you can log your
results. You can verify some geocaches at
www.geocaching.com.
1
Select Geocaching > Log.
2
Select Found, Did Not Find, Needs Repair, or
Unattempted.
3
Select an option:
To stop logging, select Done.
To begin navigation to the geocache nearest you, select
Find Next Closest.
To enter a comment about looking for the cache or about
the cache itself, select Edit Comment, enter a comment,
and select Done.
If you are signed in to www.geocaching.com, the log uploads to
your www.geocaching.com account automatically.
chirp
A chirp is a small Garmin accessory that is programmed and left
in a geocache. You can use your device to find a chirp in a
geocache.
Enabling chirp Searching
1
Select Setup > Geocaching.
2
Select chirp™ Searching > On.
Finding a Geocache with a chirp
1
With chirp searching enabled, navigate to a geocache.
12 Main Menu Tools
When you are within approximately 10 m (33 ft.) of the
geocache that contains a chirp, details about the chirp
appear.
2
Select Show Details.
3
If necessary, select Go to navigate to the next stage of the
geocache.
Removing Live Geocache Data from the Device
You can remove live geocache data to show only geocaches
manually loaded on the device using a computer.
Select Setup > Geocaching > Geocaching Live > Remove
Live Data.
Live geocaching data is removed from the device and no
longer appears in the geocache list.
Removing Your Device Registration From
Geocaching.com
If you transfer ownership of your device, you can remove your
device registration from the geocaching website.
Select Setup > Geocaching > Geocaching Live >
Unregister Device.
Setting a Proximity Alarm
Proximity alarms alert you when you are within a specified range
of a particular location.
1
Select Proximity Alarms > Create Alarm.
2
Select a category.
3
Select a location.
4
Select Use.
5
Enter a radius.
When you enter an area with a proximity alarm, the device
sounds a tone.
Editing or Deleting a Proximity Alarm
1
Select Proximity Alarms.
2
Select an alarm.
3
Select an option:
To edit the radius, select Change Radius.
To view the alarm on a map, select View Map.
To delete the alarm, select Delete.
Sending and Receiving Data Wirelessly
Before you can share data wirelessly, you must be within 3 m
(10 ft.) of a compatible Garmin device.
Your device can send and receive data wirelessly when
connected with a compatible Garmin device using ANT+
technology. You can share waypoints, geocaches, routes,
tracks, and more.
1
Select Share Wirelessly.
2
Select an option:
Select Send, and select a type of data.
Select Receive to receive data from another device. The
other compatible device must be attempting to send data.
3
Follow the on-screen instructions.
Selecting a Profile
When you change activities, you can change the setup of the
device by changing the profile.
1
Select Profile Change.
2
Select a profile.
Calculating the Size of an Area
1
Select Area Calculation > Start.
2
Walk around the perimeter of the area you want to calculate.
3
Select Calculate when finished.
Using the VIRB Remote
Before you can use the VIRB remote function, you must enable
the remote setting on your VIRB camera. See the VIRB Series
Owner's Manual for more information.
The VIRB remote function allows you to control your VIRB
action camera using your device.
1
Turn on your VIRB camera.
2
On your GPSMAP 66 series device, select VIRB Remote.
3
Wait while the device connects to your VIRB camera.
4
Select an option:
To record video, select .
To take a photograph, select .
Using the Flashlight
NOTE: Using the flashlight can reduce battery life. You can
reduce the brightness or flash frequency to extend the life of the
battery.
1
Select Flashlight > ENTER.
2
If necessary, use the brightness slider to adjust the
brightness.
3
If necessary, select a different flash type.
0 No strobe, constant beam.
1 through 9 Number of strobes per second.
SOS Emergency strobe.
NOTE: WiFi, Bluetooth, and ANT+ connections are
disabled in SOS mode.
Satellite Page
The satellite page shows your current location, GPS accuracy,
satellite locations, and signal strength.
GPS Satellite Settings
Select Satellite > MENU.
Use With GPS On: Allows you to turn the GPS on.
Track Up: Indicates whether satellites are shown with rings
oriented with north toward the top of the screen or oriented
with your current track toward the top of the screen.
Single Color: Allows you to select whether the satellite page is
displayed in multicolor or single color.
Set Location On Map: Allows you to mark your current location
on the map. You can use this location to create routes or
search for saved locations.
AutoLocate Position: Calculates your GPS position using the
Garmin AutoLocate
®
feature.
Satellite Setup: Sets the satellite system options (Satellite
Settings, page 14).
Customizing the Device
Customizing the Data Fields
You can customize the data fields displayed on each main page.
1
Open the page for which you will change the data fields.
2
Select MENU.
3
Select Change Data Fields.
4
Select the new data field.
5
Follow the on-screen instructions.
Customizing the Device 13
Setup Menu
Select MENU twice, and select Setup.
System: Allows you to customize system settings (System
Settings, page 14).
Display: Adjusts the backlight and display settings (Display
Settings, page 14).
Bluetooth: Pairs your device to a smartphone, and allows you
to customize the Bluetooth settings (Bluetooth Settings,
page 14).
Wi-Fi: Allows you to connect to wireless networks (Wi
Fi
Settings, page 15).
Tracking: Allows you to customize the Tracking settings
(inReach Tracking Settings, page 3).
Messages: Allows you to customize the settings for messages
(Messages Settings, page 3).
Contacts: Allows you to add, delete, and edit contacts
(Contacts, page 4).
Map: Sets the map appearance (Map Settings, page 4).
Recording: Allows you to customize activity recording settings
(Recording Settings, page 9).
Routing: Allows you to customize how the device calculates
routes for each activity (Routing Settings, page 15).
Expedition Mode: Allows you to customize settings for turning
on expedition mode (Turning On Expedition Mode,
page 17).
Waypoints: Allows you to enter a custom prefix for
automatically named waypoints.
Tones: Sets the device sounds, such as key tones and alerts
(Setting the Device Tones, page 15).
Heading: Allows you to customize the compass heading
settings (Heading Settings, page 5).
Altimeter: Allows you to customize the altimeter settings
(Altimeter Settings, page 5).
Geocaching: Allows you to customize your geocache settings
(Geocaching Settings, page 15).
Sensors: Pairs wireless sensors with your device (Wireless
Sensors, page 15).
Fitness: Allows you to customize settings for recording fitness
activities (Fitness Settings, page 15).
Marine: Sets the appearance of marine data on the map
(Marine Settings, page 15).
Menus: Allows you to customize the page sequence and main
menu (Menu Settings, page 15).
Position Format: Sets the geographical position format and
datum options (Position Format Settings, page 16).
Units: Sets the units of measure used on the device (Changing
the Units of Measure, page 16).
Time: Adjusts the time settings (Time Settings, page 16).
Profiles: Allows you to customize and create new activity
profiles (Profiles, page 16).
Reset: Allows you to reset user data and settings (Resetting
Data and Settings, page 16).
About: Displays device information, such as the unit ID,
software version, regulatory information, and license
agreement (Viewing E-label Regulatory and Compliance
Information, page 18).
System Settings
Select Setup > System.
Satellite: Sets the satellite system options (Satellite Settings,
page 14).
Text Language: Sets the text language on the device.
NOTE: Changing the text language does not change the
language of user-entered data or map data, such as street
names.
Interface: Sets the format of the serial interface (Serial Interface
Settings, page 14).
RINEX Logging: Enables the device to write Receiver
Independent Exchange Format (RINEX) data to a system file.
RINEX is a data interchange format for raw satellite
navigation system data.
Satellite Settings
Select Setup > System > Satellite.
Satellite System: Sets the satellite system to GPS or Demo
Mode (GPS off).
WAAS/EGNOS: Enables the system to use Wide Area
Augmentation System/European Geostationary Navigation
Overlay Service (WAAS/EGNOS) data.
Serial Interface Settings
Select Setup > System > Interface.
Garmin Spanner: Allows you to use the device USB port with
most NMEA 0183-compliant mapping programs by creating a
virtual serial port.
Garmin Serial: Sets the device to use a Garmin proprietary
format to exchange waypoint, route, and track data with a
computer.
NMEA In/Out: Sets the device to use standard NMEA 0183
output and input.
Text Out: Provides simple ASCII text output of location and
velocity information.
MTP: Sets the device to use Media Transfer Protocol (MTP) to
access the file system on the device instead of mass storage
mode.
Display Settings
Select Setup > Display.
Backlight Timeout: Adjusts the length of time before the
backlight turns off.
Battery Save: Saves the battery power and prolongs the battery
life by turning off the screen when the backlight times out.
Appearance: Changes the appearance of the display
background and selection highlight (Changing the Color
Mode, page 14).
Screen Capture: Allows you to save the image on the device
screen.
Review Text Size: Changes the size of the text on the screen.
Changing the Color Mode
1
Select Setup > Display > Appearance.
2
Select an option:
To allow the device to display day or night colors
automatically based on the time of day, select Mode >
Auto.
To use a light background, select Mode > Day.
To use a dark background, select Mode > Night.
To customize the color scheme for daytime, select Day
Color.
To customize the color scheme for nighttime, select Night
Color.
Bluetooth Settings
Select Setup > Bluetooth.
Status: Enables Bluetooth wireless technology, and shows
current connection status.
Notifications: Shows or hides smartphone notifications.
14 Customizing the Device
Forget Phone: Removes the connected device from the list of
paired devices. This option is available only after a device is
paired.
WiFi Settings
Select Setup > Wi-Fi.
Wi-Fi: Enables wireless technology.
Add Network: Allows you to scan for and connect to a wireless
network.
Routing Settings
The available routing settings vary based on the activity
selected.
Select Setup > Routing.
Direct Routing: Calculates the most direct route possible to the
destination.
Activity: Sets an activity for routing. The device calculates
routes optimized for the type of activity you are doing.
Calculation Method: Sets the method used to calculate your
route.
Lock On Road: Locks the blue triangle, which represents your
position on the map, onto the nearest road. This is most
useful when driving or navigating on roads.
Off Route Recalculation: Sets recalculation preferences when
navigating away from an active route.
Avoidance Setup: Sets the types of roads, terrain, and
transportation methods to avoid while navigating.
Route Transitions: Sets how the device routes from one point
on the route to the next. This setting is available only when
the Direct Routing option is enabled. The Distance option
routes you to the next point on the route when you are within
a specified distance of your current point.
Setting the Device Tones
You can customize tones for messages, keys, turn warnings,
and alarms.
1
Select Setup > Tones.
2
Select Sounds.
3
Select an option:
To enable both tones and vibration, select Tone &
Vibration.
To enable only tones, select Tone.
To enable only vibration, select Vibration.
4
Select Volume to set the tone volume.
5
Select a tone for each audible type.
Geocaching Settings
Select Setup > Geocaching.
Geocaching Live: Allows you to remove live geocache data
from your device and remove your device registration from
geocaching.com (Removing Live Geocache Data from the
Device, page 13, Removing Your Device Registration From
Geocaching.com, page 13).
Geocache Style: Sets the device to display the geocache list
using names or codes.
chirp™ Searching: Allows the device to search for a geocache
containing a chirp accessory (Enabling chirp Searching,
page 12).
Program chirp™: Programs the chirp accessory.
Filter Setup: Allows you to create and save custom filters for
geocaches (Saving a Custom Geocache Filter, page 12).
Found Geocaches: Allows you to edit the number of geocaches
found. This number automatically increases when you log a
find (Logging the Attempt, page 12).
Wireless Sensors
Your device can be used with wireless ANT+ or Bluetooth
sensors. For more information about compatibility and
purchasing optional sensors, go to buy.garmin.com.
Pairing Your Wireless Sensors
Before you can pair, you must put on the heart rate monitor or
install the sensor.
Pairing is the connecting of wireless sensors using ANT+ or
Bluetooth technology, for example, connecting a heart rate
monitor with your device.
1
Bring the device within 3 m (10 ft.) of the sensor.
NOTE: Stay 10 m (33 ft.) away from other sensors while
pairing.
2
Select Setup > Sensors.
3
Select your sensor type.
4
Select Search For New.
When the sensor is paired with your device, the sensor status
changes from Searching to Connected.
Fitness Settings
Select Setup > Fitness.
Auto Lap: Sets the device to automatically mark the lap at a
specific distance.
User: Sets your user profile information. The device uses this
information to calculate accurate training data in Garmin
Connect.
HR Zones: Sets the five heart rate zones and your maximum
heart rate for fitness activities.
Marking Laps by Distance
You can use Auto Lap
®
to automatically mark the lap at a
specific distance. This feature is helpful for comparing your
performance over different parts of an activity.
1
Select Setup > Fitness > Auto Lap.
2
Enter a value, and select Done.
Marine Settings
Select Setup > Marine.
Marine Chart Mode: Sets the type of chart the device uses
when displaying marine data. Nautical displays various map
features in different colors so the marine POIs are more
readable and so the map reflects the drawing scheme of
paper charts. Fishing (requires marine maps) displays a
detailed view of bottom contours and depth soundings and
simplifies map presentation for optimal use while fishing.
Appearance: Sets the appearance of marine navigation aids on
the map.
Marine Alarm Setup: Sets alarms for when you exceed a
specified drift distance while anchored, when you are off
course by a specified distance, and when you enter water of
a specific depth.
Marine Speed Filter: Averages the speed of your vessel over a
short period of time for smoother speed values.
Setting Up Marine Alarms
1
Select Setup > Marine > Marine Alarm Setup.
2
Select an alarm type.
3
Enter a distance, and select Done.
Menu Settings
Select Setup > Menus.
Menu Style: Changes the appearance of the main menu.
Main Menu: Allows you to move, add, and delete items in the
main menu (Customizing the Main Menu, page 16).
Customizing the Device 15
Page Sequence: Allows you to move, add, and delete items in
the page sequence (Changing the Page Sequence,
page 16).
Setup: Changes the order of items in the setup menu.
Find: Changes the order of items in the find menu.
Customizing the Main Menu
You can move, add, and delete items in the main menu.
1
From the main menu, select MENU > Change Item Order.
2
Select a menu item.
3
Select an option:
Select Move to change the placement of the item in the
list.
Select Insert to add a new item to the list.
Select Remove to delete an item from the list.
Changing the Page Sequence
1
Select Setup > Menus > Page Sequence > Edit Page
Sequence.
2
Select a page.
3
Select an option:
To move the page up or down in the list, select Move.
To add a new page to the page sequence, select Insert,
and select a category.
To remove a page from the page sequence, select
Remove.
TIP: You can select PAGE to view the page sequence.
Configuring the Page Ribbon Display
1
Select Setup > Menus > Page Sequence > Page Ribbon
Display.
2
Select an option:
To disable the page ribbon display, select Off.
To set the speed at which a page opens after being
selected in the page ribbon display, select Slow or Fast.
Position Format Settings
NOTE: You should not change the position format or the map
datum coordinate system unless you are using a map or chart
that specifies a different position format.
Position Format: Sets the position format in which a location
reading appears.
Map Datum: Sets the coordinate system on which the map is
structured.
Map Spheroid: Shows the coordinate system the device is
using. The default coordinate system is WGS 84.
Changing the Units of Measure
You can customize units of measure for distance and speed,
elevation, depth, temperature, pressure, and vertical speed.
1
Select Setup > Units.
2
Select a measurement type.
3
Select a unit of measure.
Time Settings
Select Setup > Time.
Time Format: Sets the device to show time in a 12-hour or 24-
hour format.
Time Zone: Sets the time zone for the device. Automatic sets
the time zone automatically based on your GPS position.
Profiles
Profiles are a collection of settings that optimize your device
based on how you are using it. For example, the settings and
views are different when you use the device for hunting than
when geocaching.
Profiles are associated with the activity screens, including the
home screen.
When you are using a profile and you change settings, such as
data fields or units of measurement, the changes are saved
automatically as part of the profile.
Creating a Custom Profile
You can customize your settings and data fields for a particular
activity or trip.
1
Select Setup > Profiles > Create Profile > OK.
2
Customize your settings and data fields.
Editing a Profile Name
1
Select Setup > Profiles.
2
Select a profile.
3
Select Edit Name.
4
Enter the new name.
Deleting a Profile
NOTE: Before you can delete the active profile, you must
activate a different profile. You cannot delete a profile while it is
active.
1
Select Setup > Profiles.
2
Select a profile.
3
Select Delete.
Resetting Data and Settings
1
Select Setup > Reset.
2
Select an option:
To reset data specific to a trip, such as distance and
averages, select Reset Trip Data.
To delete all saved waypoints, select Delete All
Waypoints.
To clear the data recorded since you started your current
activity, select Clear Current Activity.
NOTE: The device continues to record new data for the
current activity.
To reset only the settings for your current activity profile to
the factory default values, select Reset Profile Settings.
To reset all device settings and profiles to the factory
default values, select Reset All Settings.
NOTE: Resetting all settings clears all geocaching activity
from your device. It does not remove your saved user
data, such as tracks and waypoints.
To remove all saved user data and reset all settings on
the device to the factory default values, select Delete All.
NOTE: Deleting all settings removes your personal data,
history, and saved user data, including tracks and
waypoints.
Restoring Default Page Settings
1
Open a page for which you will restore the settings.
16 Customizing the Device
1 / 1

Garmin GPSMAP 66i Owner's manual

Category
Smartphones
Type
Owner's manual
This manual is also suitable for

Ask a question and I''ll find the answer in the document

Finding information in a document is now easier with AI

Ask the document