Page is loading ...
Page is loading ...
Page is loading ...
Page is loading ...
Page is loading ...

6
ENGLISH
(Original instructions)
Intended use
Your Black & Decker Speedy Roller
TM
has been designed for
applying paint to walls and ceilings. This appliance is intended
for indoor household use only.
Safety instructions
@
Warning! Read all safety warnings and all
instructions. Failure to follow the warnings and
instructions listed below may result in injury.
u Read all of this manual carefully before using the appli-
ance.
u The intended use is described in this manual. The use of
any accessory or attachment or the performance of any
operation with this appliance other than those recom-
mended in this instruction manual may present a risk of
personal injury.
u Retain this manual for future reference.
Using your appliance
u Never put descaling, aromatic, alcoholic or detergent
products into the speedy roller, as this may damage it or
make it unsafe for use.
After use
u When not in use, the appliance should be stored in a dry
place.
u Children should not have access to stored appliances.
Inspection and repairs
u Before use, check the appliance for damaged or defective
parts. Check for breakage of parts, damage to switches
and any other conditions that may affect its operation.
u Do not use the appliance if any part is damaged or defec-
tive.
u Have any damaged or defective parts repaired or
replaced by an authorized repair agent.
u Never attempt to remove or replace any parts other than
those specied in this manual.
Safety of others
u This appliance is not intended for use by persons (includ-
ing children) with reduced physical, sensory or mental
capabilities, or lack of experience and knowledge, unless
they have been given supervision or instruction concern-
ing the use of the appliance by a person responsible for
their safety.
u Children should be supervised to ensure that they do not
play with the appliance.
Residual risks.
Additional residual risks may arise when using the tool which
may not be included in the enclosed safety warnings. These
risks can arise from misuse, prolonged use etc.
Even with the application of the relevant safety regulations
and the implementation of safety devices, certain residual
risks can not be avoided. These include:
u Injuries caused by touching any moving parts.
u Injuries caused when changing any parts or accessories.
u Injuries caused by prolonged use of the appliance. When
using any appliance for prolonged periods ensure you
take regular breaks.
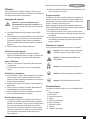
Labels on the appliance
The following pictograms are shown on the tool:
:
Warning! To reduce the risk of injury, the user
must read the instruction manual.
&
Warning! Only use non-amable liquids.
Warning! Keep bystanders away.
6
Warning! Wear a dust mask.
O
Warning! Wear safety glasses.
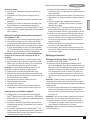
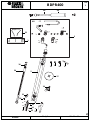
Features
This appliance includes some or all of the following features.
1. Plunger
2. Trigger
3. Paint resevior
4. Kick stand
5. Fill valve
6. Head rotation button
7. Roller head
8. Roller
9. Drip tray
Assembly
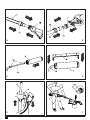
Attaching the handle (g. A)
u Slide the handle (10) into the paint reservoir (3) ensuring
that the orange collar (11) meets the handle (3).
u Thread the orange collar (11) onto the threads of the
handle (3) and tighten.

7
ENGLISH
(Original instructions)
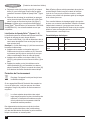
Attaching the roller head (g. B)
u Slide the handle assembly (12) into the roller head (7) en-
suring that the O-ring (13) is seated inside the roller head
(7) and the black collar (14) meets the roller head (7).
u Thread the black collar (14) onto the threads of the roller
head (7) and tighten.
Attaching a roller to the roller head (g. C)
u Lubricate the tips (15) at either end of the roller frame (16)
using petroleum jelly.
u Slide the assembled roller (8) onto the roller frame (16).
Note: Make sure the roller assembly snaps into the locking
clip on the outer end cap of the roller.
Attaching the drip tray (g. D)
The drip tray helps reduce spatter and drips when painting,
especially on ceilings.
u Clip the drip tray (9) onto the roller frame (16) so that it ts
around the roller (8).
u Rotate the drip tray to the required position.
Note: The drip tray is also helpful to prevent dripping when the
Speedy Roller
TM
is resting on the kickstand and is not in use.
Position the drip tray under the roller.
Use
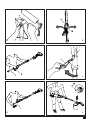
Filling with paint (g. E & F)
Note: When using the Speedy Roller
TM
for the rst application,
it will take most of the paint in the paint reservoir to saturate
the roller cover. A second ll may be needed.
u Insert the small end of the ll tube (17) through the hole in
the bottom side of the paint can clip (18). Push gently until
it click into place.
u Place the paint can clip (18) over the edge of your paint
can.
Note: For deeper containers, t a section of 19mm inner
diameter clear tubing over the ribs of the ll tube to extend it
and clip to side of pail with ll tube can clip. Cut the bottom
end of the tubing at a slight angle. Tubing is available at most
DIY stores.
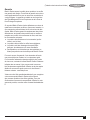
u Lubricate the top of the ll tube (17) with a small amount
of petroleum jelly.
u Hold the Speedy Roller
TM
at a 45
O
angle and place the ll
valve (5) over the ll tube (17). Gently push the Speedy
Roller
TM
down so it completely covers the ll tube.
Note: Make sure the orange ll cap cover (19) is com-
pletely covered by the shroud of the can clip.
u Very rmly pull the plunger (1) all the way back to draw
paint into Speedy Roller
TM
ensuring you apply sufcient
pressure to maintain an adequate union between the ll
valve and ll tube.
u Lift the Speedy Roller
TM
slowly off the ll tube.
Note: If you do not receive a complete ll the rst time, push
the plunger slowly to return paint to can and then pull the back
plunger making sure the angle is correct and the orange ll
cap cover is fully seated.
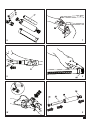
Adjusting the angle of the roller head (g. G & H)
The roller head can be adjusted to three different angles.
u Press and hold the orange head ratation button (6) on the
roller head (7).
u Rotate the rollerhead (7) to the required angle.
Note: Use straight on for general painting and 40
O
or 80
O
angles for hard to reach places or when painting close to
ceiling or edging.
Note: The handle (10) can be rotated to make it more comfort-
able when painting with an angled roller frame. To rotate
handle to desired position, loosen collar (11), adjust handle
and retighten collar (g H).
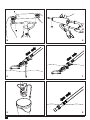
Painting with the Speedy Roller
TM
(g. I & J)
u Begin rolling on wall and push plunger handle (1) or
squeeze trigger (2) to feed paint into the roller cover.
Note: Initial saturation of the roller may require the full amount
of paint from the rst ll. Fill Speedy Roller
TM
as needed.
Helpful hints
u The trigger only needs to be squeezed when paint is
needed.
u If you are getting a dot pattern when painting, apply more
paint.
u If the roller is sliding on the surface, apply less paint.
u You may notice petroleum jelly within the handle. This is
necessary and will help in its operation and will not affect
the paint.
u When not in use, rest the Speedy Roller
TM
on the kick-
stand (4) with the drip tray (9) attached and positioned
under the roller..
Returning excess paint to paint tin (g. K - M)
u Place thumb over orange ll cap cover (19).
u Pull plunger (1) back to draw excess paint from roller
frame into tube.
u Hold the Speedy Roller
TM
at a 45
O
angle and place the ll
valve (5) over the ll tube (17). Gently push the Speedy
Roller
TM
down so it completely covers the ll tube.
Note: Make sure the orange ll cap cover (19) is com-
pletely covered by the shroud of the can clip.
u Push the plunger all of the way into the tube.
u Remove the roller (8) by grasping the outer end cap (20)
and the roller frame (16) and using your thumb on the
opposite hand to push the roller off
Note: Wear disposable gloves or use a plastic bag over roller
to keep your hands clean.

8
ENGLISH
(Original instructions)
u Scrape any excess paint into the tin from the roller.
u Remove the inner end cap by inserting the metal tube of
the roller frame into the cap about 2-3 centimetres and at
an angle.
u Pull the roller frame gently towards you.
u Remove the roller core.
u Empty any remaining paint.
u Remove the outer cap (20) by inserting the roller frame
into the roller and gently pushing the cap off.
Hints for optimum use
u Only use a perforated Black & DeckerSpeedy Roller
TM
roller cover (Accessory number : BDPRA09-XJ &
BDPRA18-XJ). Standard roller covers will not work.
u Inspect the roller cover for lint before painting, if needed
wash and dry before using.
u When using the Speedy Roller
TM
for the rst application, it
will take most of the paint in the Speedy Roller
TM
tube to
saturate the roller cover. A second ll may be needed.
u Keep the roller moving while pushing the plunger in or
squeezing the trigger to prevent dripping.
u Stop pushing the plunger in or squeezing trigger if the
roller starts to skid, slide or drip.
u When painting in tight areas partially ll the Speedy
Roller
TM
or pivot the frame. This reduces its overall length.
u When leaving the Speedy Roller
TM
unattended for a longer
period of time, wrap the roller in a plastic bag to prevent
drying, removing as much air as possible from bag.
u Make sure the type of paint you use can be cleaned with
either mineral spirits (for oil-based paints) or a warm water
and soap solution (for water soluble paints)
u Use suitable coverings to protect your oors and anything
else in the room that you do not want accidentally splat-
tered with paint.
u When using the kickstand, always pivot the head to the
straight position and release pressure by pulling the
plunger out slightly.
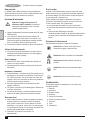
Maintenance and cleaning
Cleaning the Speedy Roller
TM
(g. O - T)
u Remove the roller sleve.
u Push the ll tube directly into the ll valve. When cleaning
water soluble paints, submerge the ll tube into warm,
soapy water and pull the plunger in and out 5 or more
times. When using oil based paints, instead of water, use
proper cleaning solvent listed on manufacturers container
and dispose of properly.
Note: Use a sink, a wash tub, or any container that will hold
water to perform above ushing process. Replace water when
dirty or when moving to the next step.
u Remove the ll tube. Then submerge the roller frame, and
ensuring the ll valve is also under water, pull the plunger
in and out 5 or more times (g. P).
Note: When using a small container, pivot the roller frame to
the 80 degree position to t inside container (g. Q).
u Remove roller frame and continue cleaning as needed.
Submerge the handle in the warm, soapy water and pull
the plunger in and out 5 or more times.
Note: Wipe off remaining paint from the end of plunger (1).
u Unthread valve cap (19) and remove wiper seal (22) and
duck bill valve (21) to clean. Rinse all remaining parts and
drain all uid from the Speedy Roller
TM
(g. S).
u Remove tubing from frame (if needed) by pinching hose
clamps. Flush frame and tubing. Replace tubing and
secure with hose clamps (24) (g. T).
Note: Always purchase a perforated Black & DeckerSpeedy
Roller
TM
roller cover (Accessory number : BDPRA09-XJ &
BDPRA18-XJ). A standard roller will not work.
Lubricating the Speedy Roller
TM
(g. U - X)
Lubrication helps with normal operation and should be done
after cleaning and before each use.
u Turn the threaded assembly collar (11) near the trigger
counterclockwise until the main tube assembly slides off.
Note: When reassembling, the orange threaded collar (11)
should be towards trigger handle.
u Apply petroleum jelly around and in between the rubber
seals (25). Reassemble making sure the rubber seals are
not twisted or damaged. Tighten the locking collar.
u Apply petroleum jelly to the duck bill valve (21) and wiper
seal (22) and replace within unit threading the valve cap
(19) back into place.
u Apply petroleum jelly to the inner seals on the end caps
(26) then assemble the roller by placing the core (27)
inside of roller cover (28) and attaching end caps and as
shown.
Protecting the environment
Z
Separate collection. This product must not be
disposed of with normal household waste.
Should you nd one day that your Black & Decker product
needs replacement, or if it is of no further use to you, do not
dispose of it with household waste. Make this product avail-
able for separate collection.
z
Separate collection of used products and packaging
allows materials to be recycled and used again.
Re-use of recycled materials helps prevent environ-
mental pollution and reduces the demand for raw
materials.

9
ENGLISH
(Original instructions)
Local regulations may provide for separate collection of elec-
trical products from the household, at municipal waste sites or
by the retailer when you purchase a new product.
Black & Decker provides a facility for the collection and
recycling of Black & Decker products once they have reached
the end of their working life. To take advantage of this service
please return your product to any authorised repair agent who
will collect them on our behalf.
You can check the location of your nearest authorised repair
agent by contacting your local Black & Decker ofce at
the address indicated in this manual. Alternatively, a list of
authorised Black & Decker repair agents and full details of our
after-sales service and contacts are available on the Internet
at: www.2helpU.com
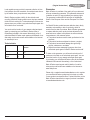
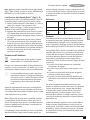
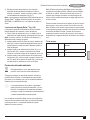
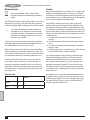
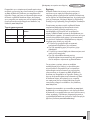
Technical data
BDPR400
Capacity ml
650
Weight kg 1.4
Guarantee
Black & Decker is condent of the quality of its products and
offers an outstanding guarantee. This guarantee statement is
in addition to and in no way prejudices your statutory rights.
The guarantee is valid within the territories of the Member
States of the European Union and the European Free Trade
Area.
If a Black & Decker product becomes defective due to faulty
materials, workmanship or lack of conformity, within 24
months from the date of purchase, Black & Decker guarantees
to replace defective parts, repair products subjected to fair
wear and tear or replace such products to ensure minimum
inconvenience to the customer unless:
u The product has been used for trade, professional or hire
purposes;
u The product has been subjected to misuse or neglect;
u The product has sustained damage through foreign
objects, substances or accidents;
u Repairs have been attempted by persons other than
authorised repair agents or Black & Decker service staff.
To claim on the guarantee, you will need to submit proof of
purchase to the seller or an authorised repair agent. You can
check the location of your nearest authorised repair agent
by contacting your local Black & Decker ofce at the address
indicated in this manual. Alternatively, a list of authorised
Black & Decker repair agents and full details of our after-
sales service and contacts are available on the Internet at:
www.2helpU.com
Please visit our website www.blackanddecker.co.uk to register
your new Black & Decker product and to be kept up to date
on new products and special offers. Further information on the
Black & Decker brand and our range of products is available
at www.blackanddecker.co.uk
Page is loading ...
Page is loading ...
Page is loading ...
Page is loading ...
Page is loading ...
Page is loading ...
Page is loading ...
Page is loading ...
Page is loading ...
Page is loading ...
Page is loading ...
Page is loading ...
Page is loading ...
Page is loading ...
Page is loading ...
Page is loading ...
Page is loading ...
Page is loading ...
Page is loading ...
Page is loading ...
Page is loading ...
Page is loading ...
Page is loading ...
Page is loading ...
Page is loading ...
Page is loading ...
Page is loading ...
Page is loading ...
Page is loading ...
Page is loading ...
Page is loading ...
Page is loading ...
Page is loading ...
Page is loading ...
Page is loading ...
Page is loading ...
Page is loading ...
Page is loading ...
Page is loading ...
Page is loading ...
Page is loading ...
Page is loading ...
Page is loading ...
Page is loading ...
Page is loading ...
Page is loading ...
Page is loading ...
Page is loading ...

TYP.
www.2helpU.com
12 - 10 - 11
E16490
1
BDPR400
22
24
25
27
28
21
23
19
29
30
17
9
10
11
12
54
2
31
1
5
4
49

ENGLISH
Do not forget to register your product!
www.blackanddecker.co.uk/productregistration
Register your product online at www.blackanddecker.co.uk/pro-
ductregistration or send your name, surname and product code to
Black & Decker in your country
.
DEUTSCH
Vergessen Sie nicht, Ihr Produkt registrieren zu lassen!
www.blackanddecker.de/productregistration
Lassen Sie Ihr Produkt unter www.blackanddecker.de/productreg-
istration online registrieren oder schicken Sie Ihren Nachnamen,
Vornamen und den Produktcode an Black & Decker in Ihrem Land.
FRANÇAIS
N’oubliez pas d’enregistrer votre produit !
www.blackanddecker.fr/productregistration
Enregistrez votre produit en ligne sur www.blackanddecker.fr/
productregistration ou envoyez vos nom, prénom et code produit à
Black & Decker dans votre pays.
ITALIANO
Non dimenticate di registrare il prodotto!
www.blackanddecker.it/productregistration
Registrate il prodotto online su www.blackanddecker.it/productreg-
istration o inviate nome, cognome e codice del prodotto al centro
Black & Decker del vostro paese.
NEDERLANDS
Vergeet niet uw product te registreren!
www.blackanddecker.nl/productregistration
U kunt uw product online registreren op www.blackanddecker.nl/pro-
ductregistration of u kunt uw voornaam, achternaam en productcode
opsturen naar Black & Decker in uw land.
ESPAÑOL
¡No olvide registrar su producto!
www.blackanddecker.es/productregistration
Registre su producto on-line en www.blackanddecker.es/produc-
tregistration o envíe su nombre, apellidos y código de producto a
Black & Decker en su país.
PORTUGUÊS
Não se esqueça de registar o seu produto!
www.blackanddecker.pt/productregistration
Registe o seu produto online em www.blackanddecker.pt/productre-
gistration ou envie o seu nome, apelido e código do produto para a
Black & Decker no seu país.
SVENSKA
Glöm inte att registrera produkten!
www.blackanddecker.se/productregistration
Registrera produkten online på www.blackanddecker.se/productre-
gistration
eller skicka namn och produktkod till Black & Decker i landet
du bor i.
NORSK
Ikke glem å registrere produktet ditt!
www.blackanddecker.no/productregistration
Registrer produktet ditt online på www.blackanddecker.no/pro-
ductregistration, eller send ditt navn, etternavn og produktkode til
Black & Decker i ditt eget land.
DANSK
Glem ikke at registrere dit produkt!
www.blackanddecker.dk/productregistration
Registrer dit produkt på internettet på: www.blackanddecker.dk/
productregistration eller send dit navn, efternavn og produktkode til
Black & Decker i dit eget land.
SUOMI
Muistathan rekisteröidä tuotteesi!
www.blackanddecker./productregistration
Rekisteröi tuotteesi verkossa osoitteessa www.blackanddecker./
productregistration tai lähetä etunimesi, sukunimesi ja tuotekoodi
oman maasi Black & Decker -edustajalle.
Ε Λ Λ Η Ν Ι Κ Α
Μην ξεχάσετε να καταχωρίσετε το προϊόν σας!
www.blackanddecker.gr/productregistration
Καταχωρίστε το προϊόν σας σε σύνδεση στη σελίδα www.
blackanddecker.gr/productregistration ή στείλτε το όνομα, επίθετο
σας και τον κωδικό πριονωτός στη Black & Decker στη χώρα σας.
Page is loading ...
-
 1
1
-
 2
2
-
 3
3
-
 4
4
-
 5
5
-
 6
6
-
 7
7
-
 8
8
-
 9
9
-
 10
10
-
 11
11
-
 12
12
-
 13
13
-
 14
14
-
 15
15
-
 16
16
-
 17
17
-
 18
18
-
 19
19
-
 20
20
-
 21
21
-
 22
22
-
 23
23
-
 24
24
-
 25
25
-
 26
26
-
 27
27
-
 28
28
-
 29
29
-
 30
30
-
 31
31
-
 32
32
-
 33
33
-
 34
34
-
 35
35
-
 36
36
-
 37
37
-
 38
38
-
 39
39
-
 40
40
-
 41
41
-
 42
42
-
 43
43
-
 44
44
-
 45
45
-
 46
46
-
 47
47
-
 48
48
-
 49
49
-
 50
50
-
 51
51
-
 52
52
-
 53
53
-
 54
54
-
 55
55
-
 56
56
-
 57
57
-
 58
58
-
 59
59
-
 60
60


Black & Decker BDPR400 Owner's manual
- Type
- Owner's manual
- This manual is also suitable for
Ask a question and I''ll find the answer in the document
Finding information in a document is now easier with AI
in other languages
- italiano: Black & Decker BDPR400 Manuale del proprietario
- français: Black & Decker BDPR400 Le manuel du propriétaire
- español: Black & Decker BDPR400 El manual del propietario
- Deutsch: Black & Decker BDPR400 Bedienungsanleitung
- Nederlands: Black & Decker BDPR400 de handleiding
- português: Black & Decker BDPR400 Manual do proprietário
- dansk: Black & Decker BDPR400 Brugervejledning
- svenska: Black & Decker BDPR400 Bruksanvisning
- suomi: Black & Decker BDPR400 Omistajan opas
Related papers
-
Black and Decker WM550 T13 Owner's manual
-
BLACK DECKER WM536 T11 Owner's manual
-
Black & Decker BDPR400 User manual
-
-
BLACK DECKER BDPE400 Owner's manual
-
Black & Decker EasyEdge BDPE200-AR User manual
-
Black & Decker BHPC210 User manual
-
Other documents
-
Lumberjack PR5KIT Owner's manual
-
VonHaus 3500087 User manual
-
WAGNER Paint-N-Roll Manual User manual
-
-
-
-
-
-
-