Page is loading ...

Giles Enterprises, Inc.
2750 Gunter Park Drive West • Montgomery, AL 36109 USA
Fax: 334.239.4117 • Website: www.gfsequipment.com
Service Hotline (Toll Free): 800.554.4537 (USA & Canada Only)
Form No. 60221 (Release date: 11/99) Revised: 1015/10; Rev. D)
EOF-10-10/FFLT/24, EOF-10-10/FFLT/24/24
EOF-20/FFLT/24, EOF-20/FFLT/24/24
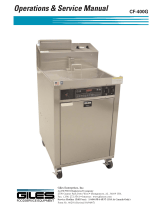
Operations & Service Manual
FOODSERVICE EQUIPMENT
Model: EOF-20/FFLT/24/24
Model: EOF-10-10/FFLT/24/24

LIMITED WARRANTY
• Subject to the terms and conditions of this Limited Warranty as herein stated, all Giles Enterprises,
Inc., Foodservice Equipment and parts purchased new from an authorized Giles Enterprises, Inc.,
representative are warranted as to defects in material or workmanship for a period of 12 months
from the date of installation, provided, however, that with regard to labor costs in connection with
this warranty, see below. All installations must be made by a qualified installing agency in accor-
dance with all applicable codes and/or regulations in the jurisdiction in which installed. Limited war-
ranty coverage is extended to the original owner only and is void if the unit is resold.
• During the Limited Warranty period, Giles Enterprises, Inc. will replace or recondition, at its factory,
any part or parts of this unit which Giles Enterprises, Inc. inspectors judge defective, provided the
unit has been subjected to normal usage, properly installed, operated and serviced. This Limited
Warranty does not cover cosmetic damage, and damage due to acts of God, accident, misuse, alter-
ation, negligence, abuse of the Giles Foodservice Equipment or the use of unorthodox repair meth-
ods. All parts replaced under this Limited Warranty carry only the unexpired term of this Limited
Warranty. Limited Warranty service may be furnished only by an authorized Giles Enterprises, Inc.,
representative.
• If Limited Warranty service is requested, Giles Enterprises, Inc., will send factory-authorized serv-
ice representatives to repair, recondition, replace or inspect units of its manufacture with such labor
being rendered without cost to owner for ninety (90) days from the date of installation. Otherwise,
service, including labor and transportation charges or other expenses, in connection with the
removal or installation of any part or parts supplied under this Limited Warranty, are specified on the
original sales contract between the purchaser and the authorized Giles Enterprises, Inc., represen-
tative.
• Giles Enterprises, Inc. reserves the right to change or improve its equipment and parts in any way
without obligation to alter such equipment or parts previously manufactured.
• Giles Enterprises, Inc. makes no further warranties, express or implied including implied warranties
of merchantability or fitness for a particular purpose, and has no other obligation or liability not
specifically stated herein.
• Repair or replacement as provided under this limited warranty is the exclusive remedy. Giles
Enterprises, Inc., shall not be liable for any incidental or consequential damages for breach of any
express or implied warranty on this product, except to the extent prohibited by applicable law. Any
implied warranty of merchantability or fitness for a particular purpose on this product is limited in
duration to the duration of this limited warranty.
• Used Giles Enterprises, Inc., Foodservice Equipment or parts or Giles Enterprises, Inc., Foodservice
Equipment or parts not purchased from an authorized Giles Enterprises, Inc., representative, carry
no warranties, express or implied.

iii
Table Of Contents
Safety . . . . . . . . . . . . . . . . . . . . . . . . . . . . . . . . . . . . . . . . . . . . . . . . . . . . . . . vii
Safety Overview . . . . . . . . . . . . . . . . . . . . . . . . . . . . . . . . . . . . . . . . . . . . . . . . . . . . . . . . . . . . . . . . . . . vii
Specific Safety Precautions . . . . . . . . . . . . . . . . . . . . . . . . . . . . . . . . . . . . . . . . . . . . . . . . . . . . . . . . . . viii
1. Introduction . . . . . . . . . . . . . . . . . . . . . . . . . . . . . . . . . . . . . . . . . . . . . . 1
1-01. Construction . . . . . . . . . . . . . . . . . . . . . . . . . . . . . . . . . . . . . . . . . . . . . . . . . . . . . . . . . . . . . . 1
1-02. Standard Features. . . . . . . . . . . . . . . . . . . . . . . . . . . . . . . . . . . . . . . . . . . . . . . . . . . . . . . . . . 1
1-03. Optional Features . . . . . . . . . . . . . . . . . . . . . . . . . . . . . . . . . . . . . . . . . . . . . . . . . . . . . . . . . . 1
1-04. Specifications . . . . . . . . . . . . . . . . . . . . . . . . . . . . . . . . . . . . . . . . . . . . . . . . . . . . . . . . . . . . . 2
1-04.1. Overall Dimensions for EOF-10-10/FFLT/24(24) or EOF-20/FFLT/24(24) . . . . . . . . . . . . . . . . . 2
1-04.2. Regulatory Listings . . . . . . . . . . . . . . . . . . . . . . . . . . . . . . . . . . . . . . . . . . . . . . . . . . . . . . . . . 3
1-04.3. Basket Size . . . . . . . . . . . . . . . . . . . . . . . . . . . . . . . . . . . . . . . . . . . . . . . . . . . . . . . . . . . . . . . 3
1-04.4. Vat Size and Capacity . . . . . . . . . . . . . . . . . . . . . . . . . . . . . . . . . . . . . . . . . . . . . . . . . . . . . . . 3
1-04.5. Shipping Specifications (Crated) . . . . . . . . . . . . . . . . . . . . . . . . . . . . . . . . . . . . . . . . . . . . . . . 4
2. Installation . . . . . . . . . . . . . . . . . . . . . . . . . . . . . . . . . . . . . . . . . . . . . . . 5
2-01. Location . . . . . . . . . . . . . . . . . . . . . . . . . . . . . . . . . . . . . . . . . . . . . . . . . . . . . . . . . . . . . . . . . 5
2-02. Unpacking . . . . . . . . . . . . . . . . . . . . . . . . . . . . . . . . . . . . . . . . . . . . . . . . . . . . . . . . . . . . . . . . 6
2-03. Shipping Bars . . . . . . . . . . . . . . . . . . . . . . . . . . . . . . . . . . . . . . . . . . . . . . . . . . . . . . . . . . . . . 7
2-04. Electrical Requirements . . . . . . . . . . . . . . . . . . . . . . . . . . . . . . . . . . . . . . . . . . . . . . . . . . . . . 8
2-04.1. EOF-10-10 Electrical Specifications . . . . . . . . . . . . . . . . . . . . . . . . . . . . . . . . . . . . . . . . . . . . . 8
2-04.1. EOF-20 Electrical Specifications . . . . . . . . . . . . . . . . . . . . . . . . . . . . . . . . . . . . . . . . . . . . . . . 8
2-04.2. EOF-24 Electrical Specifications . . . . . . . . . . . . . . . . . . . . . . . . . . . . . . . . . . . . . . . . . . . . . . . 9
2-05. Electrical Connections . . . . . . . . . . . . . . . . . . . . . . . . . . . . . . . . . . . . . . . . . . . . . . . . . . . . . . 9
2-05.1. Electrical Connections Diagram . . . . . . . . . . . . . . . . . . . . . . . . . . . . . . . . . . . . . . . . . . . . . . 10
2-06. Ventilation of Fryer . . . . . . . . . . . . . . . . . . . . . . . . . . . . . . . . . . . . . . . . . . . . . . . . . . . . . . . . 10
3. Overview . . . . . . . . . . . . . . . . . . . . . . . . . . . . . . . . . . . . . . . . . . . . . . . 11
3-01. EOF-10-10 Basket Elevator and Baskets . . . . . . . . . . . . . . . . . . . . . . . . . . . . . . . . . . . . . . . . 12
3-02. EOF-10-10 Control Panel . . . . . . . . . . . . . . . . . . . . . . . . . . . . . . . . . . . . . . . . . . . . . . . . . . . . 14
3-03. EOF-10-10 Lower Cabinet Area . . . . . . . . . . . . . . . . . . . . . . . . . . . . . . . . . . . . . . . . . . . . . . . 16
3-04. EOF-20 Basket Elevator and Baskets . . . . . . . . . . . . . . . . . . . . . . . . . . . . . . . . . . . . . . . . . . 18
3-05. EOF-20 Control Panel . . . . . . . . . . . . . . . . . . . . . . . . . . . . . . . . . . . . . . . . . . . . . . . . . . . . . . 20
3-06. EOF-20 Lower Cabinet Area . . . . . . . . . . . . . . . . . . . . . . . . . . . . . . . . . . . . . . . . . . . . . . . . . 22
3-07. FFLT Table . . . . . . . . . . . . . . . . . . . . . . . . . . . . . . . . . . . . . . . . . . . . . . . . . . . . . . . . . . . . . . . 24
3-08. FFLT Control Panel . . . . . . . . . . . . . . . . . . . . . . . . . . . . . . . . . . . . . . . . . . . . . . . . . . . . . . . . 26
3-09. FFLT Lower Cabinet Area . . . . . . . . . . . . . . . . . . . . . . . . . . . . . . . . . . . . . . . . . . . . . . . . . . . 28
3-10. EOF-24 Basket Hanger and Baskets. . . . . . . . . . . . . . . . . . . . . . . . . . . . . . . . . . . . . . . . . . . 30
3-11. EOF-24 Control Panel . . . . . . . . . . . . . . . . . . . . . . . . . . . . . . . . . . . . . . . . . . . . . . . . . . . . . . 32
3-12. EOF-24 Lower Cabinet Area . . . . . . . . . . . . . . . . . . . . . . . . . . . . . . . . . . . . . . . . . . . . . . . . . 34
3-13. Filter Pan Assembly . . . . . . . . . . . . . . . . . . . . . . . . . . . . . . . . . . . . . . . . . . . . . . . . . . . . . . . 36
3-14. Accessories (Included) . . . . . . . . . . . . . . . . . . . . . . . . . . . . . . . . . . . . . . . . . . . . . . . . . . . . . 38
3-15. Accessories (Not Included). . . . . . . . . . . . . . . . . . . . . . . . . . . . . . . . . . . . . . . . . . . . . . . . . . 41
EOF-10-10/FFLT/24, EOF-10-10/FFLT/24/24
EOF-20/FFLT/24/24, EOF-20/FFLT/24/24

iv
Table Of Contents
EOF-10-10/FFLT/24, EOF-10-10/FFLT/24/24,
EOF-20/FFLT/24, EOF-20/FFLT/24,24
4. Unit Preparation . . . . . . . . . . . . . . . . . . . . . . . . . . . . . . . . . . . . . . . . . 43
4-01. Settings before each test . . . . . . . . . . . . . . . . . . . . . . . . . . . . . . . . . . . . . . . . . . . . . . . . . . . 43
4-02. Power test . . . . . . . . . . . . . . . . . . . . . . . . . . . . . . . . . . . . . . . . . . . . . . . . . . . . . . . . . . . . . . 45
4-03. Heating Element test . . . . . . . . . . . . . . . . . . . . . . . . . . . . . . . . . . . . . . . . . . . . . . . . . . . . . . 46
4-04. Filter Pump Test . . . . . . . . . . . . . . . . . . . . . . . . . . . . . . . . . . . . . . . . . . . . . . . . . . . . . . . . . . 47
4-05. Perform Boil Out Procedure . . . . . . . . . . . . . . . . . . . . . . . . . . . . . . . . . . . . . . . . . . . . . . . . . 48
4-06. Clean Filter Pan. . . . . . . . . . . . . . . . . . . . . . . . . . . . . . . . . . . . . . . . . . . . . . . . . . . . . . . . . . . 48
5. Fryer Operation . . . . . . . . . . . . . . . . . . . . . . . . . . . . . . . . . . . . . . . . . . 49
5-01. Cooking Controller . . . . . . . . . . . . . . . . . . . . . . . . . . . . . . . . . . . . . . . . . . . . . . . . . . . . . . . . 50
5-01.1. Buttons and Functions . . . . . . . . . . . . . . . . . . . . . . . . . . . . . . . . . . . . . . . . . . . . . . . . . . . . . 51
5-01.2. Programming the Cooking Temperature . . . . . . . . . . . . . . . . . . . . . . . . . . . . . . . . . . . . . . . . 52
5-01.3. Programming a Cooking Time. . . . . . . . . . . . . . . . . . . . . . . . . . . . . . . . . . . . . . . . . . . . . . . . 53
5-01.4. Start a cooking time . . . . . . . . . . . . . . . . . . . . . . . . . . . . . . . . . . . . . . . . . . . . . . . . . . . . . . . 54
5-01.5. Cancel the currently running cooking time. . . . . . . . . . . . . . . . . . . . . . . . . . . . . . . . . . . . . . 54
5-01.6. Manually lowering and raising the cooking basket (Basket Elevator Only) . . . . . . . . . . . . . 54
5-01.7. Displaying remaining cooking time. . . . . . . . . . . . . . . . . . . . . . . . . . . . . . . . . . . . . . . . . . . . 55
5-01.8. Displaying the actual temperature of the liquid shortening . . . . . . . . . . . . . . . . . . . . . . . . . 55
5-02. Cooking Procedure . . . . . . . . . . . . . . . . . . . . . . . . . . . . . . . . . . . . . . . . . . . . . . . . . . . . . . . . 56
5-03. Filtering Liquid Shortening . . . . . . . . . . . . . . . . . . . . . . . . . . . . . . . . . . . . . . . . . . . . . . . . . . 61
5-04. Removal of Liquid Shortening . . . . . . . . . . . . . . . . . . . . . . . . . . . . . . . . . . . . . . . . . . . . . . . 64
5-05. Normal Shut-Down . . . . . . . . . . . . . . . . . . . . . . . . . . . . . . . . . . . . . . . . . . . . . . . . . . . . . . . . 67
5-06. Emergency Shut-Down. . . . . . . . . . . . . . . . . . . . . . . . . . . . . . . . . . . . . . . . . . . . . . . . . . . . . 67
6. Cleaning . . . . . . . . . . . . . . . . . . . . . . . . . . . . . . . . . . . . . . . . . . . . . . . . 69
6-01. Boil-Out Procedure (Cleaning the Fry Pot) . . . . . . . . . . . . . . . . . . . . . . . . . . . . . . . . . . . . . . 69
6-02. Cleaning the Filter Pan and replacing Filter Paper after Boil Out . . . . . . . . . . . . . . . . . . . . . 72
6-03. Cleaning the Filter Pan and replacing the Filter Paper daily . . . . . . . . . . . . . . . . . . . . . . . . . 73
7. Troubleshooting . . . . . . . . . . . . . . . . . . . . . . . . . . . . . . . . . . . . . . . . . 75
7-01. Temperature Control System . . . . . . . . . . . . . . . . . . . . . . . . . . . . . . . . . . . . . . . . . . . . . . . . 75
7-02. Oil Filtration System . . . . . . . . . . . . . . . . . . . . . . . . . . . . . . . . . . . . . . . . . . . . . . . . . . . . . . . 77
7-03. Basket Elevator System (Basket Elevator Option Only) . . . . . . . . . . . . . . . . . . . . . . . . . . . . 78
8. Parts List . . . . . . . . . . . . . . . . . . . . . . . . . . . . . . . . . . . . . . . . . . . . . . . 79
8–01. Parts Ordering and Service Information . . . . . . . . . . . . . . . . . . . . . . . . . . . . . . . . . . . . . . . . 79
8-02. EOF-10-10 Control Panel & Front Header . . . . . . . . . . . . . . . . . . . . . . . . . . . . . . . . . . . . . . . 80
8-03. EOF-10-10 Front Lower Cabinet . . . . . . . . . . . . . . . . . . . . . . . . . . . . . . . . . . . . . . . . . . . . . . 82
8-04. EOF-10-10 Rear Lower Cabinet. . . . . . . . . . . . . . . . . . . . . . . . . . . . . . . . . . . . . . . . . . . . . . . 84
8-05. EOF-20 Control Panel & Front Header . . . . . . . . . . . . . . . . . . . . . . . . . . . . . . . . . . . . . . . . . 86
8-06. EOF-20 Front Lower Cabinet. . . . . . . . . . . . . . . . . . . . . . . . . . . . . . . . . . . . . . . . . . . . . . . . . 88
8-07. EOF-20 Rear Lower Cabinet . . . . . . . . . . . . . . . . . . . . . . . . . . . . . . . . . . . . . . . . . . . . . . . . . 90
8-08. EOF-24 Control Panel & Front Header . . . . . . . . . . . . . . . . . . . . . . . . . . . . . . . . . . . . . . . . . 92
8-09. EOF-24 Front Lower Cabinet. . . . . . . . . . . . . . . . . . . . . . . . . . . . . . . . . . . . . . . . . . . . . . . . . 94
8-10. EOF-24 Rear Lower Cabinet . . . . . . . . . . . . . . . . . . . . . . . . . . . . . . . . . . . . . . . . . . . . . . . . . 96
8-11. FFLT Front. . . . . . . . . . . . . . . . . . . . . . . . . . . . . . . . . . . . . . . . . . . . . . . . . . . . . . . . . . . . . . . 98

v
Table Of Contents
EOF-10-10/FFLT/24, EOF-10-10/FFLT/24/24
EOF-20/FFLT/24/24, EOF-20/FFLT/24/24
8-12. FFLT Rear . . . . . . . . . . . . . . . . . . . . . . . . . . . . . . . . . . . . . . . . . . . . . . . . . . . . . . . . . . . . . . 100
8-13. Filter Pan . . . . . . . . . . . . . . . . . . . . . . . . . . . . . . . . . . . . . . . . . . . . . . . . . . . . . . . . . . . . . . . 102

vi
Table Of Contents
EOF-10-10/FFLT/24, EOF-10-10/FFLT/24/24,
EOF-20/FFLT/24, EOF-20/FFLT/24,24
Notes:

vii
Safety
EOF-10-10/FFLT/24, EOF-10-10/FFLT/24/24
EOF-20/FFLT/24, EOF-20/FFLT/24/24
Safety Overview
Safety
The instructions contained in this manual have been prepared to aid you in learning the proper procedures
for installing and servicing your unit.
Throughout this manual, safety precautions are identified through the use of the safety alert symbol and
three signal words: DANGER, WARNING, and CAUTION. All safety alert information precedes the
step(s) to which they apply. Suggested, recommended, or other noteworthy information is identified
through the use of NOTES. Additionally, certain words are used to indicate a specific meaning or to add
emphasis.
The following words are used as indicated throughout the manual:
Shall: understood to be mandatory.
Should: understood to be advisory.
May: understood to be permissive.
Will: indicates a future event/condition to occur.
or
(Safety Alert Symbol)
Used in conjunction with signal words (DANGER, WARNING, or CAUTION) to alert you of potential per-
sonal injury hazards, immediately preceding precautionary measures that pertain to subsequent step(s).
Obey all safety messages that follow these symbols to avoid possible injury or death. Failure to adhere to
safety precautions identified by the safety alert symbol may also void the warranty.
!!
• Indicates an imminently hazardous situation which, if not avoided, will result in death or serious injury.
Use of this is limited to the most extreme situations.
!
DANGER
• Indicates a potentially hazardous situation which, if not avoided, could result in death or serious injury.
!
WARNING
• Indicates a potentially hazardous situation which, if not avoided, may result in minor or moderate injury.
Also used to alert against unsafe practices.
!
CAUTION
• When used without the safety alert symbol, CAUTION indicates a potentially hazardous situation
which, if not avoided, may result in equipment/property damage, and void the warranty.
CAUTION
NOTE:
•Identifies suggested, recommended, or other noteworthy information.

viii
Safety
EOF-10-10/FFLT/24, EOF-10-10/FFLT/24/24,
EOF-20/FFLT/24, EOF-20/FFLT/24/24
• Turn off the unit and unplug the power cord before cleaning or performing maintenance.
• DO NOT hose down the unit’s interior or exterior with water.
• Failure to comply with these DANGER notices will result in death or serious injury, equipment/property damage,
and void the warranty.
!
DANGER
For your safety, please observe the following precautions when operating or servicing this unit. Read the
following important safety information to avoid personal injury and/or damage to the equipment.
Specific Safety Precautions
• Consult a qualified electrician to ensure that:
•• all electrical specifications and codes are met.
•• circuit breakers and wiring are of sufficient rating and gauge.
• The unit must be properly grounded and all electrical specifications must be met during installation.
• Improper installation, adjustment, alteration, service or maintenance could result in death or serious injury, equip-
ment/property damage, and void the warranty.
• DO NOT use or store gasoline or other flammable liquids or vapors in the vicinity of this or any other electrical
appliance!
• Failure to comply with WARNING notices could result in death or serious injury and equipment/property damage
and void the warranty.
!
WARNING
• The unit must remain in the upright (vertical) position.
• Exercise care when removing the wooden crate from around the unit.
• DO NOT operate the unit unless you fully understand the components and their intended functions (see Section
3).
• The unit and its parts are HOT!
Exercise caution when operating, loading/unloading food, cleaning or servicing.
Wearing of thermal oven mitts is recommended.
• Failure to comply with CAUTION notices may result in minor or moderate injury, equipment/property damage,
and void the warranty.
!
CAUTION

ix
Safety
EOF-10-10/FFLT/24, EOF-10-10/FFLT/24/24
EOF-20/FFLT/24, EOF-20/FFLT/24/24
• Food products must be maintained at a temperature of 150°F (65.5°C) minimum or in accordance with local or
state health regulations.
• Fryers must be adequately and properly grounded. Improper grounding may result in electrical shock.
Always refer to your local electrical code to ensure proper grounding of this or any other electrical equip-
ment. Always consult with an electrician or other qualified service person to ensure breakers and wiring are
of sufficient rating and gauge for the equipment being operated.
• Giles Electric Fryers are available from the factory wired for various voltages, phase and hertz. Check the rating
plate on the front of the fryer to determine the correct power supply.
• Ensure the fry kettle is positioned in a secure, safe location with the casters in the locked position.
• Consult an electrician to ensure all electrical specifications have been met and the unit is properly grounded. The
wiring diagrams contained in this manual should aid your electrician in the installation of your fryer.
• Due to the high temperature of shortening in your fryer during cooking, it is extremely important the user exer-
cise caution in the operation of this equipment to avoid personal injury.
• Before attempting to operate the unit, refer to Section 3 to familiarize yourself with the various control functions.
• Be careful not to puncture the filter paper when using the brush to unclog the Drain Valve.
• Allow the unit to cool down a minimum of 15 minutes before cleaning or servicing.
!
CAUTION
• The electronic components of the Control Panel are impact-sensitive. Exercise care around the Control Panel to
maintain proper operation.
• DO NOT install the unit next to combustible walls and materials. Failure to maintain safe distances may result in
fire.
• During cleaning of the unit:
•• DO NOT steam clean.
•• DO NOT use products containing chlorine.
•• DO NOT use abrasive products, steel wool or scouring pads.
•• DO NOT use oven cleaner.
• Failure to comply with these CAUTION notices may result in equipment/property damage and void the warranty.
• Failure to comply with these CAUTION notices may violate local health codes.
• DO NOT Modify, Alter or Add Attachments to this Equipment!
CAUTION

x
Safety
EOF-10-10/FFLT/24, EOF-10-10/FFLT/24/24,
EOF-20/FFLT/24, EOF-20/FFLT/24/24
NOTE:
• If the crate in which the unit is shipped is damaged upon receipt, immediately inspect the unit and notify the car-
rier of any damage to the unit.
• To aid the electrician, an electrical wiring diagram is contained in this manual. Refer to the wiring diagram during
installation or servicing.
• Comply with all appropriate state and/or local heath regulations regarding the cleaning and sanitation of equip-
ment.

1
Introduction
EOF-10-10/FFLT/24, EOF-10-10/FFLT/24/24
EOF-20/FFLT/24, EOF-20/FFLT/24/24
Congratulations on the purchase of your new Giles equipment, Model EOF-10-10/FFLT/24/24 or
EOF-10-10/FFLT/24, EOF-20/FFLT/24/24 or EOF-20/FFLT/24, manufactured by Giles Enterprises, Inc.,
Montgomery, Alabama (USA), hereafter referred to as "Giles". Every unit is thoroughly inspected and test-
ed prior to shipment. Proper care and maintenance will ensure years of trouble-free service.
To help protect your investment in this state-of-the-art cooking equipment, we recommend you take a few
moments to familiarize yourself with the installation, cleaning and maintenance procedures contained in this
manual. Adherence to these recommended procedures minimizes the potential for costly “Down-Time” and
equipment repairs. Please retain this manual for future reference.
Temperature Controller -used to control the temperature of the cooking oil and the cooking time.
Oil Filtration System
-used to extend the life of cooking oil.
FFLT
(Fried Food Landing Table) -used as a convenient location to place cooked product.
1. Introduction
1-01. Construction
1-02. Standard Features
Model EOF-10-10/FFLT/24, EOF-10-10/FFLT/24/24, EOF-20/FFLT/24/24 and EOF-20/FFLT/24/24, exterior and
fry vats are constructed of stainless steel.
Automatic Basket Lift -used to automatically lift cooked product from hot cooking oil at the end of the
cooking cycle.
1-03. Optional Features

2
Introduction
EOF-10-10/FFLT/24, EOF-10-10/FFLT/24/24,
EOF-20/FFLT/24, EOF-20/FFLT/24/24
1-04. Specifications
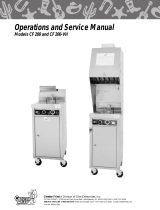
1-04.1. Overall Dimensions for EOF-10-10/FFLT/24(24) or EOF-20/FFLT/24(24)
EOF-10-10/FFLT/24/24 or EOF-20/FFLT/24/24
EOF-10-10/FFLT/24 or EOF-20/FFLT/24
INCHES [MILLIMETERS]
BASKET LIFT IN UP POSITION

3
Introduction
EOF-10-10/FFLT/24, EOF-10-10/FFLT/24/24
EOF-20/FFLT/24, EOF-20/FFLT/24/24
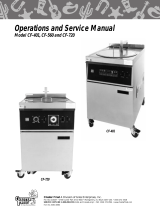
EOF-24
24
610 24
610
4 1/2
114 160 73 23 86
EOF-20
20
508 20
508
4 1/2
114 110 50 16 59
EOF-24
11.00
1176 0.01922.75
5.0
577.85 127
279.4
EOF-10
EOF-10 or EOF-20
mmin
in
in
mm mm
9.00
Length
Height
Width
1-04.2. Regulatory Listings
UL (US and Canada)
UL Sanitation
1-04.3. Basket Size
Model
Basket Size Volume
cubic inch cubic meter
811 0.00518.50
5.5
469.9 139.7
228.6
1-04.4. Vat Size and Capacity
Length
(Inside)
Width
(Inside)
Height
(Top of element to oil
level line
Liquid Shortening Capacity
(Bottom of Vat to Oil level)
In
mm
In
mm
In mm Lbs Kg Gal Lt
20
508 10
254
4 1/2
114 55 25 8 29.5
Model

4
Introduction
EOF-10-10/FFLT/24, EOF-10-10/FFLT/24/24,
EOF-20/FFLT/24, EOF-20/FFLT/24/24
EOF-10-10/FFLT/24/24
EOF-10-10/FFLT/24
Model
1085431197 2743 50 1270 61
1549
5.5193.75
1-04.5. Shipping Specifications (Crated)
Net Weight
Crated Size Volume
Length Width Height
In mm In mm In
mm
108
4851069
2743 50 1270 61
1549
Lbs Kg
Cubic
Meters
Cubic
Feet
5.5193.75
EOF-20/FFLT/24/24
EOF-20/FFLT/24
1085431197 2743 50 1270 61
1549
5.5193.75
1084851069 2743 50 1270 61
1549
5.5193.75

5
Installation
EOF-10-10/FFLT/24, EOF-10-10/FFLT/24/24
EOF-20/FFLT/24, EOF-20/FFLT/24/24
2. Installation
1. Keep the appliance and surrounding area free and clear from combustible materials. {(3")(7.6cm) for
Fryer.}
2. Please note wiring diagrams for this appliance are located in the rear of this manual. Ensure the
wiring diagram corresponds with the model being operated.
3. Please ensure this appliance is electrically grounded in accordance with local codes, or in the absence
of local codes, with the National Electrical Code, ANSI/NFPA NO. 70-1999.
4. Please provide adequate room for servicing and proper operation of this appliance. Also, provide
adequate ventilation in the operating area where necessary.
5. Always consult with an electrician or other qualified individual prior to installation.
6. Ensure voltage and amperage supplied to the unit are as specified on the fryer’s rating plate.
7. Make sure this unit is in a secure position and will not move. Locking casters are supplied on this
unit--use them!
8. This appliance is to be installed, used and maintained in accordance with the Standard for Ventilation
Control, and Fire Protection of Commercial Cooking Operations, NFPA 96-1994.
Compliance with the above steps will help to ensure safe and proper installation of your fryer. If you have any
questions concerning these procedures, contact your local Giles distributor or other qualified service person.
This section provides a summary of the procedures necessary for proper installation of your new unit. To pre-
vent personal injury or equipment damage, please ensure the following steps are taken.
2-01. Location
• DO NOT MODIFY, ALTER OR ADD ATTACHMENTS TO THIS EQUIPMENT
!
CAUTION

6
Installation
EOF-10-10/FFLT/24, EOF-10-10/FFLT/24/24,
EOF-20/FFLT/24, EOF-20/FFLT/24/24
Your Giles Fryer may arrive enclosed by a wooden crate. The Fryer is secured to a wooden platform by means
of high-tensile strength strapping.
1. Carefully cut and remove the plastic shipping wrap and the strapping mentioned above.
2. Use pliers to loosen wire hooks which secure the wooden crate around the fryer. Remove the wood-
en crate.
3. Carefully remove the fryer from the shipping platform. Your new fryer is extremely heavy, the uncrat-
ed weight for the EOF-10-10/FFLT/24 and the EOF-20/FFLT/24 is 769 lbs (349 kg); the EOF-10-
10/FFLT/24/24 and EOF-20/FFLT/24/24 is 897 lbs (407 kg), only use a fork lift when lifting this equip-
ment, refer to 2-03.
2-02. Unpacking
• Exercise care when lifting or moving the unit.
• Exercise care when removing the wooden crate from around the unit.
• Failure to comply with these CAUTION notices may result in minor or moderate injury, equip-
ment/property damage, and void the warranty.
!
CAUTION
NOTE:
• If crate is damaged, immediately inspect the unit and notify the carrier of any damage to the
unit.

7
Installation
EOF-10-10/FFLT/24, EOF-10-10/FFLT/24/24
EOF-20/FFLT/24, EOF-20/FFLT/24/24
Reinforcement bars have been attached to the framework, at both the front and rear of the fryer bank.
These bars are provided as a stabilizing reinforcement for lifting the unit and during installation. Please
note the following:
1. The bars must remain in place until the fryer is positioned in the designated final position.
2. Open or remove front doors before placing forks underneath the unit.
3. The bars are designed to be used as a lifting point for fork trucks or other type lifting devices.
2-03. Shipping Bars
• Caution must be used whenever attempting to lift any fryer or placing forks for lifting to insure
that components on the fryer are not hit by the forks or damaged due to lifting.
!
CAUTION
NOTE:
•The Front Bar must be removed to allow the installation of the Filter Pan.
NOTE:
• Giles is not liable for damage to a unit caused by the improper use of forklifts or other handling
equipment, or by premature removal of the reinforcing bars. The bars must remain in place until
the fryer has been located in the designated final operating position. Failure to follow these
instructions could void the warranty. Giles is not liable for injuries incurred during installation of
this equipment. Installation of this equipment is the sole responsibility of the purchaser.
4. After the banked unit is in the final position, the front bar must be removed to permit installation and
proper operation of the fryer Filter Pan.
5. The rear bar is intended to remain in place and will not affect fryer operation.
6. Remove the front bar by removing all the screws fastening the bar to the fryer frame. Note that the
bar is fastened to the fryer at all vertical uprights.
7. Once the screws are removed, the bar can be removed from the fryer.
8. Install the screws that are included with the shipping documents, these screws are designed to
replace the screws removed when removing the shipping bar.
9. Close or reinstall the unit's front doors.
10. Once the front bar is removed, then please follow the instructions provided in the operation manual for
the remaining installation and operation of the equipment.

8
Installation
EOF-10-10/FFLT/24, EOF-10-10/FFLT/24/24,
EOF-20/FFLT/24, EOF-20/FFLT/24/24
2-04. Electrical Requirements
The EOF-10-10, EOF-20 and EOF-24 are available from the factory in the voltages and phases listed below.
Check the rating plate on the rear of the fryer to determine the correct power supply.
2-04.1. EOF-10-10 Electrical Specifications
Voltage Phase Watts
Circuit Breaker
required
Amps
L1 L2 L3
208 3 24,000 68 66 68 80
240 3 24,000 59 57 59 75
480 3 24,000 31 29 31 50
• Fryers must be adequately and properly grounded. Improper grounding may result in electrical
shock. Always refer to your local electrical code to ensure proper grounding of this or any other
electrical equipment. Always consult with an electrician or other qualified service person to ensure
breakers and wiring are of sufficient rating and gauge for the equipment being operated.
!
CAUTION
2-04.1. EOF-20 Electrical Specifications
Voltage Phase Watts
Circuit Breaker
required
Amps
L1 L2 L3
208 1 24,000 115 115 --- 150
208 3 24,000 72 46 72 80
240 1 24,000 100 100 --- 125
240 3 24,000 68 44 68 75
480 3 24,000 34 22 34 50

9
Installation
EOF-10-10/FFLT/24, EOF-10-10/FFLT/24/24
EOF-20/FFLT/24, EOF-20/FFLT/24/24
2-05. Electrical Connections
1. Install appropriate Circuit Breakers in Main Breaker Box! See Table 2-04.
2. Connect Flexible Conduit from Main Breaker Box to Quick Disconnect Box.
3. Connect Flexible Conduit from Quick Disconnect Box to the Fryer. Allow enough Conduit so Fryer can
be moved away from the wall for cleaning and servicing. See Figure 2-05.1.
4. Open Fryer Door and remove Service Box Cover. See Figure 2-05.1.
5. Connect the electrical ground wire between the Terminal Block Ground Lug and a proper earth ground.
6. Route appropriate size Power Wires to the Fryer.
7. Connect the Power Wires to the appropriate Terminal Blocks located in the Service Box. See Figure 2-
04.1.
8. Reinstall Service Box Cover and close the Fryer Door.
2-04.2. EOF-24 Electrical Specifications
Voltage Phase Watts
Circuit Breaker
required
Amps
L1 L2 L3
208 1 30,000 144 144 --- 200
208 3 30,000 72 92 72 100
240 1 30,000 125 125 --- 150
240 3 30,000 68 88 68 100
480 3 30,000 34 44 34 50

2-06. Ventilation of Fryer
Consult a professional ventilation or heating and air conditioning company for assistance in designing a
Ventilation hood for this unit.
10
Installation
EOF-10-10/FFLT/24, EOF-10-10/FFLT/24/24,
EOF-20/FFLT/24, EOF-20/FFLT/24/24
NOTE:
•Guidelines for proper ventilation system requirements differ from location to location. Always
consult with local authorities to ensure compliance.
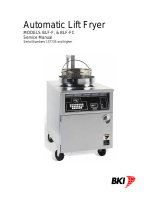
2-05.1. Electrical Connections Diagram
Flexible Conduit
Terminal Blocks
Service Box
Power Wires from Quick-
Disconnect Box
Service Box Cover
Power Wires from Quick-
Disconnect Box
Ground Lug
Terminal Blocks
Service Box
Service Box Cover
Flexible Conduit
/