Page is loading ...

Instruction
&
Operation
Manual
CT-1000
Constant
Temperature
Bath
27.9990


Copyright
Copyright ©2019 CANNON Instrument Company®. All rights reserved.
Trademarks
CANNON® and the CANNON® logo are registered trademarks of Cannon Instrument Company®.
Contact
Address: CANNON Instrument Company®
2139 High Tech Road
State College PA 16803, USA
Phone: 1-814-353-8000; 1-800-676-6232
Fax: 1-814-353-8007
Website: www.cannoninstrument.com
Email:
Sales: sales@cannoninstrument.com
Service: service@cannoninstrument.com
Manual P/N 27.9990


Contents
Contents ........................................................................................................................... 1
Introduction/Installation .................................................................................................... 1
Manual.......................................................................................................................................... 1
Temperature Selection ................................................................................................................. 2
Bath Description ........................................................................................................................... 2
Temperature Stability ................................................................................................................... 3
Notes/Cautions/Warnings ............................................................................................................. 4
Safety Precautions ........................................................................................................................ 5
Overheat Thermistor ................................................................................................................ 5
Thermistor Detection/Cutoff .................................................................................................... 5
Liquid-Level Control Float ........................................................................................................ 5
Specifications .................................................................................................................... 7
Unpack & Assemble .......................................................................................................... 8
Unpack the CT-1000 ..................................................................................................................... 8
Assembly Procedure ..................................................................................................................... 8
Insert Viscometer Tubes/Thermometers .................................................................................... 14
Thermometer Immersion ....................................................................................................... 14
Fill the Bath ................................................................................................................................ 14
Drain the Bath ............................................................................................................................ 16
Bath Operation ................................................................................................................ 17
Turn on the CT-1000 .................................................................................................................... 17
Set Bath Temperature ................................................................................................................ 18
Fixed Temperature Adjustments ............................................................................................ 18
Variable Temperature Adjustments ........................................................................................ 19
Adjust the High Temperature Limit Control ................................................................................ 20
Troubleshooting .............................................................................................................. 21
Spare Parts List ............................................................................................................... 23
Warranty......................................................................................................................... 25
Products Limited Warranty ......................................................................................................... 25

Reagent and Chemical Warranty................................................................................................. 25
Returning a Product to CANNON ................................................................................................ 26
Required Information .............................................................................................................. 26
Hazardous Materials ............................................................................................................... 26
Shipping Notification .............................................................................................................. 26
Appendix I – Choosing a Temperature Bath Fluid................................................................ 27
Methyl Alcohol ............................................................................................................................ 27
Isopropyl Alcohol
.......................................................................................................................... 28
Silicone Fluids
.............................................................................................................................. 28
Water .......................................................................................................................................... 28
Refined White Oils ........................................................................................................................ 28
Appendix II – Correct Shaft & Impeller Misalignment .......................................................... 29
Set Screw Alignment .................................................................................................................. 29
Shaft Run-Out Correction ........................................................................................................... 30
Appendix III – Adjusting Trimpots (Potentiometers) ........................................................... 31
List of Figures
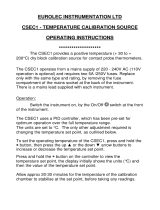
Figure 1: CANNON CT-1000 .............................................................................................................. 1
Figure 2: CT-1000 Front Panel ........................................................................................................... 2
Figure 3: Top View of CT-1000 Assembly with Probe ........................................................................ 2
Figure 4: Primary Bath Components after Unpacking ....................................................................... 8
Figure 5: Remove Screws from Top Covers ....................................................................................... 9
Figure 6: Remove Top & Rear Top Covers ......................................................................................... 9
Figure 7: Checking Support Ring ..................................................................................................... 10
Figure 8: Placing Gasket
................................................................................................................. 10
Figure 9: Installing Bath Jar ............................................................................................................. 10
Figure 10: Placing Inner Glass Plate................................................................................................. 11
Figure 11: Inside Drawer .................................................................................................................. 11
Figure 12: Adjusting Seal with Set Screws with Allen Wrench ......................................................... 12
Figure 13: Remove Housing ............................................................................................................ 12
Figure 14: Insert the Motor ............................................................................................................. 13
Figure 15: CT-1000 Assembly Rear View ......................................................................................... 13
Figure 16: CT-1000 Top View without Hole Covers.......................................................................... 14
Figure 17: Filling the Bath ................................................................................................................ 15

Figure 18: CT-1000 Front Panel ........................................................................................................ 17
Figure 19: Trimpots ........................................................................................................................ 19
Figure 20: CT-1000 Rear View ......................................................................................................... 20
Figure 21: Motor Stirrer .................................................................................................................. 29
Figure 22: Inside Drawer with Access to Trimpots ........................................................................... 31
Figure 23: Adjusting Potentiometers ............................................................................................... 31
List of Tables
Table 1: Specifications ..................................................................................................................... 7
Table 2: Problem Analysis .............................................................................................................. 21
Table 3: CT-1000 Spare Parts List ................................................................................................... 23
Table 3: Bath Fluid Options ..............................................................................................................27


CANNON Instrument Company® | Introduction/Installation
1
Introduction/Installation
The CANNON CT-1000 Constant Temperature Bath is designed to maintain precise temperatures at
a wide range of settings for accurate viscosity measurements. Because of its temperature stability
and ease of use, it is also suitable for any other application where temperatures must be maintained
within close tolerances.
The CANNON CT-1000 maintains temperatures of 20 °C to 100 °C within 0.01 °C and temperatures of
101 °C to 150 °C within 0.03 °C.
Manual
This manual is intended to provide information on the installation, characteristics and operation of
the CANNON CT-1000 Constant Temperature Bath.
Figure 1: CANNON CT-1000

2
CT-1000 Instruction Manual
Temperature Selection
Ten of the most commonly-used temperatures for kinematic viscosity measurement can be set by
using a switch on the bath front panel. The bath equilibrates within a fraction of one degree of the
desired temperature. A fine-tuning control permits further temperature adjustments. By switching
to the variable setting on the front panel, the operator can set any temperature within the
operating range of the instrument. Refer to Figure 2.
Figure 2: CT-1000 Front Panel
Bath Description
The bath chamber is a cylindrical clear Pyrex® vessel 300 mm (12”) in diameter and 300 mm (12”)
high. A stainless steel baffle is located in the center of the bath and provides a convenient backdrop
for viewing viscometers placed in the bath. The top cover contains seven round holes 51 mm (two
inches) in diameter for insertion of viscometer holders. Two additional holes are provided for
thermometers as shown in Figure 3. Twin fluorescent lamps provide glare-free illumination of the
bath.
Figure 3: Top View of CT-1000 Assembly with Probe

CANNON Instrument Company® | Introduction/Installation
3
A solid-state control circuit equipped with a stainless steel-encased thermistor provides proportional
temperature control. A motor-driven stirrer ensures that a uniform temperature is maintained
throughout the bath.
The bath housing is fabricated from heavy aluminum and coated with a corrosion-resistant epoxy.
The top cover consists of three layers: a stainless steel top surface, an insulating layer, and a bottom
stainless steel heat reflector.
Temperature Stability
The temperature control of ± 0.01 °C below 100 °C and ± 0.03 °C from 100 °C to 150 °C provides the
sensitivity required by ASTM D445 for kinematic viscosity measurements. A built-in cooling coil,
when connected to tap water or a cooling system, permits operation below or slightly above
ambient temperature.

4
CT-1000 Instruction Manual
Notes/Cautions/Warnings
Please keep this manual near your system to easily access necessary information while operating or
preparing for operation.
Notes, caution, and warnings are used in the manual to call an operator’s attention to important
details prior to performing a procedure or step. Read and follow these important instructions.
Failure to observe these instructions may void warranties, compromise operator safety, and/or
result in damage to the instrument.
Notes provide more information about the content that follows.
Cautions alert the operator to conditions that may damage equipment.
Warnings alert the operator to conditions that may cause injury.
It is prohibited to copy or reproduce in part or in whole this manual without authorization by
copyright.
If you should find any part in this manual not clear to understand or missing article, contact your
local dealer or sales representative.
Manufacturer is not liable for any loss or damage directly or indirectly caused by use of the
instrument or its consequences.
This manual pertains directly to the CT-1000 constant temperature bath. For details relating to other
accessories or equipment please refer to the appropriate manufacturers supplied documentation.

CANNON Instrument Company® | Introduction/Installation
5
Safety Precautions
Always observe these signs and instructions. You must observe cautionary messages and warnings in
order to protect yourself as well as prevent others from physical injury or property damages.
Overheat Thermistor
A thermistor in the bath senses any over-temperature fault condition. If such a condition occurs, all
power is removed from the bath until an operator resets the over-temperature limit circuit.
Thermistor Detection/Cutoff
If the control thermistor is disconnected, all power to the bath heaters is cut off.
Liquid-Level Control Float
Bath operation is not possible unless it is filled with liquid to a safe operating level. A liquid-level
control float prevents the control circuit from heating the bath until the safe operating level is
attained. The bath heaters automatically turn off if the bath liquid drops below the minimum safe
level.
• Only qualified personnel should operate the CT-1000.
• Place the CT-1000 on a stable surface such as a laboratory table or bench. Do not place
instrument on a cart or stand.
• If any liquids are spilled into the electronic components of the CT- 1000, contact Cannon
Instrument Company immediately.
• Position power cords so they will not be walked on or pinched by items placed on or against
them. Keep all connections as neat as possible.
• Unplug the power cord from the wall outlet if the CT-1000 will not be used for an extended
period of time. Disconnect the power cord by pulling it out by the plug. Never pull on the cord.
• Read and understand all operating instructions and safety precautions listed in this manual
before installing or operating the instrument. Any questions regarding instrument operation or
documentation should be referred to Cannon Instrument Company.
• Do not deviate from the installation, operation, or maintenance procedures described in this
manual. Improper use of the CT-1000 may result in a hazardous situation and may void the
manufacturer’s warranty.

6
CT-1000 Instruction Manual
• Handle and transport the unit with care. Sudden jolts or impacts may cause damage to
components.
• Never operate the instrument without proper levels of approved bath fluid in bath.
• Observe all warning labels. Never remove warning labels.
• Never operate damaged or leaking equipment.
• Unless procedures specify otherwise, always turn off the unit and disconnect the MAINS cable
from the power source before performing service or maintenance procedures, or before
moving the unit.
• Refer all service and repairs to qualified personnel.
Warning: The bath fluid used with the CT-1000 may be hazardous. Use
proper safety precautions when handling the bath fluid and refer to the
Material Safety Data Sheets included with the bath fluid for more detail.
Caution: Do not attempt to service the CT-1000 system by removing panels and
trying to effect repairs. Contact CANNON regarding service and repair needs.
~MAINS
The
~MAINS
symbol indicates the connections for the AC power supply. The AC
power input must match the electrical specifications of the instrument.
Never operate the equipment with a damaged MAINS AC power cable.
Use only the manufacturer-supplied MAINS AC power cable. This cable must be
inserted into a receptacle with a protective earth ground.
(O)
The (O) symbol indicates the OFF position for the electrical switches for your
unit.

CANNON Instrument Company® | Specifications
7
Specifications
Table 1: Specifications
Specifications
Details
Model
CT-1000 Extended Range Constant Temperature Bath
Methodology
ASTM D445, ASTM D446, ISO 3104/3105
Applications
Formulated oil analysis, hydraulic oil analysis, additive
analysis, marine fuel testing, base stock analysis, light and
heavy fuel testing, waxes/paraffin, crude oil testing, glycols
Dimensions
(W × D × H)
43.8 cm × 46.4 cm × 58.4 cm
(17.25 in × 18.25 in × 23 in)
Weight
43 kg (95 lb)
Sample Capacity
7
Temperature Range &
Accuracy
20 °C to 100 °C ± 0.01 °C*
100 °C to 150 °C ± 0.03 °C
*Test temperatures <40 °C and high ambient temperature test
environments require and optional bath cooler
Bath Height
12 inches
Bath Volume
17 L (4.5 gal)
Operating Conditions
15 °C to 30 °C, 10% to 75% relative humidity (non-
condensing), Installation Category II, Pollution Degree 2
Electrical Specifications
120 VAC, 50/60 Hz; 240 VAC, 50/60 Hz
1400 watt power consumption
Compliance
CE Mark: EMC Directive (2004/108/EC); Low Voltage
Directive (2006/95/EC); HI-POT (1900 VDC, 60 sec.); ROHS

8
CT-1000 Instruction Manual
Unpack & Assemble
This section of the manual provides assistance in unpacking and assembling the CT-1000 Constant
Temperature Bath.
Unpack the CT-1000
The CANNON CT-1000 Constant Temperature Bath is shipped in two boxes:
• Box 1 contains the glass jar, front glass panel pieces, jar gasket top, trimpot adjust screwdriver,
Allen wrench, seven hole covers, rubber thermometer holder and instruction manual.
• Box 2 contains the bath housing, including the electronics drawer. Box 2 also holds a smaller
box with the motor and stirrer, including the impeller and mounting plate.
The bath unit housing is shipped completely assembled. However, the glass jar, the glass panels, and
the motor and stirrer must be installed in the bath unit housing. To proceed with this installation,
some disassembly of the bath unit housing is required. Required tools include a utility knife, a Philips
screwdriver, and an included 1/8" Allen wrench.
Assembly Procedure
Figure 4: Primary Bath Components after Unpacking
1. Unpack the bath unit housing.
2. Move the bath unit housing to its permanent location on the laboratory bench.

CANNON Instrument Company® | Unpack & Assemble
9
3. Remove all eight screws from the stainless steel top covers. Refer to Figure 5.
Figure 5: Remove Screws from Top Covers
4. Disconnect all probes, heaters, and float switch from the rear panel.
5. Remove the front top cover and rear top cover. Use caution when removing the rear top cover
as the temperature control probes and heating elements are attached to it as shown in Figure 6.
Figure 6: Remove Top & Rear Top Covers
6. Remove the glass jar from its box.
Caution: The glass jar is heavy. Use caution when lifting jar.
7. Make sure the rubber support ring is seated properly around the bottom jar opening in the bath
unit as shown in Figure 7.
Remove eight screws

10
CT-1000 Instruction Manual
Figure 7: Checking Support Ring
8. Place the rubber gasket around the top rim of the jar. The rubber may have to be trimmed
slightly to allow the ends of the rubber gasket to meet with no gap when placed around the rim.
Refer to Figure 8.
Figure 8: Placing Gasket
9. Remove the large piece of foam packing from the inside of the cabinet. Also remove the small
piece of foam from the float level, located on the upper left corner of the inside of the cabinet.
10. Lower the glass jar into the cabinet so it seats evenly on the rubber support ring. Refer to Figure
9.
Figure 9: Installing Bath Jar

CANNON Instrument Company® | Unpack & Assemble
11
11. Remove the wrapping from around the two glass panels. Place the thinner of the two piece of
glass in the slot closest to the jar. Refer to Figure 10.
Figure 10: Placing Inner Glass Plate
12. Place the wider (tempered) piece of glass in the front slot furthest away from the jar. The middle
slot is left empty as a vapor barrier.
13. Replace the rear top cover. Align the four holes, then insert and tighten the screws.
14. Replace the front top cover. Line up the four holes, then insert and tighten the screws.
15. Ensure that the gasket forms a tight seal with the top covers of the bath. Pull out the drawer
using the handles provided, disconnecting the two connection cables while pulling out the
drawer. Refer to Figure 11.
Figure 11: Inside Drawer
Caution: The AC MAINS power cord must be pulled through the rear panel
opening as the drawer is removed. Do not try to remove the cord until the screw
securing the power cord to its connection is loosened on the back of the drawer.
16. Press down or pull up on the plastic release bars on either side of the drawer track to release
the drawer, then pull the drawer completely free of the unit and set it aside.

12
CT-1000 Instruction Manual
17. When the drawer is removed, locate the four ¼ -20 set screws visible at the top of the drawer
opening underneath the bath.
18. Turn the set screws clockwise with the included Allen wrench until the top of the jar forms a
tight seal with the covers. Make sure to tighten the set screws uniformly so the jar remains
level. Refer to Figure 12.
Figure 12: Adjusting Seal with Set Screws with Allen Wrench
19. Run the AC cord through the rear panel opening.
20. Replace the drawer in the slide tracks and push the drawer back into its opening. Insert the two
plugs into the rear of the drawer assembly.
Complete the assembly of the bath, including the motor-stirrer installation, per the instructions
below:
21. Unpack the motor/stirrer from its box. Remove the two screws on the top heater housing and
lift off the housing. Refer to Figure 13.
Figure 13: Remove Housing
22. After checking the impeller blades to make sure that the flat sections all lie in the same plane
(refer to Appendix II – Correct Shaft & Impeller Misalignment) insert the motor stirrer in the
provided opening. Refer to Figure 14.
/