Page is loading ...

i
CANNONCANNON
CANNONCANNON
CANNON
®
CT-500/600 Series II CONSTANT TEMPERATURE BATH
Version 3..2—March, 2012;
CANNONCANNON
CANNONCANNON
CANNON
®
Instrument Company
2139 High Tech Road • State College, PA • 16803 • USA
CONTENTS
1
INTRODUCTION 1
Overview ............................................................................................................................. 1
Specifications ....................................................................................................................... 2
Safety warnings .................................................................................................................... 3
Safety features ...................................................................................................................... 4
Operator safety .................................................................................................................... 4
2
UNPACKING AND ASSEMBLY 5
Unpacking the CT-500 ......................................................................................................... 5
Assembly ............................................................................................................................. 6
CT-500 Series motor-stirrer installation ..................................................................... 8
CT-600 TE cooler and motor-stirrer installation......................................................... 8
Final assembly ........................................................................................................ 11
Inserting viscometer tubes/thermometers .............................................................................. 11
Filling the bath .................................................................................................................... 12
Draining the bath ................................................................................................................. 12
3
CT-500 OPERATION 13
Front panel ......................................................................................................................... 13
Turning on the CT-500........................................................................................................ 14
Setting the temperature ....................................................................................................... 14
Pre-set temperature selection .................................................................................. 14
Adjusting the High Temperature Limit Control ......................................................... 15
Custom temperature selection ................................................................................. 15
Adjusting the High Temperature Limit Control ......................................................... 16
Verifying Limit Control operation ......................................................................................... 17
Cleaning ............................................................................................................................. 17
Using the thermoelectric cooling system (CT-600 only) ........................................................ 17
4
WARRANTY/RETURN INFORMATION 19
Products limited warranty .................................................................................................... 19
Reagent and chemical warranty ........................................................................................... 19
Returning a product to CANNON
®
.................................................................................... 20

ii
CANNONCANNON
CANNONCANNON
CANNON
®
CT-500/600 Series II CONSTANT TEMPERATURE BATH
Version 3..3—March, 2012;
CANNONCANNON
CANNONCANNON
CANNON
®
Instrument Company
2139 High Tech Road • State College, PA • 16803 • USA
A
APPENDIX A — PROBLEM ANALYSIS 21
B
APPENDIX B — REPLACEMENT PARTS LIST 23
C
APPENDIX C —THERMOMETRY FOR THE CT-500 25
Kinematic viscosity and temperature .................................................................................... 25
D
APPENDIX D — CHOOSING A BATH LIQUID 27

1
CANNONCANNON
CANNONCANNON
CANNON
®
CT-500/600 Series II CONSTANT TEMPERATURE BATH
Version 3..3—March, 2012;
CANNONCANNON
CANNONCANNON
CANNON
®
Instrument Company
2139 High Tech Road • State College, PA • 16803 • USA
CHAPTER
1
INTRODUCTION
Overview
Manual
This manual is intended to provide information on the installation, charac-
teristics and operation of the CANNON
®
CT-500/600 series II Constant
Temperature Baths. CT-500 references in the manual will apply to all
models unless otherwise indicated.
CT-500 function
The CANNON
®
CT-500 series II Constant Temperature Baths are
designed to be used for precise viscosity measurements. Because of its
temperature stability and ease of use, the baths are also suitable for many
other applications where temperatures must be maintained within
± 0.01 °C.
Effective temperature range
The CANNON
®
CT-500 will maintain temperatures of 20°C to 100°C
± 0.01°C. The CT-500 includes a built-in cooling coil which, when
connected to tap water or a cooling system, permits operation below or
slightly above ambient temperature. The cooling coil should be used
when controlling temperature within 10°C of ambient.
Precision
The precision of kinematic viscosity measurements possible with the CT-
500 system meets the sensitivity requirements of ASTM D 445.
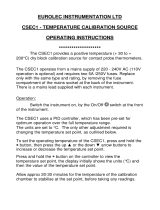
Temperature selection
Ten of the most
commonly-used
temperatures for
kinematic viscosity
measurement can
be set using the
left-hand dial on
the bath front
panel. The bath
will equilibrate
within a fraction of
one degree of the
desired tempera-
ture. A fine-tuning
control permits
further tempera-
ture adjustments.
By switching to
the variable setting
on the front panel,
the operator can set any temperature within the operating range of the
instrument.
Figure 1: The CT-500/518 Series II instrument
s

2
CANNONCANNON
CANNONCANNON
CANNON
®
CT-500/600 Series II CONSTANT TEMPERATURE BATH
Version 3..2—March, 2007;
CANNONCANNON
CANNONCANNON
CANNON
®
Instrument Company
2139 High Tech Road • State College, PA • 16803 • USA
Bath description
The bath chamber is a cylindrical clear Pyrex
®
vessel 300 mm (12
inches) in diameter and 300 mm (12 inches) high. A stainless steel baffle
coated with white PTFE
is located in the center of the bath and provides
a convenient backdrop for viewing viscometers placed in the bath. The
top cover contains seven round holes 51 mm (two inches) in diameter for
insertion of viscometer holders. An additional 10 mm (3/8 inch) hole is
provided for a thermometer.
A solid-state control circuit provides proportional control of the tempera-
ture. The sensing element for the control circuit is a stainless steel-
encased thermistor. The entire electrical control system is located in a
drawer beneath the bath.
Specifications
SNOITACIFICEPSTNEMURTSNI
ledoMtnemurtsnI
005-TC 815-TC 425-TC 006-TC
snoisnemiD ediwmm704
peedmm263
hgihmm016
)ni42x52.41x61(
ediwmm704
peedmm263
hgihmm267
)ni03x52.41x61(
ediwmm704
peedmm263
hgihmm419
)ni63x52.41x61(
ediwmm704
peedmm914
hgihmm838
)ni33x5.61x61(
thgieW .lcni)sbl46(gk1.92
rajhtab
.lcni)sbl07(gk8.13
rajhtab
.lcni)sbl67(gk5.43
rajhtab
htab.lcni)sbl87(gk4.53
raj
thgieWgnippihS .lcni)sbl19(gk4.14
rajhtab
.lcni)sbl99(gk54
rajhtab
.lcni)sbl701(gk6.84
rajhtab
htab.lcni)sbl801(gk94
raj
yticapaChtaB )lag5(L22)lag7(L03)lag9(L83)lag5(L22
egnaR.pmeThtaB C°001-C°02
ytilibatS.pmeThtaB *C°10.0±
snoitidnoCgnitarepO IIyrogetacnoitallatsnI;gnisnednoc-nonHR%09-%01,C°03-C°51
2eergednoitulloP
tnemecalpeResuF "¼x"¼1;V052A21M
ecnailpmoC )CEE/32/37(evitceridegatlovwoL;)CEE/633/98(evitceridCME
).ces06,CDV0091(TOP-IH
/rebmuNgolataC
stnemeriuqeRlacirtcelE
005-TC 815-TC 425-TC 006-TC
01A-6279
%01±CAV511
0001,zH06/05
sttaw
71A-6279
%01±CAV511
sttaw0031,zH06/05
%01±CAV511
sttaw0031,zH06/05
03A-6279
%01±CAV511
sttaw0001,zH06/05
51A-6279
%01±CAV032
0001,zH06/05
sttaw
91A-6279
%01±CAV032
sttaw0031,zH06/05
%01±CAV032
sttaw0031,zH06/05
53A-6279
%01±CAV032
sttaw0001,zH06/05
retaergrom/V2fodleifFRnafoecneserpehtniC°1.0otesaercedyamytilibatshtaB*

3
CANNONCANNON
CANNONCANNON
CANNON
®
CT-500/600 Series II CONSTANT TEMPERATURE BATH
Version 3..2—March, 2007;
CANNONCANNON
CANNONCANNON
CANNON
®
Instrument Company
2139 High Tech Road • State College, PA • 16803 • USA
Safety warnings
Please observe the following safety procedures and notices for proper
operation of your CT-500 series II Constant Temperature Bath:
• Make sure that your unit is operated only by qualified personnel
• Make sure that you read and understand all operating instructions
and safety precautions listed in this manual before installing or
operating your unit. If you have questions regarding instrument
operation or documentation, contact CANNON
®
Instrument Com-
pany.
• Deviation from the installation, operation or maintenance procedures
described in this manual may result in a hazardous situation and may
void the manufacturer's warranty.
• Transport the unit with care. Sudden jolts or drops may cause
damage to components.
• Observe all warning labels.
• Never remove warning labels.
• Never operate damaged or leaking equipment.
• Never operate the unit without appropriate levels of approved bath
fluid in the bath.
• Do not add bath fluid to the bath unless the bath temperature is
within 10°C of ambient.
• Do not splash liquids on the external surfaces of the CT-500, includ-
ing the Pyrex
®
bath jar.
• Do not obstruct the cooling vent on the top of the CT-500.
• Always turn off the unit and disconnect the mains cable from the
power source before performing service or maintenance procedures,
or before moving the unit.
• Always empty the bath before moving the unit.
• Never operate the equipment with damaged mains power cables.
• Refer all service and repairs to qualified personnel.
In addition to the warnings listed above, additional cautions are posted
throughout the manual. These warnings may be designated by an appro-
priate symbol inside an equilateral triangle. General cautions are indi-
cated with an exclamation point (see diagram, left). Read and follow
these important instructions. Failure to observe these instructions can
result in permanent damage to the unit, significant property damage,
personal injury or death.
Hot surface cautions (see diagram, left) may be attached on or near hot
surfaces of the CT-500. Avoid touching these surfaces when running the
bath at temperatures above 50°C.
General Caution

4
CANNONCANNON
CANNONCANNON
CANNON
®
CT-500/600 Series II CONSTANT TEMPERATURE BATH
Version 3..3—March, 2012;
CANNONCANNON
CANNONCANNON
CANNON
®
Instrument Company
2139 High Tech Road • State College, PA • 16803 • USA
Safety features
The CT-500 comes equipped with a number of safety features:
Temperature fault sensor
A second thermistor in the temperature bath senses any over-temperature
fault condition. If such a condition occurs, all power is removed from the
bath until an operator corrects the problem and resets the over-tempera-
ture limit circuit.
Thermistor cutoff detection
If the control thermistor is disconnected, all power to the bath heaters is
cut off.
Bath fluid level cutoff
The CT-500 will not operate if the liquid level in the bath is too low. If
such a condition occurs, all power is removed from the bath until the
liquid level in the bath is restored to the minimum safe level.
NOTE
Safety devices may be impaired if equipment is not operated per manual
instructions.
Operator safety
All technicians who use the CT-500 should follow these basic safety
procedures:
• The CT-500 power cord should only be connected to a suitable AC
mains power source (with protective earth ground) matching the
specifications of the S/N label on the CT-500 rear panel.
• The CT-500 should be placed on a stable laboratory table or bench.
• If any liquids are spilled in or around any electronic components of
the CT-500, remove power and contact CANNON
®
Instrument
Company before introducing power to the system again.
• Position power cords so that they are not likely to be walked on or
pinched by items placed on or against them. Keep all connections as
neat as possible.
• To disconnect the power cord, pull it out by the plug. Never pull the
cord itself.
• Do not attempt to service the CT-500 system by removing panels and
trying to effect repairs. Contact CANNON
®
Instrument Company for
all service and repair needs.
• Monitor bath fluid level carefully and use caution when operating at
temperature set points above ambient temperature. Liquid may
expand and overflow the jar.
• Observe appropriate safety precautions when handling bath fluid
(refer to the Material Safety Data Sheet included with the bath fluid
for more details.)
CAUTION
Never use flammable bath liquids in any CT-500 bath.

5
CANNONCANNON
CANNONCANNON
CANNON
®
CT-500/600 Series II CONSTANT TEMPERATURE BATH
Version 3..3—March, 2012;
CANNONCANNON
CANNONCANNON
CANNON
®
Instrument Company
2139 High Tech Road • State College, PA • 16803 • USA
CHAPTER
2
UNPACKING AND ASSEMBLY
Unpacking the CT-500
CAUTION
Some CT-500 components, including the glass jar and the primary
instrument housing, are quite heavy. It is recommended that two people
carry the shipping cartons and the heavier unpacked components.
When lifting the CT-500 bath, do not grasp the handles of the electrical
drawer. Drawer handles are not designed to bear the weight of the
instrument.
1. Remove all components from the shipping container(s).
2. Remove any and all packing materials (styrofoam, etc.) from the
components.
3. Verify reception of shipped materials by comparing equipment items
with packing/parts list(s). Report missing items to CANNON
®
Instrument Company immediately.
4. Inspect each component for signs of damage. Report damages to the
shipper and CANNON
®
Instrument Company immediately.
Damaged items
Retain all packing materials until the instrument is connected and
functioning properly. If any component(s) must be returned to
CANNON
®
Instrument Company, the damaged item(s) should be pack-
aged in the original shipping container. Refer to the final chapter of this
manual for instructions on returning defective equipment. Customers
outside the United States should contact the local CANNON
®
agent for
procedures on returning products to CANNON
®
.
Figure 2: CT-500 primary components

6
CANNONCANNON
CANNONCANNON
CANNON
®
CT-500/600 Series II CONSTANT TEMPERATURE BATH
Version 3..2—March, 2007;
CANNONCANNON
CANNONCANNON
CANNON
®
Instrument Company
2139 High Tech Road • State College, PA • 16803 • USA
Assembly
Instrument placement
1. Place the bath control housing in the space that it will occupy when
the bath is operable. This should be a sturdy, level tabletop or bench
with a non-flammable surface.
CAUTION
Be careful when lifting the control housing; it is quite heavy.
Minimum clearance
The CT-500 series II bath requires 25 cm (10") of clearance to the
rear and sides of the unit.
Support/insulation
2. The CT-600 will require
two felt pads. The CT-500
will require one felt pad.
Felt pad placement
3. Place the felt pad(s) on top
of the insulating disk (see
Figure 3).
Bath jar placement
4. Place the glass bath jar on
top of the felt pad(s).
CAUTION
Be careful when lifting
the bath jar; it is quite
heavy.
5. Position the rear
cover containing
the motor housing,
heaters, cooling
coil, and baffle on
top of the jar (see
Figure 4), feeding
all connecting
cables from the
heaters, float
switch and control/overtemp probes through the vertical wiring
channel in the rear of the housing. The back of the motor housing
should fit over the vertical channel, and the groove on the underside
of the half-round cover should fit over the edge of the jar.
6. Place the front bath cover (with holes for the viscometers) on top of
the front half of the jar.
6b. CT-600 ONLY: Check for alignment of the the tab slots in the rear
housing with the screw holes in the vertical channel. If the alignment
is not correct, adjust the height of the bath vessel per steps 6c-6g.
Figure 3: Placing the felt pad(s)
on the insulating disk
Figure 4: Positioning the rear cover

7
CANNONCANNON
CANNONCANNON
CANNON
®
CT-500/600 Series II CONSTANT TEMPERATURE BATH
Version 3..2—March, 2007;
CANNONCANNON
CANNONCANNON
CANNON
®
Instrument Company
2139 High Tech Road • State College, PA • 16803 • USA
6c. Loosen and remove
the two Phillips-
head screws
securing the drawer
unit to the brackets
inside the drawer
housing (see Figure
4b).
6d. Pull out the electri-
cal drawer using the
handles provided,
disconnecting the
two connection
cables as you do so.
CAUTION
If it is plugged in, unplug the AC line (power) cord before you remove the
drawer!
6e. Pull the drawer completely free of the housing and set it aside.
6f. When the drawer is
removed, locate the
four 1/4-20 socket
head cap screws
visible at the top of
the drawer opening
underneath the bath.
6g. Using the Allen
wrench provided,
adjust the cap screws
until the bath top is
level and the tab slots
in the rear housing
are aligned with the
screw holes in the
vertical channel (see
Figure 4c). Then
replace the bath
drawer and secure it
using the Philips-head
screws previously
removed.
Figure 4c: tab slots properly aligned with
vertical channel screw holes
Figure 4b: Removing drawer screws

8
CANNONCANNON
CANNONCANNON
CANNON
®
CT-500/600 Series II CONSTANT TEMPERATURE BATH
Version 3..2—March, 2007;
CANNONCANNON
CANNONCANNON
CANNON
®
Instrument Company
2139 High Tech Road • State College, PA • 16803 • USA
CT-500 Series motor-stirrer installation
Motor-stirrer installation
To install the motor-stirrer, follow the procedure below.
NOTE
If you have the CT-600 Series instrument, skip to the CT-600 Series
installation section and complete the installation directions in place of this
section.
7. Remove the screws that fasten the top cover to the motor housing
and remove the top cover.
8. Remove the motor-stirrer from its box.
CAUTION
Use care when handling the motor shaft and impeller to prevent damaging
sensitive components. Do NOT hold the motor assembly by the shaft.
Doing so could bend the rotor shaft slightly out of alignment.
NOTE
Two standoffs, one on each side of the opening for the motor-stirrer, serve
as locating pins for the motor support pad. The holes in the pad fit loosely
over these standoffs to prevent the motor from vibrating out of position.
9. Carefully slide the motor-stirrer into place on the motor support pad,
impeller shaft down, and align the motor line cord so it points toward
the rear of the bath (see
Figure 5). The motor-stirrer
should now lie flat on the top
of the bath.
10. Lower the motor-stirrer
power cord down through
the vertical channel in the
rear of the unit.
11. Attach the top cover,
making sure that all cords
pass through the rear
opening and down through the
vertical shaft. Secure the front of the cover first. The two longer
screws w/toothed washers from the Accessories Kit are used to
secure the housing to the sides the vertical shaft.
CT-600 TE cooler and motor-stirrer installation
This section of the installation procedure is for the CT-600 bath only.
The CT-600 is shipped with the top housing sections installed, but with the
motor-stirrer and TE cooling unit packaged separately. To complete CT-
600 installation you will remove the housing sections, install the motor-
stirrer and TE cooling unit, and reassemble the housing. Follow the
procedure below to install these components.
Figure 5: Positioning motor-stirrer

9
CANNONCANNON
CANNONCANNON
CANNON
®
CT-500/600 Series II CONSTANT TEMPERATURE BATH
Version 3..2—March, 2007;
CANNONCANNON
CANNONCANNON
CANNON
®
Instrument Company
2139 High Tech Road • State College, PA • 16803 • USA
1. Remove the two screws securing the rear housing to
the bath chassis (see Figure 5a). Set the screws
aside.
2. Loosen but DO NOT REMOVE the two top screws
securing the front housing (see Figure 5b). This will
provide play for removal of the rear housing.
3. Remove the rear housing by sliding it backward
away from the bath.
4. Remove the screws securing the front housing to the
bath chassis.
5. Remove the front housing.
6. Uncoil the cables from the heaters, float switch and
control/overtemp probes, then lower the ends of the
cables through the vertical channel at the rear of the
bath.
7. Install the thermoelectric cooler by sliding it through
the circular 2" aperture that will be enclosed by the
housing (see Figure 5c).
CAUTION
Make certain that the tabs (see Figure 5d, next page) are
oriented so that they will clear the edges of the
aperture during installation.
8. Tighten the two tab screws (one on each side of the
finned tube). During tightening the tabs will orient
and seat against the bottom of the bath cover to
secure the themoelectric cooler to the bath cover
(see Figure 5e).
9. Attach the two matching white power supply
connectors together (see Figure 5f).
10. Attach the two matching black power supply
11. Carefully slide the motor-stirrer into place on the
motor support pad, impeller shaft down (see Figure
5, previous section) with "cut out" portion corre-
sponding to the location of the TE cooler.
12. Make certain to align the motor line cord so it points
toward the rear of the bath. The motor-stirrer should
now lie flat on the top of the bath.
13. Lower the motor-stirrer power cord down through
the vertical channel in the rear of the unit.
Figure 5a: Removing top rear housing
Figure 5b: Removing top rear housing
Figure 5c: Inserting the TE cooler
connectors together (see Figure 5g).

10
CANNONCANNON
CANNONCANNON
CANNON
®
CT-500/600 Series II CONSTANT TEMPERATURE BATH
Version 3..2—March, 2007;
CANNONCANNON
CANNONCANNON
CANNON
®
Instrument Company
2139 High Tech Road • State College, PA • 16803 • USA
14. Loosely install the front
housing using the screws
previously removed, but do
not yet tighten the screws.
15. Install the rear housing by
sliding the front flanges
forward under the front
housing until the two pieces
mate. If there is insufficient
play, loosen the front housing
screws until the flanges can
slide into place.
16. Secure the rear housing
using the two screws
previously removed (see
Figure 5h, below).
17. Obtain two additional screws
and toothed washers from
the Accessories Kit. Install
the screws to the tabs at the
rear of the front housing to
secure the housing to the
vertical channel.
18. Tighten all housing screws to
complete the housing
installation.
Figure 5d: TE cooler mounting tabs
Figure 5e: Securing mounting tabs
Figure 5h: Installing rear housing
Figure 5f: Connecting TE power
Figure 5g: Connecting power

11
CANNONCANNON
CANNONCANNON
CANNON
®
CT-500/600 Series II CONSTANT TEMPERATURE BATH
Version 3..2—March, 2007;
CANNONCANNON
CANNONCANNON
CANNON
®
Instrument Company
2139 High Tech Road • State College, PA • 16803 • USA
Final assembly
Connect all remaining plugs and probes to the correspondingly labeled
and/or color-coded sockets at the rear of the CT-500 bath unit.
(see Figure 6)
Figure 6: CT-500 rear panel connections. All connections marked with " " contain potentially
hazardous voltages. These sockets are for connection to CT-500 plugs ONLY (see below).
Rear Panel Connections:
Control Thermistor — Connects main temperature control thermistor to the Control Unit
Float Switch — Connects the fluid-level sensor to the Control Unit
Over-temp. Thermistor — Connects over-temp. thermistor to the Control Unit
Heaters — Supplies AC Mains power to the bath heaters
Stirrer — Supplies AC Mains power to the motor-stirrer
Fuses — Protects against damage or hazard in the event of an internal fault
Mains — Provides AC mains power entry connection
CAUTION
The CT-500 power cord must be connected to an AC mains source
matching the specifications of the S/N label on the instrument rear panel.
Inserting viscometer tubes/thermometers
The top cover of the CT-500 contains seven apertures, 51 mm (2") in
diameter, for the insertion of viscometer tube holders. Two additional
holes are provided for insertion of thermometers.
Inserting viscometer tubes
If necessary, remove the viscometer tube hole cover(s) from the top of
the bath and carefully place the viscometer tube(s), with the proper
holder attached, into the bath through the aperture(s) in the top cover.
NOTE
After filling the bath with fluid, adjust the height of the viscometer tube(s)
to ensure that the liquid under test and/or any timing marks on the tube
are a minimum of 6 mm (¼") below the top level of the liquid.
Thermometer immersion
Proper thermometer immersion is critical for viscosity measurements.
Even a calibrated thermometer will read incorrectly if is it improperly
immersed in the bath. “Total immersion” kinematic viscosity thermom-
eters should be used with the bulb and only the mercury column beneath
the surface of the liquid, but with the emergent stem above the surface at
ambient temperatures.

12
CANNONCANNON
CANNONCANNON
CANNON
®
CT-500/600 Series II CONSTANT TEMPERATURE BATH
Version 3..2—March, 2007;
CANNONCANNON
CANNONCANNON
CANNON
®
Instrument Company
2139 High Tech Road • State College, PA • 16803 • USA
NOTE
Different thermometers have different immersion requirements. Refer to the
information included with the thermometer in use for specific instructions.
Filling the bath
Make sure that the bath is placed in its intended final position before
adding bath fluid. The CT-500 should not be moved with bath fluid in the
bath jar. NEVER USE FLAMMABLE BATH LIQUIDS.
1. Make sure that the instrument power is OFF and select a bath liquid
appropriate to your operating temperature range (see APPENDIX D).
2. Fill the jar with bath liquid at ambient temperature to a level sufficient
to engage the float switch. This float permits bath operation when the
minimum amount of fluid has been added to the bath jar.
3. Continue to add fluid until the bath liquid level has risen to approxi-
mately 40 mm (1.5") of the top of the jar.
4. Turn the instrument power ON and incrementally heat the bath to
desired control temperature while monitoring the bath liquid level
carefully. The bath level must be 15-20 mm (approximately ½" to
¾") from the top of the jar at the control temperature. If it becomes
apparent that this liquid level will not be achieved, return the bath to
within 10°C of ambient, turn the instrument power OFF and add or
remove liquid as necessary.
5. Repeat step four until you have attained the proper bath liquid level at
the desired control temperature.
CAUTION
Different bath fluids expand at different rates. Do not overfill the bath!
WARNING
Monitor the level of bath liquid closely when operating the CT-500 at
higher temperatures (80-100°C). The bath liquid will expand as the
temperature increases. The CT-500 bath jar is not designed to contain
liquid under pressure. If the bath is overfilled, liquid may overflow.
Draining the bath
If it becomes necessary to drain the liquid from the bath, obtain a suitable
container to hold all of the liquid drained from the bath (approximately 22
liters—4.5 - 5 gallons for the CT-500; approximately 30 liters—7 gallons
for the CT-518, approximately 38 liters—9 gallons for the CT-524).
Make sure that the bath liquid is within 10°C of ambient temperature.
Then insert a tube into the bath chamber from the top opening and siphon
the liquid from the bath into a container positioned lower than the bath.
WARNING
Always use a rubber bulb or similar device to apply suction to a tube
containing bath liquids.

13
CANNONCANNON
CANNONCANNON
CANNON
®
CT-500/600 Series II CONSTANT TEMPERATURE BATH
Version 3..3—March, 2012;
CANNONCANNON
CANNONCANNON
CANNON
®
Instrument Company
2139 High Tech Road • State College, PA • 16803 • USA
CHAPTER
3
CT-500 OPERATION
Front panel
The controls for the CT-500 are divided into 5 different “control areas”
on the front panel. Each corresponds with a major function of the bath.
)lenaptnorf(SAERALORTNOC005-TC
hctiwssihT
sedivorp
ehtotrewop
.htab
laidnoitcelessihT
kciuqstimrep
dradnatsfognittes
htabteserp
.serutarepme
t
ehtfonoitropsihT
ehtstimreplenap
elggototresu
dexifneewteb
elbairavdna
erutarepmet
.snoitcnuflortnoc
hctiws
sihT
setavitca
na
lanoitidda
.retaeh
lortnocsihT
ehtstsujda
erutarepmet
sretemarap
efasrof
htab
.noitarepo
REWOP ERUTAREPMET ERUTAREPMET
TSUJDA
TAEHERP TIMIL
LORTNOC
Figure 7: CT-500 front panel
In this manual, the control areas will be abbreviated as follows:
Power = P Temperature = T Temperature Adjust = TA Preheat = PH Limit Control = LC
The commands in those areas will be printed in bold uppercase type,
with the abbreviation preceding. For example, TA - FIXED refers to the
left-hand dial (marked FIXED) in the TEMPERATURE ADJUST (TA)
section of the control panel.

14
CANNONCANNON
CANNONCANNON
CANNON
®
CT-500/600 Series II CONSTANT TEMPERATURE BATH
Version 3..3—March, 2012;
CANNONCANNON
CANNONCANNON
CANNON
®
Instrument Company
2139 High Tech Road • State College, PA • 16803 • USA
Turning on the CT-500
NOTE
Temperature Adjust (TA) dials on the CT-500 are equipped with locks to
prevent accidental changing of dial settings. Push the lock up to release
the dial. When the dial has been set to the proper position, push the lock
down to re-lock the dial.
1. Verify that the CT-500 has been assembled and installed correctly
(Chapter 2, Unpacking and Assembly).
2. Turn the bath Power switch on. Remember that the bath heaters will
not be activated if there is insufficient liquid in the bath.
NOTE
Initially the Limit Control (LC - TEMPERATURE ADJUST) dial must be
turned completely clockwise to enable the bath to heat properly. After the
bath reaches operating temperature, this dial should be reset to prevent
the bath from overheating (see page 11).
3. Move the TA - SELECT switch to the left (fixed) position.
4. Release the dial lock on the TA - FIXED dial and reset it to 5.
5. Re-lock the dial.
Setting the temperature
Do not touch hot surfaces of the CT-500 bath when operating the equip-
ment at high temperatures or burns may result.
There are two ways to set the CT-500 bath temperature. The procedure
depends upon whether or not the desired temperature is on the
T - SELECT dial.
Pre-set temperature selection
To set the CT-500 to a preset temperature:
1. Turn the T - SELECT dial to the appropriate temperature. If the
temperature is above the current bath temperature, the CT-500 will
begin heating and the HEAT LED (Light-Emitting Diode) will light.
2. Make sure the TA - SELECT switch is set to the left (FIXED)
position.
NOTE
To heat the bath more rapidly, turn on the PREHEAT (PH) switch. If the
target temperature is below 80°C, turn the PH switch off when the desired
temperature is reached. For temperatures above 80°C, keep the PH
switch ON to maintain temperature control. When the PH switch has been
turned on, the PH - HEAT LED will light.
3. As the bath temperature approaches the selected T -SELECT
setting, the LED above the TA controls will start to blink as the
heater duty cycle is automatically adjusted to stabilize temperature.

15
CANNONCANNON
CANNONCANNON
CANNON
®
CT-500/600 Series II CONSTANT TEMPERATURE BATH
Version 3..2—March, 2007;
CANNONCANNON
CANNONCANNON
CANNON
®
Instrument Company
2139 High Tech Road • State College, PA • 16803 • USA
NOTE
If the auxiliary heater was engaged, the PREHEAT light will also blink.
Make sure to turn off the PREHEAT switch if operating at temperatures
below 80°C.
4. Insert the appropriate thermometer for the test temperature (see
APPENDIX C for thermometry information).
5. To adjust the bath temperature to the exact temperature desired, first
unlock the TA - FIXED dial.
6. Read the thermometer to determine the actual temperature of the
bath. Make sure that both the bath temperature and thermometer
have stabilized before taking a reading.
7. Turn the TA - FIXED dial to adjust the temperature. After each
adjustment, allow several minutes for the bath temperature to
stabilize.
8. Turn the dial clockwise to increase the bath temperature or turn the
dial counterclockwise to decrease the bath temperature.
9. When the desired temperature has been reached, re-lock the TA -
FIXED dial.
10. After the bath has reached the desired temperature, set the HIGH
TEMPERATURE LIMIT CONTROL (LC). This will prevent the
bath from overheating if a malfunction occurs.
Adjusting the High Temperature Limit Control
NOTE
During this procedure, the temperature of the bath may change slightly,
but will quickly recover.
1. Using a screwdriver, slowly turn the LC - TEMPERATURE
ADJUST control counterclockwise until the OVER TEMP message
lights up on the LC - PUSH TO RESET button.
2. Turn the control clockwise approximately ¼ to ½ turn.
3. Push the LC - PUSH TO RESET button. If the bath doesn't recover,
repeat step 2 and try again.
Custom temperature selection
To set the CT-500 to a temperature not indicated on the T-SELECT dial:
1. Turn the T - SELECT dial to the temperature closest to your desired
temperature. If the temperature is above the current bath tempera-
ture, the CT-500 will begin heating and the HEAT LED (Light-
Emitting Diode) will light.
2. Move the TA - SELECT switch to the right (the VARIABLE
position).
NOTE
To heat the bath more rapidly, turn on the PREHEAT (PH) switch. If the
target temperature is below 80°C, turn the PH switch off when the desired
temperature is reached. For temperatures above 80°C, keep the PH

16
CANNONCANNON
CANNONCANNON
CANNON
®
CT-500/600 Series II CONSTANT TEMPERATURE BATH
Version 3..2—March, 2007;
CANNONCANNON
CANNONCANNON
CANNON
®
Instrument Company
2139 High Tech Road • State College, PA • 16803 • USA
switch ON to maintain temperature control. When the PH switch has been
turned on, the PH - HEAT LED will light.
When the bath temperature is approximately that selected with the T -
SELECT switch, the LED above the TA controls will start to blink as
the heater duty cycle is automatically adjusted to stabilize temperature.
3. Release the lock on the TA - VARIABLE dial.
4. Read the thermometer in the CT-500 bath to determine the actual
temperature of the bath. Make sure that both the thermometer and the
bath temperature have stabilized before taking a reading.
5. Turn the TA - VARIABLE dial to adjust the temperature. Turn the
dial clockwise to increase the bath temperature. Turn the dial coun-
terclockwise to decrease the bath temperature. After each adjust-
ment, allow several minutes for the bath temperature to stabilize.
6. When the desired temperature has been reached, re-lock the TA -
VARIABLE dial.
Limit Control
After the bath has reached the desired temperature, set the HIGH
TEMPERATURE LIMIT CONTROL (LC). This will prevent the bath
from overheating if a malfunction occurs.
Adjusting the High Temperature Limit Control
NOTE During this procedure, the temperature of the bath may change slightly,
but will quickly recover.
1. Using a screwdriver, slowly turn the LC - TEMPERATURE
ADJUST control counterclockwise until the OVER TEMP message
lights up on the LC - PUSH TO RESET button.
2. Turn the control clockwise approximately ¼ to ½ turn.
3. Push the LC - PUSH TO RESET button. If the bath doesn't recover,
repeat step 2 and try again.
NOTE
If the desired temperature is within 2 or 3°C of a temperature listed on
the T - SELECT dial, it may be possible to attain the temperature using
the TA - FIXED dial. Because this dial has a finer adjustment than the
TA -VARIABLE dial, the final temperature can be more easily obtained.
To try this alternative method, follow the previous instructions, using the
TA - FIXED dial instead of the TA - VARIABLE dial.

17
CANNONCANNON
CANNONCANNON
CANNON
®
CT-500/600 Series II CONSTANT TEMPERATURE BATH
Version 3..2—March, 2007;
CANNONCANNON
CANNONCANNON
CANNON
®
Instrument Company
2139 High Tech Road • State College, PA • 16803 • USA
Verifying Limit Control operation
The Limit Control should be checked periodically to ensure its function-
ality. To check the Limit Control, follow the procedure below:
1. Power up the CT-500 and set the instrument to a desired bath tem-
perature. Wait for the temperature to stabilize at the desired tempera-
ture.
2. Using a screwdriver, slowly turn the Limit Control counterclockwise
until the Limit Control OVER TEMP warning lights up.
WARNING
If the Limit Control warning fails to light up and the Limit Control has been
adjusted counterclockwise to its furthest setting, the unit may need to be
repaired. Call CANNON
®
for assistance.
3. When the Limit Control OVER TEMP warning lights up, turn the
Limit Control clockwise for ¼ turn and press the OVER TEMP
button to reset the Limit Control for normal operation.
Functionality of the Limit Control has been verified for the current
operational temperature. If it is necessary to reset the bath temperature,
follow the manual instructions (Setting the temperature, pages 10-13) to
reset the Limit Control for the new temperature.
Cleaning
CAUTION
Before cleaning the CT-500, turn off the instrument and unplug the power
cord. Do not clean the instrument unless the bath temperature is within
10°C of ambient.
Periodically clean the outside of the unit with a damp cloth moistened
with water and/or a mild detergent solution.
Using the thermoelectric cooling system (CT-600 only)
The CT-600 thermoelectric cooling system is activated via the front panel
On/Off switch. Thermoelectric cooling is generally recommended when
maintaining a bath temperature within 20 degrees of ambient.
The thermoelectric system should be turned off whenever the bath
temperature exceeds 50°C.

18
CANNONCANNON
CANNONCANNON
CANNON
®
CT-500/600 Series II CONSTANT TEMPERATURE BATH
Version 3..2—March, 2007;
CANNONCANNON
CANNONCANNON
CANNON
®
Instrument Company
2139 High Tech Road • State College, PA • 16803 • USA
This page intentionally left blank.
/