Page is loading ...

www.gronomics.com East Bethel, MN USA 763-753-7374
Continued
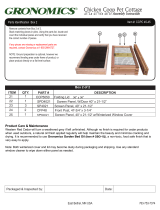
Remove the contents from box.
Using the parts list, locate and count the individual
pieces and verify that you have received the correct
number of pieces.
4
If any pieces are missing or replacement parts are required, contact Gronomics at 1-855-299-6727.
NOTE: The vertical garden stand (shown) must be
purchased separately.
Self-Watering System-AC
Assembly Instruction
Parts List
ITEM QTY. PART # DESCRIPTION
1 1 DACT-20 Digital Timer
2 1 SHS24 Suction Hose With Screen
3 1 SHTE24 Supply Hose With Threaded Hose Connection
4 1 VGWPA-1AC Pump, AC1GPM
5 2 CS8-112ZY Screw, GRK #8 x 1-1/2” USE TORX T15
1
Parts Identifi cation Item #: VGSWS-8AC
1
5
2
3
Packaged & Inspected by: Date:
Torx ® T15
Vertical Garden Stand
Pump
Connect the suction hose with screen (Item 2) and
supply hose with threaded hose connection (Item 3)
to the pump (Item 4) as shown.
Route the pump suction hose w/screen (Item 2)
through the garden stand as shown.
Route the pump supply hose w/threaded hose
connection (Item 3) through the garden stand as
shown.
Pump / Hose Connections And Hose Routing
2
Hose Connections To Pump Hose Routing
3
2
4
2
3
Ground preparation is optional, however we
recommend leveling area under frame of product, or
place product directly on a flat level surface before
filling with soil.
Product Care and Maintenance - Western Red Cedar will turn a weathered grey if left unfinished. Although no finish is required for cedar when used
outdoors, a natural oil finish applied regularly will help maintain the beauty and minimize cracking and drying. It is recommended to use Gronomics Garden Bed
Oil (Item # GBO-1Q), a non-toxic, food safe finish that is very easy to apply.Apply Oil when air andwind temperatures are between 50-90degrees. Avoid applying
in direct sunlight.

www.gronomics.com East Bethel, MN USA 763-753-7374
Align the pump (Item 4) suction hose with the hole in the garden stand
and secure the pump with two screws (Item 5).
Route the pumps power cord through the garden bed as shown.
Pump Installation
3
5
Pump Power
Cord
Pump
Suction
Hose
Timer Installation
5
Connect
Pump Power
Cord
Here
Connect the timer (Item 1) to a power source and connect the pump
power cord to the timer.
NOTE: See instructions supplied with the timer for programming the
timer.
Connect the supply hose threaded connector (Item 3) to the hose
connecter on the garden bed.
Supply Hose Connection
4
3
Vertical Garden Bed
Vertical Garden Stand
NOTE: Before adding the soil mix, verify that the vertical garden stand is
secure and stable. Verify that all back rails and shelf rails are completely
installed.
CAUTION: When fi lling the vertical garden with soil mix, support the
irrigation tubing while fi lling. This will help prevent damage to the
irrigation tubing.
Slowly place the soil mix into the top of the vertical garden. Add soil mix
until it is approximately one inch below the top back and shelf rails.
6
Soil Mix
1
4
/