
CAM SMARTY.indd 1CAM SMARTY.indd 1 4-12-2007 16:15:044-12-2007 16:15:04

CAM SMARTY.indd 1CAM SMARTY.indd 1 4-12-2007 16:15:064-12-2007 16:15:06

CAM SMARTY.indd 2CAM SMARTY.indd 2 4-12-2007 16:15:074-12-2007 16:15:07

CAM SMARTY.indd 3CAM SMARTY.indd 3 4-12-2007 16:15:094-12-2007 16:15:09

CAM SMARTY.indd 4CAM SMARTY.indd 4 4-12-2007 16:15:094-12-2007 16:15:09

CAM SMARTY.indd 5CAM SMARTY.indd 5 4-12-2007 16:15:104-12-2007 16:15:10

CAM SMARTY.indd 6CAM SMARTY.indd 6 4-12-2007 16:15:114-12-2007 16:15:11

CAM SMARTY.indd 7CAM SMARTY.indd 7 4-12-2007 16:15:124-12-2007 16:15:12

CAM SMARTY.indd 8CAM SMARTY.indd 8 4-12-2007 16:15:134-12-2007 16:15:13

CAM SMARTY.indd 9CAM SMARTY.indd 9 4-12-2007 16:15:144-12-2007 16:15:14

CAM SMARTY.indd 10CAM SMARTY.indd 10 4-12-2007 16:15:154-12-2007 16:15:15

CAM SMARTY.indd 11CAM SMARTY.indd 11 4-12-2007 16:15:154-12-2007 16:15:15

CAM SMARTY.indd 12CAM SMARTY.indd 12 4-12-2007 16:15:174-12-2007 16:15:17
Page is loading ...
Page is loading ...

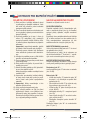
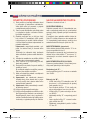
IMPORTANT INFORMATION
1) Read carefully these instructions and retain
them for future reference.
2) Cam il mondo del bambino reserves all the
rights to amend the product for technical or
commercial reasons.
3) Always use the product as it has been con-
ceived; on the contrary the producer will not
be held responsible for any misuse. Do not
use if components or fi ttings are worn, dam-
aged or missing. In this case, do not use re-
placement parts other than those recom-
mended or supplied by the manufacturer.
4) Use this product only on a chair with larger
dimensions than those of the booster seat it-
self.
5) This product isn’t recommended for babies
who can’t sit by themselves.
6) Make sure that both the fl oor and the chair
surface are fl at before using the product.
7) Once the booster seat is on the chair, verify
the stability of the product on the chair.
8) Never use this product on a stool, a folding
chair or an unstable chair.
9) Never leave your child unattended in this
product.
10) Use the safety harness at all times.
11) Use this product only on a chair and with all
the restraining system and safety harness
locked as described in the instruction leaf-
let.
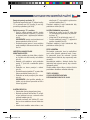
INSTRUCTIONS FOR SAFE USE
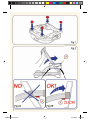
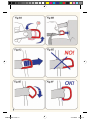
Assemble the 4 feet as described in fi g. 1
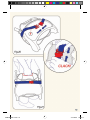
OPENING THE PRODUCT
Lift completely the backrest (fi g. 2). Avoid putting
the backrest in the incorrect position (fi g. 2A).
When reaching the correct position of the back-
rest, you will hear a “click” (fi g. 2B).
To open the booster seat frame, push the 2 but-
tons “B”, while pushing down the frame at the
same time (fi g. 3). Thanks to its locking mecha-
nism, the booster seat frame is adjustable in dif-
ferent heights (fi g. 3A).
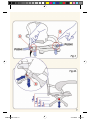
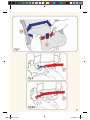
ASSEMBLING THE TRAY (optional)
• Insert the 2 plastic parts “C” of the tray on the
armrests’ slots (fi g. 4).
• Turn the tray towards the direction of the ar-
row and insert the buttons “T” on the hous-
ings “L”, placed on the sides of both arm-
rests (fi g. 4A).
ASSEMBLING THE SAFETY HARNESS
Carefully examine picture 5 to establish the dif-
ference between each kind of harness / strap.
Crotch strap “S”:
insert the crotch strap “S” through the slot on the
seat (fi g. 5A-5B).
Waist strap “M”:
• Insert the 2 D rings of the waist strap “M” into
the relevant slots 1 and 2 placed on the low-
er part of the backrest (fi g. 6)
• Before inserting the D ring, turn it as to make
it pass through the slot (Fig. 6A)
• Insert the D rings one after the other into the
slots (fi g. 6B-6C).
• Avoid leaving the D ring in the incorrect posi-
tion (fi g. 6D)
• Slightly turn the D ring clockwise (fi g. 6E)
• Reach the locking position of the D ring (fi g.
6F).
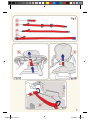
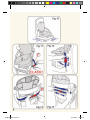
Lock the waist strap “M” into the crotch strap “S”
(fi g. 7)
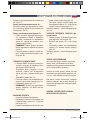
Backrest locking harness “P”:
Make pass the backrest locking harness “P” into
both the 2 D rings of the harness “M” (already as-
sembled to the backrest) (fi g. 8-8A)
Seat unit locking harness “F”:
After lowering the backrest (fi g. 15), turn the
booster seat upside down, making sure that the
CAM SMARTY.indd 15CAM SMARTY.indd 15 4-12-2007 16:15:284-12-2007 16:15:28

harness “F” is in the correct position before in-
serting it into the right and left elements (fi g. 9).
WARNING: the harness must pass between the
frame and the seat unit as shown in fi g. 9
Make pass the harness into the right and left el-
ements following the sequence from fi g. 9A to
fi g. 9H.
POSITIONING AND FITTING THE BOOSTER
SEAT
• Position the booster seat on the centre of the
chair and make sure that the chair has larg-
er dimensions than those of the booster seat
itself (fi g. 10).
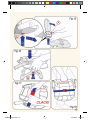
• Adjust the height of the booster seat and
then make pass the backrest locking har-
ness “F” under the chair and lock the buckle
(fi g. 11).
• Pull the end of the harness to tighten it (fi g.
12).
• Make pass the seat unit locking harness at
the back of the chair and lock the buckle (fi g.
13).
• Pull the end of the harness to tighten it (fi g.
14)
WARNING: before using the product, make sure
the booster seat is correctly fi xed on the chair to
prevent it from moving.
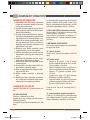
FOLDING THE PRODUCT
• Unlock all the safety harnesses.
• Push simultaneously the 2 buttons “A”
placed under the armrests and lower the
backrest at the same time (fi g. 15)
• Push simultaneously the 2 buttons “B”
placed on the booster seat frame and push
downwards the frame at the same time (fi g.
16)
• Once the product is completely folded, en-
gage the seat unit locking harness “F” to
prevent the booster seat from opening again
(fi g. 17)
• Transporting the product is very easy thanks
to the practical carrying handle (fi g. 18).
FOLDING THE TRAY (optional)
• Please refer to the image shown in fi g. 19;
insert part “N” (placed under the tray) into
the relevant housing “Q”.
• Insert parts “R” into the relevant housings
“U”.
• Use the seat unit locking harness “F” to lock
the tray to the product (fi g. 20).
Transporting the product is very easy thanks to
the practical carrying handle (fi g. 21).
CARE AND MAINTENANCE
Prolonged exposure to the sun and inadequate
washing can cause the colours to change. Lim-
it exposure if possible. Dry all metal parts should
they get wet or damp.
Never leave the product near any source of
strong heat (electrical heating or gas heating) to
avoid fi re danger.
Clean the product with a damp cloth or sponge
and mild detergent. Do not use abrasive or
bleach.
THIS PRODUCT COMPLIES
WITH SAFETY REQUIREMENTS AS PER X PS
54-041
CAM SMARTY.indd 16CAM SMARTY.indd 16 4-12-2007 16:15:324-12-2007 16:15:32
Page is loading ...
Page is loading ...
Page is loading ...
Page is loading ...
Page is loading ...
Page is loading ...
Page is loading ...
Page is loading ...
Page is loading ...
Page is loading ...
Page is loading ...
Page is loading ...
Page is loading ...
Page is loading ...
Page is loading ...
Page is loading ...
Page is loading ...
Page is loading ...
Page is loading ...
Page is loading ...

CAM SMARTY.indd 37CAM SMARTY.indd 37 4-12-2007 16:17:054-12-2007 16:17:05

CAM SMARTY.indd 38CAM SMARTY.indd 38 4-12-2007 16:17:054-12-2007 16:17:05

CAM SMARTY.indd 39CAM SMARTY.indd 39 4-12-2007 16:17:064-12-2007 16:17:06
-
 1
1
-
 2
2
-
 3
3
-
 4
4
-
 5
5
-
 6
6
-
 7
7
-
 8
8
-
 9
9
-
 10
10
-
 11
11
-
 12
12
-
 13
13
-
 14
14
-
 15
15
-
 16
16
-
 17
17
-
 18
18
-
 19
19
-
 20
20
-
 21
21
-
 22
22
-
 23
23
-
 24
24
-
 25
25
-
 26
26
-
 27
27
-
 28
28
-
 29
29
-
 30
30
-
 31
31
-
 32
32
-
 33
33
-
 34
34
-
 35
35
-
 36
36
-
 37
37
-
 38
38
-
 39
39
-
 40
40


cam S332 Owner's manual
- Type
- Owner's manual
- This manual is also suitable for
Ask a question and I''ll find the answer in the document
Finding information in a document is now easier with AI
in other languages
- italiano: cam S332 Manuale del proprietario
- français: cam S332 Le manuel du propriétaire
- español: cam S332 El manual del propietario
- Deutsch: cam S332 Bedienungsanleitung
- русский: cam S332 Инструкция по применению
- português: cam S332 Manual do proprietário
- slovenčina: cam S332 Návod na obsluhu
- čeština: cam S332 Návod k obsluze
Other documents
-
Chicco Pocket Snack Booster Seat User manual
-
mothercare Mode User guide
-
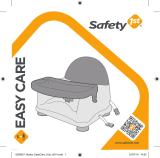 Safety 1st Easy Care User manual
-
MaxiCosi 8644388300 User manual
-
BEBE CONFORT Rodi SPS Owner's manual
-
 Weelko Fast+ 1023AB2 Owner's manual
-
 Weelko Practi+ 1021AB2 Owner's manual
-
HOMCOM 839-505V00LG Assembly Instructions
-
 Weelko Comfort 1025B Owner's manual
-
 Safety 1st Travel booster User manual


