Page is loading ...

Feb 2016
Operation Manual
Hybrid Digital Screwdriver
HDC-40i, HDC-35i
1080 N 11th St San Jose CA 95112
www.mountztorque.com 408.292.2214
1

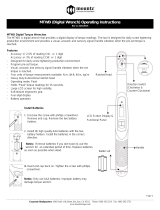
Hybrid Digital Screwdriver
HDC-40i, HDC-35i
Quick Set Up
Installation:
1.
After unpacking system, please connect cable to driver and controller. Be aware that cable's ends are
indetified so one specific end goes to controller and other to driver. Cable must snap in completelly,
please verify both ends are fully connected.
2.
Connect Mini Compressor's air hose to the back of controller. Pull hose out to make sure it is correctly
installed.
3. Connect power cord to the back of controllers and plug it into the 110V outlet. Turn on unit.
4.
On Controller Keyboard, click on "mode" than click enter, than click "mode" again and than click enter.
Display will show "P 1".
5.
With the use of the arrows, select P169 and click enter. A number will show up. PLEASE WRITE THIS
NUMBER DOWN AS
THIS IS THE FIRMWARE VERSION OF YOUR SYSTEM. Click reset button and
6.
Please type in P59 and click enter. The display might show "0" or "1". Make sure "0" for USB
communication is selected.
If display showed "0" than click "reset" button. If "1" was shown, please change
it to "0" than click enter.
7
.
Type in P83 and click enter. A blinking "0" will b shown. Type in 77 and click enter. This will re-
initialize the system. Please turn system OFF, wait 5 seconds and turn it ON.
Hi Manager Software:
1.
Obtain firmware version of your system by Typing in 169 on the display of your controller.
Go to page 89 on this operation manual. Look at the chart and locate the corresponding Hi Manager
Software for the Firmware you have writen down for your system.
Ask your Sales Rep for a copy of the Hi Manager Software you need according to Firmware Version of
your System.
You can also request Hi Manager software on these email addresses below. (MAKE SURE YOU
INDICATE FIRMWARE VERSION OF YOUR SYSTEM OBTAINED ON P169 when sending a
request). [email protected], [email protected],
1080 N 11th St San Jose CA 95112
www.mountztorque.com 408.292.2214
2
2.
3.
Quickchangeslipring
Quickchangeslipring
OnetouchFiitingforairtube (dia.4mm)
than "mode" twice.

Index
■ General & Specific safety rules
6
1. Products introduction
9
2. Key features
9
3. Specification
3.1 Driver
10
3.2 Manual screwdriver models
11
3.3 Automation screwdriver models
12
3.4 Controller (HDC) specification
13
4. LAY-OUT
4.1 Screwdriver LAY-OUT
14
4.2 HDC Controller LAY-OUT
15
4.3 HDC Controller Dimensions
16
5. Operation
5.1 Front panel of controller
18
1) FND Display
18
2) Key Buttons
19
5.2 Parameter number group
20
5.3 Preset # & parameters
21
5.4 Torque, speed & angle setting (I) - by PC program
22
5.5 Torque, speed & angle setting (II) - on the front panel
23
5.6 Details of each parameter numbers
24
5.7 Error code
45
5.8 Preset # selecting by sensor
48
5.9 Wiring example of check out signal output
49
5.10 Preset # selecting in 25P I/O port
50
1080 N 11th St San Jose CA 95112
www.mountztorque.com 408.292.2214
3

5.11 25P I/O port configuration
50
5.11.1 25P I/O configuration (I) - for Sensor
51
5.11.2 25P I/O configuration (II) - for PLC
52
5.11.3 25P I/O configuration (III) - for Sensor + PLC
53
5.11.4 25P Interface schematic - INPUT
54
5.11.5 25P Interface schematic - OUTPUT
55
5.11.6 Wiring of the Alarm signal to the Tower Lamp
56
5.11.7 Error code pin composition on 25P Output
56
5.12 25PIN I/O Timing Chart
57
5.13 Built in Screw Counter(patent)
58
5.13.1 Fastening quality verification
58
1) Fastening OK
58
2) Fastening NG
59
5.13.2 Count Start & Stop to HDC
60
5.13.3 Wiring of Count Start & Stop
64
5.13.4 Operation of screw counter on HDC
66
5.13.5 Operation of Model selecting
67
5.13.6 FND Display for Counter mode
68
5.13.7 FND Display for Model selecting
68
6. USB Communication
6.1 Port and cable
69
6.2 USB driver install
69
7. RS-232C Communication
69
7.1 Connection
70
7.2 Protocol
71
7.2.1 Protocol Frame
71
7.2.2 Communication control letters
71
1080 N 11th St San Jose CA 95112
www.mountztorque.com 408.292.2214
4

7.2.3 Command
71
7.2.4 Check sum
72
7.2.5 Details of Command
72
8. Auto fastening data output through USB port
76
9. PC communication software, Hi-Manager
77
9.1 Software install
77
9.2 How to use
77
9.3 Parameter setting on Hi-Manager
79
1) Fastening Setting
79
2) Controller Setting
80
3) Screw Count Setting
80
4) Multi Sequence
82
5) Driver setting
83
6) Model selecting
84
9.4 Monitoring on Hi-Manager
85
1) Screw Count monitoring
2) Real time data monitoring
10. Trouble shooting
87
11.
Hi-Manager Software & Firmware Version History
89
1080 N 11th St San Jose CA 95112
www.mountztorque.com 408.292.2214
5

1. GENERAL SAFETY RULES
WARNING! Read and understand all instructions. Failure to follow all instructions listed below, may
result in electric shock, fire and/or serious personal injury
SAVE THIS INSTRUCTIONS
1.1 Work Area
- Keep your work area clean and well lit. Cluttered benches and dark areas invite
accidents.
- Do not operate power tools in explosive atmospheres, such as in the presence of
flammable liquids, gases, or dust. Power tools create sparks which may ignite the
dust or fumes.
- Keep bystanders, children, and visitors away while operating a power tool.
Distractions can cause you to lose control.
1.2 Electrical Safety
- Grounded tools must be plugged into an outlet properly installed and grounded in
accordance with all codes and ordinances. Never remove the grounding prong or
modify the plug in any way. Do not use any plugs. Check with a qualified
electrician if you are in doubt as to whether the outlet is properly grounded. If the
tools should electrically malfunction or break down, grounding provides a low resistance
path to carry electricity away from the user.
- Avoid body contact with grounded surface ad pipes, radiators, ranges and
refrigerators. There is an increased risk of electric shock if your body is grounded.
- Don't expose power tools to rain or wet conditions. Water entering a power tool will
increase the risk of electric shock
- Do not abuse the cord. Never use the cord to carry the tools or pull the plug
from an outlet. Keep cord away from heat, oil, sharp edges or moving parts.
Replace damaged cords immediately. Damaged cords increase the risk of electric
shock.
- When operating a power tool outside, use an outdoor extension cord marked W-A
or W. These cords are rated for outdoor use and reduce the risk of electric shock.
1.3 Personal Safety
- Stay alert, watch what you are doing and use common sense when operating a
power tool. Do not use tool while tired or under the influence of drugs, alcohol,
or medication. A moment of inflation while operating power tools may result in serious
1080 N 11th St San Jose CA 95112
www.mountztorque.com 408.292.2214
6

personal injury.
- Dress properly. Do not wear loose clothing or jewelry. Contain long hair. Keep
your hair, clothing, and gloves away from moving parts. Loose clothes, jewelry, or
long hair can be caught in moving parts.
- Avoid accidental starting. Be sure switch is off before plugging in. Carrying tools
with your finger on the switch or plugging in tools may result in personal injury.
- Remove adjusting keys or switches before turning the tool on. A wrench or a key
that is left attached to a rotating part of the tool may result in personal injury.
- Do not overreach. Keep proper footing and balance at all times. Proper footing and
balance enables better control of the tool in unexpected situations.
- Use safety equipment. Always wear eye protection. Dust mask, non-skid safety shoes,
hard hat, or hearing protection must be used for appropriate conditions.
1.4 Tool use and Care
- Use clamps or other practical way to secure and support the workplace to a
stable platform. Holding the work by hand or against your body is unstable and may
lead to loss of control.
- Do not force tool. Use the correct tool for your application. The correct tool will do
the job better and safer at the rate for which it is designed.
- Do not use tool if switch does not turn it on or off. Any tool that cannot be
controlled with the switch is dangerous and must be repaired.
- Disconnect the plug from the power source before making any adjustments,
changing accessories, or storing the tool. Such preventive safety
- Store idle tools out of reach of children and other untrained persons. Tools are
dangerous in the hands of untrained users.
- Maintain tools with care. Keep cutting tools sharp and clean. Properly maintained
tools, with sharp cutting edges are less likely to bind and are easier to control.
- Check for misalignment or binding of moving parts, breakage of parts, and any
other condition that may affect the tools operation. If damaged, have the tool
serviced before using. Many accidents are caused by poorly maintained tools.
- Use only accessories that are recommended by the manufacturer for your model.
Accessories that may be suitable for one tool, may become hazardous when used on
another tool.
1.5 SERVICE
- Tool service must be performed only by qualified personnel. Service or maintenance
performed by unqualified personnel could result in a risk of injury
- When servicing a tool, use only identical replacement parts. Follow instructions in
the Maintenance section of this manual. Use of unauthorized parts or failure to follow
Maintenance instructions may create a risk of electric shock or injury.
1080 N 11th St San Jose CA 95112
www.mountztorque.com 408.292.2214
7

2. SPECIFIC SAFETY RULES
2.1 Hold tool by insulated gripping surfaces when performing an operation where the
cutting tool may contact hidden wiring or its own cord. Contact with a "live" wire will
make exposed metal parts of the tool "live" and shock the operatior.
2.2 Never lubricate aerosol oil on to the electrical part.
1080 N 11th St San Jose CA 95112
www.mountztorque.com 408.292.2214
8

1. Product Introduction
A driver system consists of screwdriver with built-in BLDC motor, controller which provide and
control the DC power and pressed air to the screwdriver. They are connected together with
the special cable.
1) Standard Item
2) Optional accessories
2. Key features
1) Digital torque set and save 8 memories
2) Long endurance, less noise and heat, and light weight screwdriver
3) Selectable high speed up to 1,800 rpm
4) High efficient BLDC motor made by Maxon, Swiss
5) Economic cost against the compatible digital torque control screwdriver
6) Monitoring fastening quality and count of screw numbers
7) Error information by code display
8) Programing and monitoring PC software
9) Maintenance information and history memory
U-2 Interface converter
USB cable
AC adapter
(DC24V,1A)
1080 N 11th St San Jose CA 95112
www.mountztorque.com 408.292.2214
9

3. Screwdriver
3.1 Specifications
** Bit Socket size: A = 1/4" hexagonal, B = 5mm hexagonal
example) HD150P-A : with Push to start - 1/4" hex bit socket
no
Item
Specification
Remark
1
El. Power
DC40V, 3A max
(HDC-40i)
DC35V, 4A max
(HDC-35i)
2
Motor
Maxon BLDC motor
3
Dimension
refer 3.2 screwdriver model
4
Torque range
refer 3.2 screwdriver model
0.1 Kgf.cm/scale
5
Speed range
refer 3.2 screwdriver model +/- 5%
10 rpm/scale
6
Torque accuracy
+/- 10% full scale
7
Torque repeatability
+/- 5%
8
Bit size
A:1/4" Hex, B:5mm Hex
9
Start
Lever or Push start (selectable)
10
Cable
14 wire+air tube all in one / 3M
1080 N 11th St San Jose CA 95112
www.mountztorque.com 408.292.2214
10

3.2 Manual screwdriver models
Model
Torque
(Lbf.in)
Speed
(rpm)
Weight
(Kg)
Start
Power
Controller
HD081
2.6 -6.9
500-1,700
0.44
Lever
40V
HDC-40i
HD150
4.7 - 13.4
500-1,700
0.44
Lever
HD150P
500-1,700
0.44
Push
HD220
6.0 - 19.0
400-1,250
0.44
Lever
HD220P
400-1,250
0.44
Push
HD350
8.6 - 30.3
300-740
0.51
Lever
HD350P
300-740
0.51
Push
HD450
8.6 - 39.0
300-600
0.51
Lever
HD450P
300-600
0.51
Push
HD35N
10.4 - 30.3
500-1,500
0.7
Lever
35V
HDC-35i
HD35NP
500-1,500
0.7
Push
PHD35N
500-1,500
0.82
Pistol
HD50N
13.0 - 43.4
300-1,050
0.7
Lever
HD50NP
300-1,050
0.7
Push
PHD50N
300-1,050
0.82
Pistol
HD100N
26.0 - 86.6
250~500
0.75
Lever
PHD100N
250~500
0.86
Pistol
4.7 - 13.4
6.0 - 19.0
8.6 - 30.3
8.6 - 39.0
10.4 - 30.3
10.4 - 30.3
13.0 - 43.4
13.0 - 43.4
26.0 - 86.6
1080 N 11th St San Jose CA 95112
www.mountztorque.com 408.292.2214
11

3.3 Automation screwdriver models
Model
Torque
(Lbf.in)
Speed
(rpm)
Power
Controller
HDA150
4.7 - 13.4
500-1,700
40V
HDC-40i
HDA220
6.0 - 19.0
400-1,250
HDA350
8.6 - 30.3
300-740
HDA450
8.6 - 39.0
300-600
** Add suffix "V" after model name for vacuum pick-up assy option
DIMENSION
HDA150, HDA220, HDA350, HDA450
1080 N 11th St San Jose CA 95112
www.mountztorque.com 408.292.2214
12

3.4 Controller (HDC) specification
no
Item
Specification
1
Model
HDC-40i
HDC-35i
2
Input (Electric)
AC110VC or AC220V, 50~60Hz
3
Input (air presure)
Min 4.5 bar / Max 6 bar
4
Output (Electric)
DC40V, 3A
DC35V, 4A
5
Fuse
AC250V 10A
AC250V 15A
6
Dimension / Weight
refer the drawing
8
Control
Torque
5-45 Kgf.cm
12-100 Kgf.cm
Speed
300 - 1,700 rpm
300 - 1,500 rpm
Angle
0.1 - 10 turns
9
Preset parameters
Torque, Speed & Angle in 8 preset numbers
10
Selecting the preset no.
1) Front panel button
2) 25P I/O interface
3) 8 direct sensor connecting port
4) F1 button on the driver
11
Torque Adjust
- 20% ~ +20%
12
Auto detection of the
connected driver
Auto detection of the offset value from the EEP-rom on
the driver
13
Error display
Error display by code no. in system, communication &
pattern error group
14
Fastening quality control
OK/NG monitoring of screw fastening by preset pattern
of angles, times
15
Screw Counter
Save the total screw number, and monitoring the number
of OK fastening screws.
16
Monitoring and parameter
Monitoring and parameter setting on the PC program
( MS Windows base )
1080 N 11th St San Jose CA 95112
www.mountztorque.com 408.292.2214
13

4. LAY-OUT
4.1 Screwdriver LAY-OUT
(1) Screwdriver for HDC-40i
(2) Screwdriver for HDC-35i
1080 N 11th St San Jose CA 95112
www.mountztorque.com 408.292.2214
14

4. LAY-OUT
4.2 HDC Controller LAY-OUT
1080 N 11th St San Jose CA 95112
www.mountztorque.com 408.292.2214
15

4.3 HDC controller Dimensions
[HDC-40i Controller] unit : mm
These two screws can be removed for mounting
Two M3 thread holes for mounting controller
Two screws at the side can be removed for extra mounting holes.
[Caution] Screw should not go through over 5mm inside
Dimension / Weight
97(w) 222(d) 129(h)mm / 2.1Kg
1080 N 11th St San Jose CA 95112
www.mountztorque.com 408.292.2214
16

[HDC-35i Controller] unit : mm
Two M3 thread holes for mounting controller
Two screws at the side can be removed for extra mounting holes.
[Caution] Screw should not go through over 5mm inside
Dimension / Weight
104(w) 226.4(d) 144(h)mm / 2.6Kg
1080 N 11th St San Jose CA 95112
www.mountztorque.com 408.292.2214
17

5. Operation
5.1 Front panel of controller
1) FND Display (5 digit)
1080 N 11th St San Jose CA 95112
www.mountztorque.com 408.292.2214
18

2) Key Buttons
button :
By pressing the MODE button, it circulate Auto,
Log-in and Parameter mode. Auto means operating.
Before parameter mode, password required.
Every settings is possible in Parameter mode.
button
Log-in Mode
Log-in is required for parameter setting with password
Initial password "0" can be changed on P89
Parameter Mode
Cursor shift up to left at the Parameter mode
button
Auto(Work) Mode
Select the next preset number or Model no. when P75 model
select is enabled.
Log-in & Password
It increase the number up
button
Auto
(Operation)
Mode
time
FND Display
Description
Initial
0A000
Initial display at the Auto(Work) mode
1st
t
Display the temperature of driver inside
( unit : 0.1℃)
2nd
F
The latest Fastening time (unit: mS)
3rd
L
The latest Loosening time (unit: mS)
4th
Pc
The latest current value ( unit : 0.1A )
5th
tu
The latest Fastening turns (unit: 0.1 turn)
6th
SF Lo
Status of Start & Torque up sensor
(F:off, o:on) Initial status : SF LF
7th
r 0
Real-time rotation speed
Parameter
Mode
It decrease the number down
Jog Mode
Manual stop by button
MODE
1080 N 11th St San Jose CA 95112
www.mountztorque.com 408.292.2214
19

Enter button
Parameter Mode
It select or save the chosen display
Jog Mode
Manual start by button
button
It returns to the previous mode. Also it reset the error
5.2 Parameter number group
Number
Main contents
Description
1- 8
Torque
Save the target torque from 1-8
11-18
Rotation speed
Save the rotation speed for P1-P8
21-28
Max turn
Save the limit number of turn for P1-P8
(It stop at the limit number of turn and torque)
31-38
Min. rotation turn for
OK/NG verification
Save the minimum rotation turn or running time for OK
fastening of P1-P8
41-48
Soft start time
Change time to the target speed
51-58
Torque tuning
Individual torque tuning by controller
61-70
offset
Change of offset or functions
71-80
Screw Counter
Screw counter related pattern setting
82
Air Regulator
Range :0-1, Initial : 1
(0 : No use, 1 : Use)
100-139
Model data
Memory of model data
140-159
Multi sequence
Memory of Multi sequence
160-167
Error history
The latest error number record from P130 to 137
168
Model Number
Memory of controller model number
169
Version
Firmware version
RESET
1080 N 11th St San Jose CA 95112
www.mountztorque.com 408.292.2214
20
/