Page is loading ...


1
BEFORE YOU BEGIN
CONGRATULATIONS! And THANK YOU for selecting the BODYCRAFT BLU
SERIES400mTreadmill!Yourchoicereflec tsawiseinvestmentinyouand
your family’s health and wellness. We hope you use it for many healthy
years!
For your safety and benefit, please read this entire manual. Please keep the manual in a con-
venient place for quick reference when needed.
BODYCRAFT offers a complete array of high quality fitness equipment. Please refer to our
web site at BODYCRAFT.com to view more ways to enhance your lifestyle
Your BODYCRAFT BLU SERIES 400m has all the quality and design elements to make your
workout extremely efficient and comfortable. Your console offers 6 display windows with easy
to select programming buttons, plus a Polar® Compatible Heart Rate receiver. You can chose
from 8 preset programs including Quick Start and Random options, plus 4 Heart Rate inter-
active programs. Your new treadmill is a serious cardio fitness machine that will keep you
motivated, challenged and within reach of your fitness goals.
The BODYCRAFT 400m will provide an efficient, low impact cardiovascular workout that will
help improve energy levels and your quality of life. Cardiovascular training is vital for all ages
and the BODYCRAFT 400m will provide an effective workout, producing results that will en-
courage you to reach your fitness goals and maintain the body you have always wanted.
Spending 15 to 30 minutes a day, three times a week is all you need to start seeing the bene-
fitsofaregularexerciseprogram.
If you have any questions or problems, please contact your local BODYCRAFT
dealer, or us at:
Phone: 800-990-5556 Email: [email protected]
Mail: 7699 Green Meadows Dr. Lewis Center, OH 43035
Purchaser’s Reference Information
IT IS IMPERATIVE THAT YOU FILL IN THE FOLLOW-
ING INFORMATION AND REFER TO IT SHOULD THE
NEED FOR SERVICE ARISE.
Product Name: BLU 400M Treadmill
Serial Number: TR _ _ _ _ _ _ _ _ _ _ _ _
Proof of purchase must be supplied to validate war-
ranty and the product must have been registered with BODYCRAFT via the included
warranty card or online at www.BODYCRAFT.com.

2
TABLE OF CONTENTS
BEFORE YOU BEGIN .................................................................................................. 1
TABLE OF CONTENTS ................................................................................................. 2
IMPORTANT INFORMATION ....................................................................................... 3
ASSEMBLY INSTRUCTIONS ....................................................................................... 5
Step 1: Upright Posts Assembly .................................................................................... 5
Step 2: Console Assembly ............................................................................................ 5
Step 3: Handrail Assembly ............................................................................................ 5
Step 4: Tighten all bolts and screws ................................................................................. 6
Step 5: Handrail Cover Assembly ................................................................................. 6
Step 6: Motor Cover Assembly ..................................................................................... 6
Step 7: Finish Up .......................................................................................................... 6
HEART RATE MONITORING DEVICES ...................................................................... 7
CONSOLE .................................................................................................................... 8
CONSOLE LAYOUT ..................................................................................................... 11
Displays ........................................................................................................................ 11
Function Keys ............................................................................................................... 12
WORKOUT PROGRAMS .............................................................................................. 14
BELT START SEQUENCE ............................................................................................ 14
WARM UP ..................................................................................................................... 14
COOL DOWN ................................................................................................................ 15
WORKOUT SUMMARY ................................................................................................. 16
QUICK START ............................................................................................................... 17
CLASSIC PROGRAMS ................................................................................................. 18
HR INTERACTIVE PROGRAMS ................................................................................... 21
CUSTOM PROGRAMS 1, 2, 3, 4 ................................................................................... 24
WARRANTY ................................................................................................................... 25
MAINTENANCE ............................................................................................................. 26
SERVICE PARTS LIST .................................................................................................. 28
SERVICE PARTS DRAWING ........................................................................................ 29

3
IMPORTANT INFORMATION - PLEASE READ
Failure to read and follow the safety instructions below may result in serious injury.
This treadmill is built for optimum safety and is designed to meet or exceed all domestic and
international standards. However, basic precautions need to be followed when operating any
exercise equipment. BE SURE TO READ THE ENTIRE OWNER’S MANUAL BEFORE OP-
ERATING YOUR UNIT.
CAUTION – FOR SAFE OPERATION
• Wear the safety cord and clip all times while using the treadmill.
• The safety key should never be left on the treadmill when not in use.
• Before beginning any exercise program on the treadmill, it is important to consult with your
physician if you have any of the following: History of heart disease, high blood pressure,
diabetes, chronic respiratory diseases, elevated cholesterol, or if you smoke cigarettes or
experience any other chronic diseases or physical complaints.
• If over the age of 35 or overweight, consult with your physician before beginning any ex-
ercise program.
• Pregnant women should consult with their physician before beginning an exercise pro-
gram.
• If you experience dizziness, nausea, chest pains or other abnormal symptoms during ex-
ercise, stop the exercise session immediately. Consult your physician before continuing.
• Drink fluids if you exercise for twenty or more minutes on the treadmill.
• Always follow the console instructions for proper operation.
WARNING – TO REDUCE THE RISK OF BURNS, FIRE, ELECTRIC SHOCK, OR INJURY
TO PERSONS:
• Unplug from outlet before servicing or moving the unit.
• Close supervision is necessary when using this treadmill around children, pets, invalids,
or disabled persons. Keep children & pets away from the treadmill. Hands and feet may
get caught in the moving parts which could result in serious injury.
• Never operate your treadmill if it has a damaged cord or plug, or if it is not working prop-
erly. Contact your authorized BODYCRAFT Fitness dealer for service and repair.
• Keep the power cord away from heated surfaces.
• Never insert any objects into openings. Keep hands and feet away from all moving parts.
• This treadmill is designed for home use only.
• Check the power requirement for your unit to see if it matches your local power outlet.
• Do not operate the heart rate monitor transmitter together with an electrical heart pace-
maker. The transmitter may cause electrical disturbances.
• Inspect this treadmill prior to exercising to ensure it is working properly. Always make sure
all components are fastened securely.
• This treadmill is intended for indoor use. Do not place the unit outdoors.
• Place your treadmill on a solid, level surface when it is in use. Adjust the leveler on the
treadmill if necessary.
• Do not dismount the treadmill until it has come to a complete stop.
• Do not operate if oxygen equipment is being utilized or if aerosol (spray) products are
being used in the area.

4
• Keep the treadmill away from walls to allow proper ventilation. Air should be able to circu-
late freely around the unit. Keep all air openings free of dirt and dust.
• To ensure proper functioning of your treadmill, do not install attachments or accessories
not provided or recommended by BODYCRAFT.
• Place the treadmill in an area that will meet minimum clearance requirements: Front &
Sides:1 ft / 30 cm, Back 6 ft./ 180 cm
• Always wear proper clothing and shoes when exercising on the treadmill.
• Do not stand on the tread belt while performing auto-calibration.
• Never walk or jog or run backwards on the treadmill.
• Higher speed and higher incline is not for everyone. It is designed for occasional use of
a skilled runner and may exceed many users’ capabilities. Stop right away if you feel any
discomfort.
• Use this treadmill only for its intended use as described in this manual. User weight is not
to exceed 325 pounds / 148 kilograms.
• Use the handrails when getting on and off your treadmill.
• Do not remove the treadmill covers or other components. Only an authorized BODY-
CRAFT Fitness dealer should perform service.
GROUNDING INSTRUCTIONS
This product must be grounded. If it should malfunction or breakdown, grounding provides a
path of least resistance for electric current to reduce the risk of electric shock. The treadmill
is equipped with a cord having a grounding conductor and grounding plug. The plug must be
plugged into an appropriate outlet that is properly installed and grounded in accordance with
all local codes and ordinances.
DANGER
To reduce the risk of electric shock, always unplug the treadmill from the electrical outlet if
service is needed , and before cleaning.
Improper connection of the grounding conductor can result in risk of electric shock. Check with
a qualified electrician or serviceman if you are in doubt as to whether the treadmill is properly
grounded.Donotmodifytheplugprovidedwiththisproductifitwillnotfittheoutlet,havea
proper outlet installed by a qualified electrician.
Your treadmill is for use on a 120 volt circuit and has a grounding plug. Make sure the treadmill
is connected to an outlet having the same configuration as the plug. Do not use an adapter
with your treadmill.
SAFETY KEY CLIP & TETHER
• Your treadmill will not start unless the safety key is placed on the proper location of tread-
mill console.
• Attach the safety key clip properly onto your clothes before operating treadmill.
• In case of an emergency, pull the safety key off the treadmill, it will cut off the power to the
console and stop the treadmill immediately.
• Place the safety key back in place, the treadmill will resume back to idle mode.
• Contact your dealer for a safety key replacement if you do not have one.

5
ASSEMBLY INSTRUCTIONS
Please take the assembly hardware out of the hardware package box. Lay all the hardware
out and take note for its locations. Follow the assembly instruction step by step to complete
the assembly. Do not tighten any screws until instructed.
Step 1: Upright Posts Assembly
1. Straighten out the main wire harness and insert it
though the top of left upright post.
2. Slide the upright post onto its receptor and insert three
M8 x55mm screws on the side and two M8 x 15mm
screws on the front. Be careful not to pinch the main
wire harness when inserting these screws.
3. Repeat procedure 2 for the Right upright post.
4. Do not tighten bolts until end of assembly.
Step 2: Console Assembly
1. Hold the console next to the Left upright post
and connect the main wire harness connec-
tors together.
2. Insert the console U bracket into each side of
upright post. Be careful not to pinch the wire
harness while inserting the U bracket.
3. Insert three M8 x12mm screws each on inner
and outer Left upright post (total 6 screws on
each upright post).
4. Repeat procedure for Right upright post.
5. Do not tighten bolts until end of assembly.
Step 3: Handrail Assembly
1. Insert Left handrail into Left handrail recep-
tor.
2. Insert two M6 x12mm screws.
3. Repeat the procedure 1 & 2 for the Right
handrail.
4. Do not tighten bolts until end of assembly.

6
Step 4: Tighten all bolts and screws
Step 5: Handrail Cover Assembly
1. Place the Left inner handrail cover onto
the Left handrail and tighten this cover
with two M5 x12mm screws using Phil-
lips screwdriver.
2. Now place the outer handrail cover
through the handrail and onto inner cov-
er. Insert four more M5 x12mm screws.
Tighten all 6 screws now.
3. Repeat procedure 1 & 2 for the Right
handrail covers.
4. Place the handrail cover inserts into the
inner handrail covers.
Step 6: Motor Cover Assembly
1. Place the Left motor cover onto the left side of
frame.
2. Insert and tighten the selftap M5 x 10mm
screw into the center and top mounting hole
using Phillips screwdriver.
3. Insert and tighten two M5 x16 on front and rear
end of the cover using Phillips screwdriver.
4. Repeat procedure 1, 2 & 3 for Right motor cov-
er.
Step 7: Finish Up
1. Make sure the treadmill is leveled on the
floor.Usealeveltool,andadjustitifnec
essary.
2. Plug your power cord in and turn ON the
treadmill.
3. Make sure your safety key is in place.

7
HEART RATE MONITORING DEVICES
Built in Wireless Heart Rate Receiver
Note: Chest strap transmitter does not come with this unit; contact BODYCRAFT, or your
dealer for purchase.
This treadmill is equipped with a built-in receiver for your heart rate monitoring. Any heart rate
telemetry strap that transmits at 5Khz is compatible. To get an accurate reading using these
devices, you will need to be within three feet of the console, and a minimum of four feet from
others using a heart rate monitoring device.
(Note: The transmitter may fluctuate erratically if you are too close to other heart rate monitor-
ing equipment or there is other electronics near by, such as TV, Radio...)
The receiver of the wireless ECG system is built into the console unit of this treadmill. While
using heart rate control modes, the computer monitors the exact measurement of your pulse.
Heart rate frequency is displayed while the computer continually compares heart rate to the
preprogrammed personal data. The computer adjusts the wattage to maintain heart rate at the
preprogrammed level.
How to Wear Your Sensor/ Transmitter (Chest Strap)
1. Buckle one end of the chest strap onto the transmitter.
2. Adjustthebandlengthsothatthefitissnug,butnottootight.
3. Buckle the other end of the chest strap onto the transmitter.
4. Center the transmitter on your chest below the pectoral muscle (breasts).
5. Stretch the transmitter away from your chest and moisten the conductive electrode
strips located next to the buckles with water.
(Note: The transmitter is on automatically when being worn. It is off when it is not connected to
your body. However, as moisture may activate the transmitter, thoroughly dry the transmitter
to prolong battery life.)
Erratic Heart Rate Readings:
Erratic readings on the receiver can be caused by electromagnetic disturbances. If the heart
rate readings appear to be abnormal, check that your product is not within range of oth-
er strong electromagnetic signals. Common sources are televisions, computers, cars, cell
phones, TV antennas and high voltage power lines (both above and below ground). Please
note:Staticelectricityinclothingoraflappingshirtcancauseelectricalinterference,sosome
itemsofclothing,i.e.manmadefibers,canalsobethecause.Pleasetrywettingthetshirtin
the area where the transmitter is.
If the battery of the transmitter is running low, the transmission range decreases and may
cause errors similar to the ones listed above in this document.

8
CONSOLE
Glossary of Terms
• Idle mode = Console is reset and waiting for an entry. The dot matrix display window
will show “BC” and message display will scroll following a message of ”SELECT A PRO-
GRAM OR PRESS START”. If no key input for 30 minutes, the console will enter sleep
mode and the dis play will be shut off.
• Sleep mode = no key input during idle mode, the console display will be off.
You can press any key to wake up the console and return to idle mode.
• LED = The lights on the face of the console.
• Watts = The rate of energy currently being expended.
• Work = The amount of energy expended during exercise.
Default Values
• Age = 35 years
• Weight = 155 lb or 70kg for Metric system
• ProgramTime=30minutes;for5Kor10Kprogram,theprogramdefaulttimeis1hour.
• Max program time = 4 hours. When continuous workout time reaches 4 hours, the tread-
mill will enter cool down mode.
• Speed default for Warm up and Cool down is 2.0mph.
• Incline default for Warm up and Cool down is 0%.
• Target HR default is 70% of max HR.
Operating Tips
• Power ON/OFF: Power ON/OFF switch is located in the front of the motor cover. Turn
Power ON before use the treadmill and turn it OFF when not using treadmill.
• In the power save mode, press any key to wake up the console and start opera-
tion.
• Turn the Power ON, the incline will return to 0% automatically.
• Program start sequence
• Program selecting mode Press program selecting key to select a program,
press “ENTER” to accept.
• Program setting mode – console will prompt program setting for your adjustment,
pressUP/DOWNkeytoadjustthesettingandENTERtoconfirm.
• Warm up mode – as soon as START key is pressed, Warm up mode will start,
except Quick Start & Manual programs.
• Program run mode – after warm up mode, the program run mode will start. The
programtimestartscountinganddotmatrixprofilestartsblinking.
• Cool down mode when program time is up, program will end and Cool down
mode will begin.
• Workout summary mode – after completing cool down mode, console will display
your workout summary for your review.

9
• Reset: To reset a program during its operation, press and hold the “STOP” key for 2 sec-
onds. When the program resets, the console returns to idle mode.
• Pause a program: You may interrupt or pause a program for up to 30 minutes during a
work out before the console resets. To pause a program, simply press “STOP” key once.
• The dot matrix will scroll “PAUSE” during pause mode.
• Theinclinewillstaywhereitisat;speedwillreturnto0mph.
• Press “STOP” key one more time during Pause mode, the program will end and
enter workout summary mode.
• Resume a program : To resume a program back to the point of where you left off, press
“START” key during pause mode.
• Switching a program: The user may switch from current operating program to another
program during program run mode, cool down or workout summary mode by pressing a
program selecting key. Calories and distance will continue accumulating from previous
program.
If “Classic Program” or “HR Interactive” program key is pressed during a program execut-
ing mode, it will enter program switching mode:
—Thedotmatrixwillswitchtodisplaythenewprogramdefaultprofiledisplay.You
may continue pressing the program selecting key until your desire program LED
is lit.
— Press “ENTER” to accept this new program or “START” key to start this new
program right away.
—If“ENTER”keyispressed,itwillenterthisprogramsetupmode;timedisplay
will be prompted with default time and wait for an entry. Age and weight default will
be the last update.
— Follow the prompts to set up the program. Press “UP/DOWN” key to adjust the
setting. Whenfinish, press“START”to startthe program,the new programwill
begin, and Warm Up mode will be skipped.
— If 3 seconds passes after your initial program selecting key pressed and no oth-
er key is pressed, the program will resume back to previous activities.
• Restart a program: The user may restart a program after the program ends. Simply
press “START” key during Cool Down or Workout Summary mode. The program will be
started immediately without Warm up. The program default will remain the same as pre-
viousprogram;thecaloriesanddistancewillcontinueaccumulating.
• Speed adjustment: When speed adjustment is allowed by a program, you may adjust the
speed from 0 mph to 11 mph by pressing SPEED UP/DOWN key.
• Dotmatrixprofilewilladjustthedisplayaccordingtothespeedadjustment.Each
row of LED at doe matrix display represents 1.5mph increment.

10
• Incline adjustment: When incline adjustment is allowed by a program, you may adjust the
incline from 0% to 12% by pressing INCLINE UP/DOWN key.
• Dotmatrixprofilewilladjustthedisplayaccordingtotheinclineadjustment.Each
row of LED at dot matrix display represents 1.5% increment.
• HR adjustment: During HR interactive program, you may press UP/DOWN key to adjust
the HR setting.
• DotmatrixprofilewilladjusttheHRprofileaccordingtoyournewHRsettingby
displaying %max HR. Each row of LED at dot matrix display represents 10% of
max HR.
• % MAX HR = Pulse / (220 minus age) * 100%.
It is recommended to control your % Max heart rate within 60% – 85% for the most effec-
tive workout. It is also unsafe to exceed 90% and above.
This treadmill is equipped with Heart Rate protection shut off function.
The pulse display will blink and beep to warn you when your heart rate exceeds 95% max
HR. The console will shut down and return to idle mode if your heart rate is exceed 98%
max HR for more than 10 seconds. It is important to enter your age to get the accurate
% max HR.
• English / Metric setting: The default Units is English system. To enter the system switch-
ing mode, press & hold “ START” & “STOP” keys at the same time for 2 seconds during
idle mode. The Dot Matrix display will blink “ENGL” for English units or “METR” for Metric
units. To change it, press “UP/DOWN” key to switch the current Units. Press “ENTER” key
to accept the setting and enter idle mode.

11
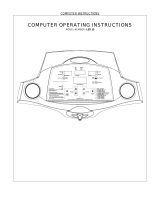
CONSOLE LAYOUT
Displays:
• DotMatrix/Profiledisplay:
1. It displays instruction letters during setup.
•Display“AGE”duringagesetup;“WT”forweightsetup;“TIME”fortimesetup&
“HR” for HR setup.
• Display “ENGL” or “METR” for English or Metric units switch.
• Scroll “WARM UP” or “COOL DOWN” to indicate entering these modes.
2.Itdisplaystheprogramprofileduringtheprogramrunmode.
•PressthisSELECTkeytoswitchtheprofiledisplayfromdefaulttoInclineprofile
andlightupitsLEDindicatororfromInclineprofilebacktodefaultprofileandturn
off the LED indicator.
• Each column represents segment time = Program time / 20 columns. If the pro-
gram time is less than 20 minutes, then the segment time will be
1 minute instead.

12
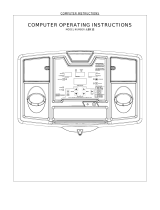
• Workout Display:
a. Speed and Incline display
• Speed (mph) – Current speed.
• Incline (%) – current incline %
b. Other data displays
As soon as a program is started, it will start displaying the default workout data: time. You
may select your favorite data displays by pressing the “SELECT” button under each data
display, the LED indicator will light up to show which data is displaying.
• Time (hr: min or min: sec): The remaining of program time.
• Distance (mile or km): Total workout distance.
• Pace (min: sec): current minutes per mile.
• Calories (kcal): Total workout calories
• Cal/min: current Calorie rate.
• Heart rate (bpm): Your current heart rate. If there is no pulse detected, it will display
“ “ instead.
• % max HR: Current % max HR.
c. Pulse indicator: the heart indicator will start blinking once there is heart rate signal
detected by the console.
Function Keys:
• Speed UP/DOWN keys:
• During program setup, press Speed “UP/DOWN” key to adjust the following: age,
weight, time & HR setting.
• After program started, press Speed “UP/DOWN” key to adjust the speed.
• Speed increment = 0.1mph.
• Incline Up/Down keys:
• During program setup, press incline “UP/DOWN” key to adjust the following: age,
weight, time & HR setting.
• After program started, press Incline “UP/DOWN” key to adjust the incline.
• Incline increment = 0.5%.
• Enter key:
• After program selecting, press “ENTER” to accept the program and enter its setup
mode.
• After age, weight, time.. adjustment, press “ENTER” key to accept your entry.

13
• Start key:
• Press “START” to start a program during program setup.
• Press “START” key to skip Warm up and enter program executing.
• Press “START” to restart a program during Cool Down, workout summary mode.
• Press “START” to resume a program from pause mode.
• Stop key:
• Press and hold “STOP” button for 2 seconds to reset the console.
• Press “STOP” to pause program run mode.
• Press “STOP” to enter workout summary during Cool Down.
• Numeric Quick Keys:
• Press numeric keys to enter your Age, Weight during program set up. After entry,
press ENTER to confirm. Ex: Press “5,4” for age 54.
• Press numeric keys to enter Time during program set up. Press ENTER to confirm
after entry. The unit of the entry will be 1 minute. Ex: Press “1,0,0” for 100 minutes.
• Press numeric keys to enter HR setting during program set up mode only. Press
ENTER to confirm your entry. Ex: Press “1,3,7” for 137 bpm.
• Press numeric keys to adjust the Speed during program run mode. The entry will
be 1.0 mph increment with no decimal point. Ex: Press “4” for 4.0 mph.
• Press “INCLINE” and numeric keys to adjust Incline during program run mode.
Press “ENTER” to confirm your entry. Ex: Press “INCLINE, 5” for 5%.
• Press “CLEAR” after you press any numeric key to void an entry.
• Emergency key
• Place the safety clip onto your clothes properly before using treadmill.
• Treadmill will not start unless the emergency key is properly engaged.
• Pulling the emergency key off the treadmill will result in power shut off and stop
the treadmill immediately.
• Pull the emergency key off the treadmill if you feel ill during use of treadmill or
any other emergency occurs.

14
WORKOUT PROGRAMS
BELT START SEQUENCE
Belt start sequence is designed with your safety in mind. It is an indication to let you know that
the treadmill motor is about to start and be prepared.
Anytime the treadmill is ready to starts, the belt start sequence will appear as below:
• Data display will display “ 3, 2, 1, GO”
• As soon as “GO” appears, the belt will start at 0.5 mph and slowly increase to appropriate
setting and program timer will begin.
WARM UP
Getting Started
This treadmill automatically initiates a 3 minute Warm Up at the beginning of each program.
It is designed to prepare your body for an intensive workout and to reduce the possibility of
injury during workout.
Note: Warm Up is skipped for the Quick Start or Manual programs. Warm Up is skipped
if it is a re-start program or switching from another program.
Beginning the Program
Warm Up is active as soon as the “START” key is pressed and a program is executed. The
Dotmatrixwindowwillscroll“WARMUP”andthendisplayprogramprofile.Thissequencewill
repeatuntilWarmupisfinished
During the Program
Data Display
• Once it is started, the data display window will start accumulating and display the default
workout data of “time, distance, calories & heart rate”. Press “SELECT” button to switch
the data displays.
• The time will display count down from 3:00.
• Speed display will show default speed of 2.0 mph.
• Incline display will show default incline of 0%.
Adjustment
• Speed = 2.0 mph. Press Speed “UP/DOWN” key or numeric quick key to adjust the speed
from 0.5 – 3.5 mph only.
• Incline = 0%. Press Incline “UP/DOWN key or numeric quick key to adjust the incline from
0 – 12%.
• “START” key can be pressed to skip the warm up and start the program immediately.

15
Ending the Warm Up
• After 3 minutes, or the Start key is pressed, Warm Up will end and the program will exe-
cute.
• There will be a beep sound to indicate the Warm up is over and the selected program
begins.
COOL DOWN
Getting Started
This treadmill is equipped with a 3 minute Cool Down at the end of each program. It appears
as soon as a program ends. Cool Down is designed to reduce muscle stiffness and allow your
heart rate to recover.
Note: Cool Down is skipped for the Quick Start program.
Beginning the Program
Cool Down is active as soon as a program ends. The dot matrix window will scroll “COOL
DOWN”andthendisplayfinalprogramprofile.ThissequencewillrepeatuntilCoolDownis
finished.
During the Program
Data Display
• Once it is started, the data display window will continue accumulating and dis play the
default workout data of “time, distance, calories & heart rate”. Press “SELECT” button to
switch the data displays.
• The time will display “3:00” and start continuing down.
• Speed display will show default speed of 2.0 mph.
• Incline display will show default incline of 0%.
Adjustment
• Speed = 2.0 mph. Press Speed “UP/DOWN” key to adjust the speed from 0.5 3.5 mph
only.
• Incline = 0%. Press Incline “UP/DOWN” key to adjust the incline from 0 12%.
• “START” key could be pressed to restart the previous program again.
• “STOP” key could be pressed to skip the cool down mode and active the Workout Sum-
mary immediately.
Ending the Cool Down
• After 3 minutes, or the Stop key is pressed, Cool Down will end and enter Workout Sum-
mary. See Workout summary for details.

16
WORKOUT SUMMARY
Getting Started
For your convenience, this treadmill incorporates a Workout Summary right after the comple-
tion of the Cool Down. It will display the total workout data for 3 minutes before the Console
resets.
Beginning the Program
Workout Summary appears as soon as the Cool Down mode ends or a “STOP” key is pressed
duringCoolDownmode.Thedotmatrixwilldisplaythefinalprogramprofile.Thedatadisplay
willstopcountingandshowthefinaldataoneatatime.
During the Program
Data Display
• Once this summary is started, the data window will display with default “time, calories &
heart rate” displays: :
• Time display shows total Program time.
• Distance display shows the total distance.
• Calories display shows total calories accumulated for the workout.
• The Incline Display shows the average incline
• The Speed Display shows the average speed
• Press ”UP/DOWN” key to switch to the next data display:
• The Cal/min display shows the average caloric rate
• The Pace display shows the average pace for the workout
• TheHeartRatedisplayshowsaverageHR;ifthereisnoHR,itwilldisplay““.
• The%maxHRdisplaytheaverage%MaxHR;ifthereisnoHR,itwilldisplay
“ “.
Adjustment
• Press “START” key to restart this program.
• Press STOP key to end workout summary and enter idle mode.
• Press program selecting key to enter switching program sequence.
Ending the Workout Summary
• After 30 seconds, or the Stop key is pressed, Workout Summary will end and console will
reset.

17
QUICK START
Getting Started
A Quick Start program is for someone who wants to bypass the setup mode and start their
workouts right away. By picking Quick Start program, you are accepting the default values for
calculations. Be sure to include a Warm Up period during your workout since the Warm Up
mode is skipped in the Quick Start program.
Beginning the Program
During idle mode, the dot matrix window displays ”BC….” Messages, to begin this program,
simply press “START” key once.
Program Default Values
• Max program time = 4 hours
• Default Speed = 0.5 mph
• Default Incline = 0%
• Defaultprofile=speedprofile;eachsegmenttime=1minute.
During the Program
Data Display
• Assoonasthe“START”buttonispressedduringidlemode,thisprogramwillbegin;the
data display window will display the default workout data of “time, calories & heart rate.
Press “SELECT” button to switch the data displays.
• Time display will show 00:00 and count up.
• Speed display will show default speed of 2.0 mph.
• Incline display will show default incline of 0%.
Adjustment
• Press Speed “UP/DOWN” key to adjust the speed from 0 — 11 mph. The speed display
willupdatethecurrent&futurespeedandthedotmatrixwindowwillupdatetheprofile
accordingly.
• Press Incline “UP/DOWN” key to adjust the incline from 0 12%. The incline display will
updatethecurrent&futureinclineandthedotmatrixwindowwillupdatetheinclineprofile
if this display is selected.
• Press“SELECT”keynexttodotmatrixwindowtoswitchtheprofiledisplay
Ending Quick Start
• When the “STOP” key has been pressed twice during Quick Start, this program will end
and enter workout summary mode.
• There will be a beep sound to indicate the program ended.

18
CLASSIC PROGRAMS
There are 8 Classic programs for selection. Each program has similar setup process. There
are preset speed, incline as well as track programs. Follow the instruction listed below to se-
lect and setup the desired program to begin exercise.
Program Names
MANUAL PROGRAM
You can build your own program with Manual program. Be sure
to include a Warm Up period during your workout since the
Warm Up mode is skipped in the Manual program.
INTERVAL TRAINER
The Interval Trainer program helps to build the strength of
your cardiovascular system. By alternating the workload from
high speed to low speed & incline, your heart gets an effective
workout.
HILL WALK
The Hill Walk program simulates a hill climb exercise with a
presethillprofileandslowspeedtowalk.Theexerciseprofile
will guide you through the up hill climb or down hill glide.
RANDOM HILLS
The Random Hills program is designed to allow the user to
choose from an unlimited number of computer generated
inclineprofiles.
Note:Profileshownhereisforreferenceonly;computerwill
generateadifferentprofileeachkeypress.
EASY JOG
The Easy Jog program is designed for a beginner who just
started running. It varies speed throughout the program to
help you getting accustomed to running. You can gradually
increase the speed or incline over time as you improve.

19
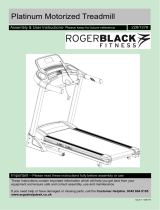
5K TRAIN & 10K RUN
The 5K Train & 10K Run programs are the dis-
tance training programs. It sets the distance tar-
get to be 5KM or 10KM and you can set up your
pace by entering the time. It is very easy to see
your speed improvement over time, because
your time will be shorter and shorter.
Assoonastheprogramrunmodebegin,thedotmatrixprofiledisplaywilldisplaya5Ktrack
or10Ktrackprofileandstartblinkinginthesmallertrack.TheblinkingLEDisshowingwhere
your position is vs. goal. Each LED blinks (Time / 32) minutes. When you completed the track,
you completed a 5K or 10K course..
Note: Because the speed is calculated from your selected time, therefore the speed can not
be adjusted during program run mode.
THIGH BURNER
TheprogramisdesignedtotoneyourThighs&Glutes;itincludes
aseriesofuphillclimbingexercisesandapresetinclineprofile.
Workout on this program often, you will see the result in no time
Beginning the Program
During idle mode, the dot matrix window displays ”BC…..”. To begin this program, press “Clas-
sic Programs” key until the desired program LED indicator lights up.
Accepting Default values or Entering the program setting mode
Whenthemessagedisplayflashestheprogramname,“PRESSENTER”,itindicatesyouare
about to select the particular program.
• Press “START” key to accept current default values and begin the program workout.
• Or press “ENTER” to enter program setup mode. The dot matrix & data displays will take
you through the program setup mode step by step as below:
Entering Age
1.IfEnterkeyispressed,thedotmatrixwindowwillflash“AGE.
2. The time display will display & blink the default age.
3. You may press “UP/DOWN” or numeric quick key to adjust the age.
4. After age adjustment, press “ENTER” to accept and enter Weight adjustment.
Entering Weight
1.IfEnterkeyispressedafterageadjustment,thedotmatrixwindowwillflash“WT”.
2. The time display will display & blink the default weight.
3. You may press “UP/DOWN” or numeric quick key to adjust the weight.
/