Philips 3000 Serie User manual

Category
Air purifiers
Type
User manual

This manual is also suitable for

AC3256
Question?
Contact
Philips
User manual 3
Benutzerhandbuch 24
Manual del usuario 47
Mode d’emploi 70
Manuale utente
93
Gebruiksaanwijzing 117
Always there to help you
Register your product and get support from
www.philips.com/welcome
3EN
English
Table of contents
1 Important 4
Safety 4
2 Your air purier 7
Product overview 7
Controls overview 8
3 Getting started 9
Install lter 9
4 Using the appliance 10
Understand the air quality
light 10
Switch on and o 10
Change the fan speed 11
Set the timer 12
Set the child lock 12
Use the light on/o function 13
5 Cleaning 13
Cleaning schedule 13
Clean the body of the
appliance 13
Clean the air quality sensor 14
Clean the pre-lter 14
6 Replacing the lter 16
Understand the healthy air
protect lock 16
Replace the lter 16
Filter force reset 18
Filter type change 18
7 Troubleshooting 20
8 Guarantee and service 22
Order parts or accessories 22
9 Notices 22
Electromagnetic elds (EMF) 22
Recycling 23
Noise level 23
4 EN
1 Important
Safety
Read this user manual carefully before
you use the appliance, and save it for
future reference.
Danger
Do not let water or any
other liquid or flammable
detergent enter the
appliance to avoid electric
shock and/or a fire
hazard.
Do not clean the
appliance with water,
any other liquid, or a
(flammable) detergent to
avoid electric shock and/
or a fire hazard.
Do not spray any
flammable materials
such as insecticides or
fragrance around the
appliance.
Warning
Check if the voltage
indicated on the
appliance corresponds to
the local power voltage
before you connect the
appliance.
If the power cord is
damaged, you must have
it replaced by Philips, a
service center authorized
by Philips, or similarly
qualified persons in order
to avoid a hazard.
Do not use the appliance
if the plug, the power
cord, or the appliance
itself is damaged.
This appliance can be
used by children aged
from 8 years and above
and persons with reduced
physical, sensory or
mental capabilities or
lack of experience and
knowledge if they have
been given supervision or
instruction concerning use
of the appliance in a safe
way and understand the
hazards involved. Child
shall not play with the
appliance. Cleaning and
maintenance shall not be
made by children without
supervision.
Do not block the air inlet
and outlet, e.g. by placing
items on the air outlet or
in front of the air inlet.
5EN
English
Make sure that foreign
objects do not fall into the
appliance through the air
outlet.
Caution
This appliance is not
a substitute for proper
ventilation, regular
vacuum cleaning, or use
of an extractor hood or
fan while cooking.
If the power socket used
to power the appliance
has poor connections,
the plug of the appliance
becomes hot. Make
sure that you plug the
appliance into a properly
connected power socket.
Always place and use the
appliance on a dry, stable,
level, and horizontal
surface.
Leave at least 20cm free
space behind and on both
sides of the appliance
and leave at least 30cm
free space above the
appliance.
Do not place anything on
top of the appliance.
Do not sit or stand on
the appliance. Sitting or
standing on the appliance
may lead to potential
injuiry.
Do not place the
appliance directly below
an air conditioner to
prevent condensation
from dripping onto the
appliance.
Make sure all filters
are properly installed
before you switch on the
appliance.
Only use the original
Philips filters specially
intended for this
appliance. Do not use any
other filters.
Combustion of the filter
may cause inreversible
human hazard and/or
jeopardize other lives . Do
not use the filter as fuel or
for similar purpose.
Avoid knocking against
the appliance (the air inlet
and outlet in particular)
with hard objects.
Always lift or move the
appliance by the handle
on top of the appliance.
6 EN
such as TVs, radios, and
radio-controlled clocks.
The appliance is only
intended for household
use under normal
operating conditions.
Do not use the appliance
in wet surroundings or in
surroundings with high
ambient temperatures,
such as the bathroom,
toilet, or kitchen.
The appliance does
not remove carbon
monoxide (CO) or radon
(Rn). It cannot be used
as a safety device in
case of accidents with
combustion processes
and hazardous chemicals.
If you need to move the
appliance, disconnect the
appliance from the power
supply first.
Do not move the
appliance by pulling its
power cord.
Do not insert your fingers
or objects into the air
outlet or the air inlet to
prevent physical injury
or malfunctioning of the
appliance.
Do not use this appliance
when you have used
indoor smoke-type insect
repellents or in places
with oily residues, burning
incense, or chemical
fumes.
Do not use the appliance
near gas appliances,
heating devices or
fireplaces.
Always unplug the
appliance after use
and before cleaning
or carrying out other
maintenance.
Do not use the appliance
in a room with major
temperature changes,
as this may cause
condensation inside the
appliance.
To prevent interference,
place the appliance at
least 2 meters away from
electrical appliances that
use airborne radio waves
7EN
English
2 Your air purifier
Congratulations on your purchase, and welcome to Philips!
To fully benefit from the support that Philips offers, register your product at
www.philips.com/welcome.
Product overview
A Control panel
B Air quality light
C Air quality sensors
D
NanoProtect S3 filter HEPA*
(FY3433)
E NanoProtect AC filter* (FY3432)
F Pre-filter
G Front panel
B
A
FDC
G
E
* Hereinafter referred to as air
purification filter
8 EN
Controls overview
H On/Off button
I Child lock button
J Light on/off button
K Display screen
L Fan speed button
M Timer button
N Reset button
H J K L M NI
9EN
English
3 Press the two clips down and pull
the pre-filter towards you.
4 Put the unpacked air purification
filters back into the appliance.
Note
Put the thick filter in the appliance first,
and then the thinner filter.
5 Put the pre-filter back into the
appliance.
3 Getting started
Install lter
Before using the appliance, remove all
packaging materials of the filters and
place the filter into the appliance as
described below.
Note
Make sure that the side with the tag is
pointing towards you.
1 Remove all packaging materials of
the air purification filters.
2 Pull the bottom part of the front
panel to remove it from the
appliance.
10 EN
Note
Make sure that the side with the two
clips is pointing towards you, and that
all hooks of the pre-filter are properly
attached to the purifier.
6 To reattach the front panel, mount
the panel onto the top of the
appliance first (1). Then, gently push
the panel against the body of the
appliance (2).
4 Using the
appliance
Understand the air
quality light
Air quality light
color
Air quality level
Blue Good
Blue-violet Fair
Red-purple Unhealthy
Red Very unhealthy
The air quality light automatically goes
on when the appliance is switched on,
and lights up all colors in sequence.
In a short time the air quality sensors
select the color that corresponds to the
ambient air quality.
Switch on and o
1
Put the plug of the appliance in the
power socket.
2 Touch to switch on the
appliance.
» The appliance operates under
the auto mode by default.
11EN
English
» After measuring the air quality
for a short time, the air quality
sensor automatically selects the
color of the air quality light.
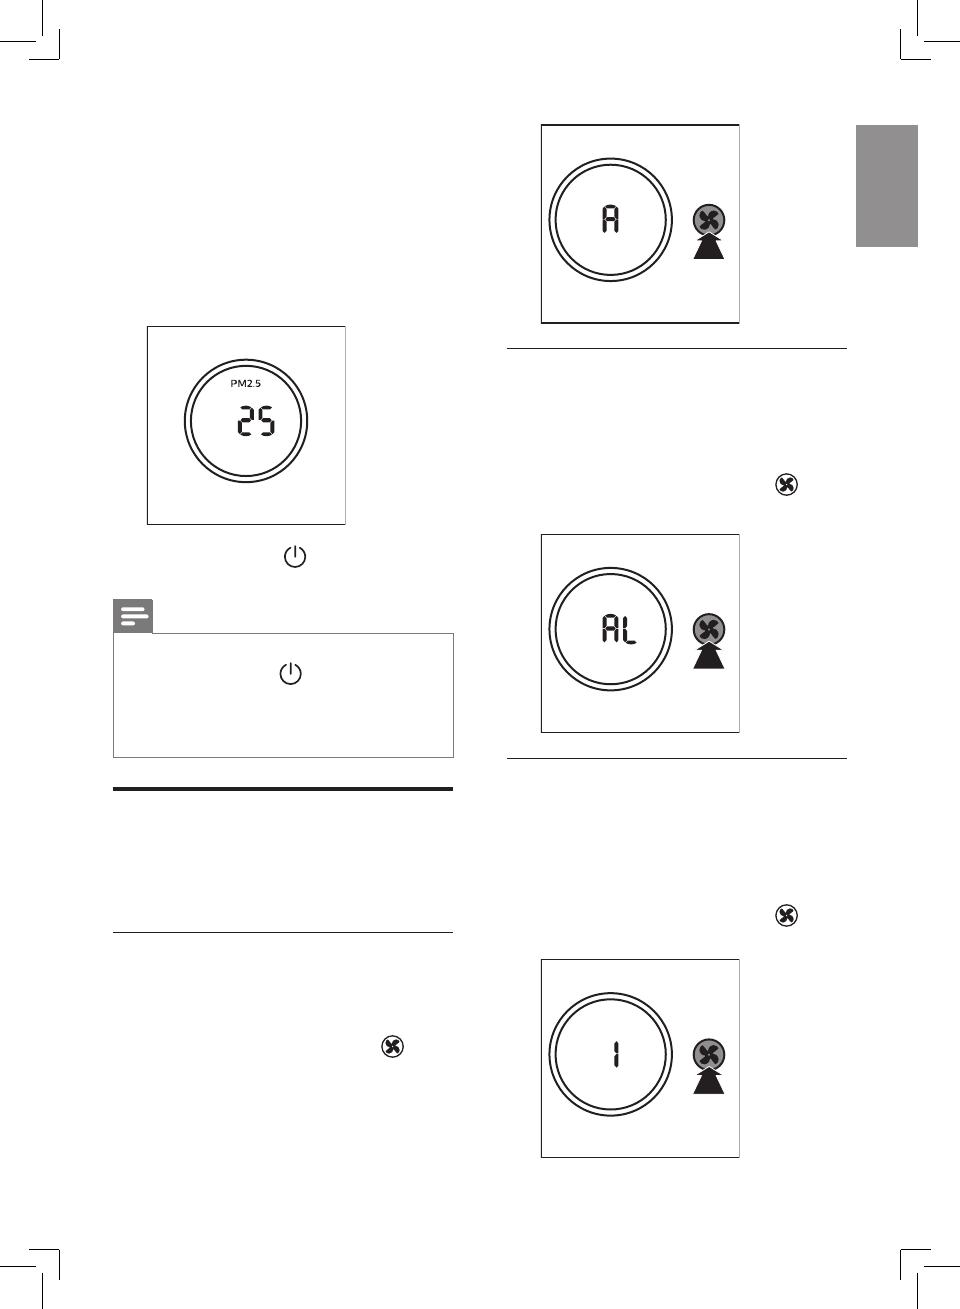
» After measuring the particle
matters in the air, the appliance
shows the PM2.5 level on the
screen.
3 Touch and hold for 3 seconds to
switch off the appliance.
Note
After the appliance is switched off by
the on/off button
, if the plug is still
in the power socket, the appliance will
operate under the previous settings
when it is switched on again.
Change the fan speed
There are several fan speeds available.
You can choose the auto mode,
allergen mode, speed 1, 2, 3, 4 or 5.
Auto (A)
In auto mode, the appliance selects the
fan speed according to the ambient air
quality.
Touch the fan speed button
to
select auto (A).
Allergen mode
The specially designed allergen mode
can effectively remove common
allergens such as pollen, pet dander
and dust mite etc.
Touch the fan speed button
to
select the allergen mode (AL).
Sleep mode
In sleep mode, the appliance operates
quietly under speed 1. One minute after
the sleep mode is selected, the power
and light on/off indicators are dimmed,
and all the other lights are off.
Touch the fan speed button
to
select the sleep mode (speed 1).
12 EN
Set the child lock
1
Touch and hold the child lock
button
for 3 seconds to activate
child lock.
» "L" displays on the screen for
3 seconds.
» When the child lock is on,
all the other buttons are not
responsive.
3s
2 Touch and hold the child lock
button
for 3 seconds again to
deactivate child lock.
» "UL" displays on the screen for
3 seconds.
3s
Manual
Touch the fan speed button
repeatedly to select the fan speed
you need.
Set the timer
With the timer, you can let the
appliance operate for a set number of
hours. When the set time has elapsed,
the appliance will automatically switch
off.
Touch the timer button
repeatedly to choose the number
of hours you want the appliance to
operate.
» The timer is available from 1 to
24 hours.
To deactivate the timer, touch the timer
button
repeatedly until displays
on the screen.
13EN
English
Use the light on/o
function
With the light on/off button, you can
switch on or off the air quality light,
the display screen and the function
indicators if needed.
1 Touch the light on/off button
once, the air quality light will go out.
2 Touch the light on/off button
again, the display screen and the
function indicators will go out. The
power on/off
and light on/off
indicators will still be on, but the
lights will be dimmed.
3 Touch the light on/off button for
the third time, all lights will be on
again.
5 Cleaning
Note
Always unplug the appliance before
cleaning.
Never immerse the appliance in water
or any other liquid.
Never use abrasive, aggressive, or
flammable cleaning agents such as
bleach or alcohol to clean any part of
the appliance.
Only the pre-filter is washable. The air
purification filter is not washable nor
vacuum cleanable.
Cleaning schedule
Frequency Cleaning method
When necessary
Wipe the surface
of the appliance
with a soft dry
cloth
When F0
displays on the
screen
Clean the pre-
filter
Every two
months
Clean the air
quality sensors
Clean the body of the
appliance
Regularly clean the inside and outside
of the appliance to prevent dust from
collecting.
1 Wipe away dust with a soft dry cloth
from the body of the appliance.
2 Clean the air outlet with a soft dry
cloth.
14 EN
3 Clean the air quality sensor, the
dust inlet and the dust outlet with a
lightly moistened cotton swab.
4 Dry them with a dry cotton swab.
5 Reattach the air quality sensor
cover.
Clean the pre-lter
Filter alert light
status
Follow this
F0 displays on the
screen
Clean the pre-
filter
Clean the air quality
sensor
Clean the air quality sensor every 2
months for optimal functioning of the
purifier. Clean them more frequently
if you use the purifier in a dusty
environment.
Note
When the humidity level in the
room is very high, it is possible that
condensation develops on the air
quality sensor. As a result, the air
quality light may indicate that the air
quality is bad even though it is good.
In this case you have to clean the
air quality sensor or use one of the
manual speed settings.
1 Clean the air quality sensor inlet
and outlet with a soft brush.
2 Remove the air quality sensor cover.
15EN
English
Note
Make sure that the pre-filter is
completely dry. If it is still wet, bacteria
may multiply in it and shorten the
lifetime of the pre-filter.
5 Put the pre-filter back into the
appliance.
Note
Make sure that the side with the two
clips is pointing towards you, and that
all hooks of the pre-filter are properly
attached to the purifier.
6 To reattach the front panel, mount
the panel onto the top of the
appliance first (1). Then, gently push
the panel against the body of the
appliance (2)
1 Pull the bottom part of the front
panel to remove it from the
appliance.
2 Press the two clips down and pull
the pre-filter towards you.
3 Wash the pre-filter under a running
tap. If the pre-filter is very dirty, use
a soft brush to brush away the dust.
4 Air dry the pre-filter.
16 EN
6 Replacing the
filter
Understand the healthy
air protect lock
This appliance is equipped with the
healthy air protect lock to make sure
that the air purification filters are in
optimal condition when the appliance
is operating. When the filters are almost
expired, the filter code displays on the
screen to indicate that you need to
replace the filters.
If the filters are not replaced in 14 days,
the appliance will stop operating and
get locked.
Replace the lter
Note
The air purification filters are not
washable nor vacuum cleanable.
Filter alert light
status
Follow this
A3 displays on the
screen
Replace
NanoProtect S3
filter HEPA
C7 displays on the
screen
Replace the
NanoProtect AC
filter
A3 and C7 display
on the screen
alternately
Replace both
filters
7 Touch and hold the reset button
for 3 seconds to reset the pre-filter
cleaning time.
3s
17EN
English
3 Place the new filter into the
appliance.
4 Touch and hold the reset button
for 3 seconds to reset the filter
lifetime counter.
3s
Note
Cleanse your hands after changing the
filter.
1 Take out the expired air purification
filter according to the filter code
displayed on the screen, and gently
put the expired filter into the trash
bin.
Note
Do not touch the pleated filter surface,
or smell the filter as it has collected
pollutants from the air.
2 Remove all packaging material of
the new filter.
18 EN
4 Touch and hold for 3 seconds to
force reset the filter lifetime of the
NanoProtect S3 AC filter and exit
the filter force reset mode.
3s
Filter type change
1
Touch and simultaneously
for 3 seconds to enter the filter type
change mode.
» Code (A3) of the NanoProtect
S3 filter HEPA displays on the
screen.
3s
2 Touch to select the filter code of
the new filter you will use.
Filter force reset
1
Touch and simultaneously
for 3 seconds to enter the filter force
reset mode.
» Code (A3) of the NanoProtect
S3 filter HEPA displays on the
screen.
3s
2 Touch and hold for 3 seconds to
force reset the filter lifetime of the
NanoProtect S3 filter HEPA.
3s
3 Code (C7) of the Nanoprotect AC
filter displays on the screen after the
lifetime of the NanoProtect S3 filter
HEPA has been reset.
19EN
English
5 Touch to select the new filter
code of the second filter.
6 Touch and hold for 3 seconds
to confirm the filter code of the
second filter and exit the filter type
change mode.
3s
Note
After you have selected the filter code
of the new filter using the
button,
if you do not touch any other buttons
in 10 seconds, the appliance will
automatically confirm the filter code of
the new filter.
Note
Refer to the separate leaflet that comes
with the filter for more information on
different filter combinations for your
choice.
3 Touch and hold for 3 seconds to
confirm the filter code of the new
filter.
3s
Note
After you have selected the filter code
of the new filter using the
button,
if you do not touch any other buttons
in 10 seconds, the appliance will
automatically confirm the filter code of
the new filter.
4 Code (C7) of the Nanoprotect
AC filter displays on the screen
after the first filter type has been
changed.
20 EN
7 Troubleshooting
This chapter summarizes the most common problems you could encounter with the
appliance. If you are unable to solve the problem with the information below, contact
the Consumer Care Center in your country.
Problem Possible solution
The appliance
does not work
even though it is
plugged in..
The filter replacement code has been displaying on the
screen but you have not replaced the corresponding filter
yet. The appliance will be locked if you keep using the
expired filter. In this case, replace the filter and reset the
filter lifetime counter.
The appliance
does not work
even though it is
switched on.
The appliance is working but the buttons are not
responsive. Check if the child lock is on.
The filter replacement code has been on continuously but
you have not replaced the corresponding filter, and the
appliance is now locked. In this case, replace the filter and
reset the filter lifetime counter.
The airow that
comes out of
the air outlet
is signicantly
weaker than
before.
The pre-filter is dirty. Clean the pre-filter (see chapter
"Cleaning").
The air quality
does not improve,
even though the
appliance has
been operating for
a long time.
One of the filters has not been placed in the appliance.
Make sure that all filters are properly installed in the
following order, starting with the innermost filter: 1)
NanoProtect S3 filter HEPA; 2) NanoProtect AC filter; 3)
pre-filter.
The air quality sensor is wet. The humidity level in your
room is high and causes condensation. Make sure that the
air quality sensor is clean and dry (see chapter "Cleaning").
The color of the air
quality light always
stays the same.
The air quality sensor is dirty. Clean the air quality sensor
(see chapter "Cleaning").
21EN
English
Problem Possible solution
The appliance
produces a strange
smell.
The first few times you use the appliance, it may produce
a plastic smell. This is normal. However, if the appliance
produces a burnt smell, contact your Philips dealer or an
authorized Philips service centre. The appliance may also
produce an unpleasant smell when the filter is dirty. In this
case, clean or replace the filter concerned.
The appliance is
extra loud.
If the appliance is too loud, you can change the fan speed
to a lower fan speed level. When using the appliance in a
bedroom at night, choose the sleep mode.
The appliance still
indicates that I
need to replace a
lter, but I already
did.
Perhaps you did not reset the filter lifetime counter. Plug
in the appliance, touch
to switch on the appliance, and
touch and hold the reset button for 3 seconds.
Error code "Er"
displays on the
screeen.
The hall sensor is not working properly. Remove and then
reattach the front panel. If the error code "Er" still exists,
contact the Consumer Care Center in your country.
Error codes "E1",
"E2", "E3" or "E4"
displays on the
screeen.
The appliance has malfunctions. Contact the Consumer
Care Center in your country.
  • Page 1 1
  • Page 2 2
  • Page 3 3
  • Page 4 4
  • Page 5 5
  • Page 6 6
  • Page 7 7
  • Page 8 8
  • Page 9 9
  • Page 10 10
  • Page 11 11
  • Page 12 12
  • Page 13 13
  • Page 14 14
  • Page 15 15
  • Page 16 16
  • Page 17 17
  • Page 18 18
  • Page 19 19
  • Page 20 20
  • Page 21 21
  • Page 22 22
  • Page 23 23
  • Page 24 24
  • Page 25 25
  • Page 26 26
  • Page 27 27
  • Page 28 28
  • Page 29 29
  • Page 30 30
  • Page 31 31
  • Page 32 32
  • Page 33 33
  • Page 34 34
  • Page 35 35
  • Page 36 36
  • Page 37 37
  • Page 38 38
  • Page 39 39
  • Page 40 40
  • Page 41 41
  • Page 42 42
  • Page 43 43
  • Page 44 44
  • Page 45 45
  • Page 46 46
  • Page 47 47
  • Page 48 48
  • Page 49 49
  • Page 50 50
  • Page 51 51
  • Page 52 52
  • Page 53 53
  • Page 54 54
  • Page 55 55
  • Page 56 56
  • Page 57 57
  • Page 58 58
  • Page 59 59
  • Page 60 60
  • Page 61 61
  • Page 62 62
  • Page 63 63
  • Page 64 64
  • Page 65 65
  • Page 66 66
  • Page 67 67
  • Page 68 68
  • Page 69 69
  • Page 70 70
  • Page 71 71
  • Page 72 72
  • Page 73 73
  • Page 74 74
  • Page 75 75
  • Page 76 76
  • Page 77 77
  • Page 78 78
  • Page 79 79
  • Page 80 80
  • Page 81 81
  • Page 82 82
  • Page 83 83
  • Page 84 84
  • Page 85 85
  • Page 86 86
  • Page 87 87
  • Page 88 88
  • Page 89 89
  • Page 90 90
  • Page 91 91
  • Page 92 92
  • Page 93 93
  • Page 94 94
  • Page 95 95
  • Page 96 96
  • Page 97 97
  • Page 98 98
  • Page 99 99
  • Page 100 100
  • Page 101 101
  • Page 102 102
  • Page 103 103
  • Page 104 104
  • Page 105 105
  • Page 106 106
  • Page 107 107
  • Page 108 108
  • Page 109 109
  • Page 110 110
  • Page 111 111
  • Page 112 112
  • Page 113 113
  • Page 114 114
  • Page 115 115
  • Page 116 116
  • Page 117 117
  • Page 118 118
  • Page 119 119
  • Page 120 120
  • Page 121 121
  • Page 122 122
  • Page 123 123
  • Page 124 124
  • Page 125 125
  • Page 126 126
  • Page 127 127
  • Page 128 128
  • Page 129 129
  • Page 130 130
  • Page 131 131
  • Page 132 132
  • Page 133 133
  • Page 134 134
  • Page 135 135
  • Page 136 136
  • Page 137 137
  • Page 138 138
  • Page 139 139
  • Page 140 140

Philips 3000 Serie User manual

Category
Air purifiers
Type
User manual
This manual is also suitable for

Ask a question and I''ll find the answer in the document

Finding information in a document is now easier with AI