Page is loading ...

D Bedienungsanleitung HEPA-Luftreiniger
GB Instruction Manual HEPA Air Purier
F Mode d‘emploi Puricateur d‘air HEPA
I Istruzioni per l‘uso Puricatore d‘aria
con ltro HEPA
CZ Návod k použití HEPA-Čistič vzduchu
BHG 280

3
BHG 280
INHALT
Wichtig! ..................................... 7
Sicherheitshinweise ........................ 7
Anbringen des Luftreinigers ................ 7
Arbeitsweise des Luftreinigers .............. 7
Inbetriebnahme ............................ 8
Fernbedienung ............................ 9
Reinigung und Pege ...................... 10
Demontage und Montage .................. 11
Problembehebung ......................... 12
Technische Daten ........................... 12
Der Umwelt zuliebe ......................... 12
Garantie .................................... 13
TABLE DES MATIERES
Important .................................. 21
Consignes de Securite ...................... 21
Positionnement du puricateur d‘air ....... 21
Fonctionnement du puricateur d‘air ...... 21
Mise en service ............................. 22
Télécommande ............................. 23
Nettoyage et entretien ..................... 24
Démontage et Montage .................... 25
Dépannage ................................. 26
Informations techniques .................... 26
Pour l‘amour de l‘environnement ........... 26
Garantie .................................... 27
CONTENUTO
Importante! ................................. 28
Avvertenze per la sicurezza ................. 28
Posizionamento del puricatore ............ 28
Funzionamento del puricatore ............ 28
Messa in funzione .......................... 29
Telecomando . . . . . . . . . . . . . . . . . . . . . . . . . . . . . . . 30
Pulizia e manutenzione ..................... 31
Smontaggio e montaggio .................. 32
Risoluzione dei problemi ................... 33
Dati tecnici .................................. 33
Indicazioni per la tutela dell‘ambiente ...... 33
Garanzia .................................... 34
CONTENTS
Important! .................................. 14
Safety information .......................... 14
Installation of air purier .................... 14
Functioning of air purier ................... 14
Using the appliance for the rst time ....... 15
Remote control unit ........................ 16
Cleaning and care of appliance ............. 17
Dismantling and assembly .................. 18
Troubleshooting ............................ 19
Technical details ............................ 19
Caring for the environment ................. 19
Warranty .................................... 20
OBSAH
Důležité! .................................... 35
Bezpečnostní pokyny ...................... 35
Umístění čističe . . . . . . . . . . . . . . . . . . . . . . . . . . . . . 35
Způsob fungování čističe vzduchu ......... 35
Uvedení do provozu ....................... 36
Dálkové ovládání ........................... 37
D
F I
CZ
GB
Čištění a péče .............................. 38
Demontáž a Montáž ....................... 39
Odstranění problémů ...................... 40
Technické údaje ............................ 40
Dbejte na životní prostředí ................. 40
Záruka ...................................... 41

54
BHG 280
BHG 280
1 2 3 4
5 6 7 8 9 10 11 12
14 13
15
16
Es können Abweichungen zwischen den Abbildungen in dieser Anleitung und Ihrem Gerät bestehen. Diese Anlei-
tung bezieht sich auf das Gerät, mit der sie geliefert wurde. Bitte beachten Sie, dass wir Sie nicht über eventuelle
Änderungen der genauen Darstellung des Produkts informieren können.
Il peut y avoir des variations entre les illustrations de ce manuel et votre appareil. Ce guide se réfère à l‘appareil avec
lequel il a été livré. Veuillez noter que nous ne pouvons pas vous informer de toute modication de la représentation
exacte de l‘appareil.
GB
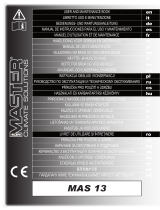
1 Vorderseite
2 Anzeige
3 Bedienelement
4 Fernbedienung
5 Vordere Abdeckung
6 Vorderer Lufteinlass
7 Vorlter
8 Hauptlter (HEPA und Aktivkohle)
1 Panneau avant
2 Achage
3 Réglage
4 Télécommande
5 Panneau frontal
6 Entrée d‘air avant
7 Préltre
8 Filtre principal
(HEPA et à charbon s actifs)
D
F
9 UV-Röhren
10 Nano-fotokatalytischer Filter
11 Ventilator
12 Seitlicher Lufteinlass
13 Luftauslass
14 Empfänger für Fernbedienung
15 Staubsensor
16 Gassensor
9 Tubes UV
10 Filtre nano- et photocatalytique
11 Ventilateur
12 Entrée d‘air côté
13 Sortie d‘air
14 Partie réceptrice de la télécommande
15 Capteur de poussières
16 Capteur de gaz
The gures shown in these instructions may diverge from your appliance. These instructions relate to the appli-
ance they accompany. Please bear in mind that we are unable to inform you about any changes made to detailed
portrayal of the product.
1 Front
2 Display
3 Operator panel
4 Remote control unit
5 Front cover
6 Front air inlet
7 Prelter
8 Main lter (HEPA and activated carbon)
9 UV tubes
10 Nano-photocatalytic lter
11 Fan
12 Side inlet
13 Air outlet
14 Receiver for remote control
15 Dust sensor
16 Gas sensor

Fig. 2: Display (2) and operator panel (3)
Fan Duration
Purify air Condition
17 18 19 20 21 22 23 24 25 26 27
28 29 30 31
Fig. 1: Air quality as shown on the display (2)
very good good normal poor
quality quality quality quality
Display for “Staub” (dust)
and “Gas” (gas)
17 Check, clean or replace lter
18 Ion generator indicator
19 Photocatalytic air purication indicator
20 Air quality indicator
21 Operating time selected / remaining time
(in hours)
22 Control fan speed
23 Start / Stop photocatalytic purication
24 Switch ion generator on / o
25 Select operating time
26 Operation indicator
27 ON / OFF
28 Fan speed selected
29 Automatic mode
30 Check / replace UV lamp
31 Stand-by indicator
1514
GBGB
IMPORTANT!
Please read these instructions for use carefully as
they contain important information about safety
as well as for usage and maintenance of the ap-
pliance.
Keep the instructions for use in a safe place and
pass them on to any new owner of the appliance.
SAFETY INFORMATION
Only connect this appliance to an AC power
outlet (voltage acc. to rating plate) and only
ever use indoors.
The use of extension cables is not recommend-
ed. If using extension cables, check power
rating (see Technical data).
After usage, unplug the appliance from the
mains before cleaning or if any fault occurs
during operation. Do not touch the power plug
with damp or wet hands.
Switch the appliance o before removing the
power plug. Grasp by the plug to remove –
never drag on the cable.
Children are unaware of the risks associated
with electrical equipment. For this reason never
leave a child alone and unsupervised with the
appliance.
Do not set down/operate the appliance on
a hot surface or near an oven/stove or heat-
ing. Do not operate the appliance near gas
sources.
During operation the appliance must stand
well away from other objects. Do not cover or
otherwise hinder the free ow of air.
Switch the appliance o and remove the pow-
er plug before cleaning or moving to another
location.
Always remove the power plug before any
lengthy absence or during thunderstorms to
prevent any damage being caused by light-
ning.
Only use the appliance in dry rooms and pro-
tect from splashing.
If the appliance or mains cable are visibly dam-
aged, please have your appliance checked by a
technician or BIELMEIER customer service. This
also applies if the appliance is making unusual
noises or giving o a strange odour.
Repairs to electrical appliances should only
be carried out by appropriately qualied pro-
fessionals. Unauthorised repairs may result in
signicant safety risks to the user. The manufac-
turer accepts no liability for any damage caused
by improper usage or incorrect operation.
Surfaces may scratch. Do not use scouring
agents or sharp objects when cleaning.
INSTALLATION OF AIR PURIFIER
To ensure your air purier functions to opti-
mum eect, we recommend placing the ap-
pliance on a stable base or mounting it on the
wall at a height of approx. 50 cm.
FUNCTIONING OF AIR PURIFIER
1 Prelter (7): Filters out the largest particles
in the air to length the service life of the HEPA
lter.
2 Main lter system (8): The lter system con-
sists of two layers of lters: the HEPA lter and
the activated carbon lter.
The HEPA lter is designed to remove tiny parti-
cles (down to 3 / 10 000mm) from the air such as
pollen, smoke, animal hairs, mould spores etc.
The activated carbon lter is designed to deal
with unpleasant odours.
3 UV tubes (9): The germicidal rays emitted by
the tubes destroy transmissible bacteria and
viruses.
4
Nano-photocatalytic lter (10): This lter is
300 times more eective at removing toxic
gases and viruses than conventional carbon
lters. A further benet of this lter is that it re-
generates and cleans itself with minimum cost.
5 Anion generator: The purpose of this function
is to ensure perfect air quality using negative
ions, which promote well-being.
6 Dust sensor (15) and gas sensor (16): The
air quality measured is shown on the display
(2) (dust, gas). The poorer the quality of the
room air, the more wavy lines that will appear
(see Fig. 1). In Automatic mode fan perfor-
mance is automatically adjusted according to
the air quality.
If the gas sensor indicator is ashing (20), it is
warming up.
USING THE BHG 280 FOR THE FIRST TIME
1 IMPORTANT!
Before inserting the power plug of the appliance
in the socket, open the front cover (5) by press-
ing on the two top corners and lift the cover o
the appliance. There is protective foil behind the
prelter (7) and this needs to be removed before
switching on!
2 ON / OFF
As soon as the air purier is supplied with power, a
signal will sound and the operation indicator (26)
and display (2) will ash. The appliance will switch
to Stand-by mode after 1second. The indicators
on the appliance are switched o, and the red in-
dicator lamp (31) lights up.
Press ON / OFF (27 / 32), and the air purier will
start up at the highest power level. The operation
indicator (26) lights up red. The appliance switches
to Automatic mode after 3 minutes. The operation
indicator (26) now lights up green.

Fig. 3: Remote control
(4)
32 Appliance is switched on / o.
33 Controls fan speed.
34 Starts or stops ion generator.
35 Selects the length of time the
appliance is to remain in operation
(1 – 12 hours).
36 Starts or stops Automatic mode.
37 Starts or stops photocatalytic
purication.
EIN / AUS
Gebläse
Aurischen
Dauer
Auto
Luft reinigen
32
33
34
35
36
37
1716
GBGB
INSERT BATTERIES
1 Open battery compartment on rear of remote
control unit
(4)
.
2 Insert batteries correctly.
When doing so, take note of “+” and “–” sym-
bols marked on the inside of the remote control
unit.
3 Now close the battery compartment again.
3 AUTOMATIC MODE (29)
In this mode the appliance adjusts itself accord-
ing to the air quality. The air is puried with the
power level (28) automatically selected, and the
appliance switches o as soon as the ideal purity
for room air is attained.
Appliance performance depends
on the quality of the air (20):
very good quality low performance level
good quality
medium performance level
normal quality
high performance level
poor quality very high performance level
Each of the four power levels (28) has a dier-
ent colour on the operation indicator (27):
low performance level
green
medium performance level
blue
high performance level
orange
very high performance level
red
4 MANUAL SETTING
Press “Auto” (36) on the remote control unit (16)
or “Gebläse” (fan) (22) on the appliance to leave
Automatic mode (29). You can now directly se-
lect the program you require by pressing “Auf-
frischen” (refresh) (24) for ionisation or “Luft
reinigen” (purify air) (23) for photocatalytic pu-
rication, pressing neither or both buttons and
selecting the required performance level for the
appliance with “Gebläse” (fan) (22). The setting
last selected for the appliance will be saved and
used when it is next started up.
5 SELECT OPERATING TIME (21
Running times from 1to 12 hours can be selected.
An hour is set each time you press the “Dauer” (du-
ration) button (25 / 35). The running time will start
as soon as selection ends. If you hold down the
“Dauer” (duration) button (25 / 35), this will speed
up time selection. The air purier switches o au-
tomatically when the selected time expires.
6 AIR QUALITY INDICATOR
There are four levels used to display the air quality
for “Staub” (dust)
(20)
and “Gas” (gas)
(20)
.
Very good, good, normal and poor (see Fig. 1).
REMOTE CONTROL UNIT 4
FUNCTIONS OF BUTTONS
CLEANING AND CARE OF APPLIANCE
HOUSING
Please make sure you remove the power plug
before cleaning the appliance.
Only clean the appliance when necessary. If it
is used in a contaminated environment, it may
need to be cleaned more frequently.
Remove dirt with a soft cloth.
Only use mild cleaning products to remove dirt.
Caution: Remove the cover (5) carefully so as not
to damage the appliance.
SENSORS (15 / 16)
Remove dust from the air inlet of the sensor.
Use the vacuum cleaner to clean the air inlets of
the sensors (15/ 16) and other parts which are
not easily accessible.
PREFILTER (7)
Filters must be regularly cleaned or replaced.
The prelter is washable (30° washing pro-
gramme without softener) although it should
not be spun! Allow the lter to dry at.
The lter should be washed every 3months and
replaced once a year.
MAIN FILTER (8)
It is recommended removing the dust from this
lter (8) with the vacuum cleaner every 3months.
The lter should be replaced when purication
eciency falls o sharply.
Filters should generally be replaced every 1 – 2
years.
FILTER (7 / 8) GENERAL INFORMATION
When the air purier has been in operation for
3 000 hours, the display will tell you that the pre-
lter (7) and main lter (8) need to be replaced.
After replacing the lters, press the “Gebläse”
(fan) (22) and “Aurischen” (refresh) (24) buttons
simultaneously for 3 seconds to reset the oper-
ating hours. Please remember that whenever
these two buttons are pressed simultaneously,
the operating hours will be deleted.
If you forget to reset the operating hours after
exchanging the lters (7 / 8), you will again be
reminded to replace them at 3 500 operating
hours.
Please contact BIELMEIER Hausgeräte
GmbH to buy new lters.
UV TUBES 9
If the “UV1” or “UV2” symbol (30) lights up,
this means that one or both UV tubes are not
working properly and must be replaced.

1918
GBGB
DISMANTLING AND ASSEMBLY
DISMANTLING
1 Front cover (5): Press on the top right and left-
hand corners of the cover (5) to release the
locking mechanism. Then slide up the cover
(5) to remove.
2 Prelter (7): Open the catches in the direction
shown in Fig. 4 to remove the prelter (7).
3 Main lter (8): Grasp the two straps at the top
to pull out the lter (8).
4 UV tubes (9): Carefully rotate the tubes (9)
either clockwise or anticlockwise until the
connections can be seen through the open-
ings of the holders. Now remove the tubes (9)
from their holders. Only grasp the tubes (9)
by the ceramic endpieces and wear gloves to
do so.
ASSEMBLY
1 UV tubes (9): Carefully t the tubes (9) into
their holders. Gently rotate the tubes (9) either
clockwise or anticlockwise until the connec-
tions audibly engage. Only grasp the tubes (9)
by the ceramic endpieces and wear gloves to
do so.
2 Main lter (8): First position the main lter (8)
at the bottom of the housing and then press
into the housing. The word “HEPA“ (on white
side of lter) must face outwards.
3 Prelter (7): Insert the lter (7) and turn the
catches in the direction shown in Fig. 5 to
secure the prelter (7).
4 Front cover (5): First position the bottom
holders in the openings of the housing. Secure
the cover (5) by pressing on the top right and
left-hand corners (5) until the cover audibly
engages.
Fig. 4: Dismantling
Fig. 5: Assembly
TROUBLESHOOTING
Problem Reason Solution
Appliance is not functioning Power plug is not
properly inserted in socket.
Check power plug.
Front cover is not secured. Secure cover.
No power supply from socket. Check your
fuse box.
Appliance does not respond
to remote control unit
Batteries are failing. Replace batteries.
Batteries without contact. Check that batteries are
touching the contact springs.
Appliance is running but not
emitting air
Objects are blocking
air supply or exhaust;
protective foil has not been
removed.
Remove objects / protective foil.
Contact Bielmeier Hausgeräte
GmbH if problem persists.
Expected air purication
eect is absent
Appliance is standing in a
room with poor ventilation or
is blocked by other objects.
Check that air can circulate
around the appliance.
Filters are contaminated with
smoke and dust.
Clean or replace lters.
The air quality indicator
shows air quality constantly
worsening while the per-
formance level of the air
purier keeps increasing
Sensors in appliance are
contaminated.
Clean the sensor openings
with the vacuum cleaner.
If the solutions suggested here still do not eliminate the problem, please contact Bielmeier Hausgeräte
GmbH or your nearest service centre.
Never try to repair the air purier yourself!
TECHNICAL DETAILS
Supply voltage: 220 – 240 V ~ / 50 Hz
Power consumption: 123 W
Airow (max.): 500 m³ / h
Timer: 1 – 12 hours
Dimensions (H x W x D): 555 x 445 x 210 mm
CARING FOR THE ENVIRONMENT
Do not simply throw away packaging and disused
appliances. These can be recycled.
Contact your local authority for details of the rel-
evant recycling centre or the nearest collection
point.

2120
FGB
GUARANTEE
For the warranty, which begins as of the date of sale of the product, the following conditions
shall apply in Great Britain:
A 2-years warranty is provided for damage caused by defects in material or workmanship.
The warranty period shall begin on the hand-over day and warranty is only granted on pre-
sentation of the warranty card and the purchase receipt. No further claims shall be granted.
1. Warranty period: 2 years
2. Conditions of warranty:
a) Parts, which exhibit defects in material and / or
workmanship after our inspection, will either
be repaired or replaced according to our de-
cision.
b) Warranty is only provided on presentation of
this warranty card and purchase receipt. This
warranty is only valid if it is lled out on date
of sale and in a complete and appropriate
manner.
c) This warranty is only valid for the rst owner
of the device.
d) No change or repair of parts performed within
the warranty period shall provide grounds for
any extension of the original warranty period.
e) Any transportation costs shall be borne by the
purchaser (this shall not apply during the rst
6 months of the warranty).
f) If the damage or defect cannot be elimina-
ted or if we refuse to repair the defect or in
the event of a delay in our repairing of the
device, then within the rst 6 months after
purchase / delivery of the device, and according
to the wish of the end user, the device will be
replaced free of charge or its value will be reim-
bursed or the device will be taken back with
a refund of the original purchase price which
shall not exceed the usual market price.
3. The warranty shall not apply to:
spots and scratches on the device.
control lamps and lights.
motor brushes.
easily breakable parts (e. g. bakelite, plastic ,
glass), even in case of defects in material
recognized by us.
damage due to improper installation or im-
proper xing.
damage caused by an unsuitable voltage
supply or an unsuitable electricity network.
improper or inappropriate use of the equip-
ment.
unsatisfactory care.
damage caused by incompetent or insucient
maintenance.
damage caused by dropping the equipment or
part thereof.
improper transportation or inappropriate
packaging during the transportation.
4. The warranty shall be deemed void:
in case of use or application of the device other
than its intended use for household purposes.
in case of any servicing or repairing of the device
performed by third parties that have not been
authorized for such purpose by our company.
Stamp and signature of salesperson Date of sale
Important! Please write down the FD-code
located on the rating plate here:
Model:
IMPORTANT!
Veuillez lire attentivement ce mode d‘emploi, il
contient d‘importantes remarques de sécurité
ainsi que sur l‘utilisation et l‘entretien de
l‘appareil.
Conservez précieusement le mode d‘emploi
et, le cas échéant, donnez-le au propriétaire
suivant.
CONSIGNES DE SECURITE
Ne brancher l‘appareil que sur courant alter-
natif, dont la tension correspond à la plaque
signalétique. L‘appareil convient à un usage
intérieur seulement.
Éviter d‘utiliser une rallonge avec cet appareil.
Soyez prudent lors de l‘utilisation de rallonges
à la charge admissible (voir Informations tech-
niques).
Après l‘utilisation, avant le nettoyage ou en cas
de dysfonctionnement pendant la marche, dé-
brancher l‘appareil. Ne touchez pas la prise si
vous avez les mains mouillées ou humides.
Arrêter l‘appareil avant de débrancher la prise
d‘alimentation électrique. Retirer le connecteur
sans tirer sur le câble de ce dernier.
Les enfants ne sont pas conscients des risques
qui existent lors de l‘utilisation d‘un appareil
électrique, c‘est pourquoi il est impératif de ne
jamais laisser les enfants seuls et sans surveil-
lance en présence de l‘appareil.
Ne jamais poser ou faire fonctionner l‘appareil
sur des surfaces chaudes ni à proximité immé-
diate de sources de chaleur comme les fours,
les foyers ou les radiateurs. N‘utiliser l‘appareil
à proximité de ammes de gaz.
Pendant le fonctionnement, l‘appareil doit être
dégagé et non couvert, an d‘assurer l‘arrivée
d‘air et l‘aération.
Avant de nettoyer l‘appareil ou de le déplacer,
éteindre l‘appareil et le débrancher.
En cas d‘absence prolongée, et pendant un
orage, débranchez l‘appareil, an d‘éviter tout
dommage provoqué par la foudre.
N‘utiliser l‘appareil que dans des pièces sèches
et à l‘abri des éclaboussures.
Si l‘appareil ou la conduite d‘alimentation sont
endommagés, ou si l‘appareil fait des bruits in-
habituels ou dégage des odeurs inhabituelles,
le faire contrôler par un spécialiste du SAV BIEL-
MEIER.
Seuls des spécialistes sont autorisés à répa-
rer les appareils électriques. Les réparations
incorrectes peuvent engendrer des risques
pour l‘utilisateur. Le fabricant ne saurait être
tenu responsable des éventuels dommages
provoqués par une utilisation inadéquate ou
incorrecte.
Les surfaces peuvent être rayées. Lors du net-
toyage, ne pas utiliser de mousses ni d‘objets
pointus.
POSITIONNEMENT DU
PURIFICATEUR D‘AIR
Pour un fonctionnement optimal, il est conseil-
lé de poser le puricateur d‘air sur une surface
stable ou sur un support mural à une hauteur
d’env. 50 cm.
FONCTIONNEMENT DU
PURIFICATEUR D‘AIR
1 Préltre (7): Capture les grosses particules de
poussières an de prolonger la durée de service
du ltre HEPA.
2 Système ltre principal (8): Le système de
ltre contient deux couches de ltres: le ltre
HEPA et le ltre à charbon s actifs.
Le ltre HEPA vise à éliminer les plus petites
particules (de jusqu‘à 0,3 microns) de l‘air
comme par exemple pollen, fumée, pellicules
d‘animaux, spores de moisissure, etc.
Le ltre à charbons actifs absorbe les odeurs
désagréables.
3 Tubes UV (9): Les rayons germicides des tubes
éliminent les bactéries et les virus transmissi-
bles.
4 Filtre nano- et photocatalytique (10): Ce l-
tre élimine des gaz toxiques et des virus d‘une
manière 300 fois plus ecace que des ltres à
charbons communs. Un autre avantage de ce
ltre est qu‘il se régénère et nettoie avec un
minimum d‘eort.
/