Page is loading ...

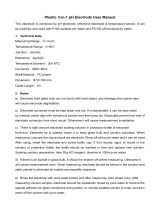
Model 4081 pH/ORP
Remote Controlled FOUNDATION
Fieldbus
Two-Wire pH/ORP Transmitter
Instruction Manual
PN 51-4081pH/rev.D
August 2002

ESSENTIAL INSTRUCTIONS
READ THIS PAGE BEFORE PROCEEDING!
Rosemount Analytical designs, manufactures, and tests its products to meet
many national and international standards. Because these instruments are
sophisticated technical products, you must properly install, use, and maintain
them to ensure they continue to operate within their normal specifications. The
following instructions must be adhered to and integrated into your safety
program when installing, using, and maintaining Rosemount Analytical
products. Failure to follow the proper instructions may cause any one of the
following situations to occur: Loss of life; personal injury; property damage;
damage to this instrument; and warranty invalidation.
• Read all instructions prior to installing, operating, and servicing the product.
If this Instruction Manual is not the correct manual, telephone 949-757-8500
or (toll free) 800-654-7768 and the requested manual will be provided. Save
this Instruction Manual for future reference.
• If you do not understand any of the instructions, contact your Rosemount
representative for clarification.
• Follow all warnings, cautions, and instructions marked on and supplied with
the product.
• Inform and educate your personnel in the proper installation, operation, and
maintenance of the product.
• Install your equipment as specified in the Installation Instructions of the
appropriate Instruction Manual and per applicable local and national codes.
Connect all products to the proper electrical and pressure sources.
• To ensure proper performance, use qualified personnel to install, operate,
update, program, and maintain the product.
• When replacement parts are required, ensure that qualified people use
replacement parts specified by Rosemount. Unauthorized parts and
procedures can affect the product’s performance and place the safe
operation of your process at risk. Look alike substitutions may result in fire,
electrical hazards, or improper operation.
• Ensure that all equipment doors are closed and protective covers are in
place, except when maintenance is being performed by qualified persons, to
prevent electrical shock and personal injury.
Emerson Process Management
Rosemount Analytical Inc.
2400 Barranca Parkway
Irvine, CA 92606 USA
Tel: (949) 757-8500
Fax: (949) 474-7250
http://www.RAuniloc.com
© Rosemount Analytical Inc. 2001

WHAT YOU NEED TO KNOW
BEFORE INSTALLING AND WIRING A ROSEMOUNT ANALYTICAL
SENSOR TO THE MODEL 4081 pH/ORP TRANSMITTER
1. THE MODEL NUMBER OF THE SENSOR
• Look on the label.
• Also note the model option string.
• If the label is missing or unreadable, see the
flowcharts on pages 28 through 30.
Write the sensor model number here
2. THE TYPE OF TEMPERATURE ELEMENT
• Look on the label.
• If the label is missing or unreadable, measure the resistance between the RTD leads.
Write the temperature element RTD here
3. THE LOCATION OF THE PREAMPLIFIER: INSIDE OR OUTSIDE THE TRANSMITTER?
• If the sensor is wired through a junction box, the preamplifier is ALWAYS in the junction box or the
sensor.
If resistance is . . . the RTD is . . .
about 110 ohms Pt 100
about 3000 ohms Balco 3K

• If the sensor is wired directly to the transmitter, the preamplifier can be in either the sensor
or the transmitter.
• Look at the wires in the sensor cable. A GREEN wire means the preamplifier is in the sen-
sor. An coaxial cable means the preamplifier is in the transmitter. A coaxial cable is an
insulated wire surrounded by a braided metal shield. The wire terminates in either a BNC
connector or an ORANGE wire with a CLEAR shield.
Write the preamplifier location here
CAN YOU USE THE QUICK START GUIDE
ON THE FOLLOWING PAGE?
Use the Quick Start Guide if . . .
1. you do NOT require an intrinsically safe or explosion-proof installation,
2. you are NOT measuring ORP,
3. you are NOT using a a sensor-mounted junction box or a remote junction box,
4. you are NOT using a sensor made by another manufacturer,
5. you are using one of the following sensors:
Note: Only the model option numbers needed to select the correct wiring diagram in the
Quick Start Guide are shown. Other model option numbers are not shown.
If you cannot use the Quick Start Guide, turn to Section 2.0 of the instruction manual.
Base Model RTD Preamplifier located Model Option (note)
381+ Pt 100 in sensor (green wire) 381+ -55
381+ Pt 100 in transmitter (orange wire) 381+ -52
385+ Pt 100 in sensor (green wire) 385+ -03
385+ Pt 100 in transmitter (orange wire) 385+ -04
396P Pt 100 in transmitter (orange wire) 396P-02-54
396P Pt 100 in sensor (green wire) 396P-01-55
396P Pt 100 in transmitter (orange wire) 396P-02-55
396R Pt 100 in transmitter (orange wire) 396R-54

QUICK START GUIDE FOR MODEL 4081pH/ORP
Before using this Quick Start Guide, please read “WHAT YOU NEED TO KNOW BEFORE
INSTALLING AND WIRING A ROSEMOUNT ANALYTICAL SENSOR TO THE MODEL 4081
pH/ORP TRANSMITTER” on the preceding page.
Section 1.1 Setup for the Models 381+-52, 385+-04, 396P-02-54, 396P-02-55 and 396R-54 without a junction box
A. The factory setting of the preamplifier switch is in the appropriate location, so no adjustment is necessary.
B. Mount the transmitter in the desired location. Most installations use PN 2002577, pipe mounting bracket.
C. Continue the start up with Section 2 Wiring.
Section 1.2 Setup for Sensor Models 381+-55, 385+-03, and 396P-01-55 without a junction box
A. This section shows how to set the preamplifier switch and should be done prior to installation of the transmitter.
B. Loosen the cover lock nut on the Model 4081pH/ORP transmitter until the tab disengages from the circuit end cap.
Unscrew and remove the cap. Unscrew the three bolts holding the circuit board stack in the enclosure.
C. Pull up on the display board. Do not disconnect the ribbon cable between it and the CPU board. The CPU and analog
boards are joined by a pin and socket connector along the bottom edge of the boards. Carefully pull the boards apart and
remove the CPU board. The analog board is on the bottom and remains in the enclosure. See Figure 1 below.
D. The analog board is shaped like a circle with an arc missing. Directly opposite the straight side is a slide switch. Change
the switch position to the "sensor or j-box" setting by sliding the switch closer to the edge of the board. See Figure 2 below.
E. To reassemble the stack, place the display board on the CPU board. Be sure the display board is properly oriented. The
small square window (the infrared detector for the remote controller) marks the top of the board. Insert the three bolts
through the holes. Align the bolts with the standoffs on the analog board and position the display and CPU boards on the
analog board. If the boards are properly aligned, the bolts will drop in place. Press along the bottom of the stack to seat the
pin and socket connector. Tighten the bolts, replace the cap and cover lock nut.
F. Mount the transmitter in the desired location. Most installations use PN 2002577, pipe mounting bracket.
FIGURE 2
FIGURE 1

Section 2 Wiring
A. Wire sensor Model 381+-55, 385+-03, or 396P-01-55 directly to the transmitter as shown in Figure 3.
B. Wire sensor Model 381+-52, 385+-04, 396P-02-55, 396P-02-55, or 396R-54 as shown in Figure 4.
C. Wire the 12 - 42.4 Vdc power supply to TB-15 and TB-16.
Section 3 Power up and Calibration
A. Apply dc power to the transmitter.
B. Remove the red protective "boot" from the sensor end. Rinse with deionized water and gently pat dry with a tissue (don't
wipe or rub). Place the pH sensor in the first buffer. Install the batteries in the remote controller.
Note: A pH measurement is only as good as the calibration, and the calibration is only as good as the buffers
used. A careful buffer calibration is the first step in making an accurate pH measurement. For best results, cali-
brate with buffers having the same temperature as the process. Allow time for the sensor and buffers to reach the
same temperature. If the process temperature is more than 10 C different from the buffer, allow at least 20 min-
utes. Be careful using buffers at high temperatures because the pH of many buffers is undefined above 60 C.
See the main instruction manual for further information.
C. Aim the infrared remote controller (IRC) at the LCD display.
Press CAL. CALIbrAtE will appear.
Press ENTER. CAL bF1 will appear.
D. With the sensor in the first buffer, be sure the glass bulb and the temperature element are completely submerged (i.e. 3
inches). Do not let the weight of the sensor rest on the glass bulb. Swirl the sensor to dislodge trapped bubbles.
Press ENTER. bF1 will flash until reading is stable. The measured pH value will appear in the main display.
Press
é
or
ê
until the small number next to bF1 matches the nominal pH buffer value (i.e. 4.01 pH).
Press ENTER to save the first calibration point. CAL bF2 will appear.
E. Remove the sensor from the first buffer, rinse, and place in the second buffer.
Press ENTER. bF2 will flash until the reading is stable. The measured pH value will appear in the main display.
Press
é
or
ê
until the small number next to bF2 matches the nominal pH buffer value (i.e. 10.00 pH).
Press ENTER to save the second calibration point.
F. Press RESET to return to the process display. The calibration is complete.
G. Place the sensor in the process. The start up is complete, although the following optional procedure may be useful.
NOTE: Diagnostics is turned OFF. See menu tree, Figure 5-4.
NOTES:
1. INSTRUMENT JUMPER SUPPLIED BY CUSTOMER.
2. DO NOT CONNECT BLUE WIRE INSIDE TRANSMITTER. INSULATE STRIPPED
END OF BLUE WIRE.
FIGURE 3 FIGURE 4
-VDC
-VDC
+VDC
+VDC

QUICK REFERENCE GUIDE
MODEL 4081PH/ORP
Automatic Buffer Calibration
Note: A pH measurement is only as good as the calibration, and the calibration is only as good as the buffers used. For best
results, calibrate with buffers having the same temperature as the process. Allow time for the sensor and buffers to reach the
same temperature. If the process temperature is more than 10°C different from the buffer, allow at least 20 minutes. Be careful
using buffers at high temperatures. The pH of many buffers is undefined above 60°C. See the main instruction manual for fur-
ther information.
A. Aim the infrared remote controller (IRC) at the LCD display.
Press HOLD on the IRC. HoLd OFF will appear.
Press
ê
to toggle the display to HoLd On.
Press ENTER to engage hold mode. The HOLD indicator will appear to the left of the pH value.
B. Press CAL. CALIbrAtE will appear.
Press ENTER. CAL bF1 will appear.
C. With the sensor in the first buffer, be sure the glass bulb and the temperature element are completely submerged (about 3
inches deep). Do not let the weight of the sensor rest on the glass bulb. Swirl the sensor to dislodge trapped bubbles.
Press ENTER. bF1 will flash until reading is stable. The measured pH value will appear in the main display.
Press
é
or
ê
until the small number next to bF1 matches the nominal pH buffer value (i.e., 4.01 pH).
Press ENTER to save the first calibration point. CAL bF2 will appear.
D. Remove the sensor from the first buffer, rinse and place in the second buffer.
Press ENTER. bF2 will flash until the reading is stable.
Press
é
or
ê
until the small number next to bF2 matches the nominal pH buffer value (i.e., 10.00 pH).
Press ENTER to save the second calibration point.
E. The calibration is complete, but the transmitter remains in the CALIbrAtE sub-menu for two minutes after ENTER is
pressed. Press RESET to return to the process display immediately.
F. Place sensor in the process.
G. (Optional) For maintenance purposes, track the slope of the pH electrode. The slope value of a new electrode is 59mV
per pH unit, and this value falls over time. The sensor should be changed when the slope nears 47.5 mV per pH. To view
the slope value, use the following steps.
Press CAL. CALIbrAtE will appear.
Press NEXT. Std will appear.
Press ENTER. The current pH value will appear next to Std.
Press ENTER. SLOPE and the current slope value will appear. Record this number as your slope value.
Press RESET to return to the process display.
H. After calibration, press HOLD. HoLd On will display.
Press
ê
to toggle the display to HoLd Off. Press ENTER to save this into memory.
The HOLD indicator on the display will turn off.
Standardizing to Match a Reference Instrument
Note: Standardization does not perform a true calibration. Regular buffer calibrations are still needed to update the sensor
slope value. For best results take your grab sample from a point as close as possible to the pH sensor and measure the sam-
ple at the same temperature as the process.
A. Aim the infrared remote controller (IRC) at the LCD display.
Press HOLD on the IRC. HoLd OFF will appear.
Press
ê
to toggle the display to HoLd On.
Press ENTER to engage the hold mode. The HOLD indicator will appear to the left of the pH value.
B. Press CAL. CALIbrAtE will appear.
Press NEXT. Std will appear.
Press ENTER. The measured value will appear.
C. Take a grab sample of the process and measure it with your reference instrument. Use the editing keys to adjust the value
on the Model 4081pH/ORP to match the reference instrument. Press ENTER to save the corrected pH value.
D. If the value is acceptable, the sensor slope is displayed. The slope has not been changed.
E. Press RESET to return to the process display.
F. After calibration, press HOLD. HoLd On will display.
Press
ê
to toggle the display to HoLd Off. Press ENTER to save this into memory.
The HOLD indicator on the display will turn off.

Technical Support Hotline:
For assistance with any technical problems, please contact our Customer Support Center (CSC) The CSC is staffed
from 5:00am to 5:00pm PST.
Phone (US only): 800-854-8257 Phone: 949-757-8500
Fax: 949-863-9159 Email: [email protected]
World Wide Web: www.RAuniloc.com
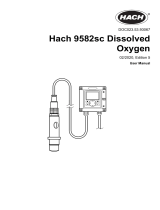
PROGRAM
CALIBRATE
GIMP 1000 V Er 4081
tEMP 25 C
InPut 58.9 ShoW FLt
nonE
rIMP 10
dIAGnOStIC tEMP
bUFFErdISPLAY ISOPOtntAL
CALIbrAtE
Std
tEMP AdJ
tEMP 25.0
tAUtO On
tMAn 25.0
tC 100-3
tYPE PH
tEMP C
OUtPUt Cur
COdE 000
bAUtO On
bUFFEr Std
tIME 04
PH 00.02
tCOEF 00.00
ISO 07.00
Snr 07.00
rOFFSt 060
dIAG OFF
IMPtC OFF
GWH 1000
GFH 1500
GWL 020
GFL 010
CAL 200
rEF LO
rFH 140
rWH 040
rWL 000
rFL 000
CAL bF1
bF 1
bF1 4.01
CAL bF2
bF 2
bF2 10.01
DIAGNOSE
Std 7.00
SLOPE 59.01
MENU
Sub-menu
PROMPT
Diag Message
Menu Tree for pH

i
MODEL 4081 pH/ORP TABLE OF CONTENTS
MODEL 4081 PH/ORP
MICROPROCESSOR ANALYZER
TABLE OF CONTENTS
Section Title Page
1.0 DESCRIPTION AND SPECIFICATIONS ................................................................ 1
1.1 Features................................................................................................................... 1
1.2 FOUNDATION Fieldbus Technology........................................................................ 2
1.3 Specifications - General for Model 4081 pH/ORP ................................................... 3
1.4 Specifications - pH ................................................................................................... 4
1.5 Specifications - ORP................................................................................................ 4
1.6 Ordering Information ............................................................................................... 4
2.0 INSTALLATION ....................................................................................................... 7
2.1 Unpacking and Inspection........................................................................................ 7
2.2 Pre-Installation Set Up ............................................................................................. 7
2.3 Orienting the Display Board ..................................................................................... 10
2.4 Mechanical Installation............................................................................................. 10
2.5 Power Supply Wiring................................................................................................ 13
3.0 WIRING.................................................................................................................... 14
3.1 General Information ................................................................................................. 14
3.2 Wiring Diagrams ...................................................................................................... 15
4.0 INTRINSICALLY SAFE AND EXPLOSION PROOF............................................... 31
4.1 Intrinsically Safe and Non-Incendive Installations.................................................... 31
4.2 Explosion Proof Installations.................................................................................... 31
5.0 OPERATION WITH REMOTE CONTROLLER ....................................................... 33
5.1 Overview .................................................................................................................. 33
5.2 Displays ................................................................................................................... 34
5.3 Infrared Remote Controller (IRC)............................................................................. 35
5.4 Menu Tree - pH........................................................................................................ 36
5.5 Diagnostic Messages - pH ....................................................................................... 36
5.6 Menu Tree -ORP...................................................................................................... 37
5.7 Diagnostic Messages - ORP.................................................................................... 37
5.8 Security .................................................................................................................... 38
6.0 CALIBRATION OF pH MEASUREMENTS ............................................................. 39
6.1 General .................................................................................................................... 39
6.2 Entering and Leaving the Calibrate Menu................................................................ 39
6.3 Using the Hold Function........................................................................................... 39
6.4 Temperature Calibration........................................................................................... 40
6.5 Auto Calibration ....................................................................................................... 41
6.6 Manual Calibration ................................................................................................... 43
6.7 Making the Transmitter Reading Match a Second pH Meter (Standardization)....... 45

MODEL 4081 pH/ORP TABLE OF CONTENTS
TABLE OF CONTENTS CONT’D
ii
7.0 PROGRAMMING FOR pH MEASUREMENTS....................................................... 47
7.1 General .................................................................................................................... 47
7.2 Entering and Leaving the Program Menu ................................................................ 47
7.3 Diagnostic Parameters............................................................................................. 49
7.4 Temperature Related Settings ................................................................................. 53
7.5 Display Units ............................................................................................................ 55
7.6 Buffer Calibration Parameters.................................................................................. 56
7.7 Isopotential Parameters ........................................................................................... 58
8.0 CALIBRATION OF ORP MEASUREMENTS .......................................................... 60
8.1 General .................................................................................................................... 60
8.2 Entering and Leaving the Calibrate Menu................................................................ 60
8.3 Using the Hold Function........................................................................................... 60
8.4 Temperature Calibration........................................................................................... 61
8.5 Standardization ........................................................................................................ 62
9.0 PROGRAMMING FOR ORP MEASUREMENTS.................................................... 63
9.1 General .................................................................................................................... 63
9.2 Entering and Leaving the Program Menu ................................................................ 63
9.3 Temperature Element............................................................................................... 64
9.4 Display Units ............................................................................................................ 65
9.5 Diagnostic Parameters............................................................................................. 66
10.0 MAINTENANCE ...................................................................................................... 69
10.1 Overview .................................................................................................................. 69
10.2 Transmitter Maintenance ......................................................................................... 69
10.3 pH Sensor Maintenance .......................................................................................... 70
10.4 ORP Sensor Maintenance ....................................................................................... 72
10.5 Calibration................................................................................................................ 72
11.0 TROUBLESHOOTING ........................................................................................... 73
11.1 Warning and Fault Messages .................................................................................. 73
11.2 Calibration Errors ..................................................................................................... 74
11.3 Troubleshooting - General ....................................................................................... 74
11.4 Troubleshooting When a Diagnostic Message is Showing ...................................... 74
11.5 Troubleshooting When No Diagnostic Message is Showing.................................... 86
11.6 Systematic Troubleshooting..................................................................................... 91
11.7 Displaying Diagnostic Variables ............................................................................... 93
11.8 Testing the Transmitter by Simulating pH ................................................................ 93
11.9 Factory Assistance and Repairs .............................................................................. 96

iii
MODEL 4081 pH/ORP TABLE OF CONTENTS
TABLE OF CONTENTS CONT’D
12.0 pH MEASUREMENTS............................................................................................. 97
12.1 General .................................................................................................................... 97
12.2 Measuring Electrode ................................................................................................ 98
12.3 Reference Electrode ................................................................................................ 98
12.4 Liquid Junction Potential .......................................................................................... 99
12.5 Converting Voltage to pH ......................................................................................... 99
12.6 Glass Electrode Slope ............................................................................................. 100
12.7 Buffers and Calibration ............................................................................................ 100
12.8 Isopotential pH ......................................................................................................... 101
12.9 Junction Potential Mismatch .................................................................................... 101
12.10 Sensor Diagnostics .................................................................................................. 102
12.11 Shields, Insulation, and Preamplifiers...................................................................... 102
13.0 ORP MEASUREMENTS.......................................................................................... 103
13.1 General .................................................................................................................... 103
13.2 Measuring Electrode ................................................................................................ 104
13.3 Reference Electrode ................................................................................................ 104
13.4 Liquid Junction Potential .......................................................................................... 104
13.5 Relating Cell Voltage to ORP................................................................................... 105
13.6 ORP, Concentration, and pH.................................................................................... 105
13.7 Interpreting ORP Measurements ............................................................................. 106
13.8 Calibration................................................................................................................ 107
14.0 GLOSSARY ............................................................................................................. 109
15.0 RETURN OF MATERIAL......................................................................................... 115
INDEX ...................................................................................................................... 116
Appendix Title Page
A 4081 pH RESOURCE AND TRANSDUCER BLOCK PARAMETERS .................. 118
B 4081 ORP RESOURCE AND TRANSDUCER BLOCK PARAMETERS ................ 125

iv
MODEL 4081 pH/ORP TABLE OF CONTENTS
TABLE OF CONTENTS CONT’D
LIST OF FIGURES
Number Title Page
2-1 Model 4081 pH/ORP Transmitter - Exploded Drawing of Circuit Board Stack ......... 8
2-2 Model 4081 pH/ORP Transmitter - Analog Board .................................................... 9
2-3 Model 4081 pH/ORP Transmitter - CPU Board........................................................ 10
2-4 Mounting the Model 4081 pH/ORP Transmitter on a Flat Surface ........................... 11
2-5 Using the Pipe Mounting Kit to Attach the Model 4081 pH/ORP to a pipe............... 12
2-6 Power Supply Wiring ................................................................................................ 13
2-7 Typical Fieldbus Network Electrical Wiring Configuration ........................................ 13
3-1 Wiring and Preamplifier Configurations for pH and ORP Sensors ........................... 14
3-2 Wire Functions for Models 399-02, 399-09, 381pH-30-41, and 381pHE-31-41.......
before removing BNC and terminating cable ........................................................... 18
3-3 Wire Functions for Models 399-02, 399-09, 381pH-30-41, and 381pHE-31-41.......
after removing BNC and terminating cable. Wire Functions for Models ..................
399-09-10-62, 381pH-30-42, and 381pHE-31-42 as received ................................. 18
3-4 Wiring Diagram for Models 399-02, 399-09, 381pH-30-41, and 381pHE-31-41 ......
after removing BNC and terminating cable. Wiring Diagram for Models 399-09-10-62,
381pH-30-42, and 381pHE-31-42 as received. Wiring directly to the transmitter .... 18
3-5 Wiring Diagram for Models 399-02, 399-09, 381pH-30-41 after removing BNC .....
and terminating cable. Wiring Diagram for Model 399-09-10-62, 381pH-30-42, and
381pH-31-42 as received. Wiring through a remote junction box to the transmitter 18
3-6 Wire Functions for Models 397-50, 397-54, 396-50, 396-54, 396R-50-60, 396R-54-60,
389-02-50, and 389-02-54 before removing BNC and terminating cable................. 19
3-7 Wire Functions for Models 397-50, 397-54, 369-50, 396-54, 396R-50-60, 396R-54-60,
389-02-50, and 389-02-54 after removing BNC and terminating cable. Wire .........
Functions for Models 397-54-62, 396-02-62, and 389-02-54-62 as received .......... 19
3-8 Wiring Diagram for Models 397-50, 397-54, 369-50, 396-54, 389-02-50, and.........
389-02-54 after removing BNC and terminating cable. Wiring Diagram for Models
397-54-62, 396-02-62, and 389-02-54-62 as received. Wiring Directly to the ........
Transmitter .................................................................................................... 19
3-9 Wiring Diagram for Models 397-50, 397-54, 369-50, 396-54, 396R-50-60, 396R-54-60,
389-02-50, and 389-02-54 after removing BNC and terminating cable. Wiring ......
Diagram for Models 397-54-62, 396-02-62, and 389-02-54-62 as received. ..........
Wiring Through a Remote Junction Box to the Transmitter ..................................... 19
3-10 Wire Functions for Models 396R-50, 396R-54, 396R-50-61, 396P-02-50, 396P-02-54,
396P-05-55, 385+-04, and 385+-41-52.................................................................... 20
3-11 Wiring Diagram for Models 396R-50, 396R-54, 396R-50-61, 396P-02-50, 396P-02-54,
396P-05-55, 385+-04, and 385+-41-52. Wiring Directly to the Transmitter ............ 20
3-12 Wiring Diagram for Models 396R-50, 396R-54, 396R-54-61, 396P-02-50, 396P-02-54,
396P-02-55, 385+-04, and 385+-41-52. Wiring Through a Sensor-Mounted ..........
Junction Box to the Transmitter ............................................................................... 20
3-13 Wire Functions for Models 396P-01-55, 385+-03, 381+-40-55, and 381+-43-55 .... 21
3-14 Wiring Diagram for Models 396P-01-55, 385+-03, 381+-40-55, and 381+-43-55.... 21
3-15 Wire Functions for Model 385+-02 ........................................................................... 22
3-16 Wiring Diagram for Model 385+-02 .......................................................................... 22
3-17 Wire Functions for Model 328A-07........................................................................... 23
3-18 Wiring Diagram for Model 328A ............................................................................... 23
3-19 Wiring Diagram for Model 320HP-10-55 .................................................................. 24
3-20 Wiring Diagram for Model 320HP-10-58 .................................................................. 24
3-21 Wire Functions for Model 399-33 ............................................................................. 25

v
MODEL 4081 pH/ORP TABLE OF CONTENTS
TABLE OF CONTENTS - CONT’D
LIST OF FIGURES - CONT’D
Number Title Page
3-22 Wiring Diagram for Model 399-33 ............................................................................ 25
3-23 Procedure for Removing BNC Connector and Preparing Coaxial Cable for ............
Connection to the Model 4081 pH/ORP Transmitter ................................................ 26
3-24 Preparation of Raw Connecting Cable ..................................................................... 27
4-1 CSA I.S. Label.......................................................................................................... 31
4-2 FM Explosion-Proof Installation for Model 4081 pH/ORP Transmitter ..................... 32A
4-3 CSA Intrinsically Safe Installation for Model 4081 pH/ORP Transmitter .................. 32B
4-4 FMRC Intrinsically Safe Installation for Model 4081 pH/ORP Transmitter ............... 32C
5-1 Functional Block Diagram for the Model 4081 pH/ORP Transmitter with.................
FOUNDATION Fieldbus ............................................................................................. 33
5-2 Process Display Screen ........................................................................................... 34
5-3 Program Display Screen .......................................................................................... 34
5-4 Infrared Remote Controller....................................................................................... 35
5-5 Menu Tree for pH ..................................................................................................... 36
5-6 Menu Tree for ORP ................................................................................................. 37
7-1 Suggested Glass Impedance Warning and Failure Limits ....................................... 49
7-2 Suggested Warning and Failure Limits for Low Impedance Reference Electrodes . 50
7-3 Suggested Warning and Failure Limits for High Impedance Glass Reference Electrodes 50
9-1 Suggested Warning and Failure Limits for Low Impedance Reference Electrodes . 66
9-2 Suggested Glass Impedance Warning and Failure Limits for a Glass Reference ...
Electrode .................................................................................................................. 66
10-1 Exploded View of Model 4081 pH/ORP Transmitter ................................................ 69
10-2 Checking the Potential of the Reference Electrode.................................................. 71
11-1 Warning Annunciation .............................................................................................. 73
11-2 Fault Annunciation.................................................................................................... 73
11-3 Three-Wire RTD .................................................................................................... 80
11-4 Temperature Simulation into the Model 4081 pH/ORP Transmitter ......................... 81
11-5 Troubleshooting Flow Chart/Preamplifier in Sensor-Mounted Junction Box or........
Remote Junction Box ............................................................................................... 91
11-6 Troubleshooting Flow Chart/Preamplifier in Transmitter or Built into Sensor ........... 92
11-7 pH Simulation When the Preamplifier is Located in the Transmitter ........................ 94
11-8 pH Simulation When the Preamplifier is Located in a Remote Junction Box or.......
in a Sensor-Mounted Junction Box .......................................................................... 94
11-9 Simulate pH Through Model 381+ Sensor Preamplifier........................................... 95
12-1 pH Measurement Cell............................................................................................... 97
12-2 Measuring Electrode (pH) ........................................................................................ 98
12-3 Cross-Section Through the pH Glass....................................................................... 98
12-4 Reference Electrode................................................................................................. 99
12-5 The Origin of Liquid Junction Potential..................................................................... 99
12-6 Glass Electrode Slope.............................................................................................. 100
12-7 Two-Point Buffer Calibration..................................................................................... 101
12-8 Liquid Junction Potential Mismatch .......................................................................... 102
13-1 ORP Measurement Cell ........................................................................................... 103
13-2 Measuring Electrode (ORP) ..................................................................................... 104
13-3 Reference Electrode................................................................................................. 104
13-4 The Origin of Liquid Junction Potential..................................................................... 105
13-5 Electrode Potential ................................................................................................... 105
13-6 ORP Measurement Interpretation ............................................................................ 106

vi
MODEL 4081 pH/ORP TABLE OF CONTENTS
TABLE OF CONTENTS CONT’D
LIST OF TABLES
Number Title Page
3-1 Wiring Diagrams for Model 399 Sensors.................................................................. 15
3-2 Wiring Diagrams for Model 397 Sensors.................................................................. 15
3-3 Wiring Diagrams for Model 396R Sensors ............................................................... 15
3-4 Wiring Diagrams for Model 396P Sensors ............................................................... 16
3-5 Wiring Diagrams for Model 396 Sensors.................................................................. 16
3-6 Wiring Diagrams for Model 389 Sensors.................................................................. 16
3-7 Wiring Diagrams for Model 385+ Sensors................................................................ 17
3-8 Wiring Diagrams for Model 381+ Sensors................................................................ 17
3-9 Wiring Diagrams for Model 381pHE and 381pH Sensors ........................................ 17
3-10 Wiring Diagrams for Model 328A Sensors ............................................................... 17
3-11 Wiring Diagrams for Model 320HP Sensors............................................................. 17
7-1 pH Settings List ....................................................................................................... 48
7-2 pH Values of Standard Buffer Solutions and the Temperature Range over which ...
pH Values are Defined ............................................................................................. 56
7-3 pH Values of Commercial (technical) Buffers and the Temperature Range over .....
which pH Values are Defined .................................................................................. 57
7-4 Standard and Technical Buffers Recognized by the Model 4081 pH Transmitter ... 57
9-1 ORP Settings List .................................................................................................... 63
10-1 Replacement Parts for Model 4081 pH Transmitter ................................................ 70
11-1 RTD Resistance Values ........................................................................................... 80

1
MODEL 4081 pH/ORP SECTION 1.0
DESCRIPTION AND SPECIFICATIONS
SECTION 1.0
DESCRIPTION AND SPECIFICATIONS
1.1 Features
1.2
FOUNDATION Fieldbus Technology
1.3 Specifications - General for Model 4081 pH/ORP
1.4 Specifications - pH
1.5 Specifications - ORP
1.6 Ordering Information
• REMOTE COMMUNICATION IS SIMPLE; use the handheld infrared remote controller,
DeltaV
1
, or FOUNDATION
2
Fieldbus host.
• LARGE TWO LINE DISPLAY shows pH or ORP, temperature, and output signal.
• SIMPLE, INTUITIVE menus make programming and calibrating easy.
• AUTOMATIC TWO-POINT BUFFER CALIBRATION reduces errors.
• SOLUTION TEMPERATURE COMPENSATION converts the pH measured at any tempera-
ture to the pH at 25°C.
• CONTINUOUS DIAGNOSTICS monitor sensor performance and warn the user of impend-
ing problems.
• ROBUST NEMA 4X and NEMA 7 ENCLOSURE protects the transmitter from harsh plant
environments.
• SOLUTION TEMPERATURE COEFFICIENT allows pH adjustment for actual pH changes
with temperature.
• NON-VOLATILE EEPROM MEMORY retains program settings and calibration data during
power failures.
1.1 FEATURES
APPLICATION: The Model 4081pH/ORP Transmitter
with the appropriate pH or ORP sensor measures pH
between 0 and 14 and ORP between -1400 and 1400
millivolts. Converting the transmitter from a pH instru-
ment to an ORP instrument takes only seconds.
REMOTE COMMUNICATIONS: Remote communica-
tions with the Model 4081 pH/ORP transmitter is easy.
The handheld, push button infrared remote controller
works from as far away as six feet. The transmitter also
communicates via any FOUNDATION fieldbus host,
such as the Fisher Rosemount DeltaV system.
DISPLAY: The 0.8-inch high LCD main display means
pH and ORP values are easy to read even at a distance.
Temperature reading also appears in a 0.3 inch high dis-
play.
MENUS: Menu formats for calibration and programming
are simple and intuitive. Prompts guide the user through
the basic procedures. Diagnostic and error messages
appear in plain language. There are no annoying error
codes to look up.
1. DeltaV is a trademark of Fisher-Rosemount.
2. FOUNDATION is a registered trademark of Fieldbus Foundation.

2
CALIBRATION: Two-point, temperature-corrected buffer
calibration is standard. To reduce errors caused by impa-
tient operators, the Model 4081 transmitter does not
accept calibration data until programmed stability limits
have been met. If data are not acceptable, the transmitter
displays an error message and does not update the cali-
bration. The transmitter recognizes buffer values common-
ly used in the world today. Manual two-point and one-point
calibration is also available.
AUTOMATIC TEMPERATURE COMPENSATION:
External 3 or 4 wire PT100 RTD, PT1000 RTD, or 3K
Balco thermistor located in the sensor compensates the
pH reading for temperature fluctuations. Compensation
covers the range -15 to 130°C (5 to 270°F). Manual tem-
perature compensation is program selectable.
SOLUTION TEMPERATURE COMPENSATION: The
Model 4081 pH transmitter features solution temperature
compensation. The transmitter calculates and displays the
pH at 25°C from the pH measured at any temperature.
The temperature coefficient of the liquid being measured
must be known.
SENSOR DIAGNOSTICS: Continuous diagnostics alert
the user to impending or existing sensor failure. Diagnostic
messages in plain language aid in troubleshooting. The
manual contains a thorough, step-by-step troubleshooting
guide.
HOUSING: The Model 4081 pH/ORP transmitter housing
meets NEMA 4X standards. The transmitter tolerates out-
door and harsh plant environments. The housing also
meets NEMA 7B explosion-proof standards.
HAZARDOUS AREA INSTALLATION: Circuits in the
Model 4081 pH/ORP transmitter are designed and built to
be intrinsically safe when used with the appropriate safety
barrier.
OUTPUT: The digital FOUNDATION fieldbus output signal
is fully adjustable between 0 and 14 pH and between -
1400 and 1400 mV.
1.2 FOUNDATION FIELDBUS TECHNOLOGY
F
OUNDATION fieldbus is an all digital, serial, two-way
communication system that interconnects field equipment
such as sensors, actuators, and controllers. Fieldbus is a
Local Area Network (LAN) for instruments used in both
process and manufacturing automation with built-in capa-
bility to distribute the control application across the net-
work. The fieldbus environment is the base level group of
digital networks in the hierarchy of plant networks.
The fieldbus retains the desirable features of the 4 - 20
mA analog system, but uses a digital signal. Fieldbus
transmitters include a standardized physical interface to
the wire, bus powered devices on a single pair of wires,
and intrinsic safety options, and enables additional capa-
bilities, such as:
* increased capabilities due to full digital communica-
tions,
* reduced wiring and wire terminations due to multiple
devices on one pair of wires,
* increased selection of suppliers due to interoperability,
* reduced loading on control room equipment with the
distribution of some control and input/output functions
to field devices.
* speed options for process control and manufacturing
applications.
MODEL 4081 pH/ORP SECTION 1.0
DESCRIPTION AND SPECIFICATIONS

3
MODEL 4081 pH/ORP SECTION 1.0
DESCRIPTION AND SPECIFICATIONS
1.3 SPECIFICATIONS -GENERAL
FOR MODEL 4081 pH/ORP
Case: Cast aluminum containing less than 6% magnesium.
NEMA 4X (IP65), NEMA 7 (explosion-proof)
Epoxy-polyester painted over low-copper aluminum.
Neoprene O-rings on cover.
Dimensions: 6.3 in. x 6.9 in. x 6.4 in. (160 mm x 175 mm x
161 mm); diameter 6.1 in (155 mm)
Conduit Openings: 2 X 3/4 in. FNPT
Reference Impedance: Transmitter accepts high impedance
(i.e. glass) reference electrodes as well as low impedance
(i.e. silver-silver chloride) reference electrodes.
Output: Digital FOUNDATION fieldbus
Response Time: Display reaches 95% of final reading within
10 seconds.
Temperature Sensors: The following RTDs can be used with
the Model 4081 pH/ORP transmitter:
3 and 4 wire Pt 100 RTDs
3 and 4 wire Pt 1000 RTDs
3000 ohm Balco RTD
Transmitter can also be used with two-wire RTDs.
Temperature Range: 5°F to 248°F (-15°C to 120°C)
Local Display: Two line LCD; first line shows process vari-
able (pH or ORP), second line shows temperature and
output signal. When triggered, fault and warning mes-
sages alternate with temperature and output readings.
Process variable: 7 segment LCD, 0.8 in. (20 mm) high
Temperature/output: 7 segment LCD, 0.3 in. (7 mm) high
Display board can be rotated 90 degrees clockwise or
counterclockwise.
During calibration and programming, messages and
prompts appear in the temperature/output area.
Power Supply and Load Requirements: A minimum power
supply voltage of 9 Vdc to 32 Vdc is required; Intrinsically
Safe installations may be limited to a maximum of 2-3
transmitters per node, depending on the barrier used.
Security: User selected security code prevents
accidental changes to program settings.
Ambient Temperature: -4 to 149°F (-20 to 65°C)
Relative Humidity: 0 to 95% (with covers sealed)
Storage Temperature: -22 to 176°F (-30 to 80°C)
F
OUNDATION
Fieldbus:
Two AI Function Blocks: pH and temperature
Execution time: 75 milliseconds
Hazardous Area Protection: The Model 4081 pH/ORP is
certified to the following:
NEMA 7B: Explosion proof housing
CE: EMI/RFI Certification
EN50081-1
EN50082-2
Hazardous Area Classification:
Explosion Proof:
FM: Class I, Div. 1, Groups B, C & D
Class II, Div. 1, Groups E, F, & G
Class III, Div. 1
CSA: Class I, Div. 1, Groups C& D
Class I, Div. 2, Groups A, B, C & D
Class II, Div. 2, Groups E, F & G
Class III, Div. 1
Intrinsic Safety:
FM: Class I, II & III, Div. 1
T4 T AMB= 40°C; T3AT AMB= 70°C
CSA: Class I, Div. 1
T 3C T AMB=40°C; T3 T AMB=80°C
CENELEC: EEx ia IIC
T5 Tamb=40°C; T4 Tamb=60°C
Non-Incendive:
FM: Class I, Div. 2, Groups A, B, C & D
CSA: Class I, Div. 2, Groups A, B, C & D T5
(Tamb=40°C)
Weight/Shipping Weight: 10 lb/10 lb (4.5 kg/4.5 kg).
Weights and shipping weights are rounded to the nearest
whole pound.

4
MODEL 4081 pH/ORP SECTION 1.0
DESCRIPTION AND SPECIFICATIONS
1.6 ORDERING INFORMATION
The Model 4081 pH/ORP two-wire microprocessor transmitter is housed in a NEMA 4X and NEMA 7 case.
Communication with the transmitter is through a hand-held infrared remote controller, DeltaV, or FOUNDATION fieldbus
host. Automatic temperature compensation is standard, and the transmitter can be programmed to convert measured pH
to pH at 25°C. Continuous sensor diagnostics are standard.
MODEL
4081pH/ORP FOUNDATION FIELDBUS TWO-WIRE MICROPROCESSOR TRANSMITTER
Code REQUIRED SELECTION
01-20 LCD (Infrared Remote Control - included), 9.4 lb/4.3 kg
01-21 LCD (Infrared Remote Control - not included)
1.4 SPECIFICATIONS - pH
pH Input Range: 0 to 14 pH
Temperature Input Range: 5°F to 248°F (-15°C to 120°C)
Output Scale Expansion: Continuously expandable
between pH 0 and 14
Accuracy at 25°C: ±0.01 pH
Repeatability at 25°C: ±0.01 pH
Resolution: 0.01 pH and 0.1°C or °F
Stability at 25°C: 0.25% per year
Temperature Compensation: Automatic or manual
between 5°F to 248°F (-15°C to 120°C)
Solution Temperature Compensation: Transmitter will
convert pH measured at any temperature to the pH at
25°C. Temperature coefficient is programmable
between -0.044 pH/°C and 0.028 pH/°C
Calibration: Automatic two-point and manual two-point
buffer calibration. For automatic calibration, the trans-
mitter recognizes NIST, DIN 19266 and 19267,
JIS 8802, BSM, Merck, and Ingold buffers.
1.5 SPECIFICATIONS - ORP
ORP Input Range: -1400 to 1400 mV
Temperature Input Range: 5°F to 248°F (-15°C to 120°C)
Accuracy at 25°C: ±1 mV
Repeatability at 25°C: ±1 mV
Resolution: 1 mV and 0.1°C or °F
Stability at 25°C: 0.25% per year
Code AGENCY APPROVALS (no selection required)
67 FM approved, Intrinsically Safe (when used with approved sensor and safety barrier) and Explosion Proof
69 CSA approved, Intrinsically Safe (when used with approved sensor and safety barrier) and Explosion Proof
73 CENELEC approved, Intrinsically Safe (safety barrier required)
4081pH - 01 - 20 - 67 EXAMPLE

5
MODEL 4081 pH/ORP SECTION 1.0
DESCRIPTION AND SPECIFICATIONS
MODEL 4081 pH/ORP TRANSMITTER-SENSOR COMPATIBILITY CHART
PREAMPLIFIER LOCATION
Sensor-mounted Remote
MODEL pH ORP Sensor junction box junction box Transmitter
320B x see note
320HP x see note x
330B x see note
328A x x x
370 x x x x
371 x x x x
381pH x x x x
381pHE x x x x
381 x x x
381+ x x x x
385 x x x x
385+ x x x x x x
389 x x x x
396 x x x
396P x x x x x
396R x x x x x
397 x x x
398 x x x x
398R x x x x x
399 x x x x
399-33 x x
GP1 x x x x
NOTE: Preamplifier installed in junction box attached to sensor mounting plate.
Notes: 1. Special Quotation No. SQ5856 2. Remote J-box/Preamplifier assembly PN 23555-00 3. Sensor Head J-box PN 23709-00
pH SENSOR PREAMP LOCATION DIAGNOSTIC CAPABILITY
320B-99
1
Sensor junction box only Glass only
320HP-55
1
Transmitter only or remote junction box Glass only
328A Transmitter or remote junction box
2
Glass only
381 pHE-31-41-52 Transmitter or remote junction box
2
Glass only
381+ Transmitter, sensor or remote junction box Glass and Reference
385-53 Transmitter or remote junction box
2
Glass only
385+ Transmitter, Sensor or remote junction box
2
Glass and Reference
389-02-54 Transmitter or remote junction box
2
Glass only
396 TUpH Transmitter, Sensor or remote junction box
2
Glass only
396P TUpH Transmitter, Sensor or remote junction box
2
Glass and Reference
399-09 Transmitter or remote junction box
2
Glass only
396R Transmitter or remote j-box
2
sensor head
3
Glass and Reference
ORP SENSOR PREAMP LOCATION DIAGNOSTIC CAPABILITY
330B-99
1
Sensor None
381pHE-31-41-52 Transmitter or remote junction box
2
None
381+ Transmitter, sensor or remote junction box Reference only
385-53 Transmitter or remote junction box
2
None
385+ Transmitter Sensor or remote junction box
2
Reference only
389-02-12-54 Transmitter or remote junction box
2
None
396P Transmitter Sensor or remote junction box
2
Reference only
396R Transmitter or remote junction box
2
sensor head
3
Reference only
399-33 Transmitter or remote junction box None

6
MODEL 4081 pH/ORP SECTION 1.0
DESCRIPTION AND SPECIFICATIONS
MODEL/PN DESCRIPTION SHIPPING WEIGHT
23572-00 Infrared remote controller, includes two 1.5 V AAA alkaline batteries 1 lb/0.5 kg
23555-00 Remote junction box, includes preamplifier (PN 23557-00), 10 terminals on 2 lb/1.0 kg
sensor side and 12 terminals on transmitter side (additional two terminals
supply power from transmitter to the preamplifier)
23557-00 Preamplifier for remote junction box (PN 23555-00) 1 lb/0.5 kg
23550-00 Remote junction box without preamplifier, 12 terminals on sensor side and 2 lb/1.0 kg
12 terminals on transmitter side
23646-01 Extension cable for connecting transmitter to junction box, 10 conductors with 1 lb per 10 ft
1 internal drain wire, cable is terminated and ready for use, specify length 1.0 kg per 10 m
(in feet) when ordering
9200273 Extension cable for connecting transmitter to junction box, 10 conductors with 1 lb per 10 ft
1 internal drain wire, cable is not terminated, customer must prepare cable 1.0 kg per 10 m
ends, specify length (in feet) when ordering
2002577 Pipe mounting kit for 2-inch pipe, complete, includes mounting bracket, 2 lb/1.0 kg
U bolts, and all necessary fasteners
9241178-00 Stainless steel tag, specify marking, shipped loose 1 lb/0.5 kg
9120531 BNC adapter, BNC female to two leads 1 lb/0.5 kg
9210012 Buffer solution, 4.01 pH at 25°C, potassium hydrogen phthalate solution, NIST 2 lb/1.0 kg
pH scale buffer, 16 oz (473 mL)
9210013 Buffer solution, 6.86 pH at 25°C, potassium dihydrogen phosphate and 2 lb/1.0 kg
sodium hydrogen phosphate solution, NIST pH scale buffer, 16 oz (473 mL)
9210014 Buffer solution, 9.18 pH at 25°C, sodium tetraborate solution, NIST pH scale 2 lb/1.0 kg
buffer, 16 oz (473 mL)
R508-16OZ ORP standard, 475 ± 20 mV at 25°C, iron (II) ammonium sulfate and iron (III) 2 lb/1.0 kg
ammonium sulfate in 1 M sulfuric acid, 16 oz (473 mL)
5104081P Instruction manual 1 lb/0.5 kg
ACCESSORIES
* Weights rounded up to nearest pound or nearest 0.5 kg.
/