VDP130RGBLD11
RGB LASER PROJECTOR – 11 DMX CHANNELS
RGB LASERPROJECTOR – 11 DMX-KANALEN
PROJECTEUR LASER RGB – 11 CANAUX DMX
PROYECTOR LÁSER RGB – 11 CANALES DMX
RGB LASERPROJEKTOR – 11 DMX-KANÄLE
USER MANUAL
GEBRUIKERSHANDLEIDING
NOTICE D’EMPLOI
MANUAL DEL USUARIO
BEDIENUNGSANLEITUNG

VDP130RGBLD11 HQPOWER
2

VDP130RGBLD11 HQPOWER
3
VDP130RGBLD11 – RGB LASER PROJECTOR – 11 DMX CHANNELS
1. Introduction
To all residents of the European Union
Important environmental information about this product
This symbol on the device or the package indicates that disposal of the device after its lifecycle could harm
the environment.
Do not dispose of the unit (or batteries) as unsorted municipal waste; it should be taken to a specialized
company for recycling.
This device should be returned to your distributor or to a local recycling service.
Respect the local environmental rules.
If in doubt, contact your local waste disposal authorities.
Thank you for choosing HQPOWER! Please read the manual thoroughly before bringing this device into service. If the
device was damaged in transit, don't install or use it and contact your dealer. Contents: 1 x laser projector, 1 x power
cable, 1 x DMX cable, 1 x DB25 cable and this user manual.
2. Safety Instructions
• Damage caused by disregard of certain guidelines in this manual is not covered by the warranty and the dealer
will not accept responsibility for any ensuing defects or problems.
• A qualified technician should install and service this device.
• This device is designed for professional use on stage, in discos, theatres, etc. The VDP130RGBLD11 should only
be used indoors and connected to an alternating current of max. 240VAC / 50Hz.
• Make sure that the available voltage does not exceed the voltage stated in the specifications of this manual.
• Do not crimp the power cord and protect it against damage. Have an authorised dealer replace it if necessary.
• Disconnect the device from the mains to clean it or when it is not in use. Handle the power cord by the plug only.
• Always ground the projector electrically. Failure to do so may damage your projector.
• There are no user serviceable parts inside.
• Never operate the projector with missing covers or damaged housing.
• Never open the housing of the projector. Opening the housing will defeat the interlocks inside the projector and
cause the laser output to stop.
• Never attempt to bypass the fuses. Always replace defective fuses with fuses of the specified type and ratings.
• Never cover the aperture with filters or other materials.
• Note that damage caused by user modifications to the device is not covered by the warranty.
• Use the original packaging if the device is to be transported.
• All modifications of the device are forbidden for safety reasons.
• Keep the device away from children and unauthorised users.
• Connect the device to the mains with the power plug. Do not connect it to a dimming pack.
Be very careful during the installation: touching live wires can cause life-threatening electroshocks.
Do not touch the device during operation as the housing heats up.
Keep this device away from rain and moisture.
Unplug the mains lead before servicing, removing or installing the projector.
DANGER! Class IIIB laser product. Avoid direct eye contact with the laser light. Never intentionally
expose eyes to direct laser radiation and do not look at the laser through binoculars, even at a
distance.

VDP130RGBLD11 HQPOWER
4
3. Installation
a) Fuse
• Only fit or replace a fuse when the device is unplugged from the mains.
• Replace a blown fuse with a fuse of the same type and rating (see “Technical Specifications”):
1. Remove the fuse holder using a flat-head screwdriver.
2. Remove the old fuse and install a new one.
3. Replace the fuse holder.
b) Mounting the Device
• Have the device installed by a qualified person, respecting EN 60598-2-17 and all other applicable norms.
• The carrying construction must be able to support 10 times the weight of the device for 1 hour without deforming.
• The installation must always be secured with a secondary attachment e.g. a safety cable.
• Never stand directly below the device when it is being mounted, removed or serviced. Have a qualified technician
check the device once a year and once before you bring it into service.
• Install the device out of reach of unauthorized persons, i.e. at a minimum height of 2.5m, in a location with few
passers-by.
• Overhead mounting requires extensive experience: calculating workload limits, determining the installation
material to be used… Have the material and the device itself checked regularly. Do not attempt to install the
device yourself if you lack these qualifications as improper installation may result in injuries.
• Adjust the desired inclination angle via the mounting bracket and tighten the bracket screws.
• Make sure there is no flammable material within a 0.5m radius of the device.
• Respect a minimum distance of 0.5m between the device’s light output and any illuminated surface.
• Do not place any object within a distance of 0.5m of the projector’s fan and air vents.
• Avoid illuminating the projector.
• Have a qualified electrician carry out the electric connection.
• Connect the device to the mains with the power plug. Do not connect it to a dimming pack.
• The installation has to be approved by an expert before the device is taken into service.
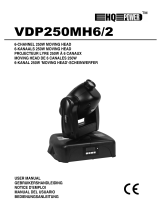
4. Description
1. X adjustment
2. Y adjustment
3. R adjustment
4. G adjustment
5. B adjustment
6. sound sensitivity
7. DIP switches
8. DB25 connector
9. DMX out
10. DMX in
11. interlock
12. key switch
13. power on/off
14. power socket
15. ILDA connector

VDP130RGBLD11 HQPOWER
5
5. Operation
DIP Switch Chart Function
1 2 3 4 5 6 7 8 9 10
X X X X X X X X X 1 Auto Mode
X X X X X X X X 1 1 Sound Control
Set DMX Address 0 DMX Mode
0 = off; 1 = on; X = off or on
• Auto Mode
Activate the auto mode by setting the DIP switches according to the table above.
• Sound-Controlled Mode
Activate the sound control mode by setting the DIP switches according to the table above. Adjust the
sensitivity via the adjustment knob. The laser will react to the rhythm of the music.
• Computer-Controlled Mode
The laser projector can be controlled via the computer using the FlashLite software.
• ILDA Connection
Connect the laser projector to the computer through the ILDA connection and the DB25 cable. The effects can
be controlled through the Pangolin
®
software by Pangolin
®
Laser Systems, Inc.
• DMX Mode
Activate the sound control mode by setting the DIP switches according to the table above.
Detailed DMX Values per Channel
Channel Function From To Description
0 31 DMX control off
32 127 Basic DMX control
1 Enabling
128 255 Standard DMX control
0 30 Page 1
31 61 Page 2
62 92 Page 3
93 123 Page 4
124 154 Page 5
155 185 Page 6
186 216 Page 7
217 247 Page 8
2 Page Selection
248 255 Page 9
0 4 1
5 9 2
10 14 3
15 19 4
… … …
225 229 46
230 234 47
3 Image Selection
235 255 48

VDP130RGBLD11 HQPOWER
6
0 24 Pause
25 127 From 1% to 10%
4 Speed
128 255 From 11% to 100%
5 Fade 0 255 From dark to full brightness
6 Zoom 0 255 From 0% to 100%
7 Size X 0 255 Adjust horizontal rotation
8 Size Y 0 255 Adjust vertical rotation
9 Spinning 0 255 From 0° to 360°
10 Position X 0 255 From pan left to pan right
11 Position Y 0 255 From tilt down to tilt up
DMX512 Connection
Connect the provided XLR cable to the female 3-pin XLR output of your controller and the other side to the
male 3-pin XLR input of the VDP130RGBLD11. Multiple VDP130RGBLD11s can be linked through serial
linking. The linking cable should be a two-core screened cable with XLR input and output connectors.
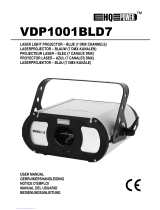
DMX512 Chain with Termination
A DMX terminator is recommended for installations where the DMX cable has to run a
long distance or is in an electrically noisy environment (e.g. discos). The terminator
prevents corruption of the digital control signal by electrical noise. The DMX terminator is
simply an XLR plug with a 120Ω resistor between pins 2 and 3, which is then plugged into
the XLR output socket of the last device in the chain.
Please see illustrations.
DMX Start Address
All DMX-controlled devices need a digital start address so that the correct device responds to the signals. This
start address is the channel number from which the device starts to “listen” to the DMX controller. Enter the
correct number and read it from the display located on the base of the VDP130RGBLD11.
You can use the same starting address for a whole group of devices or enter an individual one for every
device.
When all devices have the same address, all the VDP130RGBLD11s will “listen” to the control signal on one
particular channel. In other words: changing the settings of one channel will affect all devices simultaneously.
If you set different addresses, each device will “listen” to a separate channel number. Changing the settings of
one channel will only affect the device in question.
In the case of the 11-channel VDP130RGBLD11, you will have to set the start address of the first
VDP130RGBLD11 to 1, the second VDP130RGBLD11 to 12 (1 + 11), the third to 23 (12 + 11) and so on.
6. Troubleshooting
Problem Origin Solution
Main power off Turn on the device
Not plugged in Plug the device into the mains
No power
Fuse Check that the fuse is intact and serviceable
Check the presence of a proper connection between the control
and the device
Individually check all cables for continuity on all three pins
DMX cable
Check the polarity of the DMX cable
Poor signal from control Check the DMX cables and control DMX selection switch if
present
Erratic
output
DMX address offset Reassign the DMX address via the DIP switches; remove and
reinsert the power cable

VDP130RGBLD11 HQPOWER
7
Clean the optics Laser
appears dim
Dirty optics
Check that the fade is set at 100%
7. Technical Specifications
Power Supply max. 240VAC / 50Hz
Fuse fast blow 2A, 250VAC (5 x 20mm) (order code FF2N)
Laser Classification IIIB
Laser
Red 635nm / 80mW
Green 532nm / 30mW
Blue 473nm / 20mW
Cooling System TE cooled
Scanning Speed 12k
Operation Modes DMX512, auto and sound activation, computer software
Dimensions 500 x 280 x 150mm
Total Weight 8.25kg
For more info concerning this product, please visit our website www.hqpower.com.
The information in this manual is subject to change without prior notice.
VDP130RGBLD11 – RGB LASERPROJECTOR – 11 DMX-KANALEN
1. Inleiding
Aan alle ingezetenen van de Europese Unie
Belangrijke milieu-informatie betreffende dit product
Dit symbool op het toestel of de verpakking geeft aan dat, als het na zijn levenscyclus wordt weggeworpen,
dit toestel schade kan toebrengen aan het milieu.
Gooi dit toestel (en eventuele batterijen) niet bij het gewone huishoudelijke afval; het moet bij een
gespecialiseerd bedrijf terechtkomen voor recyclage.
U moet dit toestel naar uw verdeler of naar een lokaal recyclagepunt brengen.
Respecteer de plaatselijke milieuwetgeving.
Hebt u vragen, contacteer dan de plaatselijke autoriteiten inzake verwijdering.
Dank u voor uw aankoop! Lees deze handleiding grondig voor u het toestel in gebruik neemt. Werd het toestel
beschadigd tijdens het transport, installeer het dan niet en raadpleeg uw dealer. Inhoud: 1 x laserprojector, 1 x
voedingskabel, 1 x DMX-kabel, 1 x DB25-kabel en deze handleiding.
2. Veiligheidsinstructies
Verzeker u ervan dat het toestel niet aa
ngesloten is op een stroombron alvorens het toestel te
installeren, te verplaatsen of schoon te maken.
GEVAAR! Laserklasse IIIB. Vermijd direct oogcontact met de laserstraal. Kijk nooit direct in de
laserstraal en observeer de laserstraal nooit door optische instrumenten zoals een verrekijker, zelfs
niet op grote afstand.
Wees voorzichtig bij de installatie: raak geen kabels aan die onder stroom staan om dodelijke elektroshocks
te vermijden.
Raak het toestel niet aan wanneer het in gebruik is: de behuizing wordt warm.
Bescherm dit toestel tegen regen en vochtigheid.

VDP130RGBLD11 HQPOWER
8
• De garantie geldt niet voor schade door het negeren van bepaalde richtlijnen in deze handleiding en uw dealer zal
de verantwoordelijkheid afwijzen voor defecten of problemen die hier rechtstreeks verband mee houden.
• Laat dit toestel installeren en onderhouden door een geschoolde technicus.
• Dit toestel is ontworpen voor professioneel gebruik op podia, in disco's, enz. U mag dit toestel enkel binnenshuis
gebruiken en aansluiten op een wisselspanning van maximum 240VAC / 50Hz.
• De beschikbare netspanning mag niet hoger zijn dan de spanning in de specificaties achteraan de handleiding.
• De voedingskabel mag niet omgeplooid of beschadigd zijn. Laat uw dealer zo nodig een nieuwe kabel plaatsen.
• Trek de stekker uit het stopcontact (trek niet aan de kabel!) voordat u het toestel reinigt en als u het niet gebruikt.
• Zorg voor een elektrische aarding van het toestel om beschadiging aan de projector te voorkomen.
• De gebruiker mag geen onderdelen vervangen.
• Gebruik de projector nooit wanneer de behuizing niet goed is gesloten.
• Open de behuizing van de projector niet. Wanneer u de behuizing opent, zal het beveiligingssysteem binnenin de
projector de laserstraal afbreken.
• Overbrug de zekering nooit. Vervang een defecte zekering met een zekering van hetzelfde type.
• Bedek nooit de lensopening met filters of andere objecten.
• Schade door wijzigingen die de gebruiker heeft aangebracht aan het toestel vallen niet onder de garantie.
• Gebruik de oorspronkelijke verpakking wanneer u het toestel vervoert.
• Om veiligheidsredenen mag de gebruiker geen wijzigingen aanbrengen aan het toestel.
• Houd dit toestel uit de buurt van kinderen en onbevoegden.
• Sluit het toestel via de stekker aan op het lichtnet. Sluit het niet aan op een dimmerpack.
3. Installatie
a) Zekering
• U mag een zekering enkel plaatsen of vervangen wanneer het toestel niet is aangesloten op het lichtnet.
• Vervang een gesprongen zekering door een zekering van hetzelfde type en met dezelfde specificaties (zie
“Technische specificaties”). Ga als volgt te werk:
1. Verwijder de zekeringhouder met behulp van een schroevendraaier met platte kop.
2. Verwijder de oude zekering en breng de nieuwe in.
3. Plaats de zekeringhouder terug in het toestel.
b) Het toestel monteren
• Laat een geschoolde technicus dit toestel installeren conform EN 60598-2-17 en andere toepasselijke normen.
• De constructie waaraan het toestel wordt bevestigd, moet gedurende 1 uur 10 x het gewicht van dit toestel
kunnen dragen zonder te vervormen.
• Maak het toestel ook vast met een veiligheidskabel.
• Sta nooit recht onder het toestel wanneer u het monteert, verwijdert of schoonveegt. Laat het toestel controleren
door een geschoolde technicus voor u het in gebruik neemt en laat het 1 x per jaar volledig nakijken.
• Installeer dit toestel op een plaats waar niemand langs moet lopen en op een minimale hoogte van 2.5m.
• Een degelijke praktijkervaring is vereist voor de plaatsing van dit toestel. U moet de maximumbelasting van de
draagconstructie kunnen berekenen, weten welk constructiemateriaal u kunt gebruiken en u moet het gebruikte
materiaal en het toestel af en toe laten nakijken. Monteer het toestel niet zelf indien u er geen ervaring mee heeft.
Een slechte montage kan leiden tot verwondingen.
• Regel de gewenste invalshoek door middel van de montagebeugel en draai de regelschroeven stevig aan.
• Verwijder alle brandbaar materiaal in een straal van 0.5m rond het toestel.
• Behoud een afstand van minimaal 0.5m tussen het toestel en het belichte oppervlak.
• Plaats geen objecten binnen een straal van 0.5m van de ventilator en verluchtingsgaten.
• Verlicht de projector niet.
• Een geschoolde elektricien moet het toestel aansluiten.
• Sluit het toestel via de stekker aan op het lichtnet. Sluit het niet aan op een dimmerpack.
• De installatie moet voor het eerste gebruik gekeurd worden door een expert.

VDP130RGBLD11 HQPOWER
9
4. Omschrijving
1. instelling X
2. instelling Y
3. instelling R
4. instelling G
5. instelling B
6. gevoeligheid
7. DIP-schakelaars
8. DB25-aansluiting
9. DMX-uitgang
10. DMX-ingang
11. interlock
12. vergrendeling
13. voedingsknop
14. voedingsaansluiting
15. ILDA-aansluiting
5. Gebruik
Tabel DIP-schakelaars Functie
1 2 3 4 5 6 7 8 9 10
X X X X X X X X X 1 Automatisch
X X X X X X X X 1 1 Muziekgestuurd
DMX-adres 0 DMX-modus
0 = uit; 1 = aan; X = uit of aan
• Automatisch
Schakel de automatische modus in met behulp van de DIP-schakelaars (zie tabel hierboven).
• Muziekgestuurd
Schakel de muziekgestuurde modus in met behulp van de DIP-schakelaars (zie tabel hierboven). Regel de
gevoeligheid met behulp van de knop. De laserprojector reageert nu op het ritme van de muziek.
• Computergestuurde modus
De laserprojector kan met behulp van de FlashLite-software via de computer gestuurd worden.
• ILDA-aansluiting
Verbind de laserprojector met de computer via de ILDA-aansluiting en de DB25-kabel. De effecten kunnen
met de Pangolin
®
-software van Pangolin
®
Laser Systems, Inc. gestuurd worden.
• DMX-modus
Schakel de DMX-modus in met behulp van de DIP-schakelaars (zie tabel hierboven).

VDP130RGBLD11 HQPOWER
10
Gedetailleerde DMX-waarden per kanaal
Kanaal Functie Van Tot Omschrijving
0 31 DMX-sturing uitgeschakeld
32 127 Basis DMX-sturing
1 Inschakeling
128 255 Standaard DMX-sturing
0 30 Pagina 1
31 61 Pagina 2
62 92 Pagina 3
93 123 Pagina 4
124 154 Pagina 5
155 185 Pagina 6
186 216 Pagina 7
217 247 Pagina 8
2 Paginaselectie
248 255 Pagina 9
0 4 1
5 9 2
10 14 3
15 19 4
… … …
225 229 46
230 234 47
3 Beeldselectie
235 255 48
0 24 Pauze
25 127 Van 1% tot 10%
4 Snelheid
128 255 Van 11% tot 100%
5 Fade 0 255 Van donker naar volle helderheid
6 Zoom 0 255 Van 0% tot 100%
7 Grootte X 0 255 Instelling horizontale rotatie
8 Grootte Y 0 255 Instelling verticale rotatie
9 Rotatie 0 255 Van 0° tot 360°
10 Positie X 0 255 Van pan links naar pan rechts
11 Positie Y 0 255 Van tilt omlaag naar tilt omhoog
DMX512-aansluiting
Sluit de meegeleverde XLR-kabel aan de vrouwelijke 3-pin XLR-uitgang van de controller en de andere kant
van de mannelijke 3-pin XLR-ingang van de VDP130RGBLD11. U kunt verscheidene VDP130RGBLD11’s
aan elkaar koppelen met behulp van een seriële koppeling. Gebruik daarvoor een 2-aderige afgeschermde
kabel met XLR ingang- en uitgangsaansluitingen.
DMX512-keten met terminator
Een DMX terminator is aanbevolen als de DMX-kabel vrij lang is of wordt gebruikt in een
omgeving met veel elektrische ruis (bvb. een discotheek). De terminator voorkomt
corruptie van het digitale controlesignaal door elektrische ruis. De DMX terminator is niets
meer dan een XLR-stekker met een weerstand van 120Ω van pin 2 naar 3. Deze XLR-
stekker wordt dan aangesloten op de XLR uitgang van het laatste toestel in de reeks. Zie
de illustraties links.

VDP130RGBLD11 HQPOWER
11
DMX-startadres
Alle DMX-gestuurde toestellen hebben een digitaal startadres nodig, zodat het juiste toestel reageert op de
signalen. Dit digitale startadres is het kanaalnummer van waarop het toestel “luistert” naar het signaal van de
DMX controller. Geef het correcte nummer in en lees het af op de display onderaan uw VDP130RGBLD11.
U kunt één enkel startadres gebruiken voor een groep toestellen of u kunt per toestel een nieuw startadres
ingeven.
Wanneer u één enkel startadres instelt, zullen alle toestellen “luisteren” naar hetzelfde kanaal. Met andere
woorden: wanneer u de instellingen voor 1 kanaal verandert, zullen alle toestellen er tegelijk op reageren.
Wanneer u verschillende adressen instelt, dan luistert elk toestel naar een ander kanaal. Met andere woorden:
wanneer u de instellingen van een kanaal verandert, zal enkel het toestel op dat kanaal reageren.
In het geval van de 11-kanaals VDP130RGBLD11, zult u het startadres van het eerste toestel op 1 moeten
instellen, van het tweede toestel op 13 (1 + 11), van het derde op 23 (12 + 11) enz.
6. Problemen en oplossingen
Probleem Oorzaak Oplossing
Uitgeschakeld Schakel de projector in
Niet aangesloten Koppel de projector aan het lichtnet
Geen stroom
Zekering Ga na of de zekering niet opgebrand is
Zorg dat alle kabels goed zijn aangesloten
Controleer de continuïteit van elke kabel op alle pennen
DMX-kabel
Controleer de polariteit van de DMX-kabel
Zwak signaal Controleer de DMX-kabels en de DMX keuzeschakelaar
Onregelmatige
laser
Verkeerd DMX-adres Wijs een nieuw DMX-adres toe via de DIP-schakelaars;
ontkoppel en koppel het toestel opnieuw aan het lichtnet
Maak de lans schoon Zwakke
laserstraal
Bevuilde lens
Stel de fade op 100%
7. Technische specificaties
Voeding max. 240VAC / 50Hz
Zekering snelle zekering 2A, 250VAC (5 x 20mm) (ordercode FF2N)
Laserklasse IIIB
Laser
Rood 635nm / 80mW
Groen 532nm / 30mW
Blauw 473nm / 20mW
Koelsysteem thermo-elektrisch
Scansnelheid 12k
Gebruiksmodi DMX512, automatisch en muziekgestuurd, computersoftware
Afmetingen 500 x 280 x 150mm
Gewicht 8.25kg
Voor meer informatie omtrent dit product, zie www.hqpower.com.
De informatie in deze handleiding kan te allen tijde worden gewijzigd zonder voorafgaande kennisgeving.

VDP130RGBLD11 HQPOWER
12
VDP130RGBLD11 – PROJECTEUR LASER RGB – 11 CANAUX DMX
1. Introduction
Aux résidents de l'Union européenne
Des informations environnementales importantes concernant ce produit
Ce symbole sur l'appareil ou l'emballage indique que l’élimination d’un appareil en fin de vie peut polluer
l'environnement.
Ne pas jeter un appareil électrique ou électronique (et des piles éventuelles) parmi les déchets municipaux
non sujets au tri sélectif ; une déchèterie traitera l’appareil en question.
Renvoyer les équipements usagés à votre fournisseur ou à un service de recyclage local.
Il convient de respecter la réglementation locale relative à la protection de l’environnement.
En cas de questions, contacter les autorités locales pour élimination.
Nous vous remercions de votre achat ! Lire la présente notice attentivement avant la mise en service de l’appareil. Si
l’appareil a été endommagé pendant le transport, ne pas l’installer et consulter votre revendeur. Contenu : 1 x
projecteur laser, 1 x cordon d’alimentation, 1 x câble DMX, 1 x câble DB25 et cette notice.
2. Prescriptions de sécurité
• La garantie ne s’applique pas aux dommages survenus en négligeant certaines directives de cette notice et votre
revendeur déclinera toute responsabilité pour les problèmes et les défauts qui en résultent.
• Confier l’installation et l’entretien à un personnel qualifié.
• Cet appareil a été développé pour usage professionnel dans des discothèques, des théâtres, etc. Employer cet
appareil à l’intérieur et le connecter à une source de courant CA de max. 230VCA / 50Hz.
• La tension réseau ne peut pas dépasser la tension mentionnée dans les spécifications à la fin de cette notice.
• Le câble d’alimentation ne peut pas être replissé ou endommagé. Demander à votre revendeur de renouveler le
câble d’alimentation si nécessaire.
• Débrancher l’appareil s’il n’est pas utilisé ou pour le nettoyer. Tirer la fiche pour débrancher l'appareil ; non pas le câble.
• Veiller à mettre le projecteur à la masse électriquement pour éviter les endommagements.
• Il n’y a aucune pièce maintenable par l’utilisateur.
• Ne jamais utiliser le projecteur avec un boîtier ouvert.
• Ne jamais ouvrir le boîtier du projecteur. L’ouverture du boîtier neutralise le dispositif de sécurité est interrompra
le faisceau laser.
• Ne pas court-circuiter les fusibles. Remplacer un fusible grillé par un fusible identique.
• Éviter de boucher la sortie du laser avec des filtres ou autres objets.
• Les dommages occasionnés par des modifications à l’appareil par le client, ne tombent pas sous la garantie.
• Transporter l’appareil dans son emballage originel.
• Toute modification de l’appareil est interdite pour des raisons de sécurité.
• Garder votre VDP130RGBLD11 hors de la portée de personnes non qualifiées et de jeunes enfants.
• Brancher l’appareil sur le réseau électrique par la fiche d’alimentation. Ne pas le brancher sur un bloc de
puissance.
Débrancher le câble d'alimentation avant de déplacer, d’installer et de nettoyer l’appareil.
DANGER! Class IIIB laser product. Avoid direct eye contact with the laser light. Never intentionally
expose eyes to direct laser radiation and do not look at the laser through binoculars, even at a
distance.
Être prudent lors de l’installation : toucher un câble sous tension peut causer des électrochocs mortels.
Ne pas toucher l’appareil lorsqu’il est en service : le boîtier chauffe !
Protéger l’appareil contre la pluie et l’humidité.

VDP130RGBLD11 HQPOWER
13
3. Installation
a) Fusible
• Débranchez l’appareil du réseau électrique avant de remplacer un fusible.
• Remplacez un fusible sauté par un exemplaire identique (voir « Spécifications techniques ») :
1. Dévissez le porte-fusible à l’aide d’un tournevis à lame plate.
2. Retirez l’ancien fusible et remplacez-le.
3. Replacez le porte-fusible dans l’appareil.
b) Montage de l’appareil
• Un technicien qualifié doit installer l’appareil en respectant EN 60598-2-17 et toute autre norme applicable.
• La construction portante de l’appareil doit être capable de supporter 10 x le poids de l’appareil pendant une
heure, sans qu’une déformation de la construction en résulte.
• Fixer votre VDP130RGBLD11 à l’aide d’un câble de sécurité (sécurité supplémentaire).
• Éviter de vous positionner en dessous de l’appareil pour l’enlever ou lors du montage ou du nettoyage. Un
technicien qualifié doit réviser l’appareil avant la mise en service. Organiser une révision minutieuse annuelle.
• Installer l’appareil à un endroit où personne ne peut passer et à une hauteur minimale de 2.5m.
• L’installation de cet appareil exige une solide expérience pratique : le calcul de la charge max. de la construction,
les matériaux d’installation requis etc. De temps en temps, un technicien qualifié doit vérifier la construction
portante et l’appareil même. Ne pas essayer d’installer cet appareil vous-même si vous n’avez pas les
qualifications requises ; une installation incorrecte peut entraîner des blessures.
• Déterminer l’angle d’inclinaison au moyen de l’étrier de montage et serrez les vis de montage.
• Enlever tout matériau inflammable dans un rayon de 0.5m autour de l’appareil.
• Maintenir une distance minimale de 0.5m entre la sortie du laser et la surface illuminée.
• Éviter de placer des objets dans un rayon de 0.5m autour des bouches de ventilation du projecteur.
• Ne pas illuminer le projecteur.
• Un électricien qualifié doit établir la connexion électrique.
• Brancher l’appareil sur le réseau électrique par la fiche d’alimentation. Ne pas le brancher sur un bloc de
puissance.
• Un expert doit approuver l’installation avant qu’elle puisse être prise en service.
4. Description
1. réglage X
2. réglage Y
3. réglage R
4. réglage G
5. réglage B
6. réglage de la sensibilité
7. interrupteurs DIP
8. connexion DB25
9. sortie DMX
10. entrée DMX
11. interlock
12. verrouillage
13. interrupteur d’alimentation
14. entrée du cordon d’alimentation
15. connexion ILDA

VDP130RGBLD11 HQPOWER
14
5. Emploi
Table des interrupteurs DIP Fonction
1 2 3 4 5 6 7 8 9 10
X X X X X X X X X 1 Automatique
X X X X X X X X 1 1 Pilotage par la musique
Adressage DMX 0 Mode DMX
0 = désactivé ; 1 = activé ; X = désactivé ou activé
• Mode automatique
Activer le mode automatique en paramétrant les interrupteurs DIP selon la table ci-dessus.
• Pilotage par la musique
Activer le mode de pilotage par la musique en paramétrant les interrupteurs DIP selon la table ci-dessus.
Régler la sensibilité avec le bouton de réglage. Le projecteur réagit au rythme de la musique.
• Mode de commande depuis un ordinateur
Il est possible de commander le projecteur depuis un ordinateur à l’aide du logiciel FlashLite.
• Connexion ILDA
Raccorder le projecteur à un ordinateur via la connexion ILDA et le câble DB25. Les effets peuvent être
commandés en utilisant le logiciel Pangolin
®
de Pangolin
®
Laser Systems, Inc.
• Mode DMX
Activer le mode DMX en paramétrant les interrupteurs DIP selon la table ci-dessus.
Valeurs DMX détaillées par canal
Canal Fonction De À Description
0 31 Pilotage DMX désactivé
32 127 Pilotage DMX de base
1 Activation
128 255 Pilotage DMX standard
0 30 Page 1
31 61 Page 2
62 92 Page 3
93 123 Page 4
124 154 Page 5
155 185 Page 6
186 216 Page 7
217 247 Page 8
2 Sélection de la page
248 255 Page 9
0 4 1
5 9 2
10 14 3
15 19 4
… … …
225 229 46
230 234 47
3 Sélection de l’image
235 255 48

VDP130RGBLD11 HQPOWER
15
0 24 Pause
25 127 De 1% à 10%
4 Vitesse
128 255 De 11% à 100%
5 Fondu 0 255 De sombre à pleine puissance
6 Zoom 0 255 De 0% à 100%
7 Taille X 0 255 Réglage de la rotation horizontale
8 Taille Y 0 255 Réglage de la rotation verticale
9 Rotation 0 255 De 0° à 360°
10 Position X 0 255 De pan gauche à pan droit
11 Position Y 0 255 De tilt en bas à tilt en haut
Connexion DMX512
Connectez le câble à fiche XLR inclus à la sortie XLR femelle à 3 broches de votre contrôleur et l’autre fiche
XLR mâle à 3 broches à l’entrée du VDP130RGBLD11. Il est possible de reliez plusieurs VDP130RGBLD11 à
partir d’une connexion sérielle. Utilisez un câble de connexion blindé à 2 conducteurs avec des connecteurs
d’entrée et de sortie XLR.
Connexion DMX512 avec terminaison
Une terminaison DMX est à recommander si le câble DMX doit couvrir une grande
distance ou s’il est utilisé dans un environnement avec beaucoup de bruit électrique (p.ex.
une discothèque). La terminaison prévient la corruption du signal de contrôle numérique
par le bruit électrique. La terminaison DMX n’est rien d’autre qu’une fiche XLR avec une
résistance de 120Ω de broche 2 vers broche 3 (voir illustration à gauche). Cette fiche XLR
est connectée à la sortie XLR du dernier appareil de la série.
Adresse de départ DMX
Tous les appareils pilotés par un signal DMX demandent une adresse de départ DMX pour assurer que les
appareils corrects réagissent sur les signaux de contrôle. Cette adresse de départ numérique indique le
numéro de canal sur lequel l’appareil écoute le contrôleur DMX. Déterminez cette adresse avec les
interrupteurs DIP au dos de l’appareil.
Vous avez le choix entre une seule adresse de départ pour toute une série d’appareils ou une adresse de
départ par appareil. Dans le cas d’une seule adresse, tous les appareils « écouteront » les mêmes signaux,
sur un seul canal. Tous les appareils seront donc influencés lorsque vous changez les réglages d’un seul
canal. Avec des adresses de départ individuelles, chaque appareil « écoutera » son propre canal. Par
conséquent, un ajustement des réglages d’un canal n’influence que l'appareil sur ce canal.
Pour le VDP130RGBLD119 à 11 canaux, l’adresse de départ du premier appareil est 1, du deuxième 12 (1 +
11), du troisième 23 (12 + 11), etc.
6. Problèmes et solutions
Problème Cause Solution
Appareil éteint Allumer l’appareil
Appareil débranché Connecter l’appareil au réseau électrique
Pas de
tension
Fusible Vérifier le fusible et le remplacer si nécessaire
Contrôler la connexion entre le contrôleur et l’appareil
Vérifier la continuité de chaque câble
Câble DMX
Contrôler la polarité du câble DMX
Signal faible du contrôleur Vérifier les câbles DMX et l’interrupteur de sélection DMX
Faisceau
laser
irrégulier
Configuration DMX erronée Reconfigurer l’adresse DMX à l’aide des interrupteurs DIP ;
retirer et réinsérer le cordon d’alimentation

VDP130RGBLD11 HQPOWER
16
Nettoyer les miroirs
Laser flou Miroirs souillés
Positionner l’intensité au maximum (100%)
7. Spécifications techniques
Alimentation max. 240VCA / 50Hz
Fusible rapide 2A, 250VAC (5 x 20mm) (référence FF2N)
Laser Classification IIIB
Laser
Rouge 635nm / 80mW
Vert 532nm / 30mW
Bleu 473nm / 20mW
Système de refroidissement refroidissement thermoélectrique
Vitesse de balayage 12k
Modes d’opération DMX512, automatique et pilotage par la musique, logiciel ordinateur
Dimensions 500 x 280 x 150mm
Poids 8.25kg
Pour plus d’information concernant cet article, visitez notre site web www.hqpower.com.
Toutes les informations présentées dans cette notice peuvent être modifiées sans notification préalable.
VDP130RGBLD11 – PROYECTOR LÁSER RGB – 11 CANALES DMX
1. Introducción
A los ciudadanos de la Unión Europea
Importantes informaciones sobre el medio ambiente concerniente este producto
Este símbolo en este aparato o el embalaje indica que, si tira las muestras inservibles, podrían dañar el
medio ambiente.
No tire este aparato (ni las pilas eventuales) en la basura doméstica; debe ir a una empresa especializada
en reciclaje. Devuelva este aparato a su distribuidor o a la unidad de reciclaje local.
Respete las leyes locales en relación con el medio ambiente.
Si tiene dudas, contacte con las autoridades locales para eliminación.
Gracias por haber comprado el VDP130RGBLD11! Lea atentamente las instrucciones del manual antes de usarlo.
Si el aparato ha sufrido algún daño en el transporte no lo instale y póngase en contacto con su distribuidor. Incluye: 1
x proyector láser, 1 x cable de alimentación, 1 x cable DMX, 1 x cable DB25 y este manual del usuario.
2. Instrucciones de seguridad
• Daños causados por descuido de las instrucciones de seguridad de este manual invalidarán su garantía y su
distribuidor no será responsable de ningún daño u otros problemas resultantes.
Desconecte el cable de alimentación de la
red antes de abrir la caja
.
¡PEL
IGRO! Producto láser clase IIIB. Nunca mire directamente a la luz láser. Nunca exponga los
ojos intencionadamente a la radiación directa del láser y no mire a la luz láser con gemelos, incluso
a una distancia.
Cuidado durante la instalación: puede sufrir una peligrosa descarga eléctrica al tocar los cables con un
voltaje peligroso.
¡No toque el aparato durante su operación: la caja se calienta!
No exponga este equipo a lluvia ni humedad.

VDP130RGBLD11 HQPOWER
17
• La instalación y el mantenimiento deben ser realizados por personal especializado.
• Este aparato ha sido diseñado para uso profesional en una discoteca, un teatro, etc. Sólo está permitido para el
uso en interiores y conéctelo a una fuente de corriente CA de máx. 230VCA / 50Hz.
• Asegúrese de que la tensión de red no sea mayor que la tensión indicada en las especificaciones.
• No aplaste el cable de alimentación y protéjalo contra posibles daños causados por algún tipo de superficie
afilada. Si es necesario, pida a su distribuidor reemplazar el cable de alimentación.
• Desconecte siempre el aparato si no va a usarlo durante un largo período de tiempo o antes de limpiarlo. Tire
siempre del enchufe para desconectar el cable de red, nunca del propio cable.
• Asegúrese de que conecte el proyector de manera eléctrica a la tierra para evitar daños.
• El usuario no habrá de efectuar el mantenimiento de ninguna pieza.
• Nunca utilice el proyector con la caja abierta.
• Nunca abra la caja del proyector. El sistema de seguridad se activará al abrir la caja e interrumpirá el rayo láser.
• No cortocircuite los fusibles. Reemplace un fusible fundido por otro del mismo tipo.
• Los daños causados por modificaciones no autorizadas, no están cubiertos por la garantía.
• Transporte el aparato en su embalaje original.
• Por razones de seguridad, las modificaciones no autorizadas del aparato están prohibidas.
• Mantenga el VDP130RGBLD11 lejos del alcance de personas no capacitadas y niños.
• Conecte el aparato a la red eléctrica con la conexión de alimentación. No lo conecte a un dimmer.
3. Instalación
a) Fusible
• Desconecte el aparato de la red antes de reemplazar el fusible.
• Reemplace un fusible fundido por otro del mismo tipo (véase « Especificaciones ») :
1. Desatornille el portafusibles con un destornillador adecuado.
2. Saque el fusible fundido y reemplácelo.
3. Vuelva a poner el portafusibles en el aparato.
b) Montaje del aparato
• Respete la directiva EN 60598-2-17 y toda norma nacional antes de instalar el aparato. La instalación debe ser
realizada por un técnico especializado.
• El soporte donde irá el aparato, debe ser capaz de sostener 10 veces el peso de éste durante una hora, sin que
se produzca una deformación de dicho soporte.
• Fije el VDP130RGBLD11 con un cable de seguridad (seguridad adicional).
• Evite ponerse debajo del aparato durante el montaje, la limpieza, etc. Un técnico especializado debe revisar el
aparato antes de la puesta en marcha. Después, debe revisarlo una vez al año.
• Instale el aparato fuera del alcance de personas no autorizadas y en un lugar con poca gente y a una altura de
mín. 2.5m.
• La instalación de este aparato exige una sólida experiencia práctica: debe poder calcular la carga máx. del
soporte, debe conocer los materiales necesarios para la instalación, etc. De vez en cuando, una verificación de la
estructura y del aparato mismo debe ser llevada a cabo por un técnico especializado. No intente instalar este
aparato si no tiene las cualificaciones requeridas; una instalación incorrecta puede causar lesiones.
• Ajuste el ángulo de inclinación mediante el soporte de montaje y atornille los tornillos de montaje.
• Quite todo material inflamable en un radio de 0.5m alrededor del aparato.
• Respete una distancia de mín. 0.5m entre la salida de luz y el área iluminada.
• No pone objetos en un rayo de 0.5m alrededor de los orificios de ventilación del proyector.
• No ilumine el proyector.
• Un electricista debe llevar a cabo la conexión eléctrica.
• Conecte el aparato a la red eléctrica con la conexión de alimentación. No lo conecte a un dimmer.
• Un experto debe probar la instalación antes de la puesta en marcha.

VDP130RGBLD11 HQPOWER
18
4. Descripción
1. ajuste X
2. ajuste Y
3. ajuste R
4. ajuste G
5. ajuste B
6. ajuste de la sensibilidad
7. interruptores DIP
8. conexión DB25
9. salida DMX
10. entrada DMX
11. interlock
12. bloqueo
13. interruptor de alimentación
14. entrada del cable de alimentación
15. conexión ILDA
5. Uso
Lista de los interruptores DIP Función
1 2 3 4 5 6 7 8 9 10
X X X X X X X X X 1 Modo automático
X X X X X X X X 1 1 Control por la música
Dirección DMX 0 Modo DMX
0 = desactivado ; 1 = activado ; X = desactivado o activado
• Modo automático
Active el modo automático al ajustar los interruptores DIP según la lista (véase arriba).
• Control por la música
Active el modo de control por la música al ajustar los interruptores DIP según la lista (véase arriba). Ajuste la
sensibilidad con el botón de ajuste. El proyector reacciona al ritmo de la música.
• Modo de control por ordenador
Es posible controlar el proyector por ordenador con el software FlashLite.
• Conexión ILDA
Conecte el proyector a un ordenador por la conexión ILDA y el cable DB25. Es posible controlar los efectos al
utilizar el software Pangolin
®
de Pangolin
®
Laser Systems, Inc.
• Modo DMX
Active el modo DMX al ajustar los interruptores DIP según la lista (véase arriba).

VDP130RGBLD11 HQPOWER
19
Valores DMX detallados por canal
Canal Función De A Descripción
0 31 Control DMX desactivado
32 127 Control DMX de base
1 Activación
128 255 Control DMX estándar
0 30 Página 1
31 61 Página 2
62 92 Página 3
93 123 Página 4
124 154 Página 5
155 185 Página 6
186 216 Página 7
217 247 Página 8
2
Selección de la
página
248 255 Página 9
0 4 1
5 9 2
10 14 3
15 19 4
… … …
225 229 46
230 234 47
3
Selección de la
imagen
235 255 48
0 24 Pausa
25 127 De 1% a 10%
4 Velocidad
128 255 De 11% a 100%
5 Fade 0 255 De oscuro a potencia completa
6 Zoom 0 255 De 0% a 100%
7 Tamaño X 0 255 Ajuste de la rotación horizontal
8 Tamaño Y 0 255 Ajuste de la rotación vertical
9 Rotación 0 255 De 0° a 360°
10 Posición X 0 255 De pan izquierdo a pan derecho
11 Posición Y 0 255 De tilt abajo a tilt arriba
Conexión DMX512
Conecte el cable con conector XLR (incl.) a la salida XLR hembra de 3 polos del controlador y el otro conector
XLR macho de 3 polos a la entrada del VDP130RGBLD11. Es posible conectar varios VDP130RGBLD11 en
serie. Use un cable blindado de doble hilo conductor con conectores XLR de entrada y de salida.
Conexión DMX-512 con una terminación DMX
Se recomienda una terminación DMX si el cable DMX debe cubrir una gran distancia o si
se usa en un medio ambiente con mucho ruido eléctrico (p.ej. una discoteca). La
terminación impide que el ruido eléctrico corrompa la señal de control numérico. La
terminación DMX no es más que un conector XLR con una resistencia de 120Ω de polo 2
a polo 3. Este conector XLR está conectado a la salida XLR del último aparato de la serie.
Véase la figura a la izquierda).

VDP130RGBLD11 HQPOWER
20
Determinar la dirección inicial del proyector DMX
Si se usa una señal DMX, cada aparato tiene su propia dirección inicial DMX para asegurar que los aparatos
reaccionen a las señales de control correctas. Esta dirección inicial digital es el primer canal en el cual el
aparato reaccionará a las señales DMX del controlador DMX. Determine esta función con los interruptores
DIP de la parte trasera del aparato.
Es posible elegir entre una sola dirección inicial para toda una serie de aparatos o una dirección inicial por
aparato. Con una sola dirección inicial para una serie de aparatos, todos los aparatos reaccionarán
sincronizadamente a la misma señal. Por lo tanto, cambiar los ajustes de un solo canal afecta a los ajustes de
todos los canales. Con varias direcciones iniciales, cada aparato reaccionará independientemente. Por lo
tanto, cambiar los ajustes de un solo canal sólo afecta al canal en cuestión.
Para el VDP130RGBLD119 de 11 canales, la dirección inicial del primer aparato es 1. Introduzca 12 (1 + 11)
para el segundo aparato, introduzca 23 (12 + 11) para el tercer aparato, etc.
6. Solución de problemas
Problema Causa Solución
Aparato desactivado Active el aparato
Aparato desconectado Conecte el aparato a la red eléctrica
No hay
tensión
Fusible Controle el fusible y reemplácelo si fuera necesario
Controle la conexión entre el controlador y el aparato
Controle la continuidad de cada cable
Cable DMX
Controle la polaridad del cable DMX
Débil señal del controlador Controle los cables DMX y el interruptor de selección DMX
Rayo láser
irregular
Configuración DMX incorrecta Vuelva a configurar la dirección DMX con los interruptores DIP ;
conecte y vuelva a conectar el cable de alimentación
Limpie los espejos Rayo láser
débil
Espejos sucios
Ponga la intensidad del fade en la posición máxima (100%)
7. Especificaciones
Alimentación máx. 240VCA / 50Hz
Fusible rápido 2A, 250VAC (5 x 20mm) (referencia FF2N)
Clase láser IIIB
Láser
Rojo 635nm / 80mW
Verde 532nm / 30mW
Azul 473nm / 20mW
Sistema de enfriamiento enfriamiento termoeléctrico
Velocidad de exploración 12k
Modos de funcionamiento DMX512, automático y control por la música, software ordenador
Dimensiones 500 x 280 x 150mm
Peso 8.25kg
Para más información sobre este producto, visite nuestra página web www.hqpower.com.
Se pueden modificar las especificaciones y el contenido de este manual sin previo aviso.
Page is loading ...
Page is loading ...
Page is loading ...
Page is loading ...
Page is loading ...
/