Page is loading ...

VDP1601RGLD10_v3 HQPOWER
3
VDP1601RGLD10 – RG LASER PROJECTOR – DMX-CONTROLLED
1. Introduction
To all residents of the European Union
Important environmental information about this product
This symbol on the device or the package indicates that disposal of the device after its lifecycle could harm
the environment.
Do not dispose of the unit (or batteries) as unsorted municipal waste; it should be taken to a specialized
company for recycling.
This device should be returned to your distributor or to a local recycling service.
Respect the local environmental rules.
If in doubt, contact your local waste disposal authorities.
Thank you for choosing HQPOWER! The VDP1601RGLD10 is a powerful 10-channel laser projector with lots of pre-
programmed effects and patterns. Please read the manual thoroughly before bringing this device into service. If the
device was damaged in transit, don't install or use it and contact your dealer.
2. Safety Instructions
• Damage caused by disregard of certain guidelines in this manual is not covered by the warranty and the dealer
will not accept responsibility for any ensuing defects or problems.
• A qualified technician should install and service this device.
• Do not switch the device on immediately after it has been exposed to changes in temperature. Protect the device
against damage by leaving it switched off until it has reached room temperature.
• This device falls under protection class I. It is therefore essential that the device be earthed. Have a qualified
person carry out the electric connection.
• Make sure that the available voltage does not exceed the voltage stated in the specifications of this manual.
• Do not crimp the power cord and protect it against damage. Have an authorised dealer replace it if necessary.
• Disconnect the device from the mains to clean it or when it is not in use. Handle the power cord by the plug only.
• Do not look directly at the light source as sensitive people may go into epileptic seizure if they do.
• Keep the device away from splashing and dripping liquids. Never put objects filled with liquid on top of the device.
• Note that damage caused by user modifications to the device is not covered by the warranty.
• Mechanical wear is not covered by warranty.
• Keep the device away from children and unauthorised users.
3. General Guidelines
• This device is designed for professional use on stage, in discos, theatres, etc. The VDP1601RGLD10 should only
be used indoors and connected to an alternating current of max. 230VAC / 50Hz.
Be very careful during the installation: touching live wires can cause life-threatening electroshocks.
Do not touch the device during operation as the housing heats up.
Keep this device away from rain and moisture.
Unplug the mains lead before opening the housing.
DANGER
–
Laser Radiation
–
Avoid Direct Eye Exposure
–
Class 3B Laser
Wavelength: Red: 650nm / Green: 532nm – Max. Output Power: Red: 100mW / Green: 60mW
IEC 60825-1 – For professional use only!
Referencia Electrónica Embajadores: ILD1005

VDP1601RGLD10_v3 HQPOWER
4
• Lighting effects are not designed for permanent operation: regular operation breaks will prolong their lives.
• Do not shake the device. Avoid brute force when installing or operating the device.
• Select a location where the device is protected against extreme heat (see “Technical Specifications”), dust and
moisture. Respect a minimum distance of 0.5m between the device’s light output and any illuminated surface.
• Use an appropriate safety cable to fix the device (e.g. VDLSC8).
• Familiarise yourself with the functions of the device before actually using it. Do not allow operation by unqualified
people. Any damage that may occur will most probably be due to unprofessional use of the device.
• Use the original packaging if the device is to be transported.
• All modifications of the device are forbidden for safety reasons.
• Only use the device for its intended purpose. All other uses may lead to short circuits, burns, electroshocks,
crash, etc. Using the device in an unauthorised way will void the warranty.
4. Installation
a) Fuse
• Only fit or replace a fuse when the device is unplugged from the mains.
• Replace a blown fuse with a fuse of the same type and rating (see “Technical Specifications”):
1. Remove the fuse holder below the power socket using an appropriate screwdriver.
2. Remove the old fuse and install a new one.
3. Replace the fuse holder.
b) Mounting the Device
• Have the device installed by a qualified person, respecting EN 60598-2-17 and all other applicable norms.
• The carrying construction must be able to support 10 times the weight of the device for 1 hour without deforming.
• The installation must always be secured with a secondary attachment e.g. a safety cable.
• Never stand directly below the device when it is being mounted, removed or serviced. Have a qualified technician
check the device once a year and once before you bring it into service.
• Install the device in a location with few passers-by that is inaccessible to unauthorised persons.
• Overhead mounting requires extensive experience: calculating workload limits, determining the installation
material to be used… Have the material and the device itself checked regularly. Do not attempt to install the
device yourself if you lack these qualifications as improper installation may result in injuries.
• Adjust the desired inclination angle via the mounting bracket and tighten the bracket screws.
• Make sure there is no flammable material within a 0.5m radius of the device.
• Have a qualified electrician carry out the electric connection.
• Connect the device to the mains with the power plug. Do not connect it to a dimming pack.
• The installation has to be approved by an expert before the device is taken into service.
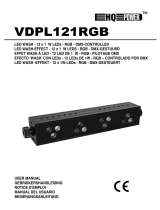
5. Description
1. DMX input
2. DIP switches: set the desired DMX address
3. DMX output
4. MIC: control the unit in sound-activated mode
5. Sensitivity knob for sound-activation mode
6. Power switch: turn the unit on/off
7. Safety key: lock the unit
8. Power and fuse socket: connect the unit the
mains

VDP1601RGLD10_v3 HQPOWER
5
6. Use
a. DIP Switch Setting
• DMX Mode: put DIP switch 10 always to ON. For the desired address see table below:
SW10
SW9
SW8 SW7 SW6 SW5 SW4 SW3 SW2 SW1 Address
1 0 0 0 0 0 0 0 0 1 1
1 0 0 0 0 0 0 0 1 0 2
1 0 0 0 0 0 0 1 0 0 4
1 0 0 0 0 0 1 0 0 0 8
1 0 0 0 0 1 0 0 0 0 16
1 0 0 0 1 0 0 0 0 0 32
1 0 0 1 0 0 0 0 0 0 64
1 0 1 0 0 0 0 0 0 0 128
1 1 0 0 0 0 0 0 0 0 256
• Master / Slave Mode: when using the unit as master DIP switches 1 and 10 must be ON; all other DIP switches
must be OFF. For all units in slave mode, DIP switch 2 must be ON; all other DIP switches must be OFF. All units
will work synchronously according to the master.
• Sound-Activated Mode: when there is no DMX signal and DIP switch 10 is ON, the unit will go in sound-activation
mode. Control the sensitivity of the sound input using the sensitivity knob on the backside of the unit.
• Automatic Mode: when there is no DMX signal and DIP switch 1 is ON, the unit will work in automatic mode.
b. Detailed DMX Values per Channel
Channel From
To Function
0 63 sound-activation mode
64 127 automatic mode
128 191 manual & sound-activation mode
1
192 255 DMX mode
0 63 green
64 127 green – red
128 191 green
2
192 255 green – red
3 0 255 pattern selection
4 0 255 pattern moving speed
0 63 static pattern
5
64 255 flat pattern effect
0 63 static gobo
64 127 fast pulse rate
128 191 middle pulse rate
6
192 255 slow pulse rate
0 63 static gobo
7
64 255 up & down effect
8 0 255 effect projection speed
9 0 255 zoom
10 0 255 drawing speed from slow to fast

VDP1601RGLD10_v3 HQPOWER
6
c. DMX512 Connection
Connect the provided XLR cable to the female 3-pin XLR output of your controller and the other side to the male 3-
pin XLR input of the VDP1601RGLD10. Multiple VDP1601RGLD10s can be linked through serial linking. The linking
cable should be a two-core screened cable with XLR input and output connectors.
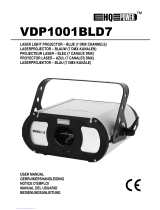
d. DMX512 Chain with Termination
A DMX terminator is recommended for installations where the DMX cable has to run a
long distance or is in an electrically noisy environment (e.g. discos). The terminator
prevents corruption of the digital control signal by electrical noise. The DMX terminator is
simply an XLR plug with a 120
Ω resistor between pins 2 and 3, which is then plugged into
the XLR output socket of the last device in the chain.
Please see illustrations.
e. Start Address Selection
All DMX-controlled devices need a digital start address so that the correct device responds to the signals. This start
address is the channel number from which the device starts to “listen” to the DMX controller. Enter the correct
number and read it from the display located on the base of the VDP1601RGLD10.
You can use the same starting address for a whole group of devices or enter an individual one for every device.
When all devices have the same address, all the VDP1601RGLD10s will “listen” to the control signal on one
particular channel. In other words: changing the settings of one channel will affect all devices simultaneously. If you
set different addresses, each device will “listen” to a separate channel number. Changing the settings of one channel
will only affect the device in question.
In the case of the 10-channel VDP1601RGLD10, you will have to set the start address of the first VDP1601RGLD10
to 1, the second VDP1601RGLD10 to 11 (1 + 10), the third to 21 (11 + 10) and so on.
7. Cleaning and Maintenance
1. All screws should be tightened and free of corrosion.
2. The housing, visible parts, mounting supports and the installation location (e.g. ceiling, suspension, trussing)
should not be deformed, modified or tampered with e.g. do not drill extra holes in mounting supports, do not
change the location of the connections.
3. Moving mechanic parts must not show any signs of wear and tear.
4. The electric power supply cables must not show any damage. Have a qualified technician maintain the device.
5. Disconnect the device from the mains prior to maintenance activities.
6. Wipe the device regularly with a moist, lint-free cloth. Do not use alcohol or solvents.
7. There are no user-serviceable parts apart from the fuse.
8. Contact your dealer for spare parts if necessary.
8. Technical Specifications
Power Supply max. 230VAC / 50Hz
Power Consumption 15W
Fuse F3A, 250VAC (5 x 20mm) (order code FF3N)
Dimensions 340 x 210 x 90mm
Total Weight 4kg
Max. Ambient Temperature 45°C
Max. Housing Temperature 90°C
Use this device with original accessories only. Velleman nv cannot be held responsible in the event of
damage or injury resulted from (incorrect) use of this device.
For more info concerning this product, please visit our website www.hqpower.com.

VDP1601RGLD10_v3 HQPOWER
7
The information in this manual is subject to change without prior notice.
/