Page is loading ...

VDPC054
V. 01 – 28/06/2013 3 ©Velleman nv
USER MANUAL
1. Introduction
To all residents of the European Union
Important environmental information about this product
This symbol on the device or the package indicates that disposal of
the device after its lifecycle could harm the environment. Do not
dispose of the unit (or batteries) as unsorted municipal waste; it
should be taken to a specialized company for recycling. This device
should be returned to your distributor or to a local recycling
service. Respect the local environmental rules.
If in doubt, contact your local waste disposal authorities.
Thank you for choosing HQPower™! Please read the manual thoroughly
before bringing this device into service. If the device was damaged in
transit, don't install or use it and contact your dealer.
This 54 channel mini DMX controller allows you to control most of your
devices while enabling complete freedom of movement. In fact, you can
control any standard DMX512 line with this compact controller.
2. Safety Instructions
Risk of electroshock when opening the cover. Touching live
wires can cause life-threatening electroshocks. Do not
disassemble or open the housing yourself. Have the device
repaired by qualified personnel.
Warning: If the supply cord is damaged, it must be replaced by
the manufacturer, its service agent, or similarly qualified persons
in order to avoid any hazard.
Do not use the device when damage to housing or cables is
noticed. Do not attempt to service the device yourself but contact
an authorised dealer.
Make sure that the available voltage does not exceed the voltage
stated in the specifications of this manual.
Always disconnect mains power or remove the battery when
device not in use or when servicing or maintenance activities are
performed. Handle the power cord by the plug only.

VDPC054
V. 01 – 28/06/2013 4 ©Velleman nv
Indoor use only. Keep this device away from rain, moisture,
splashing and dripping liquids. Never put objects filled with
liquids on top of or close to the device.
Do not operate the device with wet hands.
Keep this device away from children and unauthorized users.
3. General Guidelines
Refer to the Velleman® Service and Quality Warranty on the last pages
of this manual.
Protect this device from shocks and abuse. Avoid brute force when
operating the device.
Keep this device away from humid environments and extreme
temperatures. Use only between -10 °C and 50 °C.
Familiarise yourself with the functions of the device before actually using
it. Do not allow operation by unqualified people. Any damage that may
occur will most probably be due to unprofessional use of the device.
All modifications of the device are forbidden for safety reasons. Damage
caused by user modifications to the device is not covered by the
warranty.
Only use the device for its intended purpose. All other uses may lead to
short circuits, burns, electroshocks, lamp explosion, crash, etc. Using the
device in an unauthorised way will void the warranty.
Damage caused by disregard of certain guidelines in this manual is not
covered by the warranty and the dealer will not accept responsibility for
any ensuing defects or problems.
A qualified technician should install and service this device.
Do not switch the device on immediately after it has been exposed to
changes in temperature. Protect the device against damage by leaving it
switched off until it has reached room temperature.
This device is designed for professional use on stage, in discos, theatres,
etc. The device should only be used indoors. Use only the included power
adapter.
Frequently switching the device on and off may damage the device.
Use the original packaging if the device is to be transported.
Keep this manual for future reference.
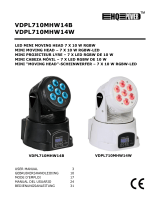
4. Features
for small mobile applications
can be battery powered

VDPC054
V. 01 – 28/06/2013 5 ©Velleman nv
light and compact
54 channels controlled by 6 faders
easy setup of scenes and programs.
5. Overview
Refer to the illustrations on page 2 of this manual.
1
battery compartment
2
BATTERY/EXTERNAL: power selection switch
3
power supply input
4
DMX output
5
DMX input (not used)
6
faders
7
control buttons:
INSERT: to save a scene in a program
DELETE: to delete a scene in a program
A: for program mode
B: to select pages/devices
UP/DOWN: to increase/decrease a value
SELECT: to synchronise several DMX devices.
8
display
SCENES: indicates the scene number in a program
PROG: indicates the program number
PROJ: indicates the device/page number.
6. Start-Up
6.1 Usage With Power Adapter
1. Plug one end of the power adapter into the power supply input [3] and
the other end into a suitable mains outlet.
2. Put the power selection switch [2] into the EXTERNAL position.
6.2 Usage With Battery
1. Open the battery compartment [1] and insert one 9 V battery (type
6LR61, not incl.). Respect the polarity.
2. Close the battery compartment with the screw.
3. Put the power selection switch [2] into the BATTERY position.

VDPC054
V. 01 – 28/06/2013 6 ©Velleman nv
Warning: Do not puncture batteries or throw them in fire as they
may explode. Do not attempt to recharge non-rechargeable
batteries (alkaline). Dispose of batteries in accordance with local
regulations. Keep batteries away from children.
Remove the battery if the device will not be used for a long time. Old
batteries can begin to leak and damage the device.
6.3 DMX Setup
Connect a compatible DMX512 device to the DMX output [4] using an XLR
cable. You can connect more devices in a daisy chain.
The controller uses 9 pages of 6 channels each, to control up to
54 channels. Typically, you connect up to 9 devices of (max.) 6 channels.
In this case, each page in the controller can control one device.
Make sure that you set the correct start address on each device (refer to the
table below).
Important! In the examples in this user manual, it is assumed that you use
the controller with 6-channel devices, and that each page corresponds with
one DMX device.
Page
Channels
Device nr.
DMX start address
1
1-6
device 1
1
2
7-12
device 2
7
3
13-18
device 3
13
4
19-24
device 4
19
5
25-30
device 5
25
6
31-36
device 6
31
7
37-42
device 7
37
8
43-48
device 8
43
9
49-54
device 9
49
Example
As an example, you have 9 identical DMX devices (6 channels each)
connected to the controller (one page = one device). The 6 channels are for
pan, tilt, dimmer, colour, gobo, and strobe control. Refer to the table below
for an overview of the channels and which pages/faders you use to control
them.

VDPC054
V. 01 – 28/06/2013 7 ©Velleman nv
Device /
page
Function
Pan
Tilt
Dimmer
Colour
Gobo
Strobe
1
1
2
3
4
5
6
2
7
8
9
10
11
12
3
13
14
15
16
17
18
4
19
20
21
22
23
24
5
25
26
27
28
29
30
6
31
32
33
34
35
36
7
37
38
39
40
41
42
8
43
44
45
46
47
48
9
49
50
51
52
53
54
Use fader:
1
2
3
4
5
6
Note: You can also use the controller for devices with more than 6 DMX
channels. In that case, use multiple pages per device. This possibility is not
further explained in this user manual.
7. Use
7.1 Start Mode
For all the procedures described below to work correctly, you normally begin
from the start mode. In start mode, the display shows ―— — — —‖. If the
display does not show this, you can return to start mode as follows,
depending on the active operating mode:
press A once
press B once
press and hold A
press and hold SELECT.
7.2 Running in Manual Mode
You can use the controller to manually set DMX values using the faders.
Refer to the documentation of your specific DMX device for more information
on the exact function of the DMX channels.
1. From start mode, press B once to enter manual mode.
The dot blinks in the PROJ display, which indicates the device/page (1-9)
that is currently active.
2. Use UP and DOWN to select the desired device/page (1-9).

VDPC054
V. 01 – 28/06/2013 8 ©Velleman nv
3. Move the faders to set the DMX channels of the selected device/page to
the desired values.
4. Repeat steps 2-3 until all DMX channels are set to the desired value.
5. To quit and return to start mode, press B once again.
7.3 Running a Program
Note: Creating programs is explained in § 8, Programming, further in this
manual.
To run an existing program, proceed as follows:
1. From start mode, press A once.
The dot blinks in the PROG display, which indicates the program (1-9)
that is currently active. The SCENES display shows the scene number that
is currently executed.
2. Use UP and DOWN to select the desired program (1-9).
3. Use fader 2 to set the speed of the program (duration of the scenes).
4. Use fader 1 to set the fade time between scenes.
Note: If the fade time is too long, the fade will not be completed before
the end of the scene.
5. To stop running the program and return to start mode, press A once
again.
7.4 Manually Overriding a Program
While running a program, you can still override the programmed scenes
manually for a specific device.
1. While the program is running, press B once.
The dot blinks in the PROJ display.
2. Use UP and DOWN to select the device/page that you want to control
manually.
3. Adjust the faders to manually set the DMX values for the selected
device/page.
4. If required, select another device/page using UP and DOWN, and adjust
the faders.
5. To undo the manual override, press B once again.
8. Programming
8.1 About Programs
The controller can contain 9 programs, each with up to 50 scenes (steps).

VDPC054
V. 01 – 28/06/2013 9 ©Velleman nv
Note: For the first use, it is recommended to delete all program scenes
before you start programming. Remainders of unfinished programs can
produce undesired and unpredictable results.
8.2 Deleting Scenes
To delete one or more scenes in a program, proceed as follows:
1. From start mode, press and hold A for ± 2 seconds to enter programming
mode.
The dot blinks in the PROG display, which indicates the currently selected
program (1-9). The SCENES display shows the number of recorded
scenes (00-50) in the selected program. If SCENES displays 00, it means
that no scenes have been recorded yet for the selected program.
2. To delete the last scene in the program, press DELETE twice.
3. To delete all scenes in the program, press and hold DELETE until SCENES
displays 00.
4. Use UP and DOWN to select another program and repeat if necessary.
5. To quit and return to start mode, press and hold A for ± 2 seconds.
8.3 Programming Scenes
To program scenes, proceed as follows:
1. From start mode, press and hold A for ± 2 seconds to enter programming
mode.
The dot blinks in the PROG display, which indicates the currently selected
program (1-9). The SCENES display shows the number of recorded
scenes (00-50) in the selected program. If SCENES displays 00, it means
that no scenes have been recorded yet for the selected program.
2. Use UP and DOWN to select the desired program (1-9).
3. Press B and use UP and DOWN to select the desired device/page (1-9).
4. Move the faders to set the DMX channels for the selected device/page to
the desired values.
5. Use UP and DOWN to select another device/page, and move the faders
again to the desired position.
Caution: After you change devices/pages, the position of the faders does
not represent the real setting. Move the faders beyond the desired
position and back to make sure that the DMX value is set correctly.
6. Repeat until you have set all devices/pages.
7. Press INSERT twice to save the scene in the current program.
The number of scenes in the SCENES display increases by 1.
8. Repeat steps 3-7 for all the next scenes that you want to program.
9. To quit programming and return to start mode, press and hold A for
± 2 seconds.

VDPC054
V. 01 – 28/06/2013 10 ©Velleman nv
8.4 Editing an Existing Program
1. From start mode, press and hold A for ± 2 seconds.
2. Use UP and DOWN to select the program (1-9) that you want to edit.
3. Press INSERT once.
The dot blinks in the SCENES display.
4. Use UP and DOWN to select the scene that you want to edit.
5. Press B and use UP and DOWN to select the device/page that you want to
edit.
6. Move the faders to the desired position.
Caution: After you change devices/pages, the position of the faders does
not represent the real setting. Move the faders beyond the desired
position and back to make sure that the DMX value is set correctly.
7. Press INSERT to add the new scene.
8. Press DELETE twice to delete the old scene.
9. To quit programming and return to start mode, press and hold A for
± 2 seconds.
9. Cleaning and Maintenance
All screws should be tightened and free of corrosion.
The electric power supply cables must not show any damage. Have a
qualified technician maintain the device.
Disconnect the device from the mains prior to maintenance activities.
Wipe the device regularly with a dry, lint-free cloth. Do not use alcohol or
solvents.
Do not immerse the device in any liquid.
There are no user-serviceable parts.
Contact your dealer for spare parts if necessary.
10. Technical Specifications
power supply
adapter
9 VDC
battery
9 VDC (6LR61C, not incl.)
power consumption
0.7 W / 59 mA
channels
54
operating temperature
-10 °C to 50 °C
dimensions
200 x 125 x 45 mm
weight
1 kg

VDPC054
V. 01 – 28/06/2013 11 ©Velleman nv
Use this device with original accessories only. Velleman nv cannot
be held responsible in the event of damage or injury resulting from
(incorrect) use of this device.
For more info concerning this product and the latest version of this
manual, please visit our website www.hqpower.eu.
The information in this manual is subject to change without prior
notice.
© COPYRIGHT NOTICE
The copyright to this manual is owned by Velleman nv. All
worldwide rights reserved. No part of this manual may be copied,
reproduced, translated or reduced to any electronic medium or otherwise
without the prior written consent of the copyright holder.

Velleman® Service and Quality Warranty
Since its foundation in 1972, Velleman® acquired
extensive experience in the electronics world and currently
distributes its products in over 85 countries.
All our products fulfil strict quality requirements and legal
stipulations in the EU. In order to ensure the quality, our
products regularly go through an extra quality check, both
by an internal quality department and by specialized
external organisations. If, all precautionary measures
notwithstanding, problems should occur, please make
appeal to our warranty (see guarantee conditions).
General Warranty Conditions Concerning Consumer
Products (for EU):
• All consumer products are subject to a 24-month
warranty on production flaws and defective material as
from the original date of purchase.
• Velleman® can decide to replace an article with an
equivalent article, or to refund the retail value totally or
partially when the complaint is valid and a free repair or
replacement of the article is impossible, or if the expenses
are out of proportion.
You will be delivered a replacing article or a refund at the
value of 100% of the purchase price in case of a flaw
occurred in the first year after the date of purchase and
delivery, or a replacing article at 50% of the purchase
price or a refund at the value of 50% of the retail value in
case of a flaw occurred in the second year after the date
of purchase and delivery.
• Not covered by warranty:
- all direct or indirect damage caused after delivery to the
article (e.g. by oxidation, shocks, falls, dust, dirt,
humidity...), and by the article, as well as its contents (e.g.
data loss), compensation for loss of profits;
- consumable goods, parts or accessories that are subject
to an aging process during normal use, such as batteries
(rechargeable, non-rechargeable, built-in or replaceable),
lamps, rubber parts, drive belts... (unlimited list);
- flaws resulting from fire, water damage, lightning,
accident, natural disaster, etc.…;
- flaws caused deliberately, negligently or resulting from
improper handling, negligent maintenance, abusive use or
use contrary to the manufacturer’s instructions;
- damage caused by a commercial, professional or
collective use of the article (the warranty validity will be
reduced to six (6) months when the article is used
professionally);
- damage resulting from an inappropriate packing and
shipping of the article;
- all damage caused by modification, repair or alteration
performed by a third party without written permission by
Velleman®.
• Articles to be repaired must be delivered to your
Velleman® dealer, solidly packed (preferably in the
original packaging), and be completed with the original
receipt of purchase and a clear flaw description.
• Hint: In order to save on cost and time, please reread the
manual and check if the flaw is caused by obvious causes
prior to presenting the article for repair. Note that returning
a non-defective article can also involve handling costs.
• Repairs occurring after warranty expiration are subject to
shipping costs.
• The above conditions are without prejudice to all
commercial warranties.
The above enumeration is subject to modification
according to the article (see article’s manual).
Velleman® service- en kwaliteitsgarantie
Velleman® heeft sinds zijn oprichting in 1972 een ruime
ervaring opgebouwd in de elektronicawereld en verdeelt
op dit moment producten in meer dan 85 landen. Al onze
producten beantwoorden aan strikte kwaliteitseisen en
aan de wettelijke bepalingen geldig in de EU. Om de
kwaliteit te waarborgen, ondergaan onze producten op
regelmatige tijdstippen een extra kwaliteitscontrole, zowel
door onze eigen kwaliteitsafdeling als door externe
gespecialiseerde organisaties. Mocht er ondanks deze
voorzorgen toch een probleem optreden, dan kunt u
steeds een beroep doen op onze waarborg (zie
waarborgvoorwaarden).
Algemene waarborgvoorwaarden
consumentengoederen (voor Europese Unie):
• Op alle consumentengoederen geldt een garantieperiode
van 24 maanden op productie- en materiaalfouten en dit
vanaf de oorspronkelijke aankoopdatum.
• Indien de klacht gegrond is en een gratis reparatie of
vervanging van een artikel onmogelijk is of indien de
kosten hiervoor buiten verhouding zijn, kan Velleman®
beslissen het desbetreffende artikel te vervangen door
een gelijkwaardig artikel of de aankoopsom van het artikel
gedeeltelijk of volledig terug te betalen. In dat geval krijgt
u een vervangend product of terugbetaling ter waarde van
100% van de aankoopsom bij ontdekking van een gebrek
tot één jaar na aankoop en levering, of een vervangend
product tegen 50% van de kostprijs of terugbetaling van
50 % bij ontdekking na één jaar tot 2 jaar.
• Valt niet onder waarborg:
- alle rechtstreekse of onrechtstreekse schade na de
levering veroorzaakt aan het toestel (bv. door oxidatie,
schokken, val, stof, vuil, vocht...), en door het toestel,
alsook zijn inhoud (bv. verlies van data), vergoeding voor
eventuele winstderving.
- verbruiksgoederen, onderdelen of hulpstukken die
onderhevig zijn aan veroudering door normaal gebruik
zoals bv. batterijen (zowel oplaadbare als niet-oplaadbare,
ingebouwd of vervangbaar), lampen, rubberen
onderdelen, aandrijfriemen... (onbeperkte lijst).
- defecten ten gevolge van brand, waterschade, bliksem,
ongevallen, natuurrampen, enz.
- defecten veroorzaakt door opzet, nalatigheid of door een
onoordeelkundige behandeling, slecht onderhoud of
abnormaal gebruik of gebruik van het toestel strijdig met
de voorschriften van de fabrikant.
- schade ten gevolge van een commercieel, professioneel
of collectief gebruik van het apparaat (bij professioneel
gebruik wordt de garantieperiode herleid tot 6 maand).
- schade veroorzaakt door onvoldoende bescherming bij
transport van het apparaat.
- alle schade door wijzigingen, reparaties of modificaties
uitgevoerd door derden zonder toestemming van
Velleman®.
• Toestellen dienen ter reparatie aangeboden te worden
bij uw Velleman®-verdeler. Het toestel dient vergezeld te
zijn van het oorspronkelijke aankoopbewijs. Zorg voor een
/