Page is loading ...

Installation Instructions
Windjammer
P1 - 80053 Rev. B 1219
Installation Instructions - Windjammer
© 2019 Bestop, Inc.
Vehicle Application:
Jeep® JL Wrangler Unlimited 2018-Current
Part Number 80053 (Requires #52603-01)
Before you begin installing your new Windjammer,
please read all the instructions thoroughly.
Do not rely in any way on the components of this
product to protect against injury or death in the event of an accident.
Never operate the vehicle in excess of manufacturer’s specications.
Read and follow, precisely, all installation instructions provided when
installing this product. Failure to do so may result in a poor t and could
place occupants of the vehicle in a potentially dangerous situation.
WEAR SEAT BELTS AT ALL TIMES
Installation TimeTools
Skill Level
Safety glasses should be worn at all
times when installing this product.
WARNING
Installation Tips
1 - Easy
30 minutes
Safety
Glasses
Support
We’re here to help! Go to:
https://www.bestop.com
and click on Need Help?
https://www.bestop.com/video-library
T25 - Torx Driver
Phillips Screwdriver
T40 Torx Wrench
(included in your
Jeep tool kit)

Installation Instructions
Windjammer
P2 - 80053 Rev. B 1219
Installation Instructions - Windjammer
© 2019 Bestop, Inc.
Vehicle Application:
Jeep® JL Wrangler Unlimited 2018-Current
Part Number 80053 (Requires #52603-01)
P1B - 54823 Rev. G 0416
Installation Instructions - Supertop NX Twill
© 2016 Bestop, Inc.
Installation Instructions
Supertop NX Twill
Vehicle Application:
Jeep Wrangler Unlimited
2007-current
Part Number 54823

P3 - 80053 Rev. B 1219 © 2019 Bestop, Inc.
Installation Instructions - Windjammer
Installation Instructions
Windjammer
Vehicle Application:
Jeep® JL Wrangler Unlimited 2018-Current
Part Number 80053 (Requires #52603-01)
Parts List
- Required parts for installation - Page number in Installation Guide
Sections 2 to 9 Windjammer, Snap Stud Screws, Snap Straps
Snap Stud Screw
#8x 5/8”
Part #728221
Qty. 2
Snap Stud Screw
#8x 1”
Part #592.71
Qty. 3
Snap Stud Spacer
Part #235.91
Qty. 3
Windjammer
Qty. 1
Pages 4 to 12 of Guide
7” Snap Straps
Qty. 5
Plastic End Cap - Left
Part #593.71
Qty. 1
Plastic End Cap - Right
Part #592.66
Qty. 1
Aluminum Extrusion
Part #52603
Qty. 1
Required Parts, available separately
in the Bestop #52603-01 Parts Kit.

P4 - 80053 Rev. B 1219 © 2019 Bestop, Inc.
Page 4
Installation Instructions - Windjammer
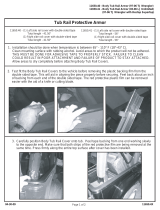
Remove Torx Screws from Sport Bar; Install Snap Stud Screws
Section 1
Step 2Step 1
Step 1
Step 2
Remove the Torx screws from the front
and underside of the sport bar in the
locations shown.
Replace the screws you removed with
three (3) #8x1” Snap Stud Screws #592.71
and three (3) Snap Stud Spacers #325.91
in the upper front locations, and two (2)
#8x5/8”Snap Stud Screws in the under-
side locations.
Tools
T25 - Torx Driver
Snap Stud Screw
#8x 5/8”
Part #728221
Qty. 2
Hardware
Phillips Screwdriver
728221 592.71 235.91
Snap Stud Screw
#8x 1”
Part #592.71
Qty. 3
Snap Stud Spacer
Part #235.91
Qty. 3

P5 - 80053 Rev. B 1219 © 2019 Bestop, Inc.
Page 5
Installation Instructions - Windjammer
Attach Snap Straps to Snap Studs
Section 2
Step 1
Step 2
Step 1
Step 2
Attach the ve (5) 7” Snap Straps to
the Snap Studs.
Upper Straps should be attached so
that the Straps can be wrapped over
the top of the Sport Bar.
Lower Straps should be attached so
that they can be wrapped around the
outside and top of each Sport Bar
downtube.
Attach the Windjammer straps to the Snap
Strap buckles. Do not snug straps yet.
Let the Windjammer hang down below the
Sport Bar.
Hardware
7” Snap Straps
Qty. 5
Windjammer
Qty. 1

P6 - 80053 Rev. B 1219 © 2019 Bestop, Inc.
Page 6
Installation Instructions - Windjammer
Section 3
Step 1
Step 1
Slide the Extruded Aluminum Bow, Bestop Part
#52603 (Available separately with Bestop Parts
Kit #52603-01)) over the “P-Extrusion” along
the bottom edge of the Windjammer.
Make sure that the Bow is oriented so that the
arch of the bow is vertical, facing up, and that the
slot that slides over the p-extrusion is the one on
the front of the Bow.
Slide the Bow all the way across along the bottom
edge of the Windjammer.
Slide Extruded Aluminum Bow onto Bottom Edge of Windjammer
Hardware
Extruded Aluminum Bow
Bestop Part #52603
Qty. 1
Use this slot
Required Parts, available separately
in the Bestop #52603-01 Parts Kit.
52603-01 Parts Kit

P7 - 80053 Rev. B 1219 © 2019 Bestop, Inc.
Page 7
Installation Instructions - Windjammer
Section 4
Attach End Caps to Extruded Aluminum Bow
Hardware
Plastic End Cap - Left
Part #593.71
Qty. 1
Plastic End Cap - Right
Part #592.66
Qty. 1
Internal Ribs
“Wing” Flange
goes on under-
side of Jeep
belt rail with
tab pointing
down.
Step 1
Place the Plastic End Caps #593.71 and #592.66 on
the Extruded Aluminum Bow (Available separately with
Bestop Parts Kit #52603-01).
The Caps should be aligned so that the “wing” ange
is on the underside of the Jeep belt rail, and the tab on
each ange is pointing down.
The internal ribs inside the round opening of each end
cap will slide into the slots on the top and bottom of
the aluminum extrusion.
Step 1
Tab points down
593.71 592.66
Required Parts, available separately
in the Bestop #52603-01 Parts Kit.
52603-01 Parts Kit

P8 - 80053 Rev. B 1219 © 2019 Bestop, Inc.
Page 8
Installation Instructions - Windjammer
Step 1
Slide the open end of one end cap over the
Jeep belt rail at a location 14” from the plastic
trim cap at the rear of the door opening.
The Caps should be aligned so that the
“wing” ange is on the underside of the Jeep
belt rail, and the tab on each ange is pointing
down.
Make sure that the arch of the Bow is facing
up when installed.
Step 1
Step 2
Section 5
Place Bow with Attached End Caps onto the Jeep Belt Rail
Tools
Step 2
Now pivot the other end of the aluminum bow
with attached end cap into place. Slide the
opening of the end cap over the Jeep belt rail,
and locate it the same distance - 14” - from the
door opening trim cap on the same side.
NOTE: If you have Door Surrounds on your
vehicle, you must remove some fasteners to
allow the Door Surround to be moved out of
the way before pivoting the Extrusion Bow into
place. You do not need to remove the Door Sur-
round - just move it out of the way. Use the T40
Torx Driver that comes in your Jeep’s tool kit to
remove the Door Surround fasteners.
You can now snug all the attachment straps
and replace the Door Rail and fasteners.
14”
T40 Torx Wrench
(included in your
Jeep tool kit)
14”

P9 - 80053 Rev. B 1219
Installation Instructions - Windjammer
© 2019 Bestop, Inc.
Vehicle Application:
Jeep® JL Wrangler Unlimited 2018-Current
Part Number 80053 (Requires #52603-01)
Warranty Information
Windjammer
WHAT BESTOP WARRANTS
Subject to the terms and conditions of sale, including any terms and conditions set forth by Bestop, Inc. (“Bestop” or “us” or “we”) in our then-current terms of
sale on our website (collectively, the “Terms”), Bestop represents and warrants that: the covered products listed in the “Covered Products and Warranty Periods”
section (a “Product”) will substantially be free from defects in materials and workmanship for the specied warranty periods set forth in that section.
THE WARRANTY IS LIMITED AND CONDITIONAL
This warranty applies to the original purchaser of the Product only. The warranty is valid only as long as the original retail purchaser owns the vehicle upon which
the Product is installed. The warranty expires should the Product be removed from the original vehicle or if the original vehicle is transferred to another owner.
This warranty is not transferable or assignable. The warranty does not apply to Product bought from auction-style or price-bid websites.
THE LIMITED WARRANTY AND STATED REMEDIES ARE SOLE AND EXCLUSIVE AND IN LIEU OF ALL OTHER WARRANTIES AND REMEDIES, AND COMPANY
EXPRESS DISCLAIMS ALL IMPLIED OR STATUTORY OR OTHER WARRANTIES, INCLUDING WITHOUT LIMITATIONS WARRANTIES OF MERCHANTABILITY,
NON-INFRINGEMENTOR FITNESS FOR A PARTICULAR PURPOSE. IN NO EVENT WILL COMPANY BE LIABLE FOR ANY SPECIAL, INCIDENTAL, CONSE-
QUENTIAL, PUNITIVE, INDIRECT OR EXEMPLARY DAMAGES OF ANY KIND, INCLUDING LOST PROFITS OR REVENUE, HOWEVER CAUSED, WHETHER FOR
BREACH OR REPUDIATION OF CONTRACT, TORT, BREACH OF WARRANTY, NEGLIGENCE, OR OTHERWISE, WHETHER OR NOT COMPANY WAS ADVISED
OF THE POSSIBILITY OF SUCH LOSS OR DAMAGES.
Some states do not allow exclusion or limitation, so this may not apply to you. This warranty gives you specic legal rights, and you may have other rights which
vary from state to state.
EXCLUSIONS TO THE WARRANTY
The Limited Warranty excludes, and Bestop is not liable in any way for any warranty claims, damages, or defects related to:
• Misuse, abuse, accidents, vandalism, negligence, re, or improper installation or modication, or improper or inadequate maintenance;
• Failure to comply with any Product documentation, Bestop instructions, or applicable law or regulations; use in extreme conditions
• Force Majeure including but not limited to, earthquake, hurricane, tornado, ooding, or other disasters natural or man-made, civil unrest, strikes, declared or
undeclared war, or lack of performance by, or discontinued product of, supply chain partners whose products, software, operations or management is beyond the
control of Bestop;
• Damage resulting in breakage (including without limitation, spontaneous breakage, accidental breakage or breakage by any other means)
of a Product or any component part;
• Damage to vinyl windows due to misuse, or cracking due to varying weather conditions.
YOUR SOLE REMEDY
During the applicable warranty period, Bestop shall, at its option, either repair or replace any Product that it conrms, in its discretion, is non-compliant with the
warranties herein. Bestop will not pay for labor charges associated with installation or removal of the Product. Should a specic Product be discontinued, Bestop
may, at its option, replace the discontinued Product with a current product or like product.
Please retain your proof of purchase. Original proof of purchase for the Product must accompany any warranty claim. If you have a warranty claim, rst you must
email Bestop Customer Service at [email protected] for instructions. All claims must be emailed to [email protected] within 30 days of
discovery of a defective Product, but in no event later than thirty days after the end of the applicable Warranty Period (the “Warranty Notice Period”). Warranty
claims made after the Warranty Notice Period are null and void and Bestop shall have no responsibility with respect to such claims.
THIS SECTION SETS FORTH BESTOP’S SOLE OBLIGATION & YOUR SOLE REMEDY WITH RESPECT TO ANY DEFECTS OR OTHER PRODUCT ISSUE. ANY
PRODUCTS REPLACED UNDER TERMS OF THIS WARRANTY WILL BE COVERED UNDER TERMS & BALANCE OF THE DURATION OF THE ORIGINAL LIMITED
WARRANTY FOR SUCH PRODUCT.

P10 - 80053 Rev. B 1219
Installation Instructions - Windjammer
© 2019 Bestop, Inc.
Vehicle Application:
Jeep® JL Wrangler Unlimited 2018-Current
Part Number 80053 (Requires #52603-01)
Warranty Information
Windjammer
COVERED PRODUCTS AND WARRANTY PERIODS: The warranty time periods are as follows for Products manufactured by Bestop:
BESTOP® LIMITED LIFETIME WARRANTY
Trektop® Pro Twill Fabric Top Sunrider® for Hardtop Twill Fabric Top
Trektop® NX Glide Twill Fabric Top Replace-a-Top™ Twill Fabric Top
Trektop® NX Twill Fabric Top Supertop® NX Twill Fabric Top
EZFold™ Soft Tonneaus Floor & Cargo Liners
ZipRail™ Soft Tonneaus Pet Barriers
EZRoll™ Soft Tonneaus
BESTOP® 5-YEAR LIMITED WARRANTY
Trektop® NX Glide™ Top (non-Twill) Sunrider® for Hardtop (non-Twill)Replace-a-Top™ Top (non-Twill) Trektop® NX Top (non-Twill)
Sailcloth Replace-a-Top™ Supertop® NX Top (non-Twill)
Tigertop™ and Halftop™ Supertop® Classic Soft Top Sunrider® Complete Soft Top Supertop® for Truck
EZ Fold Hard Tonneau
BESTOP® 3-YEAR/100K MILES LIMITED WARRANTY
Powerboard® & Powerboard® NX
Trekstep®, Side Mount
Trekstep®, Rear Mount
BESTOP® 3-YEAR LIMITED WARRANTY
Pavement Ends Sprint Top
BESTOP® 2-YEAR LIMITED WARRANTY
Trektop® Classic Soft Top
RoughRider™ Soft Storage
BESTOP® 1-YEAR LIMITED WARRANTY
All other Bestop® & Pavement Ends™ products not specied above.
For further information or request for warranty work, please contact:
Bestop Inc. Customer Service
Toll-Free: (800)845-3567
Main: (303)465-1755
E-mail: [email protected]
Website: www.Bestop.com
/