Page is loading ...

—
m
IQ
2NDEMC0
Addition of new 5800 series transmitters with this
control panel is prohibited, other than for repair of
existing installations. Non-permitted use voids U.S.
warranty.

CONGRATULATIONS !
on your purchase of the Ademco via30 System
The purpose of these Installation Instructions is to give you a brief overview of the ~
system, and provide instructions for installing a basic system.
As always, ADEMCO is there for YOU! Our SALES and TECHNICAL SUPPORT staff are eager
to assist you in any way they can, so don’t hesitate to call, for any reason!
East Coast Technical Support: 1-800-645-7492 (8 a.m.-6 p.m. E.S.T.)
West Coast Technical Support: 1-800-458-9469 (8 a.m.-5 p.m. P.S.T.)
Technical Support Fax Number: l-8@447-50t36
PLEASE,
Before you call Technical Support, be sure you have:
s Checked all wiring connections and fuses.
“ Determined that the power supply and backup battery are supplying proper voltages.
“ Verified your programming information where applicable.
c Noted the proper model number of this product, and the version level (if known)
along with any documentation that came with the product.
“ Your Ademco customer number and/or company name.
Having this information handy will make it easier for us to serve you quickly and
effectively.
Again, CONGRATULATIONS, and WELCOME ABOARD!
The Ademco via30 System
Can Support 2 EOLR Wired Zones
and
(when used with appropriate wireless receiver and/or wired expansion unit)
Up to a Total of 30 Expansion Zones
(Including up to: 30 Wireless, and/or s Additional Wired)
and
(when used with appropriate output relay unit)
2 or 4 Output Relays
FOR YOUR CONVENIENCE,
an easily removable Programming Form
has been included at the center of this manual.
This system is not California State Fire Marshall approved
and, as such, should not be used for fire protection in California
(or other areas requiring such acceptance).
-2-

Section 1. GENERAL information .............. 4
introduction ........................................................4
Zone Characteristics .............................................5
Section 2.
SYSTEM CONFIGURATIONS .......... 6
zoNEwPE Definitions ........................................6
HARD WiRED ZONES...............................................7
Basic Contm~s Zones ...........................................7
wiREDzoNE ExPANsDN .......................................8
Nos. 4219and 4229 Expansion Units .......................8
WiRELESS EXPANSON, -5700 RF SYSTEM- ...........9
General ..............................................................9
Supervision .........................................................9
House identification ..............................................9
Transm”kter identification .......................................9
WiRELESS EXPANSiON, -5800 RF SYSTEM-. ........10
General ............................................................ 10
Supervision ....................................................... 10
House identification ............................................ 10
Transmitter identification ..................................... 10
Transmitter System installation Options .................11
RELAY OUTPUTS .................................................. 12
Nos. 4204 and 4229 Output Reiay Modules.............. 12
4204Setup .......................................................l2
4229 Setup .......................................................l2
Relay Basics .....................................................l3
Section 3. MOUNTING THE CONTROL,
LOCK, &
PC BOARD .... ... . .........
14
Mounting the Cabinet ..........................................l4
installing the Lock (if Used) .................................. 14
installing the control’s Circuit Board Alone,
or (if used), with a 4219, 4229, or 4204.................... 14
installing Controi and RF Receiver Circuit Boards
Together, inthe Same Cabinet .............................. 15
Section 4. WIRING & POWERiNG
THE SYSTEM ... . .......... ... .........
16
Grounding the System ......................................... 16
Terminals andtinne@bns ..................................l6
Power.up Procedure ...........................................l7
Section 5. SYSTEM OPERATION .. ... ... ..... ....18
SECURi~~DES ................................................ 18
Master Code ...................................................... 18
User Codes ....................................................... 18
KEYPAD FuNcmoNs .....................................<......l8
Generai information
............................................ 18
Arming Fundions ...............................................l9
Panic Keys .......................................................l9
mouBLEmNDmioNs .........................................2o
General information ............................................2O
'Check" and"Batiey" Dispiays .............................2O
Power Faiiure .....................................................2O
Other Dispiays (Fixed Word Consoles) ....................2O
Section 6. PROGRAMMiNG THE SYSTEM.......21
General information ...........................................21
Summary of Programming Commands .....................22
Speciai Messages
..............................................22
PROGRAMMiNG DATA FiELDS ................................23
ALPHA Description ENTRiES..............................3O
Assigning Zone Descriptors.., ...............................3O
Entering Zone Descriptors ....................................3O
Adding Custom Words.........................................3l
ALPHA FiXED Dictionary
(For Entering Zone Descriptors) ................................32
CHA~CTER (ASCll) CHART...................................32
Section 7. SYSTEM COMMUNICATION .. . .... ...33
Re~ti Reformats ..........................................33
Section 8. REMOTE PROGRAMMiNG AND
CONTROL (DOWNLOADING)........34
Generai information ............................................34
Equipment Required ............................................34
Programming.....................................................34
Remote Programming Advisory Notes.....................34
Section 9. TESTiNG THE SYSTEM ... ...... ......36
Procedure .........................................................36
Section 10. SPECIFICATIONS &
ACCESSORIES .. ... .................39
sPEciFicATioNs .................................................39
ACCESSORIES (COMPATIBLE DEVICES). ................41
FCC STATEMENTS
. . . . . . . . . . . . . . . . . . . . . . . . . . . . . . . ...48
CANADiAN DOC STATEMENT .....................49
Limitations OF THiS ALARM SYSTEM ........50
LiMiTED WARRANTY ...............................51
Dlaa
rams
and Tabi s
e
TROUBLESHOOTiNG GUiDE . .....................37
OUTPUT RELAY EXAMPLES TABLE ..............44
DiP SWiTCH TABLES FOR
WiRELESS DEViCES
....... .... ..... ...............
46
SUMMARY OF CONNECTiONS Diagram ........
47
PROGRAMMiNG FORM................... Centerfold
–3-

Introduction
I
Alarm Output Advisov
I
This system includes an alarm
output rated at 2 amps.
Throughout the manual,
wherever
reference is
made to Alarm Output
Ratings, they
assume a
fully charged battery is
connected, unless the
UL
rating is stated. The battery
is periodically tested automati-
cally (approximately every four
hours), and if it cannot sustain a
load, a low battery message is
displayed and can be reported to
the”central station.
I
System
The Ademco via30 k a
microprocessor-based state-of-
the-art security control intended
for wireless applications.
Zones Supported
Supports
up to 32 zones, in the following configuration:
● 2 hard wired EOLR “basic” zones.
● Up to 30 expansion zones (wireless and/or additional
wired zones) by using an appropriate RF receiver( 4281
or 5881 type) or wired expansion unit (No. 4219 or
4229). Refer to the Zone Characteristics tabulation on
the next page for detailed zone information.
/Vote: The sirg/e 4281/5881 type RF receiver that the
Adenwo via30 accommodates, features Spatial
Diversity (dual antennas), which virtually eliminates
the possibility of “Nulls” and “Dead Spots” within
the coverage area.
Relay Outputs 2 or 4 output relays can be added, to perform pro-
grammable actions in response to zone activity or manual
entries, by using a No. 4229 Wired Expansion/Relay Unit
(8 wired zones and 2 output relays) or No. 4204 Relay Unit
(4 output relays).
Programming
A No.5137 or 6139 Alpha Console is required
for programming zones and relay operation, but
it need not remain in the system. These consoles have
digital keypads and 2-line 32 character alphanumeric LCDS
(Liquid Crystal Displays).
Programmed options to establish specific alarm and re-
porting features are stored in electrically erasable, non-
volatile EEROM memory. This means that the unit can be
reprogrammed many times (unlike units equipped with
PROMS) and that information which has been pro-
grammed will not be lost in the event of a complete loss of
power.
In addition, the system can be uploaded, downloaded, or
controlled via a computer and Hayes modem (see RE-
MOTE PROGRAMMING AND CONTROL on page 34).
Remote Consoles
After programming, the system may use one or more
4127, 4137, 5137, 6127 or 6139 Consoles. The 4127,
4137, and 6127 have digital keypads and fixed English
status LCDS.
Note:
4137AD and 5137AD (Addressable) Consoles
may be used, provided they are set to their non-
addressable mode (device ID 31...all DIP switch
positions UP).
When wireless is in use, the system may aLsobe armed
and disarmed with a wireless keypad (No. 5727/5827) or
other 5800 RF system units (e.g., Nos. 5801, 5802,
5803).
Jser Codes
Upto 3 secondary user codes can be assigned by the sys-
tem’s Master code.
communication
The system provides communication capability (central
station reporting, etc.) over existing telephone lines.
–4–

Zone
Characterlstlcs
!ones 1-4
not present
!ones 5,6
Wired Programmable Zones. EOLR supervised,
N.0, or N.C. sensors, 300-500 msec normal response.
!ones 7, 95, 96 Console Panics (Wired & Wireless). 24hr zones, pro-
grammable for silent, audible, auxiliary, or fire.
!one 8
Duress (see User’s Manual).
!one 9
Tamper. Reports faults in the expansion units (e.g.,
4219, 4229, 4281), tampers on 5800 system RF units
(5881), and trouble-by-day/alarm-by -night zones. For all
repori formats (except Contact ID, which provides more
explicit reporting) a trouble code is reported when the
system is not armed, and Zone 9 report code is sent for an
alarm.
additional
Up to 8 loops can be added, with a 4219 Wired
Mired Expansion Unit or No. 4229 Wired Expansion/Relay Unit.
Vogrammabie Loops are EOLR supervised, for N.O. or N.C. sensors,
tones
300-500 msec normai response, with optionai fast (1O-15
msec) response on ioop A (first expansion zone). Zone
numbers 10-17 should be assigned when using a 4219
or 4229 for zone expansion.
Alireiess Zones Up to 30 wireiess (RF) zones can be added by
using an Ademco 4281(5700 System) or 5881 (5800
System) Type RF Receiver. Specificaiiy:
Modei
Number of Zones
4281 L
up to 4
4281 M15881L
Up to 8
5881M
Upto 16
4281 H/5881 H
up to 30
Zone number assignments (which are also transmitter iD
assignments for 5700 RF system transmitters) can be in
the 10-63 range (18-63 when a 4219 or 4229 is aiso
used). A variety of RF system transmitters can be used to
make up the wireiess zones. This includes window/door
units, smoke detectors, PIRs, and panic keys.
Note: For
brevity, subsequent references herein to the
RF Receiver will be indicated by “4281/5881” un-
less a specific model is named.
if (4219/4229) wired exDansion zones and (4281/5881) wireless
expansion zones are ~o be added, they can comprise up to 8
(4219/4229) wired zones, pius wireiess zones up to the number permitted by
the type of 4281/5881 RF receiver used, as long as the tots/ does not exceec
the 30 expansion zones accommodated by the control.
For example: When aii 8 ioopsofa4219 or 4229 are to be used, a 4281H 01
5881H can add oniy 22 zones, so as not to exceed a totai of 30
expansion zones for this controi.
-5-

ZONE NPE DEFINITIONS
General Information
00- Zone Not Used
01 - Entry/Exit
Burglary
03- Perimeter
Burglary
04- Interior, Follower
05- Trouble by Day/
Alarm by, Night
06- 24-hour
Silent Alarm
07- 24-hour
Audible Alarm
08- 24-hour
Auxiliary Alarm
09- Supervised Fire
10- Interior w/Delay
Each zone must be assigned to a zone type, which defines the way in which the
system responds to faults in that zone. In addition, there are three keypad -
activated zones (PANIC keys, see note below), and two RF supervisory zones for
the RF
Receiver if installed. Zone types are defined below.
Program a zone with this zone type if the zone is not used.
This zone type provides entry delay whenever the zone is faulted if the control is
armed in the Away or Stay modes. When the panel is armed in the Instant or
Maximum modes, no entry delay is provided. Exit delay begins whenever the
control is armed, regardless of the arming mode selected. These delays are
programmable. This zone type is usually assigned to sensors or contacts on
doors through which primary entry and exit will take place.
This zone type gives an instant alarm if the zone is faulted when the panel is
armed in the Away, Stay, Instant or Maximum modes. This zone type is usually
assigned to all sensors or contacts on exterior doors and windows.
This zone type gives a delayed alarm (using the programmed Entry/Exit time) if
the Entry/Exit zone is faulted first. Otherwise this zone type gives an instant alarm.
This zone type is
active when the panel is armed in the Away and Maximum
modes. This zone type is bypassed automatically when the panel k
armed in the Stay or Instant modes. This zone type is usually assigned to a
zone covering an area such as a foyer, lobby, or hallway through which one must
pass upon entry (After faulting the entry/exit zone to reach the console to disarm
the system.) Since this zone type is designed to provide an instant alarm if the
enty/exit zone is not violated first, it will protect an area in the event an intruder
hides on the premises prior to the system being armed, or gains access to the
premises through an unprotected area.
This zone type will give an instant alarm
if faulted when armed in the Away, Stay,
Instant or Maximum (night) modes. During the disarmed state (day), the system ~,
will provide a latched trouble sounding from the console (and a central station
report, if desired). This zone type is usually assigned to a zone which contains a
foil-protected door or window (such as in a store), or to a zone covering a
“sensitive” area such as a stock room, drug supply room, etc. This zone type can
also be used on a sensor or contact in an area where immediate notification of an
entry is desired.
This zone type sends a report to the Central Station but provides no console
display or sounding. This zone type is usually assigned to a zone containing an
Emergency button.
This zone type sends a report to the Central Station, and provides a rapid
beeping sound at the console, and an audible external alarm. This zone type is
usually assigned to a zone that has an Emergency button.
This zone type sends a report to Central Station and provides a rapid beeping
sound at the console. (No bell output is provided). This zone type is
usually assigned to a zone containing a button for use in personal emergencies,
or to a zone containing monitoring devices such as water sensors, temperature
sensors, etc.
This zone type provides a fire alarm on short circuit and a trouble condition on
open circuit. The beil output will puise when this zone type is faulted. This zone
type is always active and cannot be bypassed. This zone type can be
assigned to controi panei wired zone 5, any zone in a wired zone
expansion moduie, or certain wireiess zones.
This zone type gives entry/exit delay (using the programmed entry/exit time), if
tripped when the panel is armed in the Away or Maximum modes. This zone
type is bypassed when the panei is armed in the Stay or instant .
modes. Delay begins whenever sensors in this zone are vioiated, regardless of ~
whether or not an entry/exit delay zone was tripped first.
-6–

20- Arm-Stay
This is a special purpose zone type used with 5800 series wireless pushbutton or
contact closure or opening, and which will result in arming the system in the STAY
mode when the zone is activated.
21 - Arm-Away
This is a special purpose zone type used with 5800 series wireless pushbutton or
contact closure or opening, and which will result in arming the system in the
AWAY mode when the zone is activated.
22- Disarm This is a special purpose zone type used with 5800 series wireless pushbutton or
contact closure or opening, and which will result in disarming the system when the
zone is activated,
23- No Alarm This zone type can be used on a zone when an output relay action is desired, but
Response with no accompanying alarm (ex. lobby door access).
By using a 4281/5881 RF Receiver and the appropriate 5700/5800 series
transmitters, all of the above zone types are available for the wireless portion of
the system.
HARD-WIRED ZONES
Basic Control’s Zones
The Ademco via30 supports 2 hard-wired zones, which are connected as
zones 5 & 6. These zones must be EOLR supervised, and can use N.O. and/or
N.C. sensors.
Zone Response Type Any zone response can be assigned to devices on
these zones.
Response Time 300-500 msec.
I/lax. Zone Resistance 300 ohms, excluding EOLR
EOLR Supervised
● Supports both open circuit and closed circuit
devices.
● Connect open circuit devices in parallel across
the loop. The 1,000 ohm EOLR must be
connected across the loop wires at the last
device.
Important: If the EOLR is not at the end of the
loop, the zone is not properly supervised. The
system may not respond to an open circuit within
the zone.
● Connect closed circuit devices in series with the
loop.
EOLR Fire Zone 5
● Only zone 5 can be used for fire.
● Supporls as many 4-wire smoke detectors as can
be powered.
● The zones must be configured for EOLR
supervision.
● The detectors must be wired in parallel, with the
EOLR at the last detector for full supervision.
● To supervise power, a supewisory module (e.g.,
System Sensor No. BK-A7771 601 EOL Relay
Module) is required.
-7–

WIRED ZONE EXPANSION
No% 4219 and 4229 If a No. 4219 Wired Expansion Unit, or 4229 Wired Expansion/Relay Unit is used,
Expansion Units
8 wired EOLR zones can be added to the basic control’s 2 zones, for a total of 10.
Location
Connections
Supervision
Zone Information
Settings
Can be mounted within or outside of the Ademcc
via3fl cabinet (see page 14).
Connects to the control’s remote console terminals fol
signaling.
“ Supervised against removal.
● Has tamper protection for security when mounted out-
side of the cabinet.
.
●
Eight wired expansion loops (designated A to H)
should be assigned zone numbers 10-17, and any 01
all can be programmed individually (infield ‘56).
If
RF will be used in addition to one of these units (see
WIRELESS EXPANSION sections), any zone nufiers
in the range of 18-63 (not 10-17) should be chosen for
the RF zones, even if some of the unit’s wired ex
pansion loops are not being used.
For example:
If only four of the wired expansion loops are being
used, a 4281H or 5881H RF Receiver could add 26 RF
zones (using any zone numbers in the range of 18-63)
to the system, for a combined total of 30 expansion
zones.
If a 4219 or 4229 is not being used, however, the same
receiver could add 30 RF expansion zones to the sys-
tem, assigned any zone numbers within a 10-63 range.
The 4219’s or 4229’s DIP switch must be set
[or a device address of “l”, as described in their
instructions (bottom 3 switches to the RIGHT...“on”, and
the next switch above to the LEFT...“off”).
For additional information, see the instructions that accompany the 4219 and
4229.
-8-

EXPANSION
— 5700 RF SYSTEM —
General
Supervision
House Identification
Transmitter
Identification
5700 RF System
Installation Advisories
I
1.
2.
3.
sary.
I
If the 4281 Receiver is to be
mounted remotely (not in the
control’s cabinet), place it in
a high, centrally located
area for best reception.
Do not locate receiver 01
transmitters on or neal
metal objects. This will de.
crease range and/or block
transmissions.
Before mounting transmit.
ters permanently, conduci
Go/No Go Tests to verif~
adequate signal strength
(see TESTING THE SYS
TEM) and reorient or relo
cate transmitters if neces
In addition to its basic 2 wired zones, the control, in conjunction with a 4281RF
Receiver, can provide wireless zones [4281L: up to 4 zones, 4281 M: up to 8,
4281H (in this application): up to 30]. A wireless keypad (5727) also can be used
with the system.
The receiver can be mounted within the control’s cabinet (see page 15) or in-
stalled remotely, in its own housing.
The 4281 recognizes alarms, status messages and keypad control messages
from 5700 Series Wkeless Transmitters operating at 345Mhz (315Mhz for Cana-
dian version). These messages are processed and relayed to the control panel
via a
4 wire connection to the control’s remote console terminals. The 4281’s
RED, BLACK, YELLOW, and GREEN wires are connected in parallel with console
wiring.
The 4281 can receive signals from wireless transmitters (listed below) within a
nominal range (installed) of 200 feet.
The 4281’s DIP switch must be set for a device address of “O”, as
described in the 4281’s instructions (all switches to the RIGHT...’’off”).
Each transmitter (except 5701 and 5727) is supervised by a check-in signal that is
sent to the receiver at 70-90 minute intervals. If at least one check-in is not re-
ceived from each transmitter within a 12 hour period, the “missing” transmitter
number(s) and “CHECK” will be displayed on the console.
Each transmitter (including 5701) is also supervised for low battery conditions and
will transmit a low battery signal to the 4281, with the battery having at least 30
days of life remaining. Ifthe 5727 transmits and has a low battery, it also will be in-
dicated (as Zone 00 on a fixed English console).
Note: After a low or dead battery is replaced, activate the transmitter and then
enter the security code + OFF to clear the system’s memory of the “Low
Batte
ry” signal.
The 4281 itself is supervised. If communication with the receiver is interrupted, or
valid RF signals from at least one supervised wireless transmitter are not received
within 12 hours, a tamper report (Zone 9) will be generated.
The 4281 responds only to transmitters set to the same House ID (01-31, see the
DIP switch tables on page 46) as programmed in the control (see field *24). This
prevents interference from transmitters in other nearby systems. To make sure
that a House ID is chosen that is not in use nearby, conduct the Sniffer Mode test
described under TESTING THE SYSTEM.
Each transmitter’s assigned zone number is DIP switch programmable in the unit
as its transmitter ID (except wireless keypads, which are fixed at ID 00). Whenever
a transmission takes place, whether for an alarm, fault, check-in, or low battery, the
ID number is sent along with the message to the 4281 which, in turn, relays this in-
formation to the control, which displays the condition and zone number on the
console.
WIRELESS TRANSMITTERS for the 4281 are described on page 41.
DIP SWITCH SETTING TABLES are shown on page 46.
Transmitters set for IDs of 48-55 (FIRE) have high signal priority and will
transmit once every 12 seconds while the zone is faulted.
Transmitter iDs of 62 and 63 are unsupervised to allow removal of the 5701
off-premises. Signal priority is higher than burglary.
Transmitters set for IDs of 56-63 will transmit once every 3 seconds while
faulted.
Transmitters set for IDs of 32-47 will have a 3 minute lock-out between
transmissions to conserve battery life (normally PIR units).
Note: To conserve battery life, transmitters protecting frequent/y used doors
and windows should be set for IDs in the 32-47 range.
-9–

WIRELESS EXPANSION
-5800 RF SYSTEM —
General
In addition to its basic 2 wired zones, the control, in conjunction with a 5881 RF
Receiver, can provide wireless zones [5881L: up to 8 zones, 5881M: up to 16,
5881H (in this application): up to 30]. wireless keypads (5827) also can be used
with the system.
The receiver can be mounted within the control’s cabinet (see page 15) or in-
stalled remotely, in its own housing.
The 5881 recognizes alarms, status messages and keypad control messages
from 5800 Series Wireless Transmitters operating at 345Mhz. These messages
are processed and relayed to the control panel via a
4 wire connection to the con-
trol’s remote console terminals. The 5881’s RED, BLACK, YELLOW, and GREEN
wires are connected in parallel with console wiring.
The 5881 can receive signals from wireless transmitters (listed below) within a
nominal range (installed) of 200 feet.
The 5881’s DIP switch must be set for a device address of “O”, as
described in the 5881’s instructions (ail switches to the RIGHT...’’off” ).
Supervision Each transmitter (except 5802, 5802CP, 5803, and 5827) is supervised by a
check-in signal that is sent to the receiver at 70-90 minute intervals. If at least one
check-in is not received from each transmitter within 12 hours, the “missing”
transmitter number(s) and “CHECK”’ will be displayed on the console. The super-
vision for a particular transmitter may be turned off by learning it as a “UR”
(unsupenfised RF) type.
Each transmitter is also supervised for low battery conditions and will transmit a
low battery signal to the 5881, with the battery having at least 30 days of life re-
maining. if the 5802, 5802CP, 5803, or 5827 transmits and has a low battery, it
will also be indicated.
Note: After a low or dead battery is replaced, activate the transmitter and then
enter the security code + OFF to clear the system’s memory of the “Low
Battery” signal.
Some transmitters (e.g. 5802, 5802CP, and 5803) contain long-life but
non-replaceable batteries. At the end of their life, the complete unit must
be replaced [and new identification code(s) learned by the control... see
Transmitter Mentificaticmbelow].
The 5881 itself is supervised. Ifcommunication with the receiver is interrupted, or
valid RF signals from at least one supervised wireiess transmitter are not received
within 12 hours, a tamper report (Zone 9) will be generated.
House If a 5827 Wireless Keypad is used with the system, it must have its DIP switch set
Identification
to the same House ID (01-31) as programmed in the control for the RF receiver
(see programming field
●24) to establish proper communication. D/P switch sef-
ting information for the 5827 is given on page 46.
Transmitter Each transmitter input has a different ID (identification) code, part of which in-
Identification
eludes a unique serial number permanently assigned to the device during manu-
facture. Many transmitters have more than one input, hence ID code (e.g., 5801
has 4,5803 has 3, etc.).
It is not necessary to assign a transmitter’s ID(s) during installation. Instead, the
control must learn or be programmed for each transmitter’s ID code(s) during
programming, in conjunction with assigned zone number(s) and other data.
Whenever a transmission takes place, whether for an alarm, fault, check-in, or low
battery, the ID code is sent as part of the message to the 5881. In turn, the
information is relayed to the control, which displays the condition and associated
zone number on the console.
[
WIRELESS TRANSMITTERS for the 5881
are described on page 42.
–lo–

Transmitter
To install the particular transmitters in the system, one of two optional methods
System installation
Options
I
5800 RF System
Installation Advisories
If the 5881 Receiver is to be
mounted remotely (not inthe
control’s cabinet), place it in
a high, centrally located
area for best reception.
Do not locate receiver 01
transmitters on or neal
metal objects. This will de-
crease range and/or block
transmissions.
Before mounting transmit.
ters permanently, conducl
Go/No Go Tests to verify
adequate signal strength
(see
TESTING THE SYS
TEM)
and reorient or relo.
cate transmitters if neces
sary.
can be used. “Option 1, whose procedure is-described in general below, and in
detail in PROGRAMMING THE SYSTEM on page 21, involves having the system
learn each transmitter to be used in the system. Option 2 (to be available soon),
described below, involves the downloader, where the IDs can be entered
manually at the office and then downloaded to an operating system.
OPTION 1
Learning and Assigning iD Codes at the Controi
Each transmitter sends its unique serial number with each transmission, but since
some devices have more than one sensor point (input), and the sensor point is
part of the ID, each ID must be learned and assigned separately.
As part of the programming of each zone, the device type is entered, and follow-
ing that, the display of “Learn S/N?” comes up. If the control is to be taught the
IDs now, pressing [1] will get the display “Transmit Now”.
The control program is now at a zone number to be assigned to a given transmit-
ter input (multi-point contact, single-point motion detector, single-point smoke
detector, multi-point emergency transmitter, etc.). A transmitter will either be al-
ready installed, or one of a group of transmitters to be installed at a given site. The
corresponding transmitter point (input) is then activated to generate a complete
event transmission (e.g., opening and closing a contact, closing and opening a
contact, pressing and releasing a button, causing alarm and restore, etc.). The re-
sulting transmission will contain an ID code identifying the device by serial number
and its activated point.
If the ID code of this first transmission event has not been previously learned, the
assignment of zone number and ID code (device serial number and sensor point)
is stored in the control memory, Concurrent with this first event, the console emits
a single, short sound to acknowledge this fact and to request a duplicate trans-
mission event to verify the assignment. Upon completion of a second identical
transmission event (within a pre-determined time limit), the control compares this
second (verify) event with the first (learn) event. If the two events match, the con-
trol keeps the assignment in EEPROM memory and the console emits a double,
short acknowledge sound.
Ifthe ID of the first transmission event was previously learned, a single, long error
sound is emitted. If the second (verify) transmission event does not match the
first (learn) transmission event, the ID of the first transmission event is erased and
the assignment is discarded.
In this mode, the selected zone number for that transmitter sensor point together
with other system attributes associated with that particular zone are concurrently
assigned to the “learned” ID code.
OPTION 2
Manuai iD Code Assignment Method
(TO BE AVAILABLE SOON)
Supplements
REMOTE PROGRAMMING AND CONTROL (DOWNLOADING)
section on page 34.
At the downloader computer location, the downloader for the Ademco via30 is
brought up.
The identification code numbers can be entered at the screens where the zone
characteristics and communicator reporting codes are entered. If the 5800 RF
system has been properly selected (RF expander type 5881) on a previous
screen, the type of transmitter and identification code (which includes input loop
data) can be entered on the same line as the other items for each zone. The fac-
tory pre-recorded serial number is read from the non-removable portion of the
transmitter case in a 7-decimal digit (telephone number) format.
Mark the transmitters to be used in the installation (multi-point contact, single-
point motion detector, single point smoke detector, multi-point emergency sen-
sor, etc.) and enter their ID codes when programming other data for the system.
When the data that defines the system is downloaded,
will be downloaded also and stored in EEPROM memory.
–l1-
the identification-codes

RELAY OUTPUTS
Nos. 4204 and 4229
Output Relay Modules
4204 Setup
4229 Setup
The Ademco v/a30 can support relay outputs via the use of either a 4204 (4
outputs) or a 4229 (2 outputs). These modules provide form C (normally open
and normally closed) dry contacts on relays that can be programmed to activate or -
deactivate to perform some action in response to a predetermined event such as -
turning on lights and/or closing a fire door in the event of a fire alarm condition.
There are many different uses for these relays, some of which are suggested in
the table on page 44.
The unit can be located inside the control’s cabinet or remotely (see MOU/VT//VG
THE CONTROL, LOCK, & PC BOARD section and the instructions that accom-
pany the unit).
The 4204 Relay Unit has 4 Form C relays. Each relay can be used independently
for different functions. The following steps should be taken to properly set up the
4204:
1.
2.
3.
4.
Connect the 4204 to the control’s remote console terminals
(4-7), using standard 4-conductor twisted cable (for long wiring runs) or the
connector supplied with the 4204 (as shown in the Summary of Connections
diagram).
Set the 4204’s DIP switch for a device address of “1”
(switch 2
“OFF” and switches 3, 4, 5 “ON”). Switch 1 determines the unit’s cover tam-
per response (“ON’”= disabied, “OFF” = enabled).
Note: Some “early” units have only a 4-position DIP switch. Set 1 to “OFF”
and 2, 3, 4 to “ON”.
During programming (summarized here, but see the detaiied procedure
in the PROGRAMMING THE SECURITY CONTROL section):
a. Program a”~ in field ●25.
b. Program fields ’80 (Output Relays) and ●81 (Zone Lists) for the desired
relay responses.
Connect the desired fieid wiring to the unit’s reiay contact terminals.
The 4229 Wired Expansion/Relay Unit has 8 hard-wired zones and 2 Form C re-
lays. Each relay can be used independently for different functions. The foilowing
steps should be taken to properly setup the 4229:
1. Connect the 4229 to the controi’s remote consoie terminais
(4-7),
using standard 4-conductor twisted cabie (for long wiring runs) or the
connector suppiied with the 4229 (as
shown in the Summary of Connections
diagram).
2. Set the 4229’s DiP switch for a device address of *’1‘“ (switch 2
“OFF” and switches 3, 4, 5 “ON”). Switch 1 determines zone A’s response
time (“ON” = normal response, “OFF”= fast response).
3. During programming (summarized here, but see the detailed procedure
in the PROGRAMMING THE SECUR/TY CONTROL section):
a. Program a”2 in field *25.
b. Program fieids ●8O (Output Relays) and ●81 (Zone Lists) for the desired
reiay responses.
c. In field ●56 (zone programming), assign zone numbers 10-17 to the
4229’s wired expansion zones.
4.
Connect the desired fieid wiring to the unit’s reiay contact terminais.
–12–

Relay Basics
Relavs can be used to Derform manv different functions and actions. In this svs-
Output Relay Advisory
I
Ifa reki-yis energized before
a wired smoke detector is
reset, the re/ay wi// be
stopped by the interruption
of Aux. Power that resets
the smoke detector. If this is
not desired, the power to
the relay unit should be
supplied from another 12V
power source (e.g., the
same source that is power-
ing external equipment
through the relay contacts).
I
tern,~ach relay must be programmed as to how to act (ACTION), when to activ~te
(START), and when to deactivate (STOP). Each of these is summarized briefly
below, but described later in detail in the programming procedure for fields “80
and ’81.
1. ACTION: The “ACTION” of the relay is how the relay will respond when it is
activated by the “START” programming. There are 4 different choices of
actions:
● CLOSE for 2 SECONDS and then reset.
● CLOSE and remain activated until deactivated by “STOP” programming.
● PULSE ON and OFF until deactivated by “STOP programming.
● NO RESPONSE is chosen when the relay is not used.
2. START: The “START” programming instructs the relay when and under
what conditions to activate. There are 3 parts to be programmed:
● EVENT instructs the relay what condition must occur to the zone(s) pro-
grammed into the “ZONE LIST” in order to activate the relay. The
“EVENT” and “ZONE LIST” work together. The 4 different choices for
“EVENT” are listed in the P/?OGRAMfd/NG section for field ’80.
● ZONE LIST is a fist of zones selected by the installer in field ●81.When an
event occurs as assigned by “EVENT” on any zone within that list, the
relay will activate as selected in ‘“ACTION”. In this way, many zones can
be assigned very easily to a single event. For example: Youmay wish
a relay to activate (perhaps to activate a strobe for a visual indication)
whenever any zone in a group of zones is fau/ted.
● ZONE TYPE/SYSTEM OPERATION. Instead of using a “ZONE LIST” and
“EVENT”, a specific zone (response) type or system operation action
can be selected to activate the relay.
If a specific “ZONE TYPE” is chosen, any zone of that re-
sponse type going into alarm, trouble, or fault will cause the relay to ac-
tivate as selected in “ACTION”. Any zone of that type that restores will
deactivate the relay.
If a “SYSTEM OPERATION’” is chosen, that operation will cause
the relay to activate as selected in “ACTION”.
The different choices for “ZONE TYPE and ‘“SYSTEM OPERATION”
are listed in the PROGRAMMING section for field 480.
3. STOP: The “STOP programming instructs the relay when and under what
conditions to deactivate. The 2 parts to be programmed are:
● RESTORE ZONE LIST. If a “RESTORE ZONE LIST” is used, the relay will
deactivate when all the zones in that list restore from a previous fault of
alarm condition. This will occur regardless of what is programmed to
“STAR~ the relay; therefore, a “RESTORE ZONE LIST” would nor-
mally only be used when a “ZONE LIST’ is used to start the relay.
● ZONE TYPE/SYSTEM OPERATION. Instead of using a “RESTORE
ZONE LIST”, a specific zone (response) type or system operation ac-
tion can be selected to deactivate the relay.
If a specific “ZONE TYPE” is chosen, any zone of that re-
sponse type that restores from a previous alarm, trouble, or fault condi-
tion will cause the relay to deactivate.
If a “SYSTEM OPERATION” is chosen, that operation will cause
the relay to deactivate.
The different choices for “ZONE TYPE” and “SYSTEM OPERATION”
are listed in the PROGRAMMING section for field ●80.
-13-

Mounting the Cabinet
Installing the Lock
(if Used)
m
Installing the Control’s
Circuit Board Alone,
or (if used),with a
4219, 4229, or 4204
IMPORTANT!
Before
installing the
cabinet’s contents, be
sure to remove the ap.
propriate metal cabinei
knockouts.
DO NOT ATTEMPT TO RE.
MOVE THE KNOCKOUTS AF.
TERTHE CiRCUiT BOARDHAS
BEEN INSTALLED.
The Aden?co via30 is supplied with a 12-1/2” (318mm) wide x 14-1/2 (368mm) ~
high x 3“ (76mm) deep cabinet suitable for use in residential installations.
Mount the control cabinet to a sturdy wail using fasteners or anchors (not
suppiied) in a ciean, dry area
which is not readily accessible to the generai public.
4 mounting holes are provided at the back of the cabinet.
Use an Ademco No. N6277 Cam
Lock and No. N6277-1 Push-On Clip
(Retainer Clip).
\
1. Remove the cabinet cover. /t is
easily removable for servicing
and is easily reinstalled.
LOCKED
2. Remove the lock knockout from
1
RflAINER CLIP
the control cabinet cover. Insert i
the key into the lock. Position i
*
,, m
the iock in the hole making cer-
..:
tain that the iatch wiii make con-
‘--’
tact with the latch bracket when
\
the door is closed.
UNLOCKED
3. Whiie holding the lock steady,
insert the retainer clip into the
+
[
RmAINER CLIrJ
,wEPosmoN,
1,
RSAINER
/0, ,
sLOTS
retainer slots. Position ciip as il-
(~
iustrated to facilitate easy re-
CAOINET DCOR BOITOM
rnoval.
Control’s Circuit Board
1. Hang two /ong mounting ciips (provided) on the raised cabinet tabs (see De-
taii B below).
2. insert the top of the circuit board into the siots at the top of the cabinet. Make ~
sure that the hoard rests on the correct row (see Detaii A ).
3. Swing the base of the board into the mounting clips and secure the board to
the cabinet with the accompanying screws (see Detail B).
4219, 4229 or 4204
1. Insert seif-tapping screws (provided) in two adjacent raised cabinet tabs.
Leave the heads projecting 1/8”.
2. Hang the unit on the screw heads via two of the slotted hoies at the rear of its
housing, as shown.
3. The 4219’s or 4229’s cover can be ieft off if the cover tamper jumper is placed
in its upper (nottampered) position (see Detaii C). The tampered cover is
necessary for installations outside of the control’s cabinet. ”
I
\
\
4219,+
4229,
or
4204
/q ~p
COVER TAMPER
JUMPER
–14-

Installing Control and 1.
RF Receiver
Circuit Boards z.
Together,
in the Same Cabinet
3.
IMPORTANT!
Before
Installing
the
4.
cabinet’s
contents, be
sure to remove the ap-
~
propriate
metal cabinet
“
knockouts.
6.
DO NOT ATTEMPT TO RE-
MOVE THE KNOCKOUTS AF-
TER THE CIRCUIT BOARDS
HAVE BEEN INSTALLED.
7.
Hang two short (black) mounting clips (provided with receiver) on the raised
cWlnet tabs, as shown in Detail B below.
Insert the top of the receiver board (removed from its own case as described
in its instructions) into the slots at the top of the cabinet (see Detail A). Make
sure that the board rests on the correct row of tabs.
Swing the base of the board into the mounting clips and secure it to the cabi-
net with the accompanying screws (see Detail B).
Insert the top of the control’s board into the slot in the clips and position two
/ong (red) clips at the lower edge of the board (see Detail C).
Swing this board into place and secure it with two additional screws.
Insert grounding lugs (supplied with the receiver) through the top of the cabi-
net into the /e/t-hand terminals of the antenna blocks (at the upper edge of
the receiver board) and secure them to the cabinet top with the screws pro-
vided, as shown in Detail D.
Insert the receivet’s antennas into the block’s tight-handterminals and tighten
the screws.
HOLES FOR ANTENNAS
~AND GROUNDING LUGs
L
‘OARDsuppORT’NGsLOTs
~.
RECEIVER
CIRCUIT
CIRCUIT
BOARD
SOARO ~
SHORT MOUNTING CLIPS
CONTROL
CIRCUIT
BDARD
CABINET -
LONG MOUNTINO CLIPS
SCREW
$/
~
ANTENNA
P
GROUNDING LUG
,’
d!ii!!!ii!!
!’ ,; ,,!
o
,,
,,’
RCVR BOARD
CABINET
DETAIL D
ANTENNA AND
GROUNDING LUG
INSTALLATION
@
DETAIL A
SIDE VIEW OF
BOARO SUPPORTING SLOTS
OETAIL
❑
SIDE VIEW DF
SHORT MOUNTING CLIPS
DETAIL C
SIOE VIEW OF
LONG MOUNTING CLIPS
–15–

(See Summary of ConnectIons Diagram on Page 47)
IMPORTANT:
Grounding the System
Terminals and
Connections
Do not connect the battery, or plug In the AC transformer,
until all other wiring connections have been completed.
Terminal 21 is the earth ground connection point. In order for the protective
devices in this product to be effective, the designated terminal must be
terminated in a good earth ground. The following are examples of good eatth
grounds available at most installations:
Metal cold water pipe: Use a non-corrosive metal strap firmly secured to the
pipe to which the lead is electrically connected and secured.
AC power outlet ground: Available from 3-prong, 120 VAC power outlets
only. To test the integrity of the ground terminal, use a 3-wire circuit tester with
neon lamp indicators, such as the UL Listed Ideal Model 61-035, or equivalent,
available at most electrical supply stores.
1 & 2: AC Input (16.5VAC, 25VA) from No. 1321/TF2 plug-in transformer
(in U.S.A.).
Note: For Canadian installations, a No. 1321CN transformer must be
used.
3:
Alarm relay output(+), 12VDC, 2.OAmaximum
(600mA max Alarm plus Aux Power for UL usage).
4: Alarm Output/Auxiliary Power/Wired Fire/Console(s)/ Optional 4281,5881,
4219, 4229, or 4204 (BLACK lead). Ground (-) Returnt.
5:
Auxiliary/Wired Fire/Console(s)/Optional 4281, 5881, 4219, 4229, or 4204
(RED lead) Power:
+12VDC at 500mA max ~.
6: Data In from Console(s)/Optional 4281, 5881, 4219, 4229, or 4204
(GREEN)t.
7: Data Out to Console(s)/Optional 4281, 5881, 4219, 4229, or 4204
(YELLOW)t.
8–13: not used
14:
Zone 5. (When Zones 5 and/or 6 are used, a
wired between the farthest sensor connected
low side of the zone.)
15: Zones 5 and 6 Return.
16: Zone6
17: Handset (TIP).
18: Handset (RING).
19:
Incoming Phone Line (TIP).
20: Incoming Phone Line (RING).
1,000 Ohm EOLR should be
to the zone terminal and the
21: EARTH GROUND (a proper earth ground must be provided to protect the
system from lightning and electrostatic discharge damage).
Warning: Toprevent the risk of electrical shock, disconnect the telephone line
at the Te/cojack before servicing the unit.
RED LEAD: Battery (+). When AC is present, 13.8VDC is being developed to
recharge a gel lead acid battery and when AC is absent, 12VDC current is
drawn from the battery. Battery lead reversal will blow the battery fuse.
BLACK LEAD:
Battery (-).
t
Up to 4 consoles may be used (check total auxiliary current, per SPEC/F/-
CAVONS). Consoles need not necessarily be on individual home runs, but
no more than 220 of #22 wire or 550’ of #18 wire should be used for each
run.
Addressable consoles (e.g., 4137AD and 5137AD) may be used, if they
are set to their non-addressable mode (device ID 31...all DIP switch posi-
tions UP).
–16-

Power-up Procedure 1. Make sure that the total current to be drawn from the Alarm Output terminals
(3 & 4) and Auxiliary Power Output terminals (4 &5) does not exceed the
values indicated in the SPEC/F/CAT/ONS section and on the SUMMARY OF
CONNECTIONS diagram.
2. Wire the transformer to the panel (before connecting the battery) as shown
on the SUMMARY OF CONNECTIONS diagram. Do not plug in at this
time.
3. Connect all ioops, devices, consoles, etc. to the panel.
4. Piug the transformer into a 24 hour, uninterrupted AC outlet. After some ini-
tial displays (see page 22) and approximately one minute, the green POWER
or READY LED on the consoie(s)
should be lit and the consoles should dis-
play “READV (Fixed Word consoles) or “DiSARMED READY TO ARM”
(Alpha consoles).
5. Connect the battery as shown in the SUMMARY OF CONNECTIONS
diagram.
-17-

SECURITY CODES
Master Code The installer programs the 4-digit Master Code initially as part of the programming
procedure (see W?OGRAIMWVG THE SYSTEM). The factory default Master code W
is “4111”.
The Master code can permit re-entry into the programming mode and also, in
normal operation mode, is used to enter the user codes, which also allow access
to the normal functions of the system.
See the Pl?OGRA/14M//VG section for information on exiting the programming
mode via fields ’98 or ’99.
User Codes In normal operation mode, the Master security code can be used to assign up to
three secondary security codes. It can also be used to remove secondary codes
from the system (individually).
To assign (or change) a Secondary security code, enter:
Master Code + [CODE key]+ User # (2 or 3 or 4) + desired Secondary Code
The system will emit a single beep when each secondary code has been suc-
cessfully entered.
To delete a Secondary security code, enter:
Master Code + [CODE key]+ User # (2or 3 or
4)
Notes:
s All Master and Secondary security codes permit access to the system for arm-
ing, disarming, etc.
● If a secondary code is inadvertently repeated for different users, or one user’s
code is another’s duress code (4th digit increased by
1), the lower user number
will take priority.
● Opening and closing reports are sent for the Master code as No. 1. User codes
are sent as Nos. 2, 3, and 4 respectively.
KEYPAD FUNCTIONS
General Information
Note that if QUICK ARM is enabled (field ’21), the [#] key can be pressed instead
of entering the security code, for any of the arming procedures (Away, Stay, in-
stant, Maximum, etc.).The security code is a/ways required, however, when dis-
arming the system.
The keypad allows the user to arm and disarm the system, and perform other sys-
tem functions, such as bypassing zones, and display zone descriptors. Zone and
system conditions (alarm, trouble, bypass) are displayed in the Display Window.
When an alarm occurs, console sounding and external sounding will occur, and
the zone(s) in alarm will be displayed on the console. Pressing any key will silence
the console sounder for 10 seconds. Disarming the system will silence both con-
sole and external sounders. When the system is disarmed, any zones that were
in an alarm condition during the armed period will be displayed (memory of alarm).
To clear this display, simply repeat the disarm sequence (enter the security code
and press the OFF key) twice.
The consoles also feature chime annunciation, and 3 panic key pairs (for silent,
audible, fire or personal emergency alarms) which can notify the central station of
an alarm condition, if that service is connected.
–18–

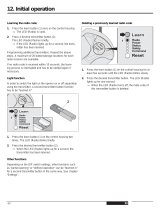
Arming Functions The following is a brief list of system commands. For detailed information
concerning system functions, refer to the User’s Manual.
Disarmed, Not Ready
Arming Away
Arming Stay
Arming Instant
Arming Maximum
Disarming
Bypassing Zones
Forced (Quick) Bypass
Chime Mode
Before arming, the system must be in the READY
condition (all zones must be intact). If the “NOT
READY” message appears, press the READY ~]
key to display faulted zones.
Enter code + AWAY [2].
Enter code + STAY [3].
Enter code + INSTANT [7].
Enter code + MAXIMUM [4].
Enter code + OFF [1].
Enter code + BYPASS [6]+ zone number(s).
(If enab/ed)To automatically bypass all faulted zones,
use “Quick Bypass” method:
Enter code + BYPASS (then stop).
Enter code + CHIME 191.
To
turn chime mode dff; enter code+ CHIME again.
SUMMARY OF ARMING MODES
Features for Each Arming Mode
Mode Exit
Entry Perimeter Interior
Delay
Delay Armed
Armed
AWAY
Yes
Yes Yes Yes
STAY
Yes
Yes
Yes No
INSTANT
Yes
No
Yes No
MAXIMUM
Yes
No Yes Yes
Panic Keys
There are three panic key pairs and (on some consoles) lettered keys(shown be-
low) that, if programmed, can be used to manually initiate alarms and send a report
to the central station. Each can be individually programmed for 24 Hour Silent,
Audible, Personal or Fire Emergency responses. The panic function is activated
when both keys of the appropriate key pair is pressed at the same time, or the ap-
propriate lettered key is pressed for at least 2 seconds.
The panic functions are identified by the system as follows:
n
Notes:
● Keys [A], [B], [C] are not on all consoles.
● Key [D], if present, is not active here.
IMPORTANT: For the Panic functions to be of practical value, the system must
be connected to a central station.
-19–

TROUBLE CONDITIONS
General Information
“Check” and
“Battery” Dispiays
Power Faiiure
Other Dispiays
{Fixed Word Consoies)
The word “CHECK on the Console’s display, accompanied by a rapid “beeping”
at the Console, indicates that there is a trouble condition in the system. The au-
dible warning sound can be silenced by pressing any key. Instruct users to call for
service immediately upon seeing any of the following messages.
QA dlspiay of “CHECK” and one or more zone numbers indicates that
a problem exists with the displayed zone(s) and requires attention.
When the problem has been corrected, the display can be cleared by entering
the OFF sequence (code plus OFF key) twice.
c if there are wireless sensors in the system, the CHECK condition may
also be caused by some change in the environment that prevents the receiver
from hearing a particular sensor.
● A dispiay of “BAT’” with no zone number indicates that the system’s
main standby battery is weak.
● A display of “BAT” with a zone number and a once per minute
“beeping” at the consoie indicates that a low battery condition exists in
the wireless sensor displayed (zone “00” indicates a wireless keypad). If the
battery is not replaced within 30 days, a CHECK display may occur.
Not e: Some wireless sensors contain a non-replaceable long-life battery
which requires replacement of the entire unit at the end of battery life
(e.g., Nos. 5802, 5802CP, 5803).
● If there is no console display at all, and the POWER indicator (if
present) is not lit, operating power for the system has stopped and the sys-
tem is inoperative.
● if the message “AC LOSS” or “NO AC” is displayed, and the
POWER Indicator (if present) Is off, the console is operating on battery
power only.
di
If this remains displayed for more than 1 minute, the system is disabled.
CC The system is in communication with the central station for change of func-
tion or status verification.
*
FC A communication failure has occurred.
O C The console is not receiving signals from the control panel and sees an
open circuit.
–20–
/