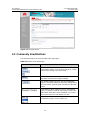
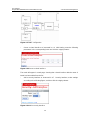
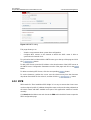
Aolynk ADSL2+Broadband Router Aolynk DR814 User manual
- Category
- Networking
- Type
- User manual
This manual is also suitable for

HUAWEI
Aolynk DR811/DR814 ADSL2+Broadband Router
User Manual

Aolynk DR811/DR814 ADSL2+Broadband Router
User Manual
Manual Version
T2-080127-20050126-C-1.00
BOM
3101A027
Huawei Technologies Co., Ltd. provides customers with comprehensive technical support
and service. If you purchase the products from the sales agent of Huawei Technologies Co.,
Ltd., please contact our sales agent. If you purchase the products from Huawei
Technologies Co., Ltd. directly, please feel free to contact our local office, customer care
center or company headquarters.
Huawei Technologies Co., Ltd.
Address: East of Liuhe Road, Zhijiang Science Park,
Hangzhou, P. R. China
Website: http://www.huawei-3com.com
Email: soho@huawei-3com.com

Copyright © 2005 Huawei Technologies Co., Ltd.
All Rights Reserved
No part of this manual may be reproduced or transmitted in any form or by any
means without prior written consent of Huawei Technologies Co., Ltd.
Trademarks
, HUAWEI, C&C08, EAST8000, HONET, , ViewPoint, INtess, ETS, DMC,
TELLIN, InfoLink, Netkey, Quidway, SYNLOCK, Radium, M900/M1800,
TELESIGHT, Quidview, Musa, Airbridge, Tellwin, Inmedia, VRP, DOPRA, iTELLIN,
HUAWEI OptiX, C&C08 iNET, NETENGINE, OptiX, iSite, U-SYS, iMUSE, OpenEye,
Lansway, SmartAX, infoX, TopEng are trademarks of Huawei Technologies Co.,
Ltd.
All other trademarks mentioned in this manual are the property of their respective
holders.
Notice
The information in this manual is subject to change without notice. Every effort has
been made in the preparation of this manual to ensure accuracy of the contents, but
all statements, information, and recommendations in this manual do not constitute
the warranty of any kind, express or implied.

User Manual
Aolynk DR811/DR814 ADSL2+Broadband Router Table of Contents
i
Table of Contents
1 Introductions.............................................................................................................................3
1.1 Product Overview..............................................................................................................3
1.2 Appearance......................................................................................................................4
1.2.1 Front View..............................................................................................................4
1.2.2 Rear View...............................................................................................................5
1.3 Features...........................................................................................................................5
1.4 Parts Check......................................................................................................................6
2 Connecting Your Device...........................................................................................................7
2.1 Overview...........................................................................................................................7
2.2 Steps................................................................................................................................7
2.3 Finish................................................................................................................................8
3 Getting Started with the Web Pages........................................................................................9
3.1 Accessing the Web Pages.................................................................................................9
3.2 Web Page Layout...........................................................................................................11
3.3 Commonly Used Buttons.................................................................................................12
3.4 Testing Your Setup.........................................................................................................13
3.5 Default Device Settings...................................................................................................14
4 Web-based Management.........................................................................................................15
4.1 Quick Setup....................................................................................................................15
4.2 WAN Setting...................................................................................................................16
4.3 DNS Relay......................................................................................................................18
4.4 LAN Setting.....................................................................................................................19
4.5 DHCP.............................................................................................................................21
4.6 Route..............................................................................................................................22
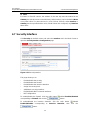
4.7 Security Interface............................................................................................................25
4.8 DMZ Configuration..........................................................................................................28
4.9 Security Policy................................................................................................................30
4.10 Trigger..........................................................................................................................31
4.11 IDS...............................................................................................................................34
4.12 SNTP............................................................................................................................35
4.13 ZIPB.............................................................................................................................36
4.14 Password......................................................................................................................38
4.15 Remote Access.............................................................................................................38
4.16 Restart Router...............................................................................................................39
4.17 Configuration Backup/Restore.......................................................................................40
4.18 Upgrade........................................................................................................................42
4.19 Status...........................................................................................................................43

User Manual
Aolynk DR811/DR814 ADSL2+Broadband Router Table of Contents
ii
4.20 Log...............................................................................................................................45
4.21 PVC Scan.....................................................................................................................46
4.22 Save Configure.............................................................................................................47
5 Configuring Your Computers.................................................................................................48
5.1 Configuring Ethernet PCs................................................................................................48
5.1.1 Before You Begin..................................................................................................48
5.1.2 Windows® XP PCs...............................................................................................48
5.1.3 Windows 2000 PCs...............................................................................................49
5.1.4 Windows Me PCs..................................................................................................50
5.1.5 Windows 95, 98 PCs.............................................................................................50
5.1.6 Windows NT 4.0 Workstations..............................................................................51
5.1.7 Assigning Static Internet Information to Your PCs.................................................52
5.2 Configuring a PC Connected by USB Port.......................................................................53
5.2.1 Connecting a Computer to the USB Port by a USB cable......................................53
5.2.2 Installing the USB Driver.......................................................................................53
5.2.3 Configuring IP Properties on PC Connected by USB Port......................................56
6 IP Addresses, Network Masks, and Subnets.........................................................................57
6.1 IP Addresses..................................................................................................................57
6.1.1 Structure of an IP Address....................................................................................57
6.1.2 Network Classes...................................................................................................58
6.2 Subnet Masks.................................................................................................................58
7 Service Configuration.............................................................................................................60
7.1 Configuration Overview...................................................................................................60
7.2 PureBridge......................................................................................................................61
7.3 DHCP/StaticIP................................................................................................................62
7.4 IPoA................................................................................................................................62
7.5 PPPoA............................................................................................................................63
7.6 PPPoE............................................................................................................................63
8 Troubleshooting......................................................................................................................65
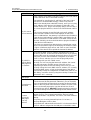
8.1 Troubleshooting Suggestions..........................................................................................65
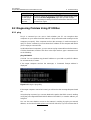
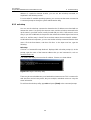
8.2 Diagnosing Problem Using IP Utilities..............................................................................67
8.2.1 ping......................................................................................................................67
8.2.2 nslookup...............................................................................................................68
9 Appendix - Glossary................................................................................................................69

User Manual
Aolynk DR811/DR814 ADSL2+Broadband Router 1 Introductions
3
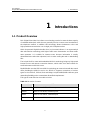
1 Introductions
1.1 Product Overview
DSL (Digital Subscriber Line) refers to a technology used to increase the data capacity
of standard twisted-pair wires that are generally used to connect most households to
the telephone network. In addition, this technology allows simultaneous voice and
high-speed data transmission over a single pair of telephone wires.
ADSL (Asymmetric Digital Subscriber Line), as its name indicates, is an asymmetrical
data transmission technology with higher traffic rates downstream and lower traffic
rates upstream. It is suitable for Internet users because information is usually
downloaded more often than uploaded, such as when surfing the web or downloading
files.
The Aolynk ADSL2+ router with embedded ADSL2+ technology brings up high-speed
internet access and remote connection features, which make it an ideal solution for
small businesses and SOHO users.
DR811/DR814 uses the ATM over ADSL2+ technology to communicate with the central
office providing the ADSL2+ service. As ATM PVC supports connections of various
types such as PPPoE, PPPoA, IPoA and bridge, Aolynk DR811/DR814 delivers great
networking flexibility and accommodates diversified requirements.
This type of router falls into 4 models as below.
Table 1-1 DR series of routers
Model Difference
DR814 ADSL2+ over POTS, 4 Ethernet ports
DR814I ADSL2+ over ISDN, 4 Ethernet ports
DR811 ADSL2+ over POTS, 1 Ethernet port
DR811I ADSL2+ over ISDN, 1 Ethernet port

User Manual
Aolynk DR811/DR814 ADSL2+Broadband Router 1 Introductions
4
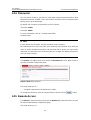
1.2 Appearance
1.2.1 Front View
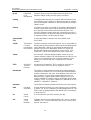
The front panel contains lights called LEDs that indicate the status of the unit.
Figure 1-1 Front panel
Table 1-2 LED description
LED Status Description
ON Power has been switched on and is working normally
Power
OFF Power is switched off or fails
Diag - For factory test only
ON ADSL loop is brought UP
Blinking Starting up
Link
OFF ADSL loop is down
Blinking Data is being transmitted or received through ADSL
Act
OFF No data transmission activities present on the link
ON USB connection established
USB
OFF No USB cable connected
ON Ethernet link is up
Blinking Ethernet interface is transmitting or receiving data
LAN1/2/3/4
(Only one
for DR811)
OFF No link is up

User Manual
Aolynk DR811/DR814 ADSL2+Broadband Router 1 Introductions
5
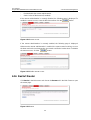
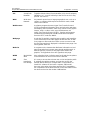
1.2.2 Rear View
All cable connections to the ADSL router are made at the rear panel. A factory reset
button is located here as well.
Figure 1-2 Rear panel connections
Table 1-3 Port description
Interface
Quantity
Connector
Description
Ethernet
1 (DR811)
4 (DR814)
RJ45
10/100Base-TX
10/100 Mbps auto-negotiation
MDI/MDIX auto-sensing
Compatible with IEEE802.3/802.3u
USB 1
Series-B
Receptacle
USB 1.1
ADSL 1 RJ11
ANSI T1.413 Issue 2
ITU G.992.1 AnnexA G.dmt
ITU G.992.2 G.lite
ITU G.992.3 ADSL2
ITU G.992.5 ADSL2+
Reset 1 -
Restoring to factory default settings (For
this purpose, you are required to hold
down the button for at least 5 seconds.)
1.3 Features
The list below contains the main features of the device which make it excellent for
network connections.
Features include:
l Internal DSL modem for high-speed Internet access.
l Data rates up to 20Mbps for downstream and 1Mbps for upstream.
l Uses NAT to allow your entire network’s PCs to connect to the Internet using only
one (purchased) IP Address.
l Supports PPPoE that enables users to seamlessly connect to ISPs via the familiar
“dial-up” connection interface.

User Manual
Aolynk DR811/DR814 ADSL2+Broadband Router 1 Introductions
6
l Built-in firewall for protecting your PCs from outside intruders.
l Supports DHCP client to acquire either a dynamic IP Address or a fixed IP
Address from the ISP.
l Built-in DHCP server for automatically assigning and managing LAN IP
addresses.
l USB port for connecting a USB-enabled PC.
l Zero Installation PPP Bridge (ZIPB), Network address translation (NAT), Firewall,
and IP filtering functions to provide security for your LAN.
l Network configuration through DHCP Server and DHCP Client.
l Services including IP route and DNS configuration and IP and DSL performance
monitoring.
l Allows multiple users to access the Internet at the same time by providing
maximum Internet utilization to multiple users sharing a single public IP Address.
l Allows users on Ethernet LAN to transfer data to each other.
l Friendly built-in web-based graphical user interface for easy configuration and
management through common web browsers.
1.4 Parts Check
Please check the arrived shipment against the following packing list, making sure all
the items are included and in good condition:
Table 1-4 Packing list
Interface Quantity
Aolynk ADSL2+ Broadband Router 1
Power adaptor 1
Telephone cables 1
Ethernet cable 1
USB cable 1
Screw and anchor 2
Quick Start manual 1
Driver & Manual CD 1
Quality card 1

User Manual
Aolynk DR811/DR814 ADSL2+Broadband Router 2 Connecting Your Device
7
2 Connecting Your Device
2.1 Overview
This chapter provides basic instructions for connecting the ADSL router to a computer
or LAN.
This chapter assumes that you have already established a DSL service with your
Internet service provider (ISP). These instructions provide a basic configuration that
should be compatible with your home or small office network setup. Refer to the
subsequent chapters for additional configuration instructions.
When selecting a location for the ADSL router, allow ample clearance to access the
connections on the rear panel. For convenience, try to place the ADSL router near your
computer so you can monitor the LED indicators. Allow some space above the ADSL
router for ventilation to avoid problems with overheating.
The diagram below illustrates the hardware connections. Refer to the steps that follow
for specific instructions.
Telephone
Desktop PC
Internet Wall plug
Aolynk ADSL2+ Router
NoteBook
Splitter
LINE
ADSL PHONE
Figure 2-1 Hardware connections
2.2 Steps
1) Connect the DSL cable and optional telephone

User Manual
Aolynk DR811/DR814 ADSL2+Broadband Router 2 Connecting Your Device
8
Two options are available for connecting the ADSL cable:
Option 1: Connect the ADSL port (same as a regular telephone port) on the rear panel
of DR811/DR814 to the wall jack of telephone line using the telephone cable.
Option 2: Connect the ADSL port on DR811/DR814 and a telephone set to a splitter,
and then the splitter to the wall jack of telephone line. Thus you may place phone calls
when accessing the Internet.
2) Connect the Ethernet cable
You can choose one of the following two options:
l If you are connecting a LAN hub to the ADSL router, attach one end of the
provided Ethernet cable to a regular hub port and the other to the one of the
Ethernet ports on the device.
l If you are connecting a single Ethernet computer to the ADSL router, attach it
directly to the one of the Ethernet ports on the device via an Ethernet cable.
3) Attach the power connector
Connect the power adapter to the Power connector on the back of the device and plug
the adapter into a wall outlet or power strip. DR811/DR814 has no power switch; so it is
powered on soon after the power cable is connected to the power jacket.
4) Configure your Ethernet PCs
You must also configure the Internet properties on your Ethernet PCs. Refer to ”5.1
Configuring Ethernet PCs”.
5) Install USB software and connect the USB cable
Only include this step if you want users to use the USB port.
You can attach a single computer to the device using a USB cable. The USB port is
useful if you have a USB-enabled PC that does not have a network interface card for
attaching to your Ethernet network.
Before attaching the USB cable, you must install a USB driver on your PC and
configure the computer. For complete instructions, refer to “5.2 Configuring a PC
Connected by USB Port.”
2.3 Finish
After setting up and configuring the device and PCs, you can log on to the device by
following the instructions in “ 3 Getting Started with
the Web Pages”.

User Manual
Aolynk DR811/DR814 ADSL2+Broadband Router
3 Getting Started with
the Web Pages
9
3 Getting Started with
the Web Pages
The ADSL router provides a series of web pages that function as an interface for
managing the device. These web pages enable you to configure the device to meet the
needs of your network. You can access them through your web browser from any PC
connected to the device via the LAN or USB port.
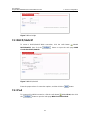
3.1 Accessing the Web Pages
To access the web pages, you need the following:
l A PC or laptop connected to the LAN or USB port on the device.
l A web browser installed on the PC. The minimum browser version requirement is
Internet Explorer v5.0 or Netscape v4. For the best display quality, use Internet
Explorer v6, or Netscape v6.1.
1. The default IP settings for the ADSL router are as follows:
IP address: 192.168.1.1
Subnet mask: 255.255.255.0
Before performing the above configurations on the ADSL router, first have the computer
set in the same subnet with the router. To do so, first install and enable the TCP/IP
protocol (refer to 5.1 Configuring Ethernet PCs), and then set an IP address and a
subnet mask, for example, 192.168.1.100 and 255.255.255.0. Make sure the IP
settings place the computer in the same subnet as the router.
2. If the browser software on the computer you are using is configured to use
a proxy server for Internet access, it is necessary to first disable the proxy
connection.
In Windows Internet Explorer, you can check if a proxy server is enabled using the
following procedure:
l In the Explorer Window, select and click on Tools->Internet Options to enter the
Internet Options window.

User Manual
Aolynk DR811/DR814 ADSL2+Broadband Router
3 Getting Started with
the Web Pages
10
l In the Internet Options window, click the Connections tab and then click on the
LAN Settings button.
l Verify that the Use proxy server option is NOT checked. If it is checked, click in
the checked box to deselect the option and then click OK.
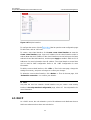
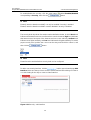
3. From any of the LAN computers, open the web browser, type
“http://192.168.1.1" in the web address (or location) box, and press [Enter]. A
login screen is displayed:
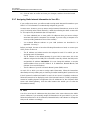
Figure 3-1 Login screen
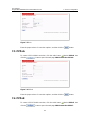
4. Enter your user name and password. The first time you log into the program,
use the default user ID and password (admin and admin)
& Note:
You can change the password at any time. For the default user ID, admin, only the
password can be changed. Refer to 4.14 Password.

User Manual
Aolynk DR811/DR814 ADSL2+Broadband Router
3 Getting Started with
the Web Pages
11
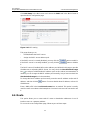
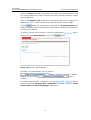
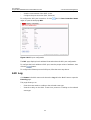
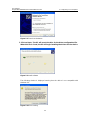
5. Click OK. The Welcome page is displayed:
Figure 3-2 The welcome page
This is the first page that is displayed each time you log in to the web pages.
& Note:
If you receive an error message or the Welcome page is not displayed, refer to “8.1
Troubleshooting Suggestions”.
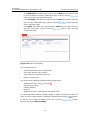
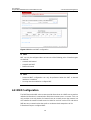
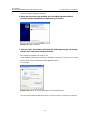
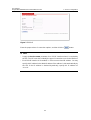
3.2 Web Page Layout
The web pages provide information that allows you to configure your device. Links to
configuration pages are listed in the Main Menu on the left-hand side of the screen.
Click on an individual menu entry to display a page in the Main Frame, which is in the
white area.

User Manual
Aolynk DR811/DR814 ADSL2+Broadband Router
3 Getting Started with
the Web Pages
12
Figure 3-3 The page layout
3.3 Commonly Used Buttons
The following buttons are used throughout the web pages:
Table 3-1 Buttons in the web pages
Button Function
These buttons appear at the end of a series of
configuration pages. Click on these buttons to confirm
and save the changes you have made.
This button appears on configuration pages. Click on
this button to restore the original settings.
This button appears on some pop-up configuration
pages. Click on this button to cancel the configurations
you have made, close the page, and return to the Main
Frame.
Radio buttons, which appear on many configuration
pages. Sometimes it may be necessary to select one
radio button from two or more available. You cannot
select more than one radio button at a time.
Drop-down list buttons, which appear on many
configuration pages. Click to select one.

User Manual
Aolynk DR811/DR814 ADSL2+Broadband Router
3 Getting Started with
the Web Pages
13
The following terms are used throughout this guide in association with these buttons:
l Click – Position the cursor over a button, menu entry or link on the screen and click
the left mouse button. This performs an action, such as displaying a new page.
l Select – Usually used when describing which radio button to select from a list, or
which entry to select from a drop-down list. Position the cursor over the entry and
left-click to select it. This does not perform an action – you will also be required to
click on a button, menu entry or link in order to proceed.
3.4 Testing Your Setup
Once you have connected your hardware and configured your PCs, any computer on
your LAN should be able to use the device’s DSL connection to access the Internet.
To test the connection, connect a single Ethernet computer to the ADSL router, plug the
power cable to POWER socket of the device, wait for 1 minute and then verify that the
LEDs are illuminating as follows:
Table 3-2 Router LEDs
LED Behavior
Power Solid green to indicate that the power has been switched on. If this light
is not on, check the power cable attachment.
Link Flashing on/off while the ADSL line of the device is being activated.
After about 20-30 seconds, solid green to indicate that the device is
now communicating normally with the central office.
Act Flashing on/off while data is being transmitted. Going off indicates that
no data transmission happens.
LAN Solid green to indicate that the Ethernet link is up.
Flashing on/off while Ethernet interface is transmitting or receiving data.
USB Solid green to indicate that the USB connection is operational.
If the LEDs illuminate as expected, test your Internet connection from the LAN
computer (and from the USB computer, if applicable): Open your web browser, and
type the URL of any external website (such as http://www.yahoo.com). The LED
labeled ADSL Act should be blinking rapidly and may appear solid as the device
connects to the site.
If the LEDs do not illuminate as expected, you may need to configure your Internet
access settings using the information provided by your ISP. For details, refer to”4.2
WAN Setting”. If the LEDs still do not illuminate as expected, or the web page is not
displayed, refer to “8.1 Troubleshooting Suggestions”, or contact your ISP for
assistance.

User Manual
Aolynk DR811/DR814 ADSL2+Broadband Router
3 Getting Started with
the Web Pages
14
3.5 Default Device Settings
In addition to handling the DSL connection to your ISP, the ADSL router can provide a
variety of services to your network. The device is pre-configured with default settings
for use with a typical home or small office network.
The table below lists some of the most important default settings; these and other
features are described fully in the subsequent chapters. If you are familiar with network
configuration, review these settings to verify that they meet the needs of your network.
Follow the instructions to change them if necessary. If you are unfamiliar with these
settings, try using the device without modification, or contact your ISP for assistance.
We strongly recommend that you contact your ISP prior to changing the default
configuration.
Table 3-3 Default settings
Option Default Setting Explanation/Instruction
DSL Port IP
Address
Unnumbered
interface:
0.0.0.0
Subnet mask:
0.0.0.0
This is the temporary public IP address of the
WAN port on the device. It is an unnumbered
interface that is replaced as soon as your ISP
assigns a ‘real’ IP address. Refer to
7 Service
Configuration.
LAN Port IP
Address
Assigned static IP
address:
192.168.1.1
Subnet mask:
255.255.255.0
This is the IP address of the LAN port on the
device. The LAN port connects the device to
your Ethernet network. Typically, you will not
need to change this address. Refer to 6 IP
Addresses, Network Masks, and Subnets.
DHCP
(Dynamic
Host
Configuratio
n Protocol)
DHCP server
enabled
with the
following pool of
addresses:
192.168.1.2
to192.168.1.21
The ADSL router maintains a pool of private IP
addresses for dynamic assignment to your
LAN computers. To use this service, you must
have set up your computers to accept IP
information dynamically, as described in 5.1
Configuring Ethernet PCs.
NAT
(Network
Address
Translation)
NAT enabled Your computers’ private IP addresses (refer to
DHCP above) will be translated to your public
IP address whenever they access the Internet.
Refer to 4.7 Security Interface.
DSL mode MultiMode Can be configured to multiple standard DSL
line modes.
Default
Username:P
assword
admin:admin
Use this account to login web-based setup
pages.

User Manual
Aolynk DR811/DR814 ADSL2+Broadband Router 4 Web-based Management
15
4 Web-based Management
This chapter tells you how to use the web-based configuration and management
software to configure the ADSL router. It is organized basing on the order of the items in
the navigation tree to describe the functions of the ADSL router and their configuration
procedures.
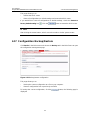
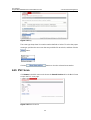
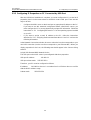
4.1 Quick Setup
Click Quick setup in the Main menu to open the Quick Start page.
This page allows you to:
l Choose the login type.
l Set up authentication & login details which may be required by your ISP.
To configure DHCP Login Options, click the radio button labeled , the
following page is displayed:
Figure 4-1 Quick setup page – no login
Enter VCI and VPI values as specified by your ISP; specify the Special DHCP host
name and/or Domain Name for Clients to send with DNS Requests, if needed
(usually not needed); then click the button.

User Manual
Aolynk DR811/DR814 ADSL2+Broadband Router 4 Web-based Management
16
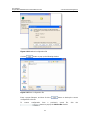
To configure PPPoE Login Options, click the radio button labeled , the
following page is displayed:
Figure 4-2 Quick setup page – PPPoE
Enter VCI and VPI values as specified by your ISP, the PPPoE login authentication info
and configuration, and then click the button.
& Note:
Avoid using the same pair of VPI and VCI values for configuring DHCP and PPPoE
login options.
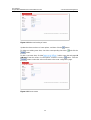
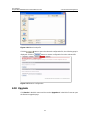
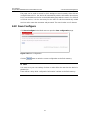
4.2 WAN Setting
Click WAN Setup in the Main menu and choose the WAN tab in the Main Frame to
open the WAN Connection Configuration page.

User Manual
Aolynk DR811/DR814 ADSL2+Broadband Router 4 Web-based Management
17
Figure 4-3 WAN setting
This page allows you to:
l Edit an existing WAN service present in the WAN service list.
l Delete a WAN service present in the WAN service list.
l Add a new WAN service to the WAN service list.
l Edit a route.
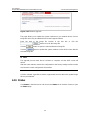
To edit a present WAN service, click the corresponding label to see the edit page
as the following one. If needed, change the values of the service options then click the
button.
Figure 4-4 Edit WAN settings
Page is loading ...
Page is loading ...
Page is loading ...
Page is loading ...
Page is loading ...
Page is loading ...
Page is loading ...
Page is loading ...
Page is loading ...
Page is loading ...
Page is loading ...
Page is loading ...
Page is loading ...
Page is loading ...
Page is loading ...
Page is loading ...
Page is loading ...
Page is loading ...
Page is loading ...
Page is loading ...
Page is loading ...
Page is loading ...
Page is loading ...
Page is loading ...
Page is loading ...
Page is loading ...
Page is loading ...
Page is loading ...
Page is loading ...
Page is loading ...
Page is loading ...
Page is loading ...
Page is loading ...
Page is loading ...
Page is loading ...
Page is loading ...
Page is loading ...
Page is loading ...
Page is loading ...
Page is loading ...
Page is loading ...
Page is loading ...
Page is loading ...
Page is loading ...
Page is loading ...
Page is loading ...
Page is loading ...
Page is loading ...
Page is loading ...
Page is loading ...
Page is loading ...
Page is loading ...
Page is loading ...
Page is loading ...
Page is loading ...
Page is loading ...
Page is loading ...
-
 1
1
-
 2
2
-
 3
3
-
 4
4
-
 5
5
-
 6
6
-
 7
7
-
 8
8
-
 9
9
-
 10
10
-
 11
11
-
 12
12
-
 13
13
-
 14
14
-
 15
15
-
 16
16
-
 17
17
-
 18
18
-
 19
19
-
 20
20
-
 21
21
-
 22
22
-
 23
23
-
 24
24
-
 25
25
-
 26
26
-
 27
27
-
 28
28
-
 29
29
-
 30
30
-
 31
31
-
 32
32
-
 33
33
-
 34
34
-
 35
35
-
 36
36
-
 37
37
-
 38
38
-
 39
39
-
 40
40
-
 41
41
-
 42
42
-
 43
43
-
 44
44
-
 45
45
-
 46
46
-
 47
47
-
 48
48
-
 49
49
-
 50
50
-
 51
51
-
 52
52
-
 53
53
-
 54
54
-
 55
55
-
 56
56
-
 57
57
-
 58
58
-
 59
59
-
 60
60
-
 61
61
-
 62
62
-
 63
63
-
 64
64
-
 65
65
-
 66
66
-
 67
67
-
 68
68
-
 69
69
-
 70
70
-
 71
71
-
 72
72
-
 73
73
-
 74
74
-
 75
75
-
 76
76
-
 77
77


Aolynk ADSL2+Broadband Router Aolynk DR814 User manual
- Category
- Networking
- Type
- User manual
- This manual is also suitable for
Ask a question and I''ll find the answer in the document
Finding information in a document is now easier with AI


Other documents
-
Huawei DR814Q User manual
-
Evolveo WR353ND Quick start guide
-
 Best Data Products Network Router DSL502E_EU User manual
-
Swisscom Huawei Router B593s-22 Operating instructions
-
MicroNet SP3362E Quick Installation Guide
-
Shiro ADSL 2/2 User manual
-
Binatone DT820N Quick Installation Manual
-
-
 Best Data Products DSL542EU User manual
-

