Texas Instruments 900 Series User manual
- Category
- Notebooks
- Type
- User manual

Extensa™ 900 Series
Notebook Computers
User’s Guide
9813630-0001

Copyright © 1996 Texas Instruments
All Rights Reserved — Printed in Taiwan
Extensa™ 900 Series Notebook Computer User’s Guide
TI Part No. 9813630-0001
Original Issue: September 1996
First Revision: November 1996
Changes may be made periodically to the information
in this publication. Such changes will be incorporated
in new editions of this manual.
Record the serial number, purchase date, and model
number in the space provided below. The serial
number and model number are recorded on the label
affixed to the case. All correspondence concerning
your unit should include the serial number, model
number, and date of purchase.
No part of this publication may be reproduced, stored
in a retrieval system, or transmitted, in any form or by
any means, electronic, mechanical, photocopy,
recording, or otherwise, without the prior written
permission of Texas Instruments.
Extensa Notebook Computer
Model_______Serial No.____________Purchase Date________

Contents
3
Extensa and livegear are trademarks of Texas Instruments. The
icons in the Windows Notebook and Startup groups are
copyrighted by Texas Instruments.
AT and PS/2 are registered trademarks and OS/2 is a trademark
of International Business Machines Corporation.
Microsoft, MS-DOS, Windows and Xenix are registered trademarks
of Microsoft Corporation.
Kensington is a registered trademark of Kensington Microware,
Inc.
Synaptics is registered trademark of Synaptics, Inc.
SimulSCAN is a trademark of Cirrus Logic, Inc.
IrDA is a trademark of Infra Red Data Association.
Phillips is a registered trademark of H.A. Phillips & Co.

This device has been tested and found to comply with the limits
for a Class B digital device pursuant to Part 15 of the FCC Rules.
These limits are designed to provide reasonable protection
against harmful interference in a residential installation. This
device generates, uses, and can radiate radio frequency energy
and, if not installed and used in accordance with the
instructions, may cause harmful interference to radio
communications.
However, there is no guarantee that interference will not occur in
a particular installation. If this device does cause harmful
interference to radio or television reception, which can be
determined by turning the device off and on, the user is
encouraged to try to correct the interference by one or more of the
following measures:
n Reorient or relocate the receiving antenna
n Increase the separation between the device and receiver
n Connect the device into an outlet on a circuit different from
that to which the receiver is connected
n Consult the dealer or an experienced radio/television
technician for help
Notice: Shield Cables
All connections to other computing devices must be made using
shielded cables to maintain compliance with FCC regulations.
Notice: Peripheral Devices
Only peripherals (input/output devices, terminals, printers, etc.)
certified to comply with the Class B limits may be attached to this
equipment. Operation with non-certified peripherals is likely to
result in interference to radio and TV reception.
Caution
Changes or modifications not expressly approved by the
manufacturer could void the user’s authority, which is granted by
the Federal Communications Commission, to operate this
computer.

FCC Notice
Use Conditions
This part complies with Part 15 of the FCC Rules. Operation is
subject to the following two conditions: (1) this device may not
cause harmful interference, and (2) this device must accept any
interference received, including interference that may cause
undesired operation.
Notice: Canadian Users
This Class B digital apparatus meets all requirements of the
Canadian Interference-Causing Equipment Regulations.
Remarque à l’intention des utilisateurs canadiens
Cet appareil numérique de la classe B respected toutes les
exigences du Règlement sur le matériel brouilleur du Canada.

Contents
vi
Preface
Chapter 1 Before You Begin
Creating Backup Disks.................................1-2
Features of the Computer .............................1-3
Environmental Specifications........................1-5
Using the Computer .....................................1-7
Power Saving Modes .....................................1-9
Securing the Computer...............................1-14
Using the AC Adapter .................................1-15
Chapter 2 Using Your Computer
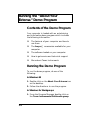
Starting the Computer..................................2-3
Running the “About Your Extensa” Demo
Program ...................................................2-4
Using the Brightness and Contrast
Controls ...................................................2-6
Turning the Speakers On and Off..................2-7
Using the Microphone...................................2-8
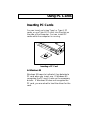
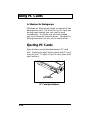
Using PC Cards............................................2-9
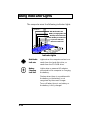
Using Indicator Lights.................................2-12
Using the Touchpad....................................2-14
Using Disk Drives.......................................2-16
Adding Memory ..........................................2-22
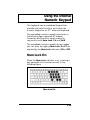
Using the Keyboard ....................................2-25
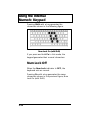
Using the Internal Numeric Keypad.............2-29
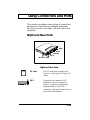
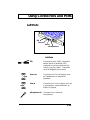
Using Connectors and Ports........................2-31
Chapter 3 Using Battery Power
Guidelines for Battery Use............................3-2
Switching to Battery Power ...........................3-3
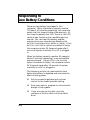
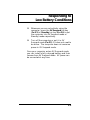
Responding to Low Battery Conditions ..........3-4
Recharging the Battery .................................3-6

Contents
vii
Calibrating the Battery .................................3-7
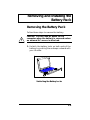
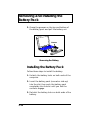
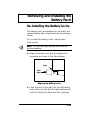
Removing and Installing the Battery Pack......3-9
Conserving Battery Power...........................3-12
Chapter 4 Options
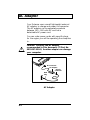
AC Adapter...................................................4-2
PC Cards......................................................4-3
PS/2 Devices................................................4-4
External Monitor ..........................................4-5
External Mouse ............................................4-6
Memory........................................................4-7
Audio Options ..............................................4-8
Mobile Productivity Base Option....................4-9
Miscellaneous Options................................4-10
Chapter 5 Using Software
Using Supplied Software...............................5-2
Getting Online Help......................................5-3
Guidelines for Installing Applications............5-4
Using System Passwords ..............................5-6
Chapter 6 Mobility
Overview of Mobility .....................................6-1
Disconnecting from the Desktop ...................6-3
Moving Around.............................................6-4
Taking the Computer Home ..........................6-5
Traveling with the Computer.........................6-7
Traveling Internationally with the Computer..6-9
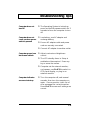
Chapter 7 Care and Troubleshooting
Cleaning the Computer.................................7-2
Troubleshooting Tips ....................................7-3
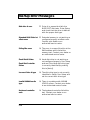
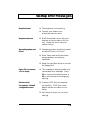
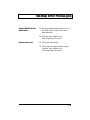
Startup Error Messages................................7-4
Appendix A Where to Get Help

Preface
viii
This manual describes features of the Texas
Instruments Extensa™ 900 Series notebook
computers. The Extensa series computers share
similar appearance and incorporate such
features as: CardBus with Zoomed Video
support, 16-bit stereo audio, Fast Infrared and
internal pointing device in an ultra-slim form
factor and light weight package.
This manual should answer most of the
questions you have about the day-to-day
operation of your Extensa notebook computer.
Use the Just for Starters… instructions that
came with your computer to get your computer
running for the first time.
You should also take advantage of the online
help files that are available with almost all of the
programs shipped with your computer.
Enjoy your Extensa computer. With proper care,
your computer will provide you with years of
productive service.

1
Before You Begin
1-1
After completing the instructions in Just for
Starters…, read this chapter to learn about the
important functions of your computer. Some
functions, such as Creating Backup Disks,
should be performed as soon as possible after
the purchase of your computer.
Contents
Creating Backup Disks................................ 1-2
Features of the Computer ............................ 1-3
Standard Features................................ 1-3
Customizing Features........................... 1-4
Environmental Specifications....................... 1-5
Using the Computer..................................... 1-7
Power Saving Modes .................................... 1-9
Power Savings Options ......................... 1-9
0V Suspend Mode............................... 1-11
5V Suspend Mode............................... 1-12
Standby Mode .................................... 1-13
Securing the Computer.............................. 1-14
Using the AC Adapter ................................ 1-15

Creating Backup Disks
1-2
You should create your backup system disks as
soon as possible after purchasing your
computer. The process you follow depends on
the operating system you selected when you
setup the computer for the first time.
Windows
®
95
Backing up Windows 95 requires several boxes
of formatted 3½-inch, 1.44 MB floppy disks.
Labels for the floppy disks are included with the
manual.
To create backup system disks, use the Create
System Disk tool from Windows 95.
Windows for Workgroups
Backing up MS-DOS
®
and Windows for
Workgroups requires several boxes of 3½-inch,
1.44 MB floppy disks.
To create backup system disks, use the Make
Disk utility, located in the Main program group.

Features of the Computer
1-3
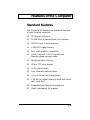
Standard Features
The following list displays the standard features
of your Extensa computer:
q PCI Bus architecture
q 16 MB EDO (Extended Data Out) memory
q 256 KB Level-2 cache memory
q 2 MB EDO video memory
q Fast video graphics accelerator
q 0-Volt Suspend, 5-Volt Suspend and
Standby power saving modes
q No-reboot setup function
q STN or TFT color display
q 16-bit stereo audio
q Fast infrared communication
q Li-Ion (Lithium-Ion) battery pack
q 1.35 GB (or higher) capacity hard disk drive
with Local Bus
q Embedded touchpad pointing device
q Small, lightweight AC adapter

Features of the Computer
1-4
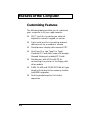
Customizing Features
The following features allow you to customize
your computer to fit your requirements.
q PS/2
port for connecting an external
keyboard, numeric keypad, or mouse
q 9-pin serial port for connecting external
devices such as a modem or mouse
q Simultaneous display with external CRT
q One Type III or two Type II or Type I
Cardbus PC Card slots; lower slot accepts
Zoomed Video port enabled PC Cards
q Parallel port with EPP and ECP for
connecting to a printer or the floppy disk
drive module
q 8 MB, 16 MB and 32 MB EDO 64-bit type
small outline dual inline memory module
(soDIMM) upgrades
q Docking module option for further
expansion

Environmental Specifications
1-5
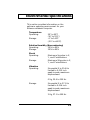
This section provides information on the
optimum operating environment for your
Extensa notebook computer.
Temperature
Operating: 50° to 95°F
(10° to 35°C)
Storage: -4° to 140°F
(-20° to +60°C)
Relative Humidity (Noncondensing)
Operating: 20% to 85%
Storage: 20% to 85%
Shock
Operating: Maximum 5g pulse in X,
Y, and Z orientations
Storage: Maximum 50g pulse in X,
Y, and Z orientations
Vibration
Operating: Sinusoidal 5 to 25.6 Hz
limited to 0.015 inch
peak-to-peak maximum
displacement
0.5g, 25.6 to 250 Hz
Storage: Sinusoidal 5 to 27.1 Hz
limited to 0.016 inch
peak-to-peak maximum
displacement
2.0g, 27.1 to 500 Hz

Environmental Specifications
1-6
Note: Your computer is equipped with a fan to
keep the computer cool under extreme high
temperature conditions. The fan will not normally
operate, but may turn on when the computer’s
internal components become warm. You will hear
the fan when it turns on. This is nothing to be
concerned about.

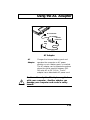
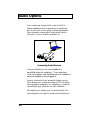
Using the Computer
1-7
q Never pick up or carry the computer by the
display.
q Never use the computer in harsh
environments where it could be subjected to
rapid temperature changes or excessive
dust.
q Never expose the computer to excessive
vibration.
q Never expose the hard disk drive or floppy
disk(s) to strong magnetic fields, such as
those generated by audio system speakers,
telephone handsets, or hand-held metal
detectors.
q To avoid overheating the computer, never
place anything on top of the computer when
it is operating or recharging the battery.
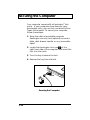
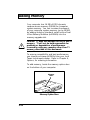
q Before moving an active computer, close the
display, and wait for the system to go into
5V Suspend mode.
q Do not try to force the display beyond its
fully opened position — about 180 degrees.

Using the Computer
1-8
!
Caution: In the rare event that you see or
smell anything that indicates overheating
(smoke or a strange smell):
1. Turn off the power.
2. Disconnect the AC adapter from the power
source and the computer.
3. Remove the battery pack.
4. Contact your Texas Instruments dealer or
service center.

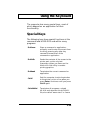
Power Saving Modes
1-9
Power Savings Options
Your Extensa system offers several options for
you to extend your battery life while you are not
actively using your computer. These options
turn off different sections of the computer that
are not currently being used.
These options are listed in the POWER
MANAGEMENT page of the System Setup screen
(accessed via Fn+F1 anytime or F2 during boot
up). They are described below:
Power
Management
This option sets when you want the
time outs to take effect.
ALWAYS: Enables the time out
settings regardless of whether the
computer is on AC or battery power.
BATTERY ONLY: Only enables the
time outs when the computer is
running off the battery power.
DISABLE: Disables all power time out
settings.
Standby
Timeout
The length of time the computer
needs to be idle before the computer
enters Standby mode.
5V Suspend
Timeout
The length of time the computer
needs to be idle before the computer
enters 5V Suspend.

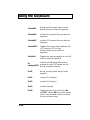
Power Saving Modes
1-10
0V Suspend
Timeout
The length of time the computer
needs to be idle before the computer
enters 0V Suspend.
Hard Disk
Timeout
The length of time the computer
needs to be idle before the hard disk
drive’s motor is turned off.
Display
Timeout
The length of time the computer
needs to be idle before the display
back light is turned off.
The computer will not enter any of the power
management time-out modes if the hard disk
drive, floppy disk drive (or CD-ROM drive in the
optional MPB docking module) is active.
Note: If the “Auto Insert Notification” option is
enabled in the CD ROM setting, the computer will
not time out on any of the power management
time-outs because Windows 95 will constantly be
looking for a new CD to be inserted. This option
is set to a default of DISABLED by Texas
Instruments.
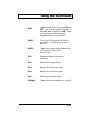
0V Suspend Mode
0V Suspend mode saves the exact spot you are
at on your computer, then shuts off all power
without losing any data.

Power Saving Modes
1-11
In 0V Suspend mode, the computer saves the
current computer state onto your hard disk
drive then shuts off. When you turn the
computer on again, it restores the computer to
the saved state within about a minute.
Press the 0V Suspend hot key (Fn+F2) to enter
0V Suspend mode. To resume normal operation,
press the power switch. 0V Suspend mode
occurs automatically if the 0 VOLT SUSPEND
TIMEOUT parameter in Setup is enabled and
times out or if the BATTERY LOW SUSPEND option is
enabled and your battery runs down to a
critically low level.
Note: Your computer will not enter 0V Suspend
mode if the 0V Suspend file is missing or is the
incorrect size. Refer to Chapter 2, the Adding
Memory section for further information.
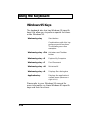
5V Suspend Mode
5V Suspend mode consumes very little power
when you are not using your computer, yet still
resumes quickly. With a fully charged battery,
your computer can remain in 5V Suspend mode
for days.
!
Caution: If your computer loses power while
in 5V Suspend, you will lose all of your
unsaved data.

Power Saving Modes
1-12
In 5V Suspend mode, the computer saves the
current computer state onto your system
memory then shuts off power to most of the
devices except the system memory. The standby
indicator flashes to indicate the computer is in
5V Suspend mode. When the computer resumes
from 5V Suspend mode, it restores the computer
to the saved state.
Press the 5V Suspend hot key (Fn+F3) or close
the display cover to enter 5V Suspend mode.
The computer also enters 5V Suspend mode if
the 5V SUSPEND TIMEOUT parameter in Setup is
enabled and times out.
To resume normal operation, press any key on
the internal keyboard or press the power switch.
The computer also resumes from 5V Suspend if
the RESUME ON MODEM RING or RESUME ON ALARM
options are enabled in the System Setup and a
modem ring or alarm occurs.
Note: It takes the computer a few seconds to
resume from a 5V Suspend. You may see the
screen blank a few times while the computer
restores all of the system states.
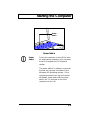
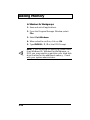
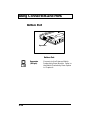
Standby Mode
Standby mode saves some computer power by
turning off a few of the unused devices and still
allows you to resume your work instantly. The
standby indicator lights up in Standby mode.
Page is loading ...
Page is loading ...
Page is loading ...
Page is loading ...
Page is loading ...
Page is loading ...
Page is loading ...
Page is loading ...
Page is loading ...
Page is loading ...
Page is loading ...
Page is loading ...
Page is loading ...
Page is loading ...
Page is loading ...
Page is loading ...
Page is loading ...
Page is loading ...
Page is loading ...
Page is loading ...
Page is loading ...
Page is loading ...
Page is loading ...
Page is loading ...
Page is loading ...
Page is loading ...
Page is loading ...
Page is loading ...
Page is loading ...
Page is loading ...
Page is loading ...
Page is loading ...
Page is loading ...
Page is loading ...
Page is loading ...
Page is loading ...
Page is loading ...
Page is loading ...
Page is loading ...
Page is loading ...
Page is loading ...
Page is loading ...
Page is loading ...
Page is loading ...
Page is loading ...
Page is loading ...
Page is loading ...
Page is loading ...
Page is loading ...
Page is loading ...
Page is loading ...
Page is loading ...
Page is loading ...
Page is loading ...
Page is loading ...
Page is loading ...
Page is loading ...
Page is loading ...
Page is loading ...
Page is loading ...
Page is loading ...
Page is loading ...
Page is loading ...
Page is loading ...
Page is loading ...
Page is loading ...
Page is loading ...
Page is loading ...
Page is loading ...
Page is loading ...
Page is loading ...
Page is loading ...
Page is loading ...
Page is loading ...
Page is loading ...
Page is loading ...
Page is loading ...
Page is loading ...
Page is loading ...
Page is loading ...
Page is loading ...
Page is loading ...
Page is loading ...
Page is loading ...
Page is loading ...
Page is loading ...
Page is loading ...
Page is loading ...
Page is loading ...
-
 1
1
-
 2
2
-
 3
3
-
 4
4
-
 5
5
-
 6
6
-
 7
7
-
 8
8
-
 9
9
-
 10
10
-
 11
11
-
 12
12
-
 13
13
-
 14
14
-
 15
15
-
 16
16
-
 17
17
-
 18
18
-
 19
19
-
 20
20
-
 21
21
-
 22
22
-
 23
23
-
 24
24
-
 25
25
-
 26
26
-
 27
27
-
 28
28
-
 29
29
-
 30
30
-
 31
31
-
 32
32
-
 33
33
-
 34
34
-
 35
35
-
 36
36
-
 37
37
-
 38
38
-
 39
39
-
 40
40
-
 41
41
-
 42
42
-
 43
43
-
 44
44
-
 45
45
-
 46
46
-
 47
47
-
 48
48
-
 49
49
-
 50
50
-
 51
51
-
 52
52
-
 53
53
-
 54
54
-
 55
55
-
 56
56
-
 57
57
-
 58
58
-
 59
59
-
 60
60
-
 61
61
-
 62
62
-
 63
63
-
 64
64
-
 65
65
-
 66
66
-
 67
67
-
 68
68
-
 69
69
-
 70
70
-
 71
71
-
 72
72
-
 73
73
-
 74
74
-
 75
75
-
 76
76
-
 77
77
-
 78
78
-
 79
79
-
 80
80
-
 81
81
-
 82
82
-
 83
83
-
 84
84
-
 85
85
-
 86
86
-
 87
87
-
 88
88
-
 89
89
-
 90
90
-
 91
91
-
 92
92
-
 93
93
-
 94
94
-
 95
95
-
 96
96
-
 97
97
-
 98
98
-
 99
99
-
 100
100
-
 101
101
-
 102
102
-
 103
103
-
 104
104
-
 105
105
-
 106
106
-
 107
107
-
 108
108
-
 109
109


Texas Instruments 900 Series User manual
- Category
- Notebooks
- Type
- User manual
Ask a question and I''ll find the answer in the document
Finding information in a document is now easier with AI
Related papers
-
Texas Instruments 600 SERIES User manual
-
-
-
-
-
-
-
-