SPECIFICATIONS
*1 When making multiple duplex copies, the copy speed will vary based on
the environment conditions.
*2 First copy time may vary depending on the status of the machine.
*3 The warm-up time may vary depending on the ambient conditions.
*4 Not including toner cartridges.
Printer Function
* When printing same document continuously on A4 plain paper in non-
offset mode, excluding processing time.
Scanner Function
Network Expansion kit (MX-NB11)
* Available only if the PS3 expansion kit (MX-PK10) is installed.
250-sheet paper feed unit (MX-CS10)
Facsimile expansion kit (MX-FX12)
For the specifications of expansion kit MX-FX12, please refer to the MX-
FX12 fax operation manual itself.
Model MX-B201D
Type Digital Multifunctional System, Desktop
Photoconductive
type
OPC drum
Document glass
type
Fixed
Copy/printing
system
Dry, electrostatic transfer
Originals Sheets, bound documents
Originals size Max. 8-1/2" x 14" (A4)
Copy size
Max. 8-1/2" x 14" (A4)
Min. 8-1/2" x 5-1/2" (A6)
Image loss: Max. 11/64" (4mm)
(leading and trailing edges)
Max. 3/16" (4.5mm)
(along other edges in total)
Max. 1/4" (6mm)
(trailing edge of the second copy of two-
sided copying.)
Copying speed*
1
20 copies/min. (8-1/2" x 11" (A4), one-sided at 100%
copy ratio)
Continuous copy Max. 99 copies; subtractive counter
First-copy time*
2
8.0 seconds (When user program 24 is set to OFF)
10.7 seconds (When user program 24 is set to ON)
(paper: A4, exposure mode: AUTO, copy ratio: 100%)
Warm-up time*
3
-
Copy ratio
Document glass:
Variable: 25% to 400% in 1% increments (total 376 steps)
Fixed preset: Inch system: 25%, 50%, 64%, 78%, 100%, 129%, 200%, 400%
(AB system: 25%, 50%, 70%, 86%, 100%, 141%, 200%, 400%)
RSPF:
Variable: 50% to 200% in 1% increments (total 151 steps)
Fixed preset: Inch system: 50%, 64%, 78%, 100%, 129%, 200%
(AB system: 50%, 70%, 86%, 100%, 141%, 200%)
Exposure system
Document glass: Moving optical source, slit exposure
(stationary platen) with automatic
exposure function
RSPF: Moving original
Paper feed
One automatic feeding paper tray (250 sheets each) +
bypass tray (50 sheets)
Fusing system Heat rollers
Developer system
Magnetic brush development
Light source
Tri-color CCD light source (CCD: 3 components; R, G, and B)
Resolution
Scan: 600 x 300 dpi Output: 600 x 600 dpi (AUTO/TEXT mode)
Scan: 600 x 600 dpi Output: 600 x 600 dpi (PHOTO mode)
Gradation 256 tones (8 bits)
Power supply
Local voltage ±10% (For this machine's power supply
requirement, see the name plate located on the back of
the machine.)
Power consumption
Max. 1.0 kW
Overall dimensions
(with bypass tray
folded)
31-5/8" (W) x 18-1/8" (D)
(802 mm (W) x 460 mm (D))
Weight*
4
Approx. 41.7 lbs (18.9kg)
Dimensions
20-3/8" (W) x 18-1/8" (D) x 14-3/4" (H)
(518 mm (W) x 460mm (D) x 376 mm (H))
Operating
conditions
Temperature: 50°F to 86°F (10°C to 30°C)
Humidity: 20% to 85%
Noise level
Sound power level L
wAd
Copying mode: 6.7 B
Standby mode: -
(
*
)
Sound pressure level L
pAm
(reference) (Bystander positions)
Copying mode: 51 dB
Standby mode: -
(
*
)
(*) = Less than background noise
Noise emission measurement in accordance with ISO7779.
Print speed* Max. 20 ppm (when printing on A4 size paper)
Resolution 600 dpi
Memory Approx. 30 MB
Emulation SPLC (Sharp Printer Language with Compression)
Interface USB 2.0 (Full-Speed/Hi-Speed compatible interface)
Interface cables
[USB cable]
USB cable that supports USB 2.0.
Please purchase a commercially available USB cable.
Type Flatbed scanner
Scanning method Document glass/RSPF
Light source
Tri-color CCD light source (CCD: 3 components; R, G, and B)
Resolution*
Basic: 600 dpi x 600 dpi
Setting range: 50 dpi - 9600 dpi
Original types Sheet media, books
Effective
scanning area
8-1/2" (Lengthwise) x 14" (Width)
(216 mm (Lengthwise) x 356 mm (Width))
Scanning speed 2.88 msec/line
Input Data A/D 16 bit
Output Data R.G.B 1 or 8 bits / pixel
Scanning colors Black and white 2 value, Grayscale, Full color
Protocol
TWAIN
WIA (Windows XP/Vista/7 only)
STI
Interface USB 2.0 (Full-Speed/Hi-Speed compatible interface)
Drop out color Ye s
Supported
operating systems
Windows 2000 Professional/XP/Vista/7
Void area None
Interface cables
[USB cable]
USB cable that supports USB 2.0.
Please purchase a commercially available USB cable.
Scanner utilities Button Manager / Sharpdesk
Dimensions
7" (W) x 5-1/2" (D) x 1-5/8" (H)
(177 mm (W) x 140 mm (D) x 40 mm (H))
Weight Approx. 0.44 lbs. (0.2 kg)
Network
expansion kit
memory
128 MB
Emulation PCL6, PS3 (PostScript 3)*
Interface
10 BASE-T / 100 BASE-TX Ethernet, USB 2.0 (Full-
Speed/Hi-Speed compatible interface)
Paper size 5-1/2" x 8-1/2" to 8-1/2" x 14" (A5 to A4)
Paper weight 15 lbs. to 21 lbs. (56 g/m
2
to 80 g/m
2
)
Paper capacity
One paper tray with capacity for 250 sheets of 80 g/m
2
bond paper
Weight Approx. 6.6 lbs. (3 kg)
Dimensions
19-5/8" (W) x 17-1/2" (D) x 3-1/2" (H)
(498 mm (W) x 445 mm (D) x 88 mm (H))
Power supply Drawn from the machine
As a part of our policy of continuous improvement, SHARP
reserves the right to make design and specification changes for
product improvement without prior notice. The performance
specification figures indicated are nominal values of production
units. There may be some deviations from these values in
individual units.
CAUTIONS
Caution label on the machine
The label ( ) in the fusing area of the machine indicates the
following:
: Caution, risk of danger
: Caution, hot surface
Cautions on using the machine
Follow the cautions below when using this machine.
Warning:
•
The fusing area is hot. Exercise care in this area when removing misfed paper
.
• Do not look directly at the light source. Doing so may damage your eyes.
• Machine power must be turned off before installing any supplies.
Caution:
• Place the machine on a firm, level surface.
• Do not install the machine in a humid or dusty location.
•
When the machine is not used for a long time, for example for consecutive
holidays, turn the power switch off and remove the power cord from the outlet
.
• When moving the machine, be sure to turn the power switch off and
remove the power cord from the outlet.
• Do not switch the machine rapidly on and off. After turning the machine
off, wait 10 to 15 seconds before turning it back on.
• Do not cover the machine with a dust cover, cloth or plastic film while the
power is on. Doing so may prevent heat radiation, damaging the machine.
• Use of controls or adjustments or performance of procedures other than
those specified herein may result in hazardous radiation exposure.
• The socket-outlet shall be installed near the machine and shall be easily
accessible.
Important points when selecting an installation site
Do not install your machine in areas that are:
• damp, humid, or very dusty
• exposed to direct sunlight
• poorly ventilated
• subject to extreme temperature or humidity changes, e.g., near an air
conditioner or heater.
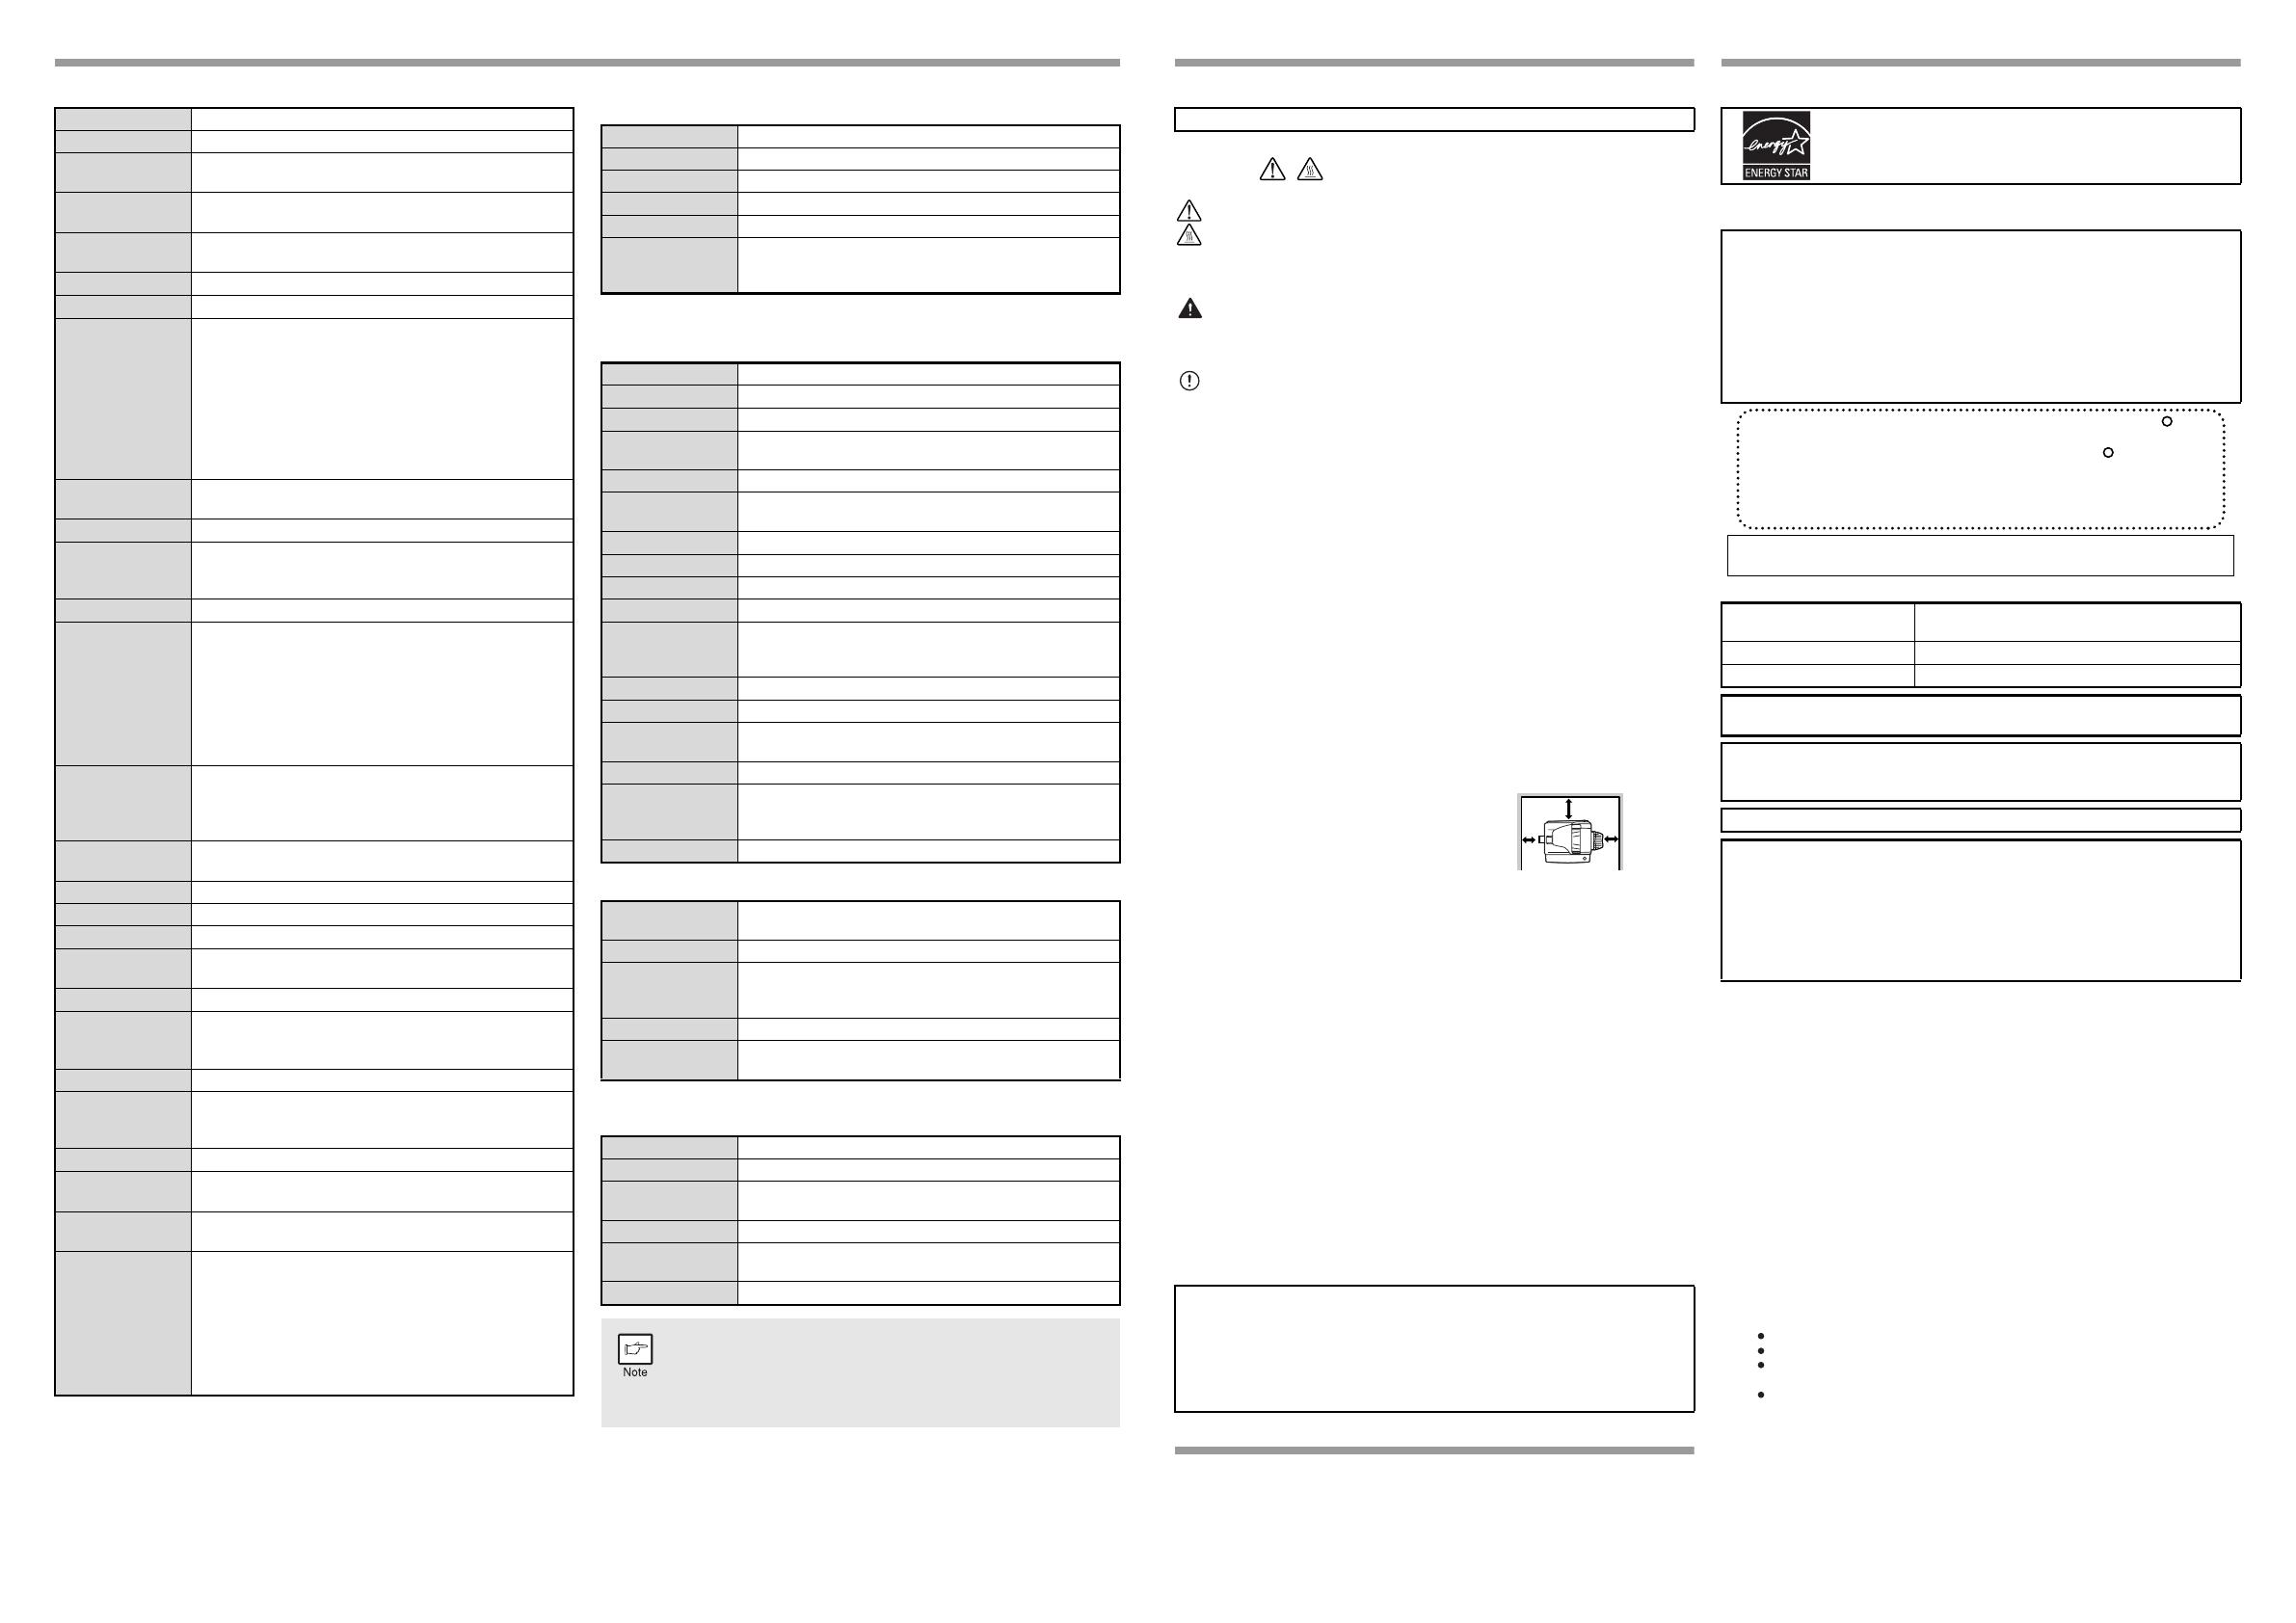
Be sure to allow the required space
around the machine for servicing
and proper ventilation.
Cautions on handling the machine
Be careful in handling the machine as follows to maintain the performance of
this machine.
Do not drop the machine, subject it to shock or strike it against any object.
Store spare toner cartridges in a cool dry place without removing from
the package before use.
•
If they are exposed to direct sunlight or excessive heat, poor copies may result
.
Do not touch the photoconductive drum (green portion).
• Scratches or smudges on the drum will cause dirty copies.
Trademark acknowledgements
•Microsoft
®
, Windows
®
, Windows
®
2000, Windows
®
XP, Windows Vista
®
,
Windows
®
7 and Internet Explorer
®
are registered trademarks or
trademarks of Microsoft Corporation in the U.S.A. and other countries.
• Macintosh is a trademark of Apple Inc., registered in the U.S. and other
countries.
• IBM, PC/AT, and PowerPC are trademarks of International Business
Machines Corporation.
• Adobe, the Adobe logo, Acrobat, the Adobe PDF logo, and Reader are
registered trademarks or trademarks of Adobe Systems Incorporated in
the United States and other countries.
• All other trademarks and copyrights are the property of their respective
owners.
SOFTWARE LICENSE
The SOFTWARE LICENSE will appear when you install the software
from the CD-ROM. By using all or any portion of the software on the CD-
ROM or in the machine, you are agreeing to be bound by the terms of
the SOFTWARE LICENSE.
ENVIRONMENTAL INFORMATION
The products that meet the ENERGY STAR
®
guidelines carry the logo shown above.
The products without the logo may not meet the ENERGY STAR
®
guidelines.
Laser information
Each instruction also covers the optional units used with the product.
Supply and Consumables
The supply of spare parts for a repair of the appliance is guaranteed for at
least 7 years following the termination of production. Spare parts are
those parts of the apparatus which may break down within the scope of
ordinary use of the product, whereas those parts which normally exceed
the life of the product are not considered spare parts. Consumables also,
are available for 7 years following the termination of production.
8" (20cm)
4"
(10cm)
4"
(10cm)
Products that have earned the ENERGY STAR
®
are designed to protect the environment through
superior energy efficiency.
CAUTION:
Do not install the machine in a location with poor air circulation.
A small amount of ozone is created inside the machine during printing. The
amount of ozone created is not sufficient to be harmful; however, an unpleasant
odor may be noticed during large copy runs, and thus the machine should be
installed in a room with a ventilation fan or windows that provide sufficient air
circulation. (The odor may occasionally cause headaches.)
* Install the machine so that people are not directly exposed to exhaust
from the machine. If installed near a window, ensure that the machine is
not exposed to direct sunlight.
Shielded interface cables must be used with this equipment to maintain
compliance with EMC regulations.
Wave length
780 nm +15 nm
-10 nm
Pulse times 12.88 µs ±12.88 ns/7 mm
Output power Max 0.2 mW
At the production line, the output power of the scanner unit is adjusted to 0.18 MILLIWATT
PLUS 5% and is maintained constant by the operation of the Automatic Power Control (APC).
Caution
Use of controls or adjustments or performance of procedures other than
those specified herein may result in hazardous radiation exposure.
This Digital Equipment is CLASS 1 LASER PRODUCT (IEC 60825-1 Edition 1.2-2001)
SAFETY PRECAUTIONS
This Digital Copier is rated Class 1 and complies with 21 CFR 1040.10 and
1040.11 of the CDRH standards. This means that the equipment does not produce
hazardous laser radiation. For your safety, observe the precautions below.
• Do not remove the cabinet, operation panel or any other covers.
• The equipment's exterior covers contain several safety interlock
switches. Do not bypass any safety interlock by inserting wedges or
other items into switch slots.
In some areas, the "POWER" switch positions are marked "I" and " " on
the copier instead of "ON" and "OFF".
If your copier is so marked, please read "I" for "ON" and " " for "OFF".
Caution!
For a complete electrical disconnection, pull out the main plug.
The socket-outlet shall be installed near the equipment and shall
be easily accessible.
This device complies with Part 15 of the FCC Rules. Operation is subject to
the following two conditions: (1) This device may not cause harmful
interference, and (2) this device must accept any interference received,
including interference that may cause undesired operation.
WARNING:
FCC Regulations state that any unauthorized changes or modifications to
this equipment not expressly approved by the manufacturer could void the
user’s authority to operate this equipment.
Note:
This equipment has been tested and found to comply with the limits for a
Class B digital device, pursuant to Part 15 of the FCC Rules. These limits
are designed to provide reasonable protection against harmful interference
in a residential installation. This equipment generates, uses and can
radiate radio frequency energy and, if not installed and used in accordance
with the instructions, may cause harmful interference to radio
communications.
However, there is no guarantee that interference will not occur in a
particular installation. If this equipment does cause harmful interference to
radio or television reception, which can be determined by turning the
equipment off and on, the user is encouraged to try to correct the
interference by one or more of the following measures:
Reorient or relocate the receiving antenna.
Increase the separation between the equipment and receiver.
Connect the equipment into an outlet on a circuit different from that to
which the receiver is connected.
Consult the dealer or an experienced radio/TV technician for help.
♠♠♠♠♠♠♠♠♠♠♠♠♠♠♠♠♠♠♠♠♠♠♠♠♠♠♠♠♠♠♠♠♠♠♠♠♠♠♠♠♠♠♠♠♠♠♠
♠
♠
♠
♠
♠♠♠♠♠♠♠♠♠♠♠♠♠♠♠♠♠♠♠♠♠♠♠♠♠♠♠♠♠♠♠♠♠♠♠♠♠♠
♠
♠
♠
♠
♠♠♠♠♠♠♠♠♠♠♠♠♠♠♠♠ ♠♠♠♠♠♠♠♠♠♠♠♠♠♠♠♠♠♠♠♠♠♠♠♠♠♠♠♠♠♠♠
♠
♠
♠
♠♠♠♠♠♠♠♠♠♠♠♠♠♠♠♠♠♠♠♠♠♠♠♠♠♠♠♠♠♠♠♠♠♠♠♠♠♠♠
♠
♠
♠
Declaration of Conformity
SHARP Digital Multifunctional System, MX-B201D
This device complies with Part 15 of the FCC Rules. Operation is subject to the
following two conditions: (1) This device may not cause harmful interference, and
(2) this device must accept any interference received, including interference that
may cause undesired operation.
Responsible Party: SHARP ELECTRONICS CORPORATION
Sharp Plaza, Mahwah, New Jersey 07495
TEL:
1-800-BE-SHARP

