Page is loading ...

Kvaser PCIcan Hardware
Reference Manual
Copyright 2001-2008 Kvaser AB, Mölndal, Sweden
http://www.kvaser.com
Last updated Thursday, 22 April 2010
We believe that the information contained herein was accurate in all respects at the time of printing. Kvaser AB cannot, however, assume
any responsibility for errors or omissions in this text. Also note that the information in this document is subject to change without notice and
should not be construed as a commitment by Kvaser AB.

Kvaser PCIcan Hardware Reference Manual 2(21)
Kvaser AB, Mölndal, Sweden — www.kvaser.com
(This page is intentionally left blank.)

Kvaser PCIcan Hardware Reference Manual 3(21)
Kvaser AB, Mölndal, Sweden — www.kvaser.com
1 Table of Contents
Kvaser PCIcan Hardware Reference Manual ..................................................................................... 1
1 Table of Contents ............................................................................................................................ 3
2 Introduction .................................................................................................................................... 4
2.1 Not recommended for new designs .......................................................................................... 4
2.2 General Description .................................................................................................................. 4
2.3 PCIcan Features ........................................................................................................................ 5
3 Specifications................................................................................................................................... 6
4 Schematics ....................................................................................................................................... 7
5 The PCIcan Hardware ................................................................................................................... 8
5.1 Installation ................................................................................................................................ 8
5.2 The CAN Bus ........................................................................................................................... 8
5.3 Selecting Driver Ground (PCIcan-Q only) ............................................................................... 9
5.4 The Common CAN Bus (PCIcan-Q only) ................................................................................ 9
5.5 External power supply (PCIcan–SWC2 and –SWC1) ............................................................ 10
5.6 CAN Bus Termination (PCIcan-Q) ........................................................................................ 10
5.7 CAN Bus Termination (PCIcan-D, -S) ................................................................................... 10
5.8 CAN Bus Termination (PCIcan-LS2, -LS1, -SWC2, -SWC1) ............................................... 10
5.9 The D-SUB connector(s) ........................................................................................................ 11
5.10 Intended Audience .................................................................................................................. 13
5.11 Additional Documentation ...................................................................................................... 13
5.12 A note on the different PCIcan versions ................................................................................. 14
5.13 The PCI bus controller ............................................................................................................ 14
5.14 Address decoding ................................................................................................................... 14
5.15 Interrupts ................................................................................................................................. 15
5.16 Registers in the Xilinx ............................................................................................................ 15
5.17 PCI Configuration Data .......................................................................................................... 15
5.18 Configuration of the SJA1000 ................................................................................................ 16
6 Support .......................................................................................................................................... 17
7 References ..................................................................................................................................... 18
8 Legal Information ......................................................................................................................... 19
8.1 RoHS Directive....................................................................................................................... 19
8.2 Copyright ................................................................................................................................ 19
8.3 CE Marking Directive............................................................................................................. 19
8.4 Trademarks and patents .......................................................................................................... 19
9 Document revision history ........................................................................................................... 20

Kvaser PCIcan Hardware Reference Manual 4(21)
Kvaser AB, Mölndal, Sweden — www.kvaser.com
2 Introduction
This document describes the following standard variants of the PCIcan board:
Product
Name
Part Number
Description
PCIcan-S
733-0130-00082-7
1 x SJA1000, 82c251 driver
PCIcan-D
733-0130-00083-4
2 x SJA1000, 82c251 drivers
PCIcan-Q
733-0130-00084-1
4 x SJA1000, 82c251 drivers
PCIcan-SWC1
733-0130-00088-8
1 x SJA1000, 5790 drivers (Single-Wire
CAN)
PCIcan-SWC2
733-0130-00089-6
2 x SJA1000, 5790 drivers (Single-Wire
CAN)
PCIcan-LS1
733-0130-00085-8
1 x SJA1000, TJA1053 drivers
PCIcan-LS2
733-0130-00086-5
2 x SJA1000, TJA1053 drivers
Please note that the product names for PCIcan-S, -D, -Q changed to PCIcan-HS, -HS/HS, -
4XHS during 2004/2005. This change was necessary due the introduction of PCIcan boards
with low speed and single wire CAN bus drivers. In addition, the part number was shortened
to the 6 last digits due practical reasons. However, both part numbers are valid. These
changes affect the product name and the part number only. The product itself is identical in all
other aspects.
2.1 Not recommended for new designs
NOTE: The PCIcan devices listed in the table above are not recommended for new
designs. Instead, we recommend our PCIcanx devices, which are fully software compatible
with the PCIcan devices. The PCIcanx devices are described in another document; please
refer to our web site.
2.2 General Description
KVASER’s PCIcan cards for CAN systems feature up to four CAN controllers.
The outputs from the CAN circuits are connected to a 25 pin DSUB (PCIcan-Q) or one or two
9-pin DSUB (all other types) via optocouplers and CAN bus driver circuits.
The bus driver circuits of type 82C251 conforms to the physical layer specified by the ISO
11898 standard and can operate up to 1 Mbit/s.
The bus driver circuits of type 5790 conforms to the physical layer specified by the SAE 2411
standard and can operate up to 25 kbit/s in normal mode and up to 80 kbit/s in high-speed
mode.
The bus driver circuits of type TJA1053 are intended for automotive body electronics buses
and can operate up to 125 kbit/s.
On the PCIcan-Q it is possible to connect all CAN circuits to a common CAN bus, which also
is connected to the DSUB connector. A built-in terminator may be connected to the common
bus if this board is at one end of the bus cable. It is necessary to have a resistor load
connected between the two bus wires to make the ISO 11898 drivers work. The 25-pin
connector also provides a ground point to the two bus sections of optocouplers and drive
circuits.

Kvaser PCIcan Hardware Reference Manual 5(21)
Kvaser AB, Mölndal, Sweden — www.kvaser.com
2.3 PCIcan Features
Up to four CAN circuits on one card.
Optical isolation between the card and the CAN buses.
DC/DC power supply to galvanically isolated bus drivers.

Kvaser PCIcan Hardware Reference Manual 6(21)
Kvaser AB, Mölndal, Sweden — www.kvaser.com
3 Specifications
General
Size
PCI-bus PC card (135 mm)
Power consumption
PCIcan-Q: max 600 mA @ 5V.
CAN bus connector
25-pin DSUB, female, for PCIcan-Q CAN buses. (See
p. 11)
2 x 9-pin DSUB, male, for PCIcan-D CAN buses. (See
p. 11)
9-pin DSUB, male, for PCIcan-S CAN bus. (See p. 11)
CAN Controller(s)
PCIcan-Q: 4 x SJA1000
PCIcan-D, PCIcan-LS2, PCIcan-SWC2: 2 x SJA1000
PCIcan-S, PCIcan-LS1, PCIcan-SWC1: 1 x SJA1000
CAN Clock frequency: 16 MHz
CAN Bus Driver(s)
Drivers
PCIcan-Q, -D, -S: Philips 82C251; compliant with the
ISO 11898 standard.
PCIcan-LS2, -LS1: Philips TJA1053
PCIcan-SWC2, -SWC1: Philips AU5790c
Voltage feed
The drivers are galvanically separated (selectable by
switches) from the power supply on the PC by on-
board DC/DC converters.
Grounding
The ground of the CAN drivers is available at the
DSUB connector. On the PCIcan-Q it is also possible
to connect the driver ground to the PC ground by a
switch on the PCIcan board.
Other Features
Fast optocouplers between CAN circuits and drivers.
CAN driver part fed by the PC through DC/DC-converters (the PCIcan-SWC2,
and -SWC1 requires external power supply.)

Kvaser PCIcan Hardware Reference Manual 7(21)
Kvaser AB, Mölndal, Sweden — www.kvaser.com
4 Schematics
CAN
Driver
CAN
Driver
Optocoupler
DC/DC
Converter
CAN Controller
SJA1000
CAN Controller
SJA1000
PCI Bridge
AMCC S5920
PCI Bridge
AMCC S5920
PCI Bus Connector
PCI Bus Connector
IRQ A
CAN 1
CAN 2 (equal to CAN 1)
CAN 3 (equal to CAN 1)
CAN 4 (equal to CAN 1)
120 Ohm
Common (on-board) CAN bus
CAN Bus Connector (D-SUB)
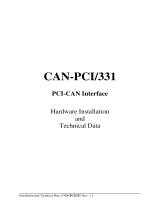
Figure 1: Block diagram for PCIcan-Q.
CAN
Driver
CAN
Driver
Optocoupler
DC/DC
Converter
CAN Controller
SJA1000
CAN Controller
SJA1000
PCI Bridge
AMCC S5920
PCI Bridge
AMCC S5920
PCI Bus Connector
PCI Bus Connector
IRQ A
CAN 1
CAN 2 (equal to CAN 1) –only on PCIcan-D
CAN Bus Connector (D-SUB)
Figure 2: Block diagram for PCIcan–D, –S, –LS2, –LS1, –SWC2, and –SWC1.

Kvaser PCIcan Hardware Reference Manual 8(21)
Kvaser AB, Mölndal, Sweden — www.kvaser.com
5 The PCIcan Hardware
5.1 Installation
PCIcan-D, -S, -LS2, -LS1, -SWC2, and -SWC1 have no switches and so are plug-and-play.
PCIcan-Q has switches that allow you to
1) connect driver ground to PC ground (see “Selecting Driver Ground (PCIcan-Q only)”
below),
2) connect any of the four CAN channels to a common CAN bus and possibly terminate the
common bus (see “The Common CAN Bus (PCIcan-Q only)” below.)
After you have configured the switches, power down the computer, insert the board into an
empty PCI slot, and power up the computer.
Figure 3: The switches on the PCIcan-Q board
5.2 The CAN Bus
On PCIcan-Q, -D and –S, the CAN bus drivers are 82C251 type and compliant with the ISO
11898 physical layer standard.
On PCIcan-LS2 and –LS1, the CAN bus drivers are of TJA1053 or TJA1054 type.

Kvaser PCIcan Hardware Reference Manual 9(21)
Kvaser AB, Mölndal, Sweden — www.kvaser.com
On PCIcan-SWC2 and –SWC1 the CAN bus drivers are of AU5790c type. The bus driver
requires an external power source.
The CAN bus is galvanically isolated from the card by means of fast optocouplers. These
optocouplers introduce a small signal delay and decreases the maximum allowed bus length
somewhat.
For PCIcan-S, PCIcan-D, and PCIcan-Q, the optocouplers allow for a CAN bus speed up to 1
Mbit/s.
5.3 Selecting Driver Ground (PCIcan-Q only)
Using switch pack SW1 you can connect the grounds at the driver part to the ground of the
PC. This is normally not necessary but it may sometimes be advantageous.
Switch pack SW1 is the small switch pack located near the 25-pin DSUB connector.
Table 1. Switch Pack 1.
SW3
Function
1
ON: PC ground and the ground of CAN driver #1 and #2 are
connected.
OFF: PC ground and the ground of CAN driver #1 and #2 are not
connected.
Default is OFF.
2
ON: PC ground and the ground of CAN driver #3 and #4 are
connected.
OFF: PC ground and the ground of CAN driver #3 and #4 are not
connected.
Default is OFF.
3
Not used. Default is OFF.
Factory settings are: all switches OFF, meaning that the PC, and the CAN controller circuits,
are galvanically isolated from the CAN bus.
5.4 The Common CAN Bus (PCIcan-Q only)
Using switch pack SW2, you can connect the four different CAN buses to one single bus on
the board. This common CAN bus is also accessible at the DSUB connector. This allows
communication between two or more of the circuits on the card without having to connect any
cables.
Switch pack SW2 is the large switch pack near the 25-pin DSUB connector.
Table 2. Switch Pack 2.
SW2-
When set to ON, it connects...
1
On-board terminating resistance to common CAN-L.
2
On-board terminating resistance to common CAN-H.
3
CAN-L of SJA1000 #1 to common CAN-L.
4
CAN-H of SJA1000 #1 to common CAN-H.
5
CAN-L of SJA1000 #2 to common CAN-L.
6
CAN-H of SJA1000 #2 to common CAN-H.

Kvaser PCIcan Hardware Reference Manual 10(21)
Kvaser AB, Mölndal, Sweden — www.kvaser.com
SW2-
When set to ON, it connects...
7
CAN-L of SJA1000 #3 to common CAN-L.
8
CAN-H of SJA1000 #3 to common CAN-H.
9
CAN-L of SJA1000 #4 to common CAN-L.
10
CAN-H of SJA1000 #4 to common CAN-H.
All switches are set to ON when the product is delivered. This means that all CAN buses and
the terminator are connected to the common bus.
5.5 External power supply (PCIcan–SWC2 and –SWC1)
The PCIcan–SWC2 and –SWC1 have a type of CAN bus driver that under certain
circumstances can consume a lot of power. For this reason the bus drivers in these cards are
not powered from the PC. You must supply power to the bus driver from an external source.
The power shall be supplied to pin 9 on the D-SUB connector (s). For PCIcan-SWC2 you
need to supply power to both connectors.
The voltage is nominal +12V DC (min 5.5V, max 26.5V.) Current consumption may go up to
200 mA per bus under certain circumstances.
5.6 CAN Bus Termination (PCIcan-Q)
A selectable CAN bus termination is built-in on the PCIcan-Q boards. You activate it by
setting switches 1 and 2 on switch pack 1 to ON. The termination works only on the common
CAN bus. The four individual CAN busses are not affected by the built-in termination.
To avoid signal reflections at the bus ends, terminating resistors must be mounted at both
ends of the CAN bus. The on-board terminating resistor is 120Ω, which is the standard for
CAN buses, and should work fine for most cables. Please observe that this internal resistor
can only be used if the board is placed at one of the ends of the CAN-bus. The terminating
resistor is only available from the on-board common CAN-bus.
The terminating resistors also serves as a load between the CAN bus wires; this is needed for
the ISO 11898 compliant bus drivers to work properly.
5.7 CAN Bus Termination (PCIcan-D, -S)
The PCIcan-S and PCIcan-D do not have built-in termination as standard. There is room for
mounting terminating resistors (R1, R3) which are located very close to the 9-pin DSUB
connector(s).
5.8 CAN Bus Termination (PCIcan-LS2, -LS1, -SWC2, -SWC1)
No separate bus termination is needed for these boards.

Kvaser PCIcan Hardware Reference Manual 11(21)
Kvaser AB, Mölndal, Sweden — www.kvaser.com
5.9 The D-SUB connector(s)
Table 3. The 25-pin DSUB connector on the PCIcan-Q.
Pin
Function
1, 2
Ground to CAN drivers #1 and #2.
14, 15
Ground to CAN drivers #3 and #4.
4
CAN-L for the common CAN bus.
16
CAN-H for the common CAN bus.
5
CAN-L for CAN #1
19
CAN-H for CAN #1
7
CAN-L for CAN #2
21
CAN-H for CAN #2
9
CAN-L for CAN #3
23
CAN-H for CAN #3
11
CAN-L for CAN #4
25
CAN-H for CAN #4

Kvaser PCIcan Hardware Reference Manual 12(21)
Kvaser AB, Mölndal, Sweden — www.kvaser.com
Table 4. The 9-pin DSUB connector(s) on PCIcan-S, -D, -LS2 and -LS1.
Pin
Function
2
CAN-L
7
CAN-H
3
Signal ground.
Table 5. The 9-pin DSUB connector(s) on PCIcan-SWC2 and –SWC1.
Pin
Function
7
CAN-H
3
Signal ground.
9
Vcc for the SWC driver. You need to supply +12V DC on this pin.

Kvaser PCIcan Hardware Reference Manual 13(21)
Kvaser AB, Mölndal, Sweden — www.kvaser.com
Figure 4: The CAN buses on the PCIcan-D, -LS2, and –SWC2. On the –S, LS1, and –
SWC1, the “CAN2” connector is not present.Software Development Information
5.10 Intended Audience
This section is intended for those who want to program the PCIcan card directly. Normally,
you would choose to use the supporting device drivers available for the PCIcan card. Refer to
the “CANLIB Software Development Kit” documentation for further information on these
device drivers from a programmer’s point of view.
5.11 Additional Documentation
This document includes all information you need to use the circuits on the card. However, the
circuits themselves are not described here so information about these must be obtained from
the suppliers. See the list of references on page 18.
General knowledge about the PCI bus is also assumed.

Kvaser PCIcan Hardware Reference Manual 14(21)
Kvaser AB, Mölndal, Sweden — www.kvaser.com
5.12 A note on the different PCIcan versions
PCIcan-Q has four CAN controllers. PCIcan-D has two CAN controllers and PCIcan-S has
just one controller. This chapter describes primarily PCIcan-Q; if you have one of the other
cards, just disregard the circuits and switches that are not on your card. Differences between
the different members of the PCIcan family are explicitly noted wherever they occur.
5.13 The PCI bus controller
All PCIcan boards use the same PCI controller, which is an S5920 from AMCC. The PCI
controller is responsible for address decoding and interrupt steering.
The initialization of the PCI controller is outside the scope of this manual. Typically, it is
carried out by the operating system and/or the BIOS. There are a few registers you have to
set up in the driver; these are described below.
5.14 Address decoding
The PCI controller can decode up to 5 different address areas, three of which are used by the
PCIcan.

Kvaser PCIcan Hardware Reference Manual 15(21)
Kvaser AB, Mölndal, Sweden — www.kvaser.com
Address area #
Type
Size (bytes)
Used for
0
I/O
128
AMCC registers.
Described in the S5920
manual.
1
I/O
128
SJA1000 circuits
0 – 0x1f: SJA1000 #1
0x20 – 0x3F: SJA1000 #2
0x40 – 0x5F: SJA1000 #3
0x60 – 0x7F: SJA1000 #4
2
I/O
8
Xilinx registers
Address area number 1, the one used for the SJA1000’s, is further subdivided into four areas
of 32 bytes each; one for each (possible) SJA1000.
The S5920 is operated in pass-thru operation, passive mode.
To configure the address areas, the value 0x80808080 should be written into the PCI PASS-
THRU CONFIGURATION REGISTER (PTCR) register. This sets all regions to use 0 wait
states and to use the PTADR signal.
5.15 Interrupts
The PCIcan uses one PCI bus interrupt, INTA#. It is asserted whenever one or more
SJA1000’s have their interrupts active. To reset an active interrupt, read the interrupt status
register in all present SJA1000s – the interrupt of the corresponding SJA1000 will then
automatically clear.
To check the status of the interrupt line, test the INTERRUPT ASSERTED bit (number 23) in
the INTCSR register in the S5920.
To enable or disable interrupts from the PCIcan, use the ADD-ON INTERRUPT PIN ENABLE
(bit 13) in the INTCSR register in the S5920.
5.16 Registers in the Xilinx
The Xilinx FPGA implements a few registers.
Address
offset
Register
Usage
0 – 6
Reserved, do not use
7
VERINT
Bit 7 - 4 contains the revision number of the
FPGA configuration. 15 is the first revision, 14 is
the next, and so on.
The current FPGA revision number is 14 (which is read from the VERINT register as
1110xxxx). Future revisions (13, 12, 11, …) will remain compatible with revision 14.
5.17 PCI Configuration Data

Kvaser PCIcan Hardware Reference Manual 16(21)
Kvaser AB, Mölndal, Sweden — www.kvaser.com
The following data are configured automatically into the S5920 PCI controller when power is
applied to the card.
Item
Value
Vendor Id
0x10e8
Device Id
0x8406 (for all PCIcan boards)
Revision Id
0
Class Code
0xffff00 (means: no base class code defined for
device)
Subsystem Vendor Id
0
Subsystem Device Id
0
5.18 Configuration of the SJA1000
Refer to the SJA1000 data sheet for all details on how to program the SJA1000. You need to
know the following:
RX1 is connected to ground.
TX1 is not connected.
CLKO is not connected.
Setting the OCR register to 0xDA is a good idea. This means “normal output mode”,
push-pull and the correct polarity.
In the CDR register, you should set CBP to 1. You will probably also want to set the
clock divider value to 0 (meaning divide-by-2), the Pelican bit, and the clock-off bit
(you have no need for CLKOUT anyway.)

Kvaser PCIcan Hardware Reference Manual 17(21)
Kvaser AB, Mölndal, Sweden — www.kvaser.com
6 Support
The PCIcan boards are supported by driver routines and program examples for Windows
95/98/ME and Windows NT/2000/XP.
The software is distributed separately and is not further documented here. Please refer to the
documentation that is packaged with the software. The software and its documentation are
available from our web site, http://www.kvaser.com. In addition, online support is available
from our web site, http://www.kvaser.com.

Kvaser PCIcan Hardware Reference Manual 18(21)
Kvaser AB, Mölndal, Sweden — www.kvaser.com
7 References
7.1.1.1 AMCC
PCI Products Data Book S5920 / S5933 (1998)
Also available on the web (www.amcc.com) in the file
pciprod.pdf.
Philips
SJA1000 Stand-Alone CAN Controller. Preliminary
Specification. 1997 Nov 04.
Also available on the web.
Shanley, T., and
Anderson, D.
PCI system architecture, fourth edition. MindShare, Inc. ISBN
0-201-30974-2. Available from e.g. Annabooks,
www.annabooks.com.
http://www.kvaser.com contains much information on CAN and has many links to other
sites with CAN information. You can also download new versions of the software for
PCIcan here.

Kvaser PCIcan Hardware Reference Manual 19(21)
Kvaser AB, Mölndal, Sweden — www.kvaser.com
8 Legal Information
8.1 RoHS Directive
This line of products will never comply with the RoHS (Restriction of Hazardous Substances)
directive when it becomes effective 1 of July 2006. However, the complete line of Kvaser
PCIcanx boards will achieve full conformance to the RoHS directive when it becomes
effective 1 of July 2006. Kvaser PCIcan and Kvaser PCIcanx is fully software compatible with
each other.
8.2 Copyright
This document is Copyright © 2001-2008 Kvaser AB. This document may not be reproduced
without our written permission. Infringement will render the user liable to prosecution.
We believe that the information contained herein was accurate in all respects at the time of
printing. Kvaser AB cannot, however, assume any responsibility for errors or omissions in this
text. Please also note that the information in this document is subject to change without notice
and should not be construed as a commitment on the part of Kvaser AB.
8.3 CE Marking Directive
This line of products has been CE marked. We will be pleased to inform you on which
standards this equipment has been tested for compliance.
NOTE: This equipment has been tested and found to comply with the limits for a Class A
digital device, pursuant to Part 15 of the FCC Rules. These limits are designed to provide
reasonable protection against harmful interference when the equipment is operated in a
commercial environment. This equipment generates, uses, and can radiate radio frequency
energy and, if not installed and used in accordance with the instruction manual, may cause
harmful interference to radio communications. Operation of this equipment in a residential
area is likely to cause harmful interference in which case the user will be required to correct
the interference at his own expense.
8.4 Trademarks and patents
All product names mentioned in this manual are registered or unregistered trademarks of their
respective owner. Windows® is a registered trademark of Microsoft Corporation in the United
States and other countries. Linux® is the registered trademark of Linus Torvalds in the United
States and other countries. The products described in this document are protected by U.S.
patent 5,696,911.

Kvaser PCIcan Hardware Reference Manual 20(21)
Kvaser AB, Mölndal, Sweden — www.kvaser.com
9 Document revision history
Revision
Date
Changes
1
2006-02
Original revision
2
2006-11-10
Reviewed – New layout, new dsub connector pics.
3
2008-12-01
Updated legal information. Added paragraph stating that the
PCIcan devices are no longer recommended for new designs;
use the PCIcanx instead.
/